
Create successful ePaper yourself
Turn your PDF publications into a flip-book with our unique Google optimized e-Paper software.
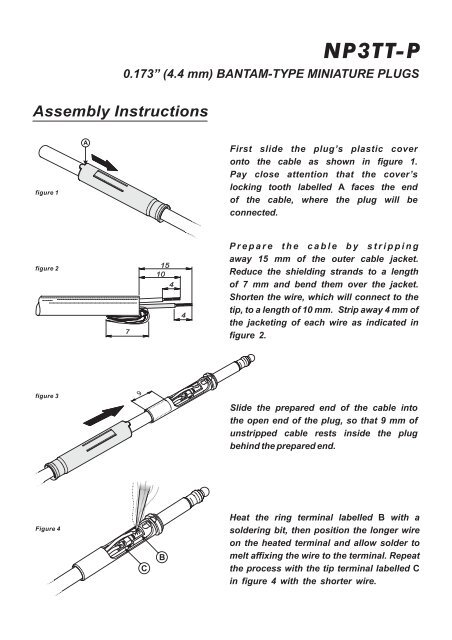
<strong>Assembly</strong> <strong>Instructions</strong><br />
NP3TT-P<br />
0.173” (4.4 mm) BANTAM-TYPE MINIATURE PLUGS<br />
figure 1<br />
A<br />
First slide the plug’s plastic cover<br />
onto the cable as shown in figure 1.<br />
Pay close attention that the cover’s<br />
locking tooth labelled A faces the end<br />
of the cable, where the plug will be<br />
connected.<br />
figure 2<br />
7<br />
15<br />
10<br />
4<br />
4<br />
Prepare the cable by stripping<br />
away 15 mm of the outer cable jacket.<br />
Reduce the shielding strands to a length<br />
of 7 mm and bend them over the jacket.<br />
Shorten the wire, which will connect to the<br />
tip, to a length of 10 mm. Strip away 4 mm of<br />
the jacketing of each wire as indicated in<br />
figure 2.<br />
figure 3<br />
Slide the prepared end of the cable into<br />
the open end of the plug, so that 9 mm of<br />
unstripped cable rests inside the plug<br />
behind the prepared end.<br />
Figure 4<br />
C<br />
B<br />
Heat the ring terminal labelled B with a<br />
soldering bit, then position the longer wire<br />
on the heated terminal and allow solder to<br />
melt affixing the wire to the terminal. Repeat<br />
the process with the tip terminal labelled C<br />
in figure 4 with the shorter wire.
figure 5<br />
Next crimp the end of the plug containing the<br />
cable with a standard 6.35 mm hexagonal<br />
crimping Tool (RG 58). Crimp only in the area<br />
designated in figure 5!<br />
D<br />
figure 6<br />
D<br />
Finish the installation sliding the cover<br />
over the plug, so that the cover’s locking<br />
tooth rests in the plug’s notch labelled D<br />
displayed in figure 6.<br />
Disassembly:<br />
figure 1<br />
Position a screw driver into one of the two tiny<br />
slots as shown in figure 1 and bend out the<br />
plastic snap.<br />
figure 2<br />
Slide the plastic cover from the connector.<br />
NEUTRIK AG NEUTRIK Zürich AG NEUTRIK (UK) Ltd. NEUTRIK Tokyo Ltd. NEUTRIK USA INC. NEUTRIK HGK<br />
Liechtenstein Switzerland Great Britain Japan<br />
USA Hong Kong<br />
Tel.: +423/237 24 24 Tel.: +41 1/736 5010 Tel.: +44 19 83/811 441 Tel.: +81/3/5411 25551 Tel.: +1 732/901 9488 Tel.: +852/2/898/9366<br />
Fax.: +423/232 53 93 Fax.: +41 1/736 5011 Fax.: +44 19 83/811 439 Fax.: +81/3/5411 2827 Fax.: +1 732/901 9608 Fax.: +852/2/898/7603<br />
www.neutrik.com<br />
9/99 : 3102M0532<br />
Data subject to change without prior notice.<br />
®<br />
© 1999 NEUTRIK . ALL RIGHTS RESERVED.