Engine Block Heater Installation Instructions - Bernardi Acura Parts ...
Engine Block Heater Installation Instructions - Bernardi Acura Parts ...
Engine Block Heater Installation Instructions - Bernardi Acura Parts ...

Create successful ePaper yourself
Turn your PDF publications into a flip-book with our unique Google optimized e-Paper software.
INSTALLATION<br />
INSTRUCTIONS<br />
Accessory Application Publications No.<br />
BII 30913<br />
ENGINE BLOCK HEATER<br />
2006 TL<br />
P/N 08T44-S5B-100<br />
Issue Date<br />
SEP 2005<br />
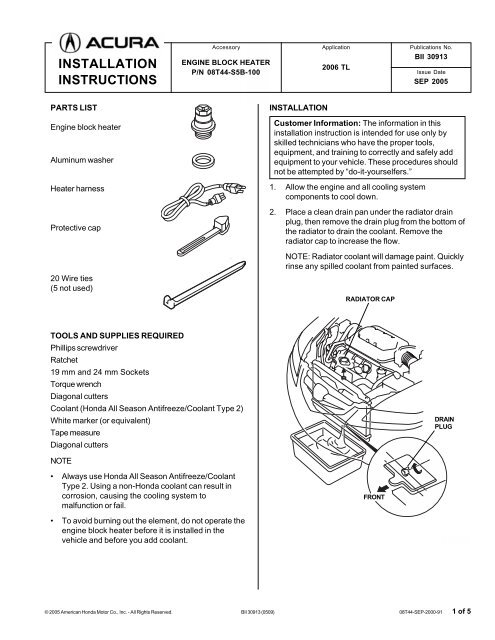
PARTS LIST<br />
<strong>Engine</strong> block heater<br />
Aluminum washer<br />
<strong>Heater</strong> harness<br />
Protective cap<br />
20 Wire ties<br />
(5 not used)<br />
INSTALLATION<br />
Customer Information: The information in this<br />
installation instruction is intended for use only by<br />
skilled technicians who have the proper tools,<br />
equipment, and training to correctly and safely add<br />
equipment to your vehicle. These procedures should<br />
not be attempted by “do-it-yourselfers.”<br />
1. Allow the engine and all cooling system<br />
components to cool down.<br />
2. Place a clean drain pan under the radiator drain<br />
plug, then remove the drain plug from the bottom of<br />
the radiator to drain the coolant. Remove the<br />
radiator cap to increase the flow.<br />
NOTE: Radiator coolant will damage paint. Quickly<br />
rinse any spilled coolant from painted surfaces.<br />
RADIATOR CAP<br />
TOOLS AND SUPPLIES REQUIRED<br />
Phillips screwdriver<br />
Ratchet<br />
19 mm and 24 mm Sockets<br />
Torque wrench<br />
Diagonal cutters<br />
Coolant (Honda All Season Antifreeze/Coolant Type 2)<br />
White marker (or equivalent)<br />
Tape measure<br />
Diagonal cutters<br />
DRAIN<br />
PLUG<br />
NOTE<br />
• Always use Honda All Season Antifreeze/Coolant<br />
Type 2. Using a non-Honda coolant can result in<br />
corrosion, causing the cooling system to<br />
malfunction or fail.<br />
FRONT<br />
• To avoid burning out the element, do not operate the<br />
engine block heater before it is installed in the<br />
vehicle and before you add coolant.<br />
3310020Y<br />
© 2005 American Honda Motor Co., Inc. - All Rights Reserved. BII 30913 (0509) 08T44-SEP-2000-91 1 of 5
3. Remove the left side engine compartment cover<br />
(two pins and one hook).<br />
4. Remove the right side engine compartment cover<br />
(three pins and three hooks).<br />
HOOK<br />
LEFT SIDE ENGINE<br />
COMPARTMENT COVER<br />
RIGHT SIDE ENGINE<br />
COMPARTMENT<br />
COVER<br />
HOOKS (3)<br />
PINS (3)<br />
PINS (2)<br />
3619010Y<br />
4. Make sure you have the anti-theft codes for the<br />
radio and the navigation system (if equipped), then<br />
write down the XM radio channel presets. With the<br />
ignition switch off, disconnect the negative cable<br />
from the battery.<br />
5. Open the positive cable cover, and disconnect the<br />
positive cable. Loosen the two nuts, and remove<br />
the battery hold down bracket. Remove the<br />
battery.<br />
3619020Y<br />
5. Remove the front bulkhead cover (five clips and<br />
two pins).<br />
CLIPS (5)<br />
PIN<br />
POSITIVE<br />
CABLE COVER<br />
BATTERY HOLD<br />
DOWN BRACKET<br />
NUT<br />
BATTERY<br />
POSITIVE<br />
CABLE<br />
NUT<br />
FRONT<br />
BULKHEAD<br />
COVER<br />
3310011Y<br />
3722010Y<br />
2 of 5 BII 30913 (0509) © 2005 American Honda Motor Co., Inc. - All Rights Reserved.
6. Remove the air intake cover (two clips), and<br />
remove the air duct.<br />
CLIPS (2)<br />
AIR INTAKE COVER<br />
FRONT<br />
8. Using a 19 mm socket, remove the drain bolt and<br />
washer from the left side of the engine block. The<br />
coolant remaining in the engine jackets will flow<br />
out of the bolt hole when the drain bolt is removed.<br />
Retain the bolt; it will be used if the engine block<br />
heater is removed.<br />
NOTE: Use a new washer if the drain bolt is<br />
reinstalled.<br />
WASHER (Retain.)<br />
0608<br />
DRAIN<br />
BOLT<br />
(Retain.)<br />
3313020Y<br />
AIR DUCT<br />
7. Remove the coolant reservoir and coolant<br />
reservoir bracket (one bolt).<br />
COOLANT<br />
RESERVOIR<br />
3426010Y<br />
9. Install the engine block heater with the aluminum<br />
washer into the hole using a 24 mm socket.<br />
Torque the engine block heater to 60 N·m<br />
(44 lb-ft).<br />
FRONT<br />
ENGINE BLOCK<br />
HEATER 60 N·m<br />
(44 lb-ft)<br />
BOLT<br />
COOLANT<br />
RESERVOIR<br />
BRACKET<br />
ALUMINUM<br />
WASHER<br />
© 2005 American Honda Motor Co., Inc. - All Rights Reserved. BII 30913 (0509) 3 of 5
10. Using a tape measure and white marker, measure<br />
and mark the heater harness at the measurements<br />
as shown.<br />
WHITE MARKER<br />
12. Route the heater harness along the fan frame, and<br />
attach it to the fan shroud with three wire ties.<br />
FRONT<br />
FAN SHROUD<br />
WIRE TIE<br />
(over the<br />
white mark)<br />
MARK<br />
HEATER<br />
HARNESS<br />
330 mm<br />
570 mm<br />
WHITE MARKER<br />
MARK<br />
220 mm<br />
11. Plug the heater harness connector into the engine<br />
block heater, and secure the heater harness to the<br />
vehicle harness with one wire tie over the white<br />
mark.<br />
ENGINE BLOCK<br />
HEATER<br />
VEHICLE<br />
HARNESS<br />
WIRE TIE<br />
(over the<br />
white mark)<br />
HEATER<br />
HARNESS<br />
WIRE TIE<br />
13. Route the heater harness along the vehicle<br />
harness through the bulkhead to the left side, and<br />
loosely secure it to the vehicle harness with three<br />
wire ties.<br />
WIRE TIE<br />
(Install loosely.)<br />
VEHICLE<br />
HARNESS<br />
HEATER<br />
HARNESS<br />
HEATER<br />
HARNESS<br />
FRONT<br />
BULKHEAD<br />
HEATER HARNESS<br />
CONNECTOR<br />
HEATER HARNESS<br />
3314020Y<br />
VEHICLE<br />
HARNESS<br />
WIRE TIE<br />
(Install loosely.)<br />
WIRE TIE<br />
3315032Y<br />
(Install loosely.)<br />
4 of 5 BII 30913 (0509) © 2005 American Honda Motor Co., Inc. - All Rights Reserved.
14. At the front grille area, measure and cut off a<br />
small piece of the bumper grille in the area shown.<br />
DIAGONAL<br />
CUTTERS<br />
40 mm<br />
BUMPER<br />
GRILLE<br />
16. Attach the protective cap to the bumper grille, and<br />
plug the heater harness connector into the<br />
protective cap.<br />
17. Fold up the excess length of the heater harness,<br />
and test fit the air intake cover with the heater<br />
harness in place. Secure the heater harness to the<br />
vehicle harness with three wire ties.<br />
VEHICLE<br />
HARNESS<br />
WIRE TIE<br />
Cut off<br />
FRONT<br />
15. Route the heater harness through the bumper grille<br />
opening, and secure it to the bumper grille with<br />
one wire tie.<br />
CONNECTOR<br />
PROTECTIVE<br />
CAP<br />
HEATER<br />
HARNESS<br />
WIRE TIE<br />
BUMPER<br />
GRILLE<br />
OPENING<br />
HEATER<br />
HARNESS<br />
Be careful not to drop<br />
anything into the air<br />
intake hole.<br />
18. Tighten the three wire ties loosely installed in<br />
step 13.<br />
19. Reinstall the radiator drain plug.<br />
3707011Y<br />
20. Fill the system with the recommended coolant.<br />
Follow the instructions described in the service<br />
manual to fill and bleed the cooling system.<br />
21. Check the coolant reservoir for correct level and<br />
check the cooling system for signs of leakage.<br />
Repair as necessary.<br />
22. Check that the heater harness is routed properly<br />
and all of the connectors are plugged in.<br />
22. Reinstall all removed parts.<br />
23. Enter the radio and navigation system (if<br />
equipped) anti-theft code(s), and set the XM radio<br />
channel presets.<br />
24. Set the clock (without navigation system).<br />
25. Give the drain bolt (removed in step 8) to you<br />
customer.<br />
© 2005 American Honda Motor Co., Inc. - All Rights Reserved. BII 30913 (0509) 5 of 5