A. KORG PA80 OPERATING SYSTEM RELEASE 2.0 - Synth Zone
A. KORG PA80 OPERATING SYSTEM RELEASE 2.0 - Synth Zone
A. KORG PA80 OPERATING SYSTEM RELEASE 2.0 - Synth Zone

You also want an ePaper? Increase the reach of your titles
YUMPU automatically turns print PDFs into web optimized ePapers that Google loves.
E<br />
Korg Pa80 Operating System release <strong>2.0</strong><br />
How to load the new Operating System<br />
A-1<br />
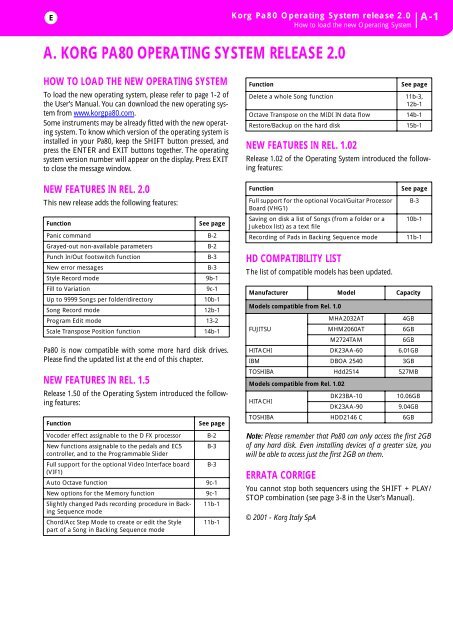
A. <strong>KORG</strong> <strong>PA80</strong> <strong>OPERATING</strong> <strong>SYSTEM</strong> <strong>RELEASE</strong> <strong>2.0</strong><br />
HOW TO LOAD THE NEW <strong>OPERATING</strong> <strong>SYSTEM</strong><br />
To load the new operating system, please refer to page 1-2 of<br />
the User’s Manual. You can download the new operating system<br />
from www.korgpa80.com.<br />
Some instruments may be already fitted with the new operating<br />
system. To know which version of the operating system is<br />
installed in your Pa80, keep the SHIFT button pressed, and<br />
press the ENTER and EXIT buttons together. The operating<br />
system version number will appear on the display. Press EXIT<br />
to close the message window.<br />
NEW FEATURES IN REL. <strong>2.0</strong><br />
This new release adds the following features:<br />
Function<br />
Pa80 is now compatible with some more hard disk drives.<br />
Please find the updated list at the end of this chapter.<br />
NEW FEATURES IN REL. 1.5<br />
See page<br />
Panic command B-2<br />
Grayed-out non-available parameters B-2<br />
Punch In/Out footswitch function B-3<br />
New error messages B-3<br />
Style Record mode 9b-1<br />
Fill to Variation 9c-1<br />
Up to 9999 Songs per folder/directory 10b-1<br />
Song Record mode 12b-1<br />
Program Edit mode 13-2<br />
Scale Transpose Position function 14b-1<br />
Release 1.50 of the Operating System introduced the following<br />
features:<br />
Function<br />
See page<br />
Vocoder effect assignable to the D FX processor B-2<br />
New functions assignable to the pedals and EC5 B-3<br />
controller, and to the Programmable Slider<br />
Full support for the optional Video Interface board B-3<br />
(VIF1)<br />
Auto Octave function 9c-1<br />
New options for the Memory function 9c-1<br />
Slightly changed Pads recording procedure in Backing<br />
11b-1<br />
Sequence mode<br />
Chord/Acc Step Mode to create or edit the Style 11b-1<br />
part of a Song in Backing Sequence mode<br />
Function<br />
Delete a whole Song function<br />
11b-3,<br />
12b-1<br />
Octave Transpose on the MIDI IN data flow 14b-1<br />
Restore/Backup on the hard disk 15b-1<br />
NEW FEATURES IN REL. 1.02<br />
Release 1.02 of the Operating System introduced the following<br />
features:<br />
Function<br />
HD COMPATIBILITY LIST<br />
The list of compatible models has been updated.<br />
Note: Please remember that Pa80 can only access the first 2GB<br />
of any hard disk. Even installing devices of a greater size, you<br />
will be able to access just the first 2GB on them.<br />
ERRATA CORRIGE<br />
You cannot stop both sequencers using the SHIFT + PLAY/<br />
STOP combination (see page 3-8 in the User’s Manual).<br />
© 2001 - Korg Italy SpA<br />
See page<br />
Full support for the optional Vocal/Guitar Processor B-3<br />
Board (VHG1)<br />
Saving on disk a list of Songs (from a folder or a 10b-1<br />
Jukebox list) as a text file<br />
Recording of Pads in Backing Sequence mode 11b-1<br />
Manufacturer Model Capacity<br />
Models compatible from Rel. 1.0<br />
MHA2032AT<br />
4GB<br />
FUJITSU<br />
MHM2060AT<br />
6GB<br />
M2724TAM<br />
6GB<br />
HITACHI DK23AA-60 6.01GB<br />
IBM DBOA 2540 3GB<br />
TOSHIBA Hdd2514 527MB<br />
Models compatible from Rel. 1.02<br />
See page<br />
DK23BA-10<br />
10.06GB<br />
HITACHI<br />
DK23AA-90<br />
9.04GB<br />
TOSHIBA HDD2146 C 6GB
B-2 Various new functions<br />
Panic command<br />
B. VARIOUS NEW FUNCTIONS<br />
PANIC COMMAND<br />
You can reset all ‘frozen’ notes and controllers on the Pa80<br />
and any instrument connected to its MIDI OUT, by using the<br />
Panic key combination. Just press SHIFT + START/STOP to<br />
stop all notes and reset all controllers.<br />
GRAYED-OUT NON-AVAILABLE PARAMETERS<br />
Currently non-available parameters are now shown in “gray”<br />
on the display, i.e. with a ghost texture. Here is an example of<br />
a grayed-out parameter, compared to a normal parameter:<br />
090: Vocoder<br />
This effect applies the character of the microphone signal<br />
(Modulator) to the track’s oscillator signal input (Carrier).<br />
Therefore, the voice can modulate one of the sounds of the<br />
Pa80. A common use of this effect is to produce the sound of<br />
various instruments by inputting a voice to the Modulator<br />
via a microphone. A special effect is also achieved by using<br />
rhythm or effect sounds. Strings or distortion guitar sounds<br />
with a lot of harmonics are suitable as a Carrier.<br />
Wet: Stereo In - Mono Out / Dry: Stereo In - Stereo Out<br />
Osc<br />
Carrier<br />
Wet / Dry<br />
Text in solid black<br />
Osc (Carrier)<br />
Trim<br />
Mic (Modulator)<br />
Trim<br />
+<br />
Envelope<br />
Band Pass Filter<br />
+<br />
Vocoder /<br />
Carrier<br />
Text in gray<br />
Mic<br />
Modulator<br />
Modulator High Mix<br />
Wet / Dry<br />
VOCODER EFFECT<br />
A Vocoder effect has been added to the list of available internal<br />
effects (see chapter 18 in the User’s Manual for more<br />
information). This effect can be assigned only to the D FX<br />
processor (usually, modulating effect for the Realtime<br />
tracks).<br />
You can load two specially programmed Performances, and<br />
use them as a template when programming the Vocoder.<br />
Please download these Performances from<br />
www.korgpa80.com, and load them as Performances 10-4<br />
and 10-5. See “Loading a single item” on page 15-6 on the<br />
User’s Manual for more information.<br />
Warning: Any Performance already existing on locations 10-4<br />
and 10-5 will be overwritten! If you don’t want to lose these<br />
data, save them on disk before loading the new Performances.<br />
Please add the following text to the “Effects” chapter of the<br />
User’s Manual.<br />
a<br />
b<br />
c<br />
d<br />
g<br />
f<br />
h<br />
i<br />
Osc (Carrier) Trim<br />
Sets the input level of the oscillator (Carrier)<br />
Mic (Modulator) Trim<br />
Sets the input level of the microphone (Modulator)<br />
Formant Shift –2...+2<br />
Sets the height of the frequency for the vocoder effect<br />
Response 0...100<br />
Sets the speed of the response to the modulator input<br />
Low Gain [dB]<br />
Sets the low-range output level of the vocoder<br />
High Gain [dB]<br />
Sets the high-range output level of the vocoder<br />
Modulator Mix<br />
Sets the high-range output level of the modulator<br />
Vocoder/Carrier<br />
Carrier, 1:99...99:1, Vocoder<br />
Sets the balance between the vocoder output and the Carrier<br />
0...100<br />
0...100<br />
–12...+12<br />
–12...+12<br />
0...100<br />
Wet/Dry<br />
Dry, 1:99...99:1, Wet<br />
Sets the balance between the effect and dry sounds<br />
Src<br />
Off...Tempo<br />
Selects the modulation source of the effect balance<br />
Amt<br />
–100...+100<br />
Sets the modulation amount of the effect balance<br />
Initial settings<br />
Before using the Vocoder, you must connect a microphone<br />
and select a path for the audio signal.<br />
1. Connect a microphone to the Input 1, and set the<br />
appropriate level (see page 2-1 on the User’s Manual for<br />
more information).<br />
2. Press GLOBAL to enter the Global environment.<br />
3. Go to “Page 14 - Audio Input Configuration”, and select<br />
the “Input 1/2” parameter (see page 14-7 of the User’s<br />
Manual).<br />
4. Select the “1/2 Int.FX” option.<br />
5. Press WRITE, select Global, and press ENTER, to save<br />
this setting in memory.<br />
6. Select the Voc.1 or Voc.2 Performance.<br />
7. Check if your settings are working as expected, by singing<br />
in the microphone and playing chords on the keyboard.<br />
c: Formant Shift<br />
By offsetting the Carrier filter, you can adjust the height of the<br />
frequency range to which the vocoder effect is applied. The tonal<br />
quality will change significantly.<br />
f: Modulator Mix<br />
This parameter sets the high-range output level of the right<br />
channel sound (Modulator). If the modulator is a human voice, it<br />
will make the words more clear.<br />
The “Vocoder/Carrier” parameter sets the balance between the<br />
vocoder sound and the left channel sound (Carrier). The “Wet/<br />
Dry” parameter sets the balance between the effect and dry<br />
sound.<br />
If you wish to change the intensity of the vocoder effect, select<br />
Wet for “Wet/Dry”, and adjust the balance using the “Vocoder/<br />
Carrier” parameter.<br />
Note: When you assign the Vocoder effect to the D FX processor,<br />
the direct input can no longer be heard. The input signal goes<br />
entirely to the FX processor. To listen to the direct signal, you<br />
can still use the “Wet/Dry” parameter to increase the level of the<br />
direct signal (Dry).<br />
Please remember to set the tracks Pan value to Off, and the Send<br />
value to 127.
Various new functions<br />
New functions assignable to the pedals and EC5 controller, and to the Programmable Slid-<br />
B-3<br />
You can add reverb to the Vocoder, by way of the “D>Csend”<br />
parameter (see page 9-7, 10-8 and 12-7).<br />
Warning: When using the Vocoder, none of the parameters on<br />
“Page 15 - Inputs/Internal FX” of the Global mode are effective.<br />
Hint: To create a new Song exploiting the Vocoder, enter the<br />
Backing Sequence mode with a Performance that includes the<br />
Vocoder effect.<br />
NEW FUNCTIONS ASSIGNABLE TO THE PEDALS<br />
AND EC5 CONTROLLER, AND TO THE<br />
PROGRAMMABLE SLIDER<br />
Some more items are now assignable to the footswitch or<br />
EC5 pedals (see User’s Manual, page 19-1):<br />
Style Up<br />
Perform. Up<br />
Program Up<br />
STS Up<br />
STS1<br />
STS3<br />
Punch In/Out<br />
FX CC13 Sw.<br />
Furthermore, new functions have been added to the Pedal<br />
and Programmable Slider (see User’s Manual, page 19-1):<br />
FX CC12 Ctl<br />
Style Down<br />
Perform. Down<br />
Program Down<br />
STS Down<br />
STS2<br />
STS4<br />
FX CC12 Sw.<br />
FX CC13 Ctl<br />
Note: Since the list of assignable parameters has been modified,<br />
after upgrading please assign the parameter again, and<br />
save the Global again. To save the Global, press WRITE and<br />
select the Global option; press ENTER to confirm.<br />
The above is not necessary, when purchasing the instrument<br />
with the new operating system already installed.<br />
SUPPORT FOR THE VOCAL/GUITAR<br />
PROCESSOR BOARD (VHG1)<br />
You must upgrade your Pa80 to release 1.02 or higher, before<br />
installing the Vocal/Guitar Processor Board (VHG1). Any<br />
previous version of the operating system will not work with<br />
this board. Please refer to the “Global” chapter in the User’s<br />
Manual for additional information.<br />
FULL SUPPORT FOR THE OPTIONAL VIDEO<br />
INTERFACE BOARD (VIF1-PAL / VIF1-NTSC)<br />
The optional Video Interface board (VIF1-PAL or VIF1-<br />
NTSC) is now fully supported. Please refer to the instructions<br />
supplied with the board for more information. Parameters<br />
for the video interface are in the Global environment, “Page 3<br />
- Video Interface” (see page 14-2 in the User’s Manual).<br />
Note: When ordering your VIF1 interface, please specify the<br />
PAL or NTSC version, according to your national TV standard.<br />
Usually, NTSC is for USA and Japan, while PAL is for most<br />
European Countries.<br />
Note: Most SECAM TV devices comply also with the PAL standard.<br />
Colors are not shown on most of these devices.<br />
Lyrics display on an external monitor<br />
As soon as you enter the Song Play mode, lyrics included in<br />
the Song assigned to the Sequencer 1 are shown on the display.<br />
To select a different sequencer, go to the Lyrics page (see<br />
page 10-5 in the User’s Manual), and press one of the A VOL-<br />
UME/VALUE buttons to select Sequencer 1, or one of the B<br />
VOLUME/VALUE buttons to select Sequencer 2.<br />
Note: You can have Sequencer 2 selected in the Main page of the<br />
Song Play mode, and Sequencer 1 selected in the Lyrics page, or<br />
vice-versa. In this way, you can select a Song whose lyrics to display<br />
on the external monitor, while selecting a different<br />
sequencer for editing operations.<br />
NEW ERROR MESSAGES<br />
Style Play<br />
Style Select Fails<br />
Pa80 was not able to complete the operation.<br />
Style Record<br />
Arranger is Running!<br />
While in Style Record mode, this message may appear when<br />
you try to select a different track, or execute an edit operation,<br />
while the Arranger is running.<br />
Save Style Failure<br />
Pa80 was not able to complete the Save operation.<br />
Copy Style Failure<br />
Pa80 was not able to complete the Copy operation.<br />
Delete Style Failure<br />
Pa80 was not able to complete the Delete operation.<br />
Song Play<br />
Wait Please<br />
You were trying to load a file, while Pa80 is still loading<br />
another one.<br />
Song<br />
S1:Michelle<br />
Michelle, ma belle<br />
Sequencer 2 Sequencer 1<br />
Too Many Events<br />
You have tried to copy too many events on the same tick.<br />
Out of Memory!<br />
The memory limit for a Song (300KB) has been reached.
B-4 Various new functions<br />
New error messages<br />
Incompatible Meter<br />
You were trying to copy a track on a track with a different<br />
meter.<br />
Disk<br />
Overwrite existing File? (Yes/No)<br />
You are writing data on an existing “.SET” folder, or on a file<br />
of type “.MID” or “.JBX”.
Style Record mode<br />
The Style’s structure<br />
9b-1<br />
9B. STYLE RECORD MODE<br />
A completely new Style Record mode has been added starting<br />
from Operating System Rel. <strong>2.0</strong>. Please add the following<br />
instructions to the “Style Play operating mode” chapter.<br />
THE STYLE’S STRUCTURE<br />
The term “Style” relates with music sequences automatically<br />
played by the arranger of the Pa80. A Style consists of a predefined<br />
number of Style Elements (E) (Pa80 features ten different<br />
Style Elements: Variation 1-4, Intro 1-2, Fill 1-2,<br />
Ending 1-2). When playing, these Style Elements can be<br />
selected directly from the control panel, using the corresponding<br />
buttons.<br />
To explain the Style structure, we can use a tree-structure, as<br />
shown in the following diagram:<br />
Pop Ballad<br />
Variation 1<br />
CV1<br />
Drum<br />
Perc<br />
Bass<br />
Acc1<br />
Acc2<br />
Acc3<br />
Acc4<br />
Acc5<br />
CV2<br />
CV3<br />
CV4<br />
CV5<br />
CV6<br />
Variation 2<br />
Variation 3<br />
Variation 4<br />
Intro1<br />
Intro 2<br />
Fill 1<br />
Fill 2<br />
CV1<br />
CV2<br />
Ending 1<br />
Ending 2<br />
Each Style Element is made up of smaller units, called Chord<br />
Variations (CV), but not all of them have the same number<br />
of CVs. Variations 1-4 have up to 6 CVs each, while the other<br />
Style Elements have only up to 2 CVs.<br />
When you play on the chord recognition area (Lower, Upper<br />
or Full, depending on the Chord Scanning section on the<br />
control panel), the arranger scans the keyboard and determines<br />
which chord you are playing. Then, depending on the<br />
selected Style Element, it determines which Chord Variation<br />
(CV) should be played for the scanned chord. Which Chord<br />
Variation corresponds to each scanned chord is a setting of<br />
the Style: the Chord Variation Table. Each Style Element<br />
contains a Chord Variation Table, whose prototype is the following:<br />
Chord<br />
Maj<br />
6<br />
M7<br />
M7b5<br />
Sus4<br />
Sus2<br />
M7sus4<br />
min<br />
m6<br />
m7<br />
m7b5<br />
mM7<br />
7<br />
7b5<br />
7sus4<br />
dim<br />
dimM7<br />
aug<br />
aug7<br />
augM7<br />
no 3rd<br />
no 3rd, no 5th<br />
Chord Variations (CVs)<br />
Variation 1-4 Intro 1-2, Fill 1-2, Ending 1-2<br />
CV1 – CV6<br />
CV1 – CV2<br />
After deciding what CV to play, the arranger triggers the right<br />
sequence for each track. Since each sequence is written in a<br />
particular key (for example, CMajor, GMajor or Emin), the<br />
arranger transposes it according to the scanned chord. Notes<br />
in the sequence are carefully transposed according to the<br />
Note Transposition Tables (NTT), to make them work fine<br />
with all recognized chords. The NTT allows you to record<br />
just some Chord Variations, and have all the notes play in the<br />
right place, avoiding dissonances and transposing the pattern<br />
notes to the notes of the recognized chord.<br />
Going deeper into the Style structure, we can see that each<br />
Chord Variation is made up of Track Sequences, and the<br />
Pa80 supports 8 different tracks. DRUM and PERC are used<br />
for drum and percussion sequences, BASS for bass and<br />
ACC1-5 are for accompaniment sequences (string, guitar,<br />
piano or other accompaniment instruments).
9b-2 Style Record mode<br />
Style Import/Export<br />
Just to summarize, when you play a chord on the chord recognition<br />
area, the arranger determines which Style Element<br />
is used, then determines which Chord Variation should be<br />
used for the played chord, then Style sequences for every<br />
track of that Chord Variation are transposed from the original<br />
chord to the recognized chord using the NTT, and so on<br />
every time you play a chord.<br />
Note: The Break and the Count In are not Style Elements, and<br />
cannot be programmed by the user. While in record/edit, the<br />
BREAK/COUNT IN button does not work.<br />
STYLE IMPORT/EXPORT<br />
You can use the Korg Pa80 Style To Midi application to<br />
exchange Styles between your computer and the Pa80,<br />
through the Standard MIDI File (SMF) format. The application<br />
is freely downloadable from www.korgPa80.com. Please<br />
read the included instructions.<br />
ENTERING THE RECORD MODE<br />
While in the Style Play operating mode, press RECORD. The<br />
following page will appear on the display:<br />
Pan, FX Send… see page 9-5 and following in the User’s<br />
Manual) and save it by pressing the WRITE button.<br />
Note: After a record or edit operation, the Style is rewritten<br />
in memory. When you press START/STOP there is a delay<br />
before you can actually listen to the Style. This delay is<br />
higher with a Style containing more MIDI event.<br />
Note: While in Record mode, all footswitches and EC5 pedals<br />
are disabled.<br />
EXIT AND SAVE/ABORT STYLE<br />
When finished editing, you can save your Style in memory, or<br />
abort any change. Press WRITE or RECORD to go to the<br />
Write page (see “The ‘Write’ window” on page 9b-2).<br />
Note: When saving the Style in memory, Pa80 automatically<br />
compresses it to reduce its size and save memory.<br />
THE ‘WRITE’ WINDOW<br />
This page appears when you press the WRITE or RECORD<br />
button while in Record mode. Here you can save the recorded<br />
or edited Style in memory.<br />
Record<br />
Current Style<br />
New Style<br />
Write to<br />
Style name: NewBossa<br />
To: U1-01 Bossa<br />
Abort<br />
• Select Current Style to edit the current Style. If it is a<br />
Factory Style, you will not be able to save it on the original<br />
location; you will select a User Style instead.<br />
When editing an existing Style, the original Style Performance<br />
is recalled, but the following parameters are reset<br />
to their default values: Drum Mapping (0), Snare & Kick<br />
Designation (Off), Program (Original), Keyboard<br />
Range (Original). This means that you can hear some<br />
differences between the Style in play and the same Style<br />
being edited; for example, resetting the Drum Mapping<br />
may lead to some instrument’s replacement.<br />
After editing the Style, please save it (see “Exit and Save/<br />
Abort Style” below). Then, edit the Style Performance to<br />
adjust the track’s settings (Tempo, Volume, Pan, FX<br />
Send… see page 9-5 and following in the User’s Manual)<br />
and save it by pressing the WRITE button.<br />
• Select New Style to start from a new, empty Style. A<br />
default Style Performance will be recalled. When finished<br />
recording, you will save the new Style onto a User<br />
Style location.<br />
After recording the Style, please save it (see “Exit and<br />
Save/Abort Style” below). Then, edit the Style Performance<br />
to adjust the track’s settings (Tempo, Volume,<br />
• To save the Style into the internal memory, press the A<br />
or B VOLUME/VALUE buttons, then press ENTER. The<br />
“Are you sure message”” will appear. Press ENTER to<br />
confirm, or EXIT to abort.<br />
• To return to the previous Style Record page, leaving all<br />
untouched and the Style unsaved, press EXIT.<br />
• To delete all changes to the Style, press one of the D<br />
VOLUME/VALUE buttons to select the Abort command.<br />
The “Are you sure message?” will appear. Press<br />
ENTER to confirm deletion, or EXIT to return to the<br />
Write page.<br />
Style name<br />
Use this parameter to change the Style’s name. Press the right<br />
A VOLUME/VALUE button to enter editing, and modify the<br />
name using the UP/DOWN buttons to move the cursor, and<br />
the DIAL to select a character. Press INSERT to insert a character<br />
at the cursor position, or DELETE to delete it<br />
To (Style number)<br />
Use the B VOLUME/VALUE buttons, or the TEMPO/VALUE<br />
controls, to select a different User Style location in memory.<br />
Note: Only User locations are available.<br />
Abort<br />
Select this command to delete any change to the Style.
Style Record mode<br />
List of recorded events<br />
9b-3<br />
LIST OF RECORDED EVENTS<br />
The Style Record mode filters out some events that may damage<br />
the right operation of the Style. Here are the recorded<br />
events, and the most important filtered-out events.<br />
Control function<br />
(*) A Note Off will always be inserted at the end of the<br />
Chord Variation.<br />
Note: Some Control Change messages cannot be recorded<br />
directly using Pa80 integrated controls.<br />
HOW TO RECORD A STYLE<br />
CC# (Control Change Number)<br />
Allowed<br />
Note On<br />
Note Off*<br />
Pitch Bend<br />
Modulation 1 1<br />
Modulation 2 2<br />
Pan 10<br />
Expression 11<br />
CC#12 12<br />
CC#13 13<br />
Damper 64<br />
Filter Resonance 71<br />
Low Pass Filter Cutoff 74<br />
CC#80 80<br />
CC#81 81<br />
CC#82 82<br />
Not allowed<br />
After Touch<br />
Volume 7<br />
All other Control Change messages<br />
Recording a Style is a matter of recording tracks, inside a<br />
series of Chord Variations, inside a series of Style Elements,<br />
inside the Style itself.<br />
You don’t need to record all Chord Variations for all Style<br />
Elements. It is often only necessary to record just a Chord<br />
Variation for each Style Element. Exceptions are the Intro 1<br />
and Ending 1, where we suggest to record both a Major and<br />
minor Chord Variations.<br />
Here is the general procedure to follow when recording a<br />
Style.<br />
1. Press STYLE PLAY to enter the Style Play mode.<br />
2. If you like to edit an existing Style, select that Style.<br />
3. Press RECORD to enter the Style Record mode.<br />
Record<br />
Current Style<br />
New Style<br />
Select “Current Style” if you want to edit the current<br />
Style, or make a new Style starting from an existing one.<br />
Select “New Style” if you want to start from scratch with<br />
an empty Style.<br />
4. You are now in the Main page of the Style Record mode,<br />
and you can prepare your recording. (For more details,<br />
see “Main page” on page 9b-4).<br />
NewBossa<br />
|T:DR<br />
e:v1 cv:cv1 RecLen:2<br />
CV Len:16 Metro:On1<br />
Resol:1/16 Meter:4/4<br />
C maj7 NTT:5th<br />
5. Select the Chord Variation to create or modify, using the<br />
E and CV parameters.<br />
6. Set the tempo. Keep the SHIFT button pressed, and use<br />
the TEMPO/VALUE controls to change the tempo.<br />
7. Press TRK SELECT to switch to the Style Tracks page.<br />
Here you can assign the right Program to each Style<br />
track. (For more details, see “Style Tracks page” on<br />
page 9b-6).<br />
NewBossa |V1-CV1<br />
Brush 2<br />
Perc Kit<br />
*AcouBass<br />
AcouPiano2<br />
Piano01<br />
Guitar01<br />
StrngEns2<br />
VoxPad1<br />
8. If you like, you can set the tempo again from this page:<br />
just use the TEMPO/VALUE controls.<br />
9. Assign a Program to each track, by using the PRO-<br />
GRAM/PERFORMANCE section. You can’t select Digital<br />
Drawbars Programs.<br />
10. If needed, set the Octave Transpose for each track. Note:<br />
The Octave Transpose will affect only the notes coming<br />
from the keyboard, and not from the arranger.<br />
11. Select the track to put in record. Its status icon will<br />
begin flashing.<br />
Note: When entering the Record mode, the last selected<br />
track is already in record. When you press START/<br />
STOP after entering the Record mode, you can immediately<br />
start recording.<br />
If you like, you can try your part before recording:<br />
• set the track in mute, by pressing both corresponding<br />
VOLUME/VALUE buttons; the status icon disappears;<br />
• press START/STOP to play back the other tracks, if<br />
already recorded, and practice on the keyboard;<br />
• when you have finished practicing, press START/STOP<br />
to stop the arranger, and unmute the track by pressing<br />
both VOLUME/VALUE buttons; the track will be in<br />
record again.<br />
12. While the status icon is flashing, press START/STOP to<br />
begin recording. Depending on the “Metro” (metronome)<br />
option you selected, a 1- or 2-bars precount may<br />
play before the recording actually begins. When it
9b-4 Style Record mode<br />
Listening to the Style while in Record/Edit mode<br />
begins, play freely. The pattern will last for some measures,<br />
according to the RecLen value, then restart.<br />
Since the recording will happen in overdub, you can add<br />
notes on any following passage. This is very useful to<br />
record different percussive instruments at any cycle on a<br />
Drum or Percussion track.<br />
Note: While recording, the track’s Keyboard Range (see<br />
page 9b-11) is ignored, and the track can play over the<br />
whole keyboard range. The Local parameter (see page 14-<br />
3 in the User’s Manual) is also automatically set to On, to<br />
allow playing on the keyboard.<br />
13. When finished recording, press START/STOP to stop<br />
the arranger. Select a different track, and go on recording<br />
the whole Chord Variation.<br />
Note: You can select a different track only when the<br />
arranger is not running.<br />
14. When finished recording the Chord Variation, select a<br />
different Chord Variation or Style Element to go on<br />
recording the whole Style.<br />
15. When finished recording the new Style, press WRITE or<br />
RECORD to save it in memory. The Write page will<br />
appear:<br />
Write to<br />
Style name: NewBossa<br />
To: U1-01 Bossa<br />
Abort<br />
• To change the Style’s name: press the right A VOL-<br />
UME/VALUE button to enter editing, and modify the<br />
name using the UP/DOWN buttons to move the cursor,<br />
and the DIAL to select a character. Press INSERT to<br />
insert a character at the cursor position, or DELETE to<br />
delete it.<br />
• To select a different location in memory, press one of<br />
the B VOLUME/VALUE buttons, then select a location<br />
with these buttons or the TEMPO/VALUE controls.<br />
Press ENTER to confirm, or one of the D (Abort) VOL-<br />
UME/VALUE buttons to abort the save. The “Are you<br />
sure?” message will appear on the display. Press ENTER<br />
to confirm, EXIT to abort. After pressing ENTER, you<br />
will exit from the Record mode.<br />
If you press EXIT while in the Write page, you will go<br />
back to the previous Style Record page, without any<br />
change.<br />
LISTENING TO THE STYLE WHILE IN RECORD/<br />
EDIT MODE<br />
While you are in Record/Edit mode, you can listen to the<br />
selected Chord Variation or to the whole Style, depending<br />
on the page you are in.<br />
To select a Chord Variation, go to the Main page (see “E<br />
(Style Element)” and “CV (Chord Variation)” on page 9b-<br />
5).<br />
• When you are in the Quantize, Transpose, Velocity, or<br />
Delete pages, you can listen to the selected Chord Variation.<br />
Press START/STOP to check how it works. Press<br />
START/STOP again to stop the playback.<br />
• When you are in the Delete All, Copy, Style Element<br />
Controls or Style Control pages, you can listen to the<br />
whole Style. Press START/STOP and play some chords<br />
to do your tests. Select any Style Element using the<br />
control panel buttons (VARIATION 1-4, INTRO 1-2,<br />
FILL 1-2, ENDING 1-2). Press START/STOP again to<br />
stop the playback.<br />
Note: When doing the above tests, the Fingered 3 Chord<br />
Scanning mode is automatically selected.<br />
FAST DELETE USING THE CONTROL PANEL<br />
BUTTONS<br />
While in the Main page or the Style Tracks page, you can use<br />
the control panel buttons to delete various elements of the<br />
Style:<br />
DELETE + note<br />
When a track is selected, you can use this key sequence to<br />
delete a single note or a single percussive instrument.<br />
If the Style is playing, this shortcut deletes the instrument<br />
only while the key is kept pressed, leaving all other notes<br />
untouched within the track.<br />
DELETE + Track<br />
While in the Style Tracks page, you can delete a whole track<br />
with a single shortcut. Keep the DELETE button pressed,<br />
then press one of the VOLUME/VALUE buttons corresponding<br />
to the track to be deleted. The “Are you sure?” message<br />
appear. Press ENTER to confirm, EXIT to abort.<br />
MAIN PAGE<br />
After pressing the RECORD button, and selected the Style to<br />
record/edit, the Main page of the Style Record mode appears.<br />
Style Play icon<br />
Chord<br />
NewBossa<br />
Style name<br />
|T:DR<br />
e:v1 cv:cv1 RecLen:2<br />
CV Len:16 Metro:On1<br />
Resol:1/16 Meter:4/4<br />
C maj7 NTT:5th<br />
Measure counter<br />
Track in record/edit<br />
Style Play icon<br />
When this icon appears on the display, you are in Style Play<br />
or Style Record mode.<br />
Chord<br />
While in the Main and Style Tracks page, this area shows the<br />
Original Key/Chord (see “Original Key/Chord” on page 9b-<br />
5) for the selected track.<br />
Style name<br />
This is the name of the Style in record/edit.
Style Record mode<br />
Main page<br />
9b-5<br />
Measure counter<br />
This counter shows the measure in record. The measure<br />
range is specified by the “RecLen” parameter (see “RecLen<br />
(Recording Length)” on page 9b-5).<br />
Track in record/edit<br />
Most editing in this edit mode are executed on a single track.<br />
While in the main page, the currently selected track is shown<br />
on the upper right area of the display. The abbreviations are:<br />
DR (Drums), PC (Percussion), BS (Bass), A1…A5 (Accompaniment<br />
1…5).<br />
To select the track to edit, press TRACK SELECT to jump to<br />
the Style Tacks page (see “Style Tracks page” on page 9b-6)<br />
and use the VOLUME/VALUE buttons to select it.<br />
E (Style Element)<br />
Use the A VOLUME/VALUE buttons to select the line, and<br />
the F1 button to select this parameter.<br />
This parameter lets you select the Style Element to put in<br />
edit. Each Style Element corresponds to one of the buttons<br />
on the control panel carrying the same name.<br />
Note: When this parameter and the assigned value is in small<br />
letters (e:v1), the Style Element is empty; when it is in capitals<br />
(E:V1), it is already recorded<br />
V1…V4 Variation 1 to Variation 4<br />
I1…I2 Intro 1 to Intro 2<br />
F1…F2 Fill 1 to Fill 2<br />
E1…E2 Ending 1 to Ending 2<br />
CV (Chord Variation)<br />
Use the A VOLUME/VALUE buttons to select the line, and<br />
the F2 button to select this parameter. This parameter lets<br />
you select the Chord Variation to edit, after selecting the Style<br />
Element this Chord Variation pertains to.<br />
Note: When this parameter and the assigned value is in small<br />
letters (cv:cv1), the Chord Variation is empty; when it is in capitals<br />
(CV:CV1), it is already recorded<br />
SE:V1…V4 You can select one of 6 Chord Variations to<br />
edit.<br />
SE:I1…E4 You can select one of 2 Chord Variations to<br />
edit.<br />
RecLen (Recording Length)<br />
This parameter sets the recording length (in measures) of the<br />
selected track. Its value is always equal to, or a divider of, the<br />
Chord Variation Length (see next parameter).<br />
This is not the total length of the Chord Variation, but just of<br />
the current track. For example, you may have a Chord Variation<br />
eight measures long, with a drum pattern repeating each<br />
two measures. If so, set the CV Len parameter to “8”, and the<br />
RecLen parameter to “2” before starting recording the Drum<br />
track. When saving the Style, or executing any edit operation<br />
on the Style, the 2-measures pattern will be extended to the<br />
full 8-measures length of the Chord Variation.<br />
Warning: If you assign CVLen a value lower than RecLen,<br />
the value of RecLen is not immediately updated on the display.<br />
Therefore, you are still free of changing the value of<br />
CVLen, before the measures exceeding its value are deleted<br />
(see warning in “CVLen (Chord Variation Length)” below).<br />
However, if you press START/STOP to begin recording, the<br />
real RecLen value is changed to the new one, even if the display<br />
still shows the old value.<br />
For example, you may have CVLen = 4 and RecLen = 4. If<br />
you set CVLen to 2, and press START/STOP to begin recording,<br />
RecLen is still shown as 4, but it is in reality set to 2, and<br />
recording will cycle for just 2 measures. After you press<br />
START/STOP to stop recording, RecLen is updated to 2, and<br />
all measures after the second measure are deleted.<br />
CVLen (Chord Variation Length)<br />
This parameter sets the total length (in measures) for the<br />
selected Chord Variation. When playing a Style, this will be<br />
the length of the accompaniment pattern to be cycled, when<br />
the chord corresponding to the Chord Variation is recognized<br />
on the keyboard.<br />
Warning: If you reduce the Chord Variation Length after<br />
recording, any measure after the selected length will be<br />
deleted. Be very careful when setting the CVLen to a lower<br />
value after recording!<br />
Metro (Metronome)<br />
This is the metronome heard during recording.<br />
Off No metronome click will be heard during<br />
recording. A one-bar precount will be played<br />
before starting recording.<br />
On1 Metronome on, with a one-bar precount<br />
before starting recording.<br />
On2 Metronome on, with a two-bar precount<br />
before starting recording.<br />
Resol (Resolution)<br />
This parameter sets the quantization during recording.<br />
1/32…1/8 Grid resolution, in musical values. For example,<br />
when you select 1/16, all notes are moved<br />
to the nearest 1/16 division. When you select 1/<br />
8, all notes are moved to the nearest 1/8 division.<br />
No quantization<br />
1/16<br />
1/8<br />
Meter<br />
This is the meter (time signature) of the Style. You can edit<br />
this parameter only when the Style is empty, i.e. before you<br />
begin recording anything.<br />
Original Key/Chord<br />
This is the track’s original key and chord. Use the D VOL-<br />
UME/VALUE buttons to select the line, and the F1 and F2<br />
buttons to switch from the key/chord name and the key/<br />
chord type (Maj, min…).<br />
When in Style Play mode, this chord will be played back<br />
exactly as it was recorded, without any NTT processing (see<br />
below). To record just one Chord Variation for a Style Element,<br />
the suggested original key/chord is “maj7”. Be very<br />
careful to play the 7th+ note (i.e., with a “Cmaj7th” key/<br />
chord, the B), to avoid the lack of notes, or a bad NTT conversion<br />
when playing different chords.
9b-6 Style Record mode<br />
Style Tracks page<br />
Note: To conform to Korg specifications, it is advisable to record<br />
both the “Major” and “minor” Chord Variations for the Intro 1<br />
and Ending 1 Style Elements.<br />
When you select a track, the original key/chord assigned to<br />
the selected track will be activated. All recorded tracks will<br />
play back on that key/chord. For example, if the original key/<br />
chord for the Acc1 track is A7th, when selecting the Acc1<br />
tracks all the remaining tracks will play according to the A7th<br />
key/chord.<br />
In the above example, you will record the Acc1 track in the<br />
AMajor key, with notes that will comply with the A7th chord.<br />
This is the pattern that will be recalled exactly as it was<br />
recorded, when playing an A7th chord.<br />
NTT<br />
The Note Transposition Table (NTT) determines how the<br />
arranger will transpose pattern notes, when playing a chord<br />
that does not exactly match to the original chord of a Chord<br />
Variation. For example, if you only recorded a Chord Variation<br />
for the CMaj chord, when a CMaj7 is recognized on the<br />
keyboard the arranger must transpose some notes to create<br />
the missing 7th.<br />
Note: To conform to Korg specifications, it is advisable to set the<br />
NTT to “No Transpose” on the Intro 1 and Ending 1.<br />
Root The root note (in CMaj = C) is transposed to<br />
the missing notes.<br />
5th The 5th note (in CMaj = G) is transposed to<br />
the missing notes.<br />
i-Series All original patterns must be programmed on<br />
the “Maj7” or “min7” chords. When loading<br />
old Korg i-Series instruments, this option is<br />
automatically selected.<br />
No Transp No transposition applied. The pattern will<br />
always play as recorded. This is the standard<br />
setting of Intro 1 and Ending 1 in Korg’s original<br />
Styles.<br />
As recorded with<br />
NTT = Root or 5th<br />
(Key/Chord = CMaj)<br />
As recorded with<br />
NTT = i-Series<br />
(Key/Chord = CM7)<br />
When you play a CM7<br />
with NTT = Root<br />
When you play a CMaj<br />
with NTT = i-Series<br />
When you play a CM7<br />
with NTT = 5th<br />
When you play a CM7<br />
with NTT = i-Series<br />
STYLE TRACKS PAGE<br />
While in the main Style Record page, press TRACK SELECT<br />
to jump to this page. Here you can see and select any Style<br />
track.<br />
Program name<br />
Select a track using the VOLUME/VALUE buttons. Select a<br />
Program using the PROGRAM/PERFORMANCE section.<br />
While in this page, you can set the track’s volume using the<br />
VOLUME/VALUE buttons. Since the track’s volume is memorized<br />
into the Style Performance and not in the pattern, this<br />
setting will not be recorded and saved. However, this will<br />
allow you to play back louder any reference track, or the track<br />
you are recording.<br />
Track status<br />
When in the Style Tracks page, each track can be in one of<br />
three status.<br />
Play<br />
Mute<br />
Record<br />
Style in record/edit<br />
Brush 2<br />
Perc Kit<br />
*AcouBass<br />
AcouPiano2<br />
Style Element-Chord Variation<br />
in record/edit<br />
NewBossa |V1-CV1<br />
Piano01<br />
Guitar01<br />
StrngEns2<br />
VoxPad1<br />
Style tracks<br />
(Visible status icon). This status is available<br />
only for non-selected tracks. When in play, a<br />
track can play back the recorded pattern.<br />
(Hidden status icon). When in this status, you<br />
can play the track on the keyboard, but you<br />
can’t record on it. This is useful to do some<br />
preliminary test, before actually start recording.<br />
To set a track in mute, first select it, then press<br />
both corresponding VOLUME/VALUE buttons<br />
to hide the status icon. To set the track in<br />
record again, press again the corresponding<br />
VOLUME/VALUE buttons.<br />
(Flashing status icon). When in this status, the<br />
track is ready to record. Just select a track to set<br />
it in record status.<br />
MENU<br />
From any page of the Style Record mode, press MENU to<br />
open the Style Record edit menu. This menu gives access<br />
to the various Style Record edit sections.<br />
Note: While the Style is in play, you cannot access the Edit section<br />
pages from the Main page and the Style Tracks page (see<br />
page 9b-4 and page 9b-6). Stop the playback before pressing<br />
MENU.<br />
When in the menu, select an edit section using the VOL-<br />
UME/VALUE (A-H) buttons, select an edit page using<br />
PAGE +, or press EXIT to exit the menu.
Style Record mode<br />
Edit page structure<br />
9b-7<br />
When in an edit page, press EXIT to go back to the main<br />
page (or the Style Tracks page) of the Style Record mode.<br />
PAGE 1 - EDIT: QUANTIZE<br />
The quantize function may be used to correct any rhythm<br />
error after recording, or to give the pattern a “groovy” feeling.<br />
Record MENU<br />
Quantize S.Elem.Ctl<br />
Transp/Vel. Style Ctl<br />
Delete<br />
Copy<br />
Each item in this menu corresponds to an edit section.<br />
Each edit section groups various edit pages.<br />
Note: When switching from the Edit section pages (Quantize,<br />
Transpose, Velocity, Delete) to the other pages, or vice-versa, the<br />
Style (if in play) is automatically stopped.<br />
EDIT PAGE STRUCTURE<br />
Select an edit section from the Menu, and/or use the PAGE<br />
buttons to reach the desired page.<br />
Press EXIT to go back to the main page of the Style Record<br />
mode.<br />
All edit pages share the same structure.<br />
Style Play icon Page header Page number<br />
Edit:Quantize<br />
E:V1 CV:CV1 Trk:All<br />
Resol:1/16<br />
S001-01-000 E001-01-192<br />
Bottom:G-1 Top:C8<br />
Style Play icon<br />
When on, this icon indicates that the instrument is in Style<br />
Play mode.<br />
Page header<br />
The header shows the name of the current edit page. As a<br />
general rule, the header is divided into a first word, identifying<br />
the section name (e.g., “Edit:Quantize” is an “Edit” section<br />
page), and a second word, referring to the page name<br />
(e.g. “Quantize”).<br />
Section name<br />
Page name<br />
Edit:Quantize<br />
Page number<br />
This area shows the current page number.<br />
A-H<br />
Each pair of VOLUME/VALUE (A-H) buttons selects a different<br />
parameter of command, depending on the edit page.<br />
After selecting a parameter, you can change its value by pressing<br />
one of the two buttons in a pair, or using the TEMPO/<br />
VALUE controls.<br />
Edit:Quantize<br />
E:V1 CV:CV1 Trk:All<br />
Resol:1/16<br />
S001-01-000 E001-01-192<br />
Bottom:G-1 Top:C8<br />
After setting the various parameters, press ENTER to execute.<br />
The “Are you sure?” message will appear. Press ENTER to<br />
confirm, EXIT to abort.<br />
E/CV (Style Element/Chord Variation)<br />
(Non editable) These read-only parameters show which Style<br />
Element and Chord Variation are currently selected for editing.<br />
See the Main page “E (Style Element)” and “CV (Chord<br />
Variation)” parameters on page 9b-5 for information on<br />
selecting a different Style Element and Chord Variation.<br />
Trk (Track)<br />
Use this parameter to select a track.<br />
All All tracks selected.<br />
Drum…Acc5 Selected track.<br />
Resol (Resolution)<br />
This parameter sets the quantization after recording. For<br />
example, when you select 1/8a, all notes are moved to the<br />
nearest 1/8 division. When you select 1/4, all notes are moved<br />
to the nearest 1/4 division.<br />
No quantization<br />
1/8<br />
1/4<br />
1/32…1/4 Grid resolution, in musical values. An “a” after<br />
the value means no swing. A “b…f” after the<br />
value means swing-quantization.<br />
S / E (Start/End)<br />
Use these parameters to set the starting (S) and ending (E)<br />
points of the range to quantize.<br />
If a Chord Variation is four measures long, and you want to<br />
select it all, the Start will be positioned at 1.01.000, and the<br />
End at 5.01.000.<br />
Bottom / Top<br />
Use these parameters to set the bottom and top of the keyboard<br />
range to quantize. If you select the same note as the<br />
Bottom and Top parameters, you can select a single percussive<br />
instrument in a Drum or Percussion track.<br />
Note: These parameters are available only when a Drum or<br />
Percussion track is selected.
9b-8 Style Record mode<br />
Page 2 - Edit: Transpose<br />
PAGE 2 - EDIT: TRANSPOSE<br />
In this page you can transpose the selected track(s).<br />
Note: After transposing, please don’t forget to readjust the<br />
“Original Key/Chord” parameter in the Style Record page (see<br />
page 9b-5).<br />
Note: These parameters are available only when a Drum or<br />
Percussion track is selected.<br />
PAGE 3 - EDIT: VELOCITY<br />
In this page you can change the velocity (dynamics) value of<br />
notes in the selected track.<br />
Edit:Transpose<br />
E:V1 CV:CV1 Trk:DRUM<br />
Value:+000<br />
S001-01-000 E001-01-192<br />
Bottom:G-1 Top:C8<br />
After setting the various parameters, press ENTER to execute.<br />
The “Are you sure?” message will appear. Press ENTER to<br />
confirm, EXIT to abort.<br />
E/CV (Style Element/Chord Variation)<br />
(Non editable) These read-only parameters show which Style<br />
Element and Chord Variation are currently selected for editing.<br />
See the Main page “E (Style Element)” and “CV (Chord<br />
Variation)” parameters on page 9b-5 for information on<br />
selecting a different Style Element and Chord Variation.<br />
Trk (Track)<br />
Use this parameter to select a track.<br />
All All tracks selected, apart for tracks set in Drum<br />
mode (like the Drum and Percussion tracks).<br />
The whole selected Chord Variation will be<br />
transposed.<br />
Drum…Acc5 Single selected track.<br />
Value<br />
Transpose value (±127 semitones).<br />
S / E (Start/End)<br />
Use these parameters to set the starting (S) and ending (E)<br />
points of the range to be transposed.<br />
If a Chord Variation is four measures long, and you want to<br />
select it all, the Start will be positioned at 1.01.000, and the<br />
End at 5.01.000.<br />
Bottom / Top<br />
Use these parameters to set the bottom and top of the keyboard<br />
range to be transposed. If you select the same note as<br />
the Bottom and Top parameters, you can select a single percussive<br />
instrument in a Drum or Percussion track. Since in a<br />
Drum Kit each instrument is assigned to a different note of<br />
the scale, transposing a percussive instrument means assigning<br />
the part to a different instrument.<br />
Edit:Velocity<br />
EV1 CV:CV1 Trk:DRUM<br />
Value:+000<br />
S001-01-000 E001-01-192<br />
Bottom:G-1 Top:C8<br />
After setting the various parameters, press ENTER to execute.<br />
The “Are you sure?” message will appear. Press ENTER to<br />
confirm, EXIT to abort.<br />
E/CV (Style Element/Chord Variation)<br />
(Non editable) These read-only parameters show which Style<br />
Element and Chord Variation are currently selected for editing.<br />
See the Main page “E (Style Element)” and “CV (Chord<br />
Variation)” parameters on page 9b-5 for information on<br />
selecting a different Style Element and Chord Variation.<br />
Trk (Track)<br />
Use this parameter to select a track.<br />
All All tracks selected. The velocity for all notes of<br />
the whole selected Chord Variation will be<br />
changed.<br />
Drum…Acc5 Selected track.<br />
Value<br />
Velocity change value (±127).<br />
S / E (Start/End)<br />
Use these parameters to set the starting (S) and ending (E)<br />
points of the range to be modified.<br />
If a Chord Variation is four measures long, and you want to<br />
select it all, the Start will be positioned at 1.01.000, and the<br />
End at 5.01.000.<br />
Bottom / Top<br />
Use these parameters to set the bottom and top of the keyboard<br />
range to be modified. If you select the same note as the<br />
Bottom and Top parameters, you can select a single percussive<br />
instrument in a Drum or Percussion track.<br />
Note: These parameters are available only when a Drum or<br />
Percussion track is selected.
Style Record mode<br />
Page 4 - Edit: Delete<br />
9b-9<br />
PAGE 4 - EDIT: DELETE<br />
This page is where you can delete single elements or MIDI<br />
events out of the Style.<br />
Edit:Delete<br />
E:V1 CV:CV1 Trk:All<br />
Ev:Note<br />
S001-01-000 E001-01-192<br />
Bottom:G-1 Top:C8<br />
After setting the various parameters, press ENTER to execute.<br />
The “Are you sure?” message will appear. Press ENTER to<br />
confirm, EXIT to abort.<br />
E/CV (Style Element/Chord Variation)<br />
(Non editable) These read-only parameters show which Style<br />
Element and Chord Variation are currently selected for editing.<br />
See the Main page “E (Style Element)” and “CV (Chord<br />
Variation)” parameters on page 9b-5 for information on<br />
selecting a different Style Element and Chord Variation.<br />
Trk (Track)<br />
Use this parameter to select a track.<br />
All All tracks selected. After deletion, the selected<br />
Chord Variation will remain empty.<br />
Drum…Acc5 Selected track.<br />
Ev (Event)<br />
Type of MIDI event to delete.<br />
All All events. The measures are not removed from<br />
the Chord Variation.<br />
Note All notes in the selected range.<br />
Dup.Note All duplicate notes. When two notes with the<br />
same pitch are encountered on the same tick,<br />
the one with the lowest velocity is deleted.<br />
A.Touch After Touch events.<br />
Note: This kind of data is automatically removed<br />
during recording.<br />
P.Bend Pitch Bend events.<br />
PrChange Program Change events, excluding the bundled<br />
Control Change #00 (Bank Select MSB)<br />
and #32 (Bank Select LSB).<br />
Note: This kind of data is automatically removed<br />
during recording.<br />
C.Change All Control Change events, for example Bank<br />
Select, Modulation, Damper, Soft Pedal…<br />
CC00/32…CC127<br />
Single Control Change events. Double Control<br />
Change numbers (like 00/32) are MSB/LSB<br />
bundles.<br />
Note: Some CC data are automatically removed<br />
during recording. See the table on page 9b-3 for<br />
more information on the allowed data.<br />
S / E (Start/End)<br />
Use these parameters to set the starting (S) and ending (E)<br />
points of the range to delete.<br />
If a Chord Variation is four measures long, and you want to<br />
select it all, the Start will be positioned at 1.01.000, and the<br />
End at 5.01.000.<br />
Bottom / Top<br />
Use these parameters to set the bottom and top of the keyboard<br />
range to delete. If you select the same note as the Bottom<br />
and Top parameters, you can select a single percussive<br />
instrument in a Drum or Percussion track.<br />
Note: These parameters are available only when the All or Note<br />
option is selected.<br />
PAGE 5 - EDIT: DELETE ALL<br />
This function lets you quickly delete a selected Style Element<br />
or Chord Variation, or the whole Style, resetting it to the<br />
default parameter’s values.<br />
Edit:Delete All<br />
Del:V1-CV1 Trk:All<br />
After setting the various parameters, press ENTER to execute.<br />
The “Are you sure?” message will appear. Press ENTER to<br />
confirm, EXIT to abort.<br />
When in this page, press the corresponding button on the<br />
control panel to select a Style Element (VARIATION1 …<br />
ENDING2).<br />
Del (Delete)<br />
Use this parameter to select the whole Style, a single Style<br />
Element, or a single Chord Variation.<br />
All All Style Elements, i.e. the whole Style. When<br />
Del=All and Trk=All, the whole Style is<br />
deleted, and all parameters set to the default<br />
status.<br />
Var1…End2 Single Style Element.<br />
V1-CV1…E2-CV2<br />
Single Chord Variation.<br />
Trk (Track)<br />
All All tracks of the selected Style, Style Element or<br />
Chord Variation.<br />
Drum-Acc5 Single track of the selected Style, Style Element<br />
or Chord Variation.
9b-10 Style Record mode<br />
Page 6 - Edit: Copy<br />
PAGE 6 - EDIT: COPY<br />
Here you can copy a track, Chord Variation or Style Element<br />
inside the same Style, or from a different one. Furthermore,<br />
you can copy a whole Style.<br />
Warning: The Copy operation deletes all data at the target<br />
location (overwrite).<br />
Edit:Copy<br />
From:S01-01 8BeatMax<br />
From:V1-CV1 To:V1-CV2<br />
FromTrk:DR<br />
After setting the various parameters, press ENTER to execute.<br />
The “Are you sure?” message will appear. Press ENTER to<br />
confirm, EXIT to abort.<br />
Note: If you copy too many events on the same “tick”, the “Too<br />
many events!” message appears, and the copy operation is<br />
aborted.<br />
Note: When you copy over an existing Chord Variation, Program<br />
Change data is not copied, to leave the original Programs<br />
unchanged for that Chord Variation.<br />
When in this page, press the corresponding button on the<br />
control panel to select a Style Element (VARIATION1 …<br />
ENDING2).<br />
From Style<br />
Use the first parameter to select the source Style to copy the<br />
track, Chord Variation or Style Element from.<br />
From… to Style Element/Chord Variation<br />
Use these parameters to select the source and target Style Elements<br />
or Chord Variations.<br />
Note: You can’t copy from a Variation to a different Style Element<br />
(or vice-versa), because of their different structure.<br />
All All Style Elements, i.e. the whole Style. You<br />
can’t change the target, that is automatically set<br />
to All.<br />
Var1…End2 Single Style Element.<br />
V1-CV1…E2-CV2<br />
Single Chord Variation.<br />
From Track<br />
Use this parameter to select the source and target track to<br />
copy. The target is always the same as the source track.<br />
All All tracks of the selected Style, Style Element or<br />
Chord Variation.<br />
Drum-Acc5 Single track of the selected Style, Style Element<br />
or Chord Variation.<br />
Copying on a Chord Variation with a different<br />
length<br />
You can copy a Chord Element on a different Chord Element<br />
with a different length. Just keep in mind the following:<br />
• If the source length is a divider of the target length, the<br />
source Chord Variation will be multiplied to fit the target<br />
Chord Variation. For example, if the source is 4-<br />
measures long, and the target 8-measures, the source<br />
will be copied two times.<br />
1 2 3 4<br />
1 2 3 4 1 2 3 4<br />
• If the source length is not a divider of the target length,<br />
the source Chord Variation will be copied for as many<br />
measures as can fit the target Chord Variation. For<br />
example, if the source is 6-measures long, and the target<br />
8-measures, the source will be copied once, then the fist<br />
2 measures will be copied to fit the remaining 2 measures.<br />
1 2 3 4<br />
5 6<br />
1 2 3 4 5 6 1 2<br />
Note: Avoid copying on a Chord Variation with a different<br />
meter, for example a 4/4 Chord Variation onto a 3/4 one.<br />
PAGE 7 - STYLE ELEMENT CONTROLS:<br />
PROGRAMS<br />
In this page you can assign a different Program to each track<br />
of the selected Style Element. Each Style Element can have<br />
different Programs; after saving the new Style, please don’t<br />
forget to set the “Prog” parameter to “Original” (see page 9-<br />
11 on the User’s Manual), to let the Style select the Program<br />
bypassing the Style Performance settings.<br />
SECtl:Program V1<br />
StandardDK<br />
PercKit 1<br />
FingerBass<br />
Ac.Piano<br />
Jazz GT<br />
Brass<br />
Vibes<br />
VoxPad<br />
When in this page, press the corresponding button on the<br />
control panel to select a Style Element (VARIATION1 …<br />
ENDING2).<br />
To copy the settings of this page to another Style Element,<br />
keep the SHIFT button pressed, and press the button of the<br />
target Style Element.<br />
Program<br />
Use the PROGRAM/PERFORMANCE section to assign a<br />
Program to the selected track.<br />
Note: You can’t select a Digital Drawbars Program from this<br />
page. Assign it to a Performance track instead.<br />
PAGE 8 - STYLE ELEMENT CONTROLS:<br />
EXPRESSION<br />
In this page you can modify the Expression (CC#11) value<br />
for each of the Style tracks. This lets you reduce the relative<br />
level of a track in a single Style Element, without reducing the<br />
overall Volume of the Style.
Style Record mode<br />
Page 9 - Style Element Controls: Keyboard Range<br />
9b-11<br />
This is a very useful control, when you have different Programs<br />
assigned to the same track in different Style Elements,<br />
and the internal level of these Programs is different.<br />
SECtl:Express.V1<br />
Value: 100 Value: 100<br />
Value: 100 Value: 100<br />
Value: 100 Value: 100<br />
Value: 100 Value: 100<br />
When in this page, press the corresponding button on the<br />
control panel to select a Style Element (VARIATION1 …<br />
ENDING2).<br />
To copy the settings of this page to another Style Element,<br />
keep the SHIFT button pressed, and press the button of the<br />
target Style Element.<br />
Value<br />
Use this parameter to set the Expression value for the corresponding<br />
track.<br />
PAGE 9 - STYLE ELEMENT CONTROLS:<br />
KEYBOARD RANGE<br />
The Keyboard Range automatically transposes any pattern<br />
note that would otherwise play too high or too low in pitch,<br />
compared to the original acoustic instrument, when transposed<br />
by the arranger. This will result in a more natural<br />
sound for each accompaniment instrument.<br />
For example, the lower limit for a guitar is E2. If you play a<br />
chord under the E2, the transposed pattern could exceed this<br />
limit, and sound unnatural. A Bottom limit set to E2 for the<br />
guitar track will solve the problem.<br />
SECtl:KbdRng V1<br />
Bottom<br />
- - - - - - C-1 G#9<br />
- - - - - - C-1 G#9<br />
C-1 G#9 C-1 G#9<br />
C-1 G#9 C-1 G#9<br />
Top<br />
Note: The Keyboard Range is ignored while recording. The<br />
selected track can play on the full range of the keyboard.<br />
When in this page, press the corresponding button on the<br />
control panel to select a Style Element (VARIATION1 …<br />
ENDING2).<br />
To copy the settings of this page to another Style Element,<br />
keep the SHIFT button pressed, and press the button of the<br />
target Style Element.<br />
Bottom/Top<br />
Use these parameters to set the bottom and top of the keyboard<br />
range for the corresponding track.<br />
PAGE 10 - STYLE ELEMENT CONTROLS: CHORD<br />
VARIATION TABLE<br />
This is the page where you can assign a Chord Variation to<br />
each recognized chord. When a chord is recognized, the<br />
assigned Chord Variation will be automatically selected by<br />
the arranger to play the accompaniment.<br />
SECtl:ChTable V1<br />
Major:<br />
Minor:<br />
Seventh:<br />
Maj7th:<br />
CV1<br />
CV2<br />
CV1<br />
CV2<br />
When in this page, press the corresponding button on the<br />
control panel to select a Style Element (VARIATION1 …<br />
ENDING2).<br />
E-F (Scroll Up), G-H (Scroll Down)<br />
Use these buttons to scroll the available parameters on the<br />
display.<br />
Chords / Chord Variation<br />
Use these parameters to assign a Chord Variation to each of<br />
the enlisted chords.<br />
PAGE 11 - STYLE CONTROLS: MODE/TENSION<br />
In this page you can set the Retrigger mode for the Style<br />
tracks, and activate/deactivate the Tension for the Accompaniment<br />
tracks.<br />
StCtl:Mode/Tens<br />
- - - - - - M:Off T:On<br />
- - - - - - M:Rt T:On<br />
M:Rp M:Rp T:On<br />
M:Rt T:On M:Rp T:Off<br />
When in this page, press the corresponding button on the<br />
control panel to select a Style Element (VARIATION1 …<br />
ENDING2).<br />
M (Mode)<br />
This setting harmonizes the notes of the Bass track or the<br />
Acc1-5 tracks to the new chord when the chord is changed.<br />
Off Each time you play a new chord, the current<br />
notes will be stopped. The track will remain<br />
silent until a new note will be encountered in<br />
the pattern.<br />
Rt<br />
(Retrigger) The sound will be stopped, and<br />
new notes matching the recognized chord will<br />
be played back.<br />
Rp (Repitch) New notes matching the recognized<br />
chord will be played back, by repitching notes<br />
already playing. There will be no break in the<br />
sound. This is very useful on Guitar and Bass<br />
tracks.
9b-12 Style Record mode<br />
Page 11 - Style Controls: Mode/Tension<br />
T (Tension)<br />
Tension adds notes (a 9th, 11th and/or 13th) that have actually<br />
been played to the accompaniment, even if they haven't<br />
been written in the Style pattern. This parameter specifies<br />
whether or not the Tension included in the recognized chord<br />
will be added to the Acc1-5 tracks.<br />
On The Tension will be added.<br />
Off No Tension will be added.
Style Play operating mode (addendum)<br />
Fill to Variation<br />
9c-1<br />
9C. STYLE PLAY <strong>OPERATING</strong> MODE (ADDENDUM)<br />
Some new functions have been added. Please add the following<br />
instructions to the “Style Play operating mode” chapter.<br />
FILL TO VARIATION<br />
This new function has been added to Page 20 ‘”StyCtl:<br />
Drums”) of the Style Play mode.<br />
AUTO OCTAVE<br />
The “Auto Octave” parameter has been added to “Page 24 -<br />
Preference: Lock” of the Style Play operative mode (see page<br />
9-13 in the User’s Manual). The display now looks as in the<br />
following image.<br />
StyCtl:Drums<br />
V1 DrMap:5 KickD :Off<br />
V2 DrMap:5 SnareD:Off<br />
V3 DrMap:5 Fill1:Off<br />
V4 DrMap:5 Fill2:Off<br />
Fill1/2<br />
These parameters set a Variation to be automatically selected<br />
at the end of the Fill.<br />
Off The same Variation, playing before selecting a<br />
Fill, will be selected again.<br />
1&2…3&4 The specified Variations will be alternatively<br />
selected. For example, with the “1&2” option,<br />
Variation 1 and Variation 2 will be alternatively<br />
selected after the end of the Fill.<br />
Up/Down The next higher/lower numbered Variation is<br />
selected, in cycle. After Variation 4, an Up<br />
command will select Variation 1. After Variation<br />
1, a Down command will select Variation<br />
4.<br />
Inc/Dec The next higher/lower numbered Variation is<br />
selected. When Variation 4 is reached, an Inc<br />
command will select Variation 4 again. When<br />
Variation 1 is reached, a Dec command will<br />
select Variation 1 again.<br />
Pref:Lock (Gbl)<br />
In1/In2: Off<br />
Pads : Off<br />
Scale : On<br />
AutoOct: On<br />
Auto Octave<br />
This lock lets the instrument automatically transpose the<br />
Upper tracks when switching between the FULL UPPER and<br />
the SPLIT Keyboard modes.<br />
On When switching to the FULL UPPER or SPLIT<br />
Keyboard Mode, the Upper tracks transposition<br />
is left unchanged.<br />
Off When switching to the FULL UPPER Keyboard<br />
Mode, the Upper tracks Octave Transpose<br />
is automatically set to “0”.<br />
When switching to the SPLIT Keyboard Mode,<br />
the Upper tracks Octave Transpose is automatically<br />
set to “-1”.<br />
NEW OPTIONS FOR THE MEMORY FUNCTION<br />
The “Lower” option has been added to the “Memory Mode”<br />
parameter in Style Play mode (see “Page 25 - Preferences:<br />
Controls”, on page 9-13 of the User’s Manual). Please change<br />
the relevant text, on page 9-14 of the User’s Manual, as follows.<br />
Memory Mode<br />
This parameter sets the way the MEMORY button works.<br />
Chord When its LED is on, the MEMORY button<br />
keeps the recognized chord in memory. When<br />
its LED is off, the chord is reset when raising<br />
the hand from the keyboard.<br />
Chord + Lower<br />
When its LED is on, the MEMORY button<br />
keeps the recognized chord in memory, and<br />
keeps the Lower track held until the next note<br />
or chord is played. When its LED is off, the<br />
chord is reset when raising the hand from the<br />
keyboard, and the Lower track is not sustained.<br />
Lower When its LED is on, the MEMORY button<br />
keeps the Lower track held until the next note<br />
or chord is played. When off, the Lower track is<br />
not sustained when raising the hand from the<br />
keyboard. The chord is always kept in memory.
9c-2 Style Play operating mode (addendum)<br />
New options for the Memory function
Song Play operating mode (addendum)<br />
Up to 9999 Songs per folder/directory<br />
10b-1<br />
10B. SONG PLAY <strong>OPERATING</strong> MODE (ADDENDUM)<br />
Some new functions have been added. Please add the following<br />
instructions to the “Song Play operating mode” chapter.<br />
UP TO 9999 SONGS PER FOLDER/DIRECTORY<br />
Each folder/directory can now contain up to 9999 Songs or<br />
files. When you select a Song through the numeric keypad,<br />
you can dial in a 4-digit number. Please replace the following<br />
sections in the “Song Play operating mode” chapter (see<br />
page 10-1 in the User’s Manual).<br />
Selecting a Song in the Song Select page<br />
1. Open the Song Select page.<br />
2. Select the disk and open the folder containing the Song<br />
to be selected. This folder will be used also in the Main<br />
and Lyrics page.<br />
3. Compose the 4-digit number corresponding to the Song<br />
you wish to select (for example: if the Song is number<br />
“1043”, dial 1, 0, 4, 3).<br />
Song number:<br />
000-<br />
After the fourth digit has been inserted, the window<br />
automatically disappears, and the Song is selected.<br />
• If the Song number is just 1, 2 or 3-digit long, dial the<br />
number, then press ENTER to confirm (for example: if<br />
the Song is number “52”, dial 5, 2, ENTER).<br />
Note: If no Song corresponds to the dialed number, the<br />
“Song not available” message appears. Press any button to<br />
make it disappear.<br />
Selecting a Song in the Main page<br />
While the S1 or S2 field is selected, compose the number<br />
corresponding to the Song you wish to select. The current<br />
folder is the one selected in the Song Select page.<br />
Selecting a Song in the Lyrics page<br />
Compose the number corresponding to the Song you wish<br />
to select. The current folder is the one selected in the Song<br />
Select page.<br />
SAVING A LIST OF SONGS<br />
How to save a list of Songs contained in a<br />
folder<br />
1. Press SONG PLAY to select the Song Play operative<br />
mode.<br />
2. Press one of the A (S1:) VOLUME/VALUE button to<br />
select the Load Song page.<br />
3. Use the F1 button to select the device (FD or HD) containing<br />
the folder whose Song list you want to save.<br />
4. Use the F3 (Open) and F4 (Close) buttons to browse<br />
through the folders in the selected device.<br />
5. Move the folder you are looking for to the first line of<br />
the display. Use the TEMPO/VALUE controls, or the E-F<br />
(Scroll Up) and G-H (Scroll Down) VOLUME/VALUE<br />
buttons.<br />
6. Once the folder is selected, press SHIFT + F2.<br />
7. A dialog box will appear, asking you to insert a floppy<br />
disk into the disk drive. Insert the disk, and press<br />
ENTER to confirm, or EXIT to abort.<br />
Note: Since you can only print the list from a personal computer,<br />
it will be automatically saved into a floppy disk.<br />
Note: The text file will contain a list of “*.mid”, “*.kar” and<br />
“*.jbx” files only (i.e., the files you can select using the numeric<br />
keypad – see “Selecting a Song composing its progressive number”<br />
on page 10-1 of the User’s Manual). Folders and different<br />
kinds of files will not be included.<br />
When saved, the text file will be named after the selected folder.<br />
For example, a folder named “Dummy” will generate a<br />
“Dummy.txt” file. If a file with the same name already exists on<br />
the floppy disk, it will be overwritten without waiting for any<br />
confirmation. A file containing the list of all valid files contained<br />
into the root of the disk will generate a “Root.txt” file.<br />
The list will include the progressive number assigned to each<br />
Song, file names in MS-DOS format (8.3), the total number of<br />
files in the list.<br />
For the correct display and printing of the list on a personal<br />
computer, use a fixed size (i.e., non-proportional) character in<br />
your text editor.<br />
Warning: While the list may contain more than 9999 files, you<br />
can’t select Songs outside the 0001-9999 range when using the<br />
numeric keypad.<br />
How to save a list of Songs contained in a<br />
Jukebox file<br />
1. Press SONG PLAY to select the Song Play operative<br />
mode.<br />
2. To select an existing Jukebox file, press one of the A (S1:)<br />
VOLUME/VALUE buttons to select the Load Song page.<br />
If you are creating a new Jukebox file, press MENU<br />
instead, select the Jukebox page, and jump to step 8.<br />
3. Use the F1 button to select the device (FD or HD) containing<br />
the Jukebox file whose Song list you want to<br />
save.<br />
4. Use the F3 (Open) and F4 (Close) buttons to browse<br />
through the folders in the selected device.<br />
5. Move the folders and files to select to the first line of the<br />
display. Use the TEMPO/VALUE controls, or the E-F<br />
(Scroll Up) and G-H (Scroll Down) VOLUME/VALUE<br />
buttons.<br />
6. When the Jukebox file you are looking for is selected,<br />
press F2 (Select) to select it.<br />
7. Once the Jukebox file is selected, press MENU and select<br />
the Jukebox page.<br />
8. While you are in the Jukebox page, press SHIFT + F2 to<br />
save the list.<br />
9. A dialog box will appear, asking you to insert a floppy<br />
disk into the disk drive. Insert the disk, and press<br />
ENTER to confirm, or EXIT to abort.
10b-2 Song Play operating mode (addendum)<br />
Saving a list of Songs<br />
Note: Since you can only print the list from a personal computer,<br />
it will be automatically saved into a floppy disk.<br />
Note: When saved, the text file will be named after the selected<br />
Jukebox file. For example, a Jukebox file named “Dummy.jbx”<br />
will generate a “Dummy.txt” file. A new, unnamed Jukebox file<br />
will generate a “New_name.txt” file. If a file with the same<br />
name already exists on the floppy disk, it will be overwritten<br />
without waiting for any confirmation.<br />
The list will include the progressive number assigned to each<br />
Song, file names in MS-DOS format (8.3), the total number of<br />
files in the list.<br />
For the correct display and printing of the list on a personal<br />
computer, use a fixed size (i.e., non-proportional) character in<br />
your text editor.
Backing Sequence operating mode (addendum)<br />
Recording Pads in Backing Sequence mode<br />
11b-1<br />
11B. BACKING SEQUENCE <strong>OPERATING</strong> MODE (ADDENDUM)<br />
Some new functions have been added. Please add the following<br />
instructions to the “Backing Sequence operating mode”<br />
chapter.<br />
RECORDING PADS IN BACKING SEQUENCE<br />
MODE<br />
Now you can record the Pads in the same track formerly<br />
devoted only to the Realtime tracks. Please change the relevant<br />
text, on page 11-4 of the User’s Manual, as follows.<br />
G (RT/Pads)<br />
RT/Pads: This Backing Sequence track includes the four<br />
Realtime (Keyboard) tracks, and the four Pads. They will be<br />
Song tracks 1-8, as in the following table:<br />
RT/Pad track<br />
CHORD/ACC STEP MODE<br />
Song track/Channel<br />
Upper 1 1<br />
Upper 2 2<br />
Upper 3 3<br />
Lower 4<br />
Pad 1 5<br />
Pad 2 6<br />
Pad 3 7<br />
Pad 4 8<br />
While in the Backing Sequence operative mode, you can<br />
enter the Chord/Acc Step Mode to create or edit the Style<br />
(Chord/Acc) part of a Song. This mode lets you enter chords<br />
even if you are not a keyboard player, or fix any error made<br />
playing chords or selecting Style controls, during the Realtime<br />
Recording mode.<br />
You can edit only Songs created on the Pa80 (Backing<br />
Sequence mode). When saving a Song created in Backing<br />
Sequence mode, all Chord/Acc data is preserved, and can be<br />
loaded later, to be edited using the Chord/Acc Step Mode.<br />
Here is how to enter the Chord/Acc Step Mode, and execute<br />
your editing:<br />
1. Press B.SEQ to enter the Backing Sequence mode.<br />
2. Press RECORD. You will be prompted to select the Realtime<br />
Recording mode (the formerly Record mode), or<br />
the Chord/Acc Step Mode.<br />
• By pressing one of the B VOLUME/VALUE buttons,<br />
you will select the Chord/Acc Step Mode.<br />
3. Press one of the B (Chord/Acc Step Mode) VOLUME/<br />
VALUE buttons to enter the Step Mode.<br />
Step Chord/Acc<br />
M001.01.000 Tempo:120<br />
Style:Umpl_Bossa<br />
Perf :01-1 SE:Off<br />
C Maj - /C<br />
4. Select the M(easure) parameter, and go to a different<br />
position into the Song, using the TEMPO/VALUE controls,<br />
or the A VOLUME/VALUE buttons. Alternatively,<br />
you can move the locator using the < > and > buttons.<br />
See “Transport controls” on page 11b-3.<br />
5. Select the parameter type to insert, edit or delete at the<br />
current position. If an arrow ( ) appears next to a<br />
parameter, the shown event has been inserted at the current<br />
position.<br />
6. Use the TEMPO/VALUE controls to modify the selected<br />
event. Delete it using the DELETE button. When editing<br />
a parameter without the arrow ( ) next to it, a new<br />
event is inserted.<br />
7. Exit the Chord/Acc Step Mode by pressing the RECORD<br />
button.<br />
8. Press START/STOP to listen to the results of your editing.<br />
If they are fine, save the Backing Sequence on a disk.<br />
Side arrow ( )<br />
The small arrow next to a parameter means that its value is<br />
effective at the current position. For example, if you are at the<br />
“M003.01.000” position, and an arrow lights up next to the<br />
Chord parameter, this means that a chord change happens at<br />
the “M003.01.000” position.<br />
M(easure)<br />
This is the locator. It shows the current position of the Step<br />
Editor. To go to a different position within the Song, select<br />
this parameter, then use the TEMPO/VALUE controls, the A<br />
VOLUME/VALUE buttons, or the < > buttons (while the > buttons let you move to the previous or following measure).<br />
When using one of these controls, the locator moves in<br />
steps of 1/8 (192 ticks), or jumps to the next event.<br />
The locator’s format is as follows:<br />
Record<br />
Realtime Recording<br />
Chord/Acc Step Mode<br />
M001.01.000<br />
Measure Beat Tick<br />
• By pressing one of the A VOLUME/VALUE buttons,<br />
you will select the Realtime Recording method<br />
described into the User’s Manual.<br />
Measure: Measure or bar number.<br />
Beat: Divider in the Time Signature ratio (e.g., a quarter in a<br />
3/4 time).<br />
Tick: Minimal sequencer’s resolution. The Pa80 internal<br />
sequencers feature a resolution of 384 ticks per quarter.
11b-2 Backing Sequence operating mode (addendum)<br />
Chord/Acc Step Mode<br />
INSERT When the Measure parameter is selected, press<br />
INSERT to insert a measure starting from the<br />
current position. All Chord/Acc events contained<br />
into the current measure will be moved<br />
to the following measure. The event at the<br />
Mxxx.xx.000 position (i.e., exactly at the<br />
beginning of the measure, like a Time Signature<br />
or Style change) will not be moved.<br />
DELETE When the Measure parameter is selected, press<br />
DELETE to delete the current measure. All<br />
Chord/Acc event contained into the following<br />
measures are moved to the current measure.<br />
SHIFT + DELETE<br />
When the Measure parameter is selected, press<br />
SHIFT + DELETE to delete all events in the<br />
Style tracks, starting from the current position<br />
to the end of the Song. To delete all events in<br />
the Style tracks, go back to the M001.01.000<br />
position, and press SHIFT + DELETE.<br />
Note: All events on the very first tick<br />
(M001.01.000), like Style, Tempo, Chord, Style<br />
Element selection, cannot be deleted.<br />
Tempo<br />
This is the Tempo Change parameter. To insert a Tempo<br />
Change event at the current position, select this parameter<br />
and use the TEMPO/VALUE controls to change its value.<br />
DELETE When the Tempo parameter is selected, and<br />
the side arrow ( ) – showing that a Tempo<br />
Change event has been selected at the current<br />
position – appears next to it, press DELETE to<br />
delete the Tempo Change at the current position.<br />
Note: If the side arrow doesn’t appear, the event<br />
was not selected at the current position, and will<br />
not be deleted.<br />
SHIFT + DELETE<br />
When the Tempo parameter is selected, press<br />
SHIFT + DELETE to delete all Tempo Change<br />
events, starting from the current position to<br />
the end of the Song. To delete all Tempo<br />
Change events in the Song, go back to the<br />
M001.01.000 position, and press SHIFT +<br />
DELETE.<br />
Note: All events on the very first tick<br />
(M001.01.000), like Perf, Style, Tempo, Chord,<br />
Style Element selection, cannot be deleted.<br />
Style<br />
This is the last selected Style. To insert a Style change at the<br />
current position, use the standard selecting procedure by<br />
exploiting the buttons of the STYLE section.<br />
Note: Any Style Change inserted after the beginning of the measure<br />
(i.e., to a position other than Mxxx.01.000) will be effective<br />
at the following measure. For example, if a Style Change event<br />
has been inserted at M004.03.000, the selected Style will be<br />
effectively selected at M005.01.000. (This works exactly as in<br />
Style Play mode).<br />
Note: When inserting a Style Change, you may also insert a<br />
Tempo Change at the same position. A Style Change will not<br />
automatically insert the Style’s Tempo.<br />
DELETE When the Style parameter is selected, and the<br />
side arrow ( ) – showing that a Style Change<br />
event has been selected at the current position<br />
– appears next to it, press DELETE to delete<br />
the Style Change at the current position.<br />
Note: If the side arrow doesn’t appear, the event<br />
was not selected at the current position, and will<br />
not be deleted.<br />
SHIFT + DELETE<br />
When the Style parameter is selected, press<br />
SHIFT + DELETE to delete all Style Change<br />
events, starting from the current position to<br />
the end of the Song. To delete all Style Change<br />
events in the Song, go back to the<br />
M001.01.000 position, and press SHIFT +<br />
DELETE.<br />
Note: All events on the very first tick<br />
(M001.01.000), like Perf, Style, Tempo, Chord,<br />
Style Element selection, cannot be deleted.<br />
Perf<br />
This is the last selected Performance. Select a Performance to<br />
recall the Style it memorizes. To insert a Performance change<br />
at the current position, use the standard selecting procedure<br />
by exploiting the buttons of the PROGRAM/PERFOR-<br />
MANCE section.<br />
Note: The STYLE CHANGE LED is automatically turned on<br />
when entering the Chord/Acc Step Mode. This means that<br />
selecting a Performance automatically selects the Style memorized<br />
into the Performance.<br />
The SINGLE TOUCH and STS buttons are automatically disabled,<br />
meaning that you can’t change the Realtime (Keyboard)<br />
tracks while in Chord/Acc Step Mode.<br />
DELETE When the Perf parameter is selected, and the<br />
side arrow ( ) – showing that a Performance<br />
Change event has been selected at the current<br />
position – appears next to it, press DELETE to<br />
delete the Performance Change at the current<br />
position.<br />
Note: If the side arrow doesn’t appear, the event<br />
was not selected at the current position, and will<br />
not be deleted.<br />
SHIFT + DELETE<br />
When the Perf parameter is selected, press<br />
SHIFT + DELETE to delete all Performance<br />
Change events, starting from the current position<br />
to the end of the Song. To delete all Performance<br />
Change events in the Song, go back<br />
to the M001.01.000 position, and press SHIFT<br />
+ DELETE.<br />
Note: All events on the very first tick<br />
(M001.01.000), like Perf, Style, Tempo, Chord,<br />
Style Element selection, cannot be deleted.
Backing Sequence operating mode (addendum)<br />
How to delete a whole Song<br />
11b-3<br />
SE (Style Element)<br />
This is the Style Element (i.e., a Variation, Fill, Intro, or Ending).<br />
The length of the selected Style Element is always shown<br />
on the measure counter, at the top of the display:<br />
This will let you know where to place the following Style Element<br />
Change. For example, if you inserted an Intro event<br />
lasting for 4 measures, you can insert 4 empty measure after<br />
this event, and a Variation event at the end of the Intro,<br />
beginning at the 4th empty measure.<br />
“Off” means that the accompaniment will not play at the<br />
selected position – only the Realtime tracks will play.<br />
Hint: Insert a Style Element Off event exactly where the autoaccompaniment<br />
must stop, at the end of the Song.<br />
Chord<br />
Use the D VOLUME/VALUE buttons to select the Chord line.<br />
Use the F1-F4 buttons to select the part of the chord you wish<br />
to edit.<br />
C Maj - /C<br />
Name Type Tension Extension<br />
Use the TEMPO/VALUE controls to modify the selected<br />
parameter. You can also play a chord, and it will be automatically<br />
recognized. While recognizing a chord, the status of the<br />
BASS INVERSION button will be considered.<br />
“No chord” means that the accompaniment will not play at<br />
the current position (apart for the Drum and Percussion<br />
tracks). To select the “No chord” option, press F1 to select the<br />
Name part of the Chord, then use the TEMPO/VALUE section<br />
to select the very last value (C…B, Off).<br />
Note: If you replace a chord with a different one, please remember<br />
that the Lower track will not be automatically changed.<br />
Transport controls<br />
While in Step Mode, you can use various control panel buttons<br />
to accomplish the editing procedure.<br />
> (Rewind or Fast Forward)<br />
Use these buttons to move to the previous or following measure.<br />
These commands are effective even if the M(easure)<br />
parameter is not selected.<br />
< or > (Previous or Next Step)<br />
Use these button to go to the previous or next step (1/8, or<br />
192 ticks). If an event is located before the previous or next<br />
step, the locator stops on that event. For example, if you are<br />
positioned on M001.01.000, and no event exists before<br />
M001.01.192, the > button moves to the M001.01.192 location.<br />
If an event exists on M001.01.010, the > button stops to<br />
the M001.01.010 location.<br />
These commands are effective even if the M(easure) parameter<br />
is not selected.<br />
+ < or > (Previous or Next Event)<br />
Keep the SHIFT button pressed while pressing the < or ><br />
button, to move to the previous or next recorded event.<br />
HOW TO DELETE A WHOLE SONG<br />
Now you can delete a whole Song, in the Song and Backing<br />
Sequence operative modes, with the simple SHIFT +<br />
DELETE key sequence.<br />
1. Enter the Song or Backing Sequence mode. You must be<br />
in the main page of the mode. If you are in Record<br />
mode, go back to the Playback mode.<br />
2. Press SHIFT + DELETE.<br />
3. The “Delete Song?” message appears. Press ENTER to<br />
confirm, EXIT to abort.
11b-4 Backing Sequence operating mode (addendum)<br />
How to delete a whole Song
Song Record mode<br />
The Songs and the Standard MIDI File format<br />
12b-1<br />
12B. SONG RECORD MODE<br />
A new function and a completely new Song Record mode has<br />
been added. Please add the following instructions to the<br />
“Song operating mode” chapter.<br />
The Song operating mode is the full-featured onboard<br />
sequencer, where you can create from scratch or edit a Song.<br />
You can also use this mode to edit the initial parameters of a<br />
Standard MIDI File, either made with an external sequencer<br />
or with Pa80 own Song and Backing Sequence modes.<br />
You can save the edited Song as a Standard MIDI File<br />
(“.MID” file), and playback it either in Song Play, Backing<br />
Sequence or Song mode.<br />
For a practical example of Song editing, see “5 - Editing a<br />
Song” on page 7-6 in the User’s Manual.<br />
THE SONGS AND THE STANDARD MIDI FILE<br />
FORMAT<br />
The native Song format for Pa80 is the Standard MIDI File.<br />
See “The Songs and the Standard MIDI File format” on<br />
page 10-1 in the User’s Manual.<br />
When saving a Song as a SMF, an empty measure in automatically<br />
inserted to the beginning of the Song. This measure<br />
contains various Song initialization parameters.<br />
When a SMF is loaded, the empty measure is automatically<br />
removed.<br />
MAIN PAGE<br />
This chapter has been integrated with new information.<br />
Replace it in the User’s Manual.<br />
Press SONG to access this page from another operating<br />
mode.<br />
Note: When switching from Style Play to Song, the Song Setup<br />
is automatically selected, and various track parameters may<br />
change.<br />
Press EXIT/NO to access this page from the Menu or any of<br />
the Song Play edit pages.<br />
To see the Song’s tracks, use the TRK SELECT button to<br />
switch from the Main page to the Tracks pages. Pressed a first<br />
time, you will see tracks 1-8 (enlightened TRK SELECT<br />
LED); a second press will show tracks 9-16 (flashing TRK<br />
SELECT LED); pressed again, you will go back to the Main<br />
page (TRK SELECT LED switched off).<br />
Song icon Page header Bar number<br />
New Song<br />
Load Song<br />
Save Song<br />
Sel.Tempo<br />
Metro:Off<br />
Meter:4/4<br />
Tempo:Auto<br />
Song icon<br />
When on, this icon shows that the instrument is in Song<br />
mode.<br />
Page header<br />
This line shows the selected Song name.<br />
Bar number<br />
This counter shows the current bar number position of the<br />
selected Song.<br />
B (Load Song)<br />
Use these buttons to select a Song (i.e., a Standard MIDI<br />
File). The Song Select page opens, and you can select a Song<br />
(see below “Song Select page”).<br />
C (Save Song)<br />
This command saves the edited Song as a Standard MIDI<br />
File. After pressing this command, the Save Song page<br />
appears (see “Save Song page” on page 12b-2).<br />
D (Select Tempo)<br />
Select this parameter to use the TEMPO/VALUE section to<br />
select the Tempo. When you select this parameter, the VALUE<br />
LED turns off.<br />
Note: The tempo is always record in overwrite mode (old data is<br />
replaced by the new data).<br />
F (Metro)<br />
Use these buttons to turn the metronome on/off during playback.<br />
G (Meter)<br />
This non-editable parameter shows the starting meter (or<br />
time signature) of the selected Song.<br />
H (Tempo mode)<br />
This sets the Tempo change mode.<br />
Man(ual) When the cursor is on the “D (Select Tempo)”<br />
parameter, you can change the Tempo using<br />
the TEMPO/VALUE section controls. The<br />
Song will be played back using the manually<br />
selected tempo.<br />
Auto The Tempo recorded into the Song will be<br />
used.<br />
TRACKS 1-8 PAGE<br />
To see and edit tracks 1-8, press TRK SELECT from the main<br />
page. The TRK SELECT LED turns on.<br />
TRACKS 9-16 PAGE<br />
To see and edit tracks 9-16, press TRK SELECT once from the<br />
Tracks 1-8 page, or twice from the main page. The TRK<br />
SELECT LED begins flashing.<br />
HOW TO DELETE A WHOLE SONG<br />
While in the Main page, you can delete a whole Song, with<br />
the simple SHIFT + DELETE key sequence.<br />
1. Enter the Song mode. You must be in the Main page of<br />
the mode. If you are in Record mode, go back to the<br />
Playback mode.<br />
2. Press SHIFT + DELETE.<br />
3. The “Delete Song?” message appears. Press ENTER to<br />
confirm, EXIT to abort.
12b-2 Song Record mode<br />
Song Select page<br />
SONG SELECT PAGE<br />
This page appears when you press PAGE+ or either the B<br />
(Load Song) buttons while you are in the main page.<br />
Press EXIT to go back to the Main page of the Song operating<br />
mode, without selecting a Song.<br />
1. If you are in an edit page, press EXIT to go back to the<br />
Main page.<br />
2. Select the Save Song button. The Save Song page<br />
appears.<br />
A-C (File, folder)<br />
Move the file or folder to be selected to the first line of the<br />
display. To select a file, press the F2 (Load) button. To open a<br />
folder, press the F3 (Open) button.<br />
The “ ” symbol identifies a folder.<br />
E-F (Scroll Up)<br />
Scroll the list up.<br />
G-H (Scroll Down)<br />
Scroll the list down.<br />
TEMPO/VALUE section<br />
These controls scroll the list up or down.<br />
F1 (Disk device)<br />
Selects a different disk device. Devices are selected in this<br />
order: HD ➛ FD ➛ HD…<br />
Device<br />
HD<br />
FD<br />
Type<br />
Hard disk<br />
Floppy disk<br />
F2 (Load)<br />
Load the Song at the first line of the display.<br />
F3 (Open)<br />
Opens the selected folder (file whose name begins with the<br />
“ ” symbol).<br />
F4 (Close)<br />
Closes the current folder, returning to the parent (“upper”)<br />
folder.<br />
SAVE SONG PAGE<br />
Load Song<br />
BALLADS |<br />
MYSONGS<br />
MYSONG.MID |<br />
FD LOAD OPEN CLOSE<br />
The new or edited Song is contained in RAM, and is lost<br />
when turning the instrument off. The Song is also lost when<br />
you overwrite it in Backing Sequence Record mode, or when<br />
switching to the Song Play mode. You must save on disk any<br />
Song you wish to preserve. The Song is saved as a Standard<br />
MIDI File (SMF).<br />
Note: When saving a Song as a SMF, an empty measure in<br />
automatically inserted to the beginning of the Song. This measure<br />
contains various Song initialization parameters.<br />
Save Song<br />
3. Move the folder where you wish to save your Song to the<br />
first line of the display, using the E-F (Scroll Up) and G-<br />
H (Scroll Down) VOLUME/VALUE buttons, or the<br />
TEMPO/VALUE controls. Press F3 (Open) to open it.<br />
Close the current folder by pressing F4 (Close).<br />
4. When in the selected folder, you can save the Song over<br />
an existing midifile (a file with a “.MID” extension), or<br />
create a new midifile.<br />
• To overwrite an existing midifile, move it to the first<br />
line of the display.<br />
• To create a new midifile, move the<br />
“NEW_NAME.MID” item to the first line of the display.<br />
5. When the “NEW_NAME.MID” item is selected, press<br />
one of the A VOLUME/VALUE buttons. You are<br />
prompted to assign a name to the new file:<br />
Move the cursor using the DOWN/- and UP/+ buttons.<br />
Select a character using the DIAL. Insert a character at<br />
the cursor position by pressing the INSERT button.<br />
Delete a character at the cursor position by pressing the<br />
DELETE button.<br />
6. When you have finished writing a name for the new<br />
midifile, press F2 (Save) to confirm. The “Are you sure?”<br />
message will appear. Press ENTER to confirm, or EXIT<br />
to abort.<br />
SONG RECORD PAGE<br />
NEW_NAME.MID<br />
MYSONGS<br />
MYSONG.MID |<br />
FD SAVE OPEN CLOSE<br />
NEW_NAME.MID<br />
While in the Song mode, press RECORD to enter the Song<br />
Record mode. The Song Record page appears.<br />
Rec:NewSong<br />
Rec:Overdub Trk:1 98%<br />
S: E: Metro:On1<br />
Resol:1/16 Meter:4/4<br />
Sel.Tempo Tempo:Auto<br />
Rec (Record mode)<br />
Set this parameter to select a recording mode.<br />
Overdub The newly recorded events will be mixed to any<br />
existing events.<br />
Overwrite The newly recorded events will replace any<br />
existing events.
Song Record mode<br />
How to record a Song<br />
12b-3<br />
Auto Punch Recording will automatically begin at the “S”<br />
position, and stop at the “E” position (see the<br />
following line).<br />
Note: The Auto Punch function will not work on<br />
an empty Song. At least one track must already<br />
be recorded.<br />
PedalPunch Recording will begin when pressing a pedal set<br />
to the “Punch In/Out” function, and will finish<br />
when pressing the same pedal again.<br />
Note: The Pedal Punch function will not work<br />
on an empty Song. At least one track must<br />
already be recorded.<br />
Trk (Track)<br />
Track in record.<br />
1…16 One of the 16 tracks selected. To select a track,<br />
go to the Track pages (see “Tracks 1-8 page” on<br />
page 12b-1 and “Tracks 9-16 page” on<br />
page 12b-1).<br />
S/E (Start/End)<br />
These parameters appear only when the “Auto Punch”<br />
recording mode is selected. They set the starting and ending<br />
points of the Punch recording.<br />
Metro (Metronome)<br />
This is the metronome heard during recording.<br />
Off No metronome click will be heard during<br />
recording. A one-bar precount will be played<br />
before starting recording.<br />
On1 Metronome on, with a one-bar precount<br />
before starting recording.<br />
On2 Metronome on, with a two-bar precount<br />
before starting recording.<br />
Resol (Resolution)<br />
Use this parameter to set the quantization during recording.<br />
Quantization is a way of correcting timing errors;<br />
notes played too soon or too later are moved to the nearest<br />
axis of a rhythmic “grid”, set with this parameter, thus<br />
playing perfectly in time.<br />
Hi No quantization applied.<br />
1/32…1/8 Grid resolution, in musical values. For<br />
example, when you select 1/16, all notes are<br />
moved to the nearest 1/16 division. When<br />
you select 1/8, all notes are moved to the<br />
nearest 1/8 division.<br />
No quantization<br />
middle of the Song, use the “Insert Measure” function (see<br />
page 12b-6).<br />
Sel.Tempo (Select Tempo)<br />
Select this parameter to use the TEMPO/VALUE controls to<br />
set the tempo.<br />
Note: You can always change the Tempo, when other parameters<br />
are selected, by keeping the SHIFT button pressed, and<br />
rotating the DIAL.<br />
Note: The tempo is always record in overwrite mode (old data is<br />
replaced by the new data).<br />
Tempo (Tempo mode)<br />
This parameter sets the way tempo events are read.<br />
Record All Tempo changes made during recording will<br />
be recorded into the Master Track.<br />
Auto The Sequencer plays back all recorded Tempo<br />
events. No new Tempo events are recorded.<br />
Manual The latest manual Tempo setting (made using<br />
the TEMPO/VALUE controls) is considered<br />
the current Tempo value. No Tempo change<br />
will be recorded. This is very useful to record<br />
the Song much slower than its actual Tempo.<br />
HOW TO RECORD A SONG<br />
Here is the general procedure to follow when recording a new<br />
Song.<br />
1. Press SONG to enter the Song mode.<br />
2. Press RECORD to enter the Song Record mode.You are<br />
now in the Main page of the Song Record mode, and<br />
you can prepare your recording. (For more details, see<br />
“Song Record page” on page 12b-2)<br />
Rec:NewSong<br />
Rec:Overdub Trk:1 98%<br />
S: E: Metro:On1<br />
Resol:1/16 Meter:4/4<br />
Sel.Tempo Tempo:Auto<br />
3. Set the tempo. There are two ways of changing tempo:<br />
• Keep the SHIFT button pressed, and use the TEMPO/<br />
VALUE controls to change the tempo.<br />
• Move the cursor to the “Sel.Tempo” parameter, and use<br />
the TEMPO/VALUE controls to change tempo.<br />
4. Press TRK SELECT to switch to the Song Tracks 1-8<br />
page.<br />
1/16<br />
1/8<br />
Meter<br />
This is the meter (or time signature) of the Song. You can edit<br />
this parameter only when the Song is empty, i.e. before you<br />
begin recording anything. To insert a meter change in the<br />
Rec:NewSong<br />
Piano1 Piano1<br />
DkStrings Guitar01<br />
Legato StrngEns2<br />
BrassyHorn VoxPad1
12b-4 Song Record mode<br />
Menu<br />
Press the button again to switch to the Song Tracks 9-16<br />
page.<br />
When in an edit page, press EXIT to go back to the main page<br />
of the Song operating mode.<br />
Rec:NewSong<br />
Strings1 VocaEns<br />
DkStrings Bassi<br />
Legato StrngEns2<br />
BrassyHorn Strings2<br />
Song Edit MENU<br />
Mixer/Tun. Transp/Vel<br />
Effects Del/Cut-Ins<br />
Track Edit Copy<br />
Quantize<br />
5. If you like, you can set the tempo again from these<br />
pages: just use the TEMPO/VALUE controls.<br />
6. Assign the right Program to each track.<br />
7. Select the track to put in record. Its status icon will automatically<br />
begin flashing.<br />
8. While the status icon is flashing, press PLAY/STOP to<br />
begin recording. Depending on the Metro option you<br />
selected, a 1- or 2-bars precount may play before the<br />
recording actually begins. When it begins, play freely.<br />
• If you selected the Auto Punch recording mode, the<br />
recording will begin only when reaching the Start point.<br />
• If you selected the Pedal Punch recording mode, press<br />
the pedal when you want to begin recording. Press it<br />
again to finish recording.<br />
Note: The Punch functions will not work on an empty<br />
Song. At least one track must already be recorded.<br />
9. When finished recording, press PLAY/STOP to stop the<br />
sequencer. Select a different track, and go on recording<br />
the whole Song.<br />
10. When finished recording the new Song, press RECORD<br />
to exit the Record mode. The Song will be saved in<br />
memory.<br />
Warning: Save the Song on a disk, to avoid it is lost when<br />
turning the instrument off.<br />
Note: When exiting the Record mode, the Octave Transpose<br />
is automatically reset to “0”.<br />
11. Edit the new Song; press the MENU page, and select the<br />
various edit pages.<br />
MENU<br />
The Menu has been changed from the previous release of the<br />
Operating System, to allow the insertion of new editing functions<br />
(under the Edit section).<br />
While in any page, press MENU to open the Song edit menu.<br />
This menu gives access to the various Song edit sections.<br />
When in the menu, select an edit section using the VOLUME/<br />
VALUE (A-H) buttons, select an edit page using PAGE +, or<br />
press EXIT to exit the menu.<br />
Each item in this menu corresponds to an edit section. Each<br />
edit section groups various edit pages.<br />
EDIT PAGE STRUCTURE<br />
Select an edit section from the Menu, and/or use the PAGE<br />
buttons to reach the desired page.<br />
Press EXIT to go back to the main page of the Song mode.<br />
All edit pages share the same structure.<br />
Song icon Page header Page number<br />
Mixer:Volume<br />
|||| 090 |||| 090<br />
|||| 090 |||| 092<br />
|||| 090 |||| 086<br />
|||| 090 ||||| 112<br />
Song icon<br />
When on, this icon indicates that the instrument is in Song<br />
mode.<br />
Page header<br />
The header shows the name of the current edit page. Usually<br />
the header is divided into a first word, identifying the section<br />
name (e.g., “Mixer:FX Send” is a “Mixer” section page), and a<br />
second word, referring to the page name (e.g. “FX Send”).<br />
Section name<br />
Track status icons<br />
Page name<br />
Edit:Quantize<br />
Page<br />
This area shows the current page number.<br />
A-H<br />
Each pair of VOLUME/VALUE buttons select a different<br />
track, parameter of command, depending on the edit page.<br />
Track status icons<br />
A series of icons near each track show the track’s status.<br />
(no icon)<br />
Selected track or parameter. When this symbol<br />
appears, you can execute any available operation<br />
on the selected item.<br />
Track in play or already recorded.<br />
The track is in mute, or does not contain data.
Song Record mode<br />
Pages 1-16<br />
12b-5<br />
PAGES 1-16<br />
Pages 1-16 remain unchanged. See the User’s Manual for<br />
more information.<br />
PAGE 17 - EDIT: QUANTIZE<br />
The quantize function corrects any rhythm error after<br />
recording.<br />
Edit:Quantize<br />
Trk:1<br />
Resol:1/32<br />
S001.01.000 E001.01.192<br />
Bottom:C-1 Top: G9<br />
After setting the various parameters, press ENTER to execute.<br />
The “Are you sure?” message will appear. Press ENTER to<br />
confirm, EXIT to abort.<br />
Trk (Track)<br />
Use this parameter to select a track.<br />
All All tracks selected.<br />
1…16 Selected track.<br />
Resol (Resolution)<br />
This parameter sets the quantization after recording. For<br />
example, when you select 1/8a, all notes are moved to the<br />
nearest 1/8 division. When you select 1/4, all notes are moved<br />
to the nearest 1/4 division.<br />
No quantization<br />
1/8<br />
1/4<br />
PAGE 18 - EDIT: TRANSPOSE<br />
Here you can transpose the Song, a track or a part of a track.<br />
Edit:Transpose<br />
Trk:1<br />
Value: +0<br />
S001-01-000 E001-01-192<br />
Bottom:G-1 Top:C8<br />
After setting the various parameters, press ENTER to execute.<br />
The “Are you sure?” message will appear. Press ENTER to<br />
confirm, EXIT to abort.<br />
Trk (Track)<br />
Use this parameter to select a track.<br />
All All tracks selected (apart for Drum tracks).<br />
1…16 Selected track.<br />
Value<br />
Value of the transpose (in semitones).<br />
S / E (Start/End)<br />
Use these parameters to set the starting (S) and ending (E)<br />
points of the range to transpose.<br />
If you wish to select a four-measure sequence starting at the<br />
beginning of the Song, the Start will be positioned at<br />
1.01.000, and the End at 5.01.000.<br />
Bottom / Top<br />
Use these parameters to set the bottom and top of the keyboard<br />
range to transpose. If you select the same note as the<br />
Bottom and Top parameters, you can select a single percussive<br />
instrument in a Drum track.<br />
PAGE 19 - EDIT: VELOCITY<br />
Here you can change the Velocity value for the notes.<br />
1/32…1/4 Grid resolution, in musical values. An “a” after<br />
the value means no swing. A “b…f” after the<br />
value means swing-quantization.<br />
S / E (Start/End)<br />
Use these parameters to set the starting (S) and ending (E)<br />
points of the range to quantize.<br />
If you wish to select a four-measure sequence starting at the<br />
beginning of the Song, the Start will be positioned at<br />
1.01.000, and the End at 5.01.000.<br />
Bottom / Top<br />
Use these parameters to set the bottom and top of the keyboard<br />
range to quantize. If you select the same note as the<br />
Bottom and Top parameters, you can select a single percussive<br />
instrument in a Drum track.<br />
Note: These parameters are available only when a Drum track<br />
is selected.<br />
Edit:Velocity<br />
Trk:1<br />
Value: +0<br />
S001-01-000 E001-01-192<br />
Bottom:G-1 Top:C8<br />
After setting the various parameters, press ENTER to execute.<br />
The “Are you sure?” message will appear. Press ENTER to<br />
confirm, EXIT to abort.<br />
Trk (Track)<br />
Use this parameter to select a track.<br />
All All tracks selected.<br />
1…16 Selected track.<br />
Value<br />
Velocity change value.<br />
S / E (Start/End)<br />
Use these parameters to set the starting (S) and ending (E)<br />
points of the range to edit.
12b-6 Song Record mode<br />
Page 20 - Edit: Delete<br />
If you wish to select a four-measure sequence starting at the<br />
beginning of the Song, the Start will be positioned at<br />
1.01.000, and the End at 5.01.000.<br />
Bottom / Top<br />
Use these parameters to set the bottom and top of the keyboard<br />
range to edit. If you select the same note as the Bottom<br />
and Top parameters, you can select a single percussive instrument<br />
in a Drum track.<br />
PAGE 20 - EDIT: DELETE<br />
This page is where you can delete MIDI events from the<br />
Song.<br />
Bottom / Top<br />
Use these parameters to set the bottom and top of the keyboard<br />
range to delete. If you select the same note as the Bottom<br />
and Top parameters, you can select a single percussive<br />
instrument in a Drum track.<br />
Note: These parameters are available only when the All or Note<br />
options are selected.<br />
PAGE 21 - EDIT: CUT MEASURES<br />
In this page you can cut measures from the Song.<br />
Edit:Cut Meas.<br />
Edit:Delete<br />
Trk:1<br />
Ev:All<br />
S001-01-000 E001-01-192<br />
Bottom:G-1 Top:C8<br />
After setting the various parameters, press ENTER to execute.<br />
The “Are you sure?” message will appear. Press ENTER to<br />
confirm, EXIT to abort.<br />
Trk (Track)<br />
Use this parameter to select a track.<br />
All All tracks selected.<br />
1…16 Selected track.<br />
Master Master track. This is where the Tempo, Scale<br />
and Effect events are recorded.<br />
Ev (Event)<br />
Type of MIDI event to delete.<br />
All All events. The measures will not be removed<br />
from the Song.<br />
Note All notes in the selected range.<br />
Dup.Note All duplicate notes. When two notes with the<br />
same pitch are encountered on the same tick,<br />
the one with the lowest velocity is deleted.<br />
A.Touch After Touch events.<br />
P.Bend Pitch Bend events.<br />
PrChange Program Change events, excluding the bundled<br />
Control Change #00 (Bank Select MSB)<br />
and #32 (Bank Select LSB).<br />
C.Change All Control Change events, for example Bank<br />
Select, Modulation, Damper, Soft Pedal…<br />
CC00/32…CC127<br />
Single Control Change events. Double Control<br />
Change numbers (like 00/32) are MSB/LSB<br />
bundles.<br />
S / E (Start/End)<br />
Use these parameters to set the starting (S) and ending (E)<br />
points of the range to delete.<br />
If you wish to select a four-measure sequence starting at the<br />
beginning of the Song, the Start will be positioned at<br />
1.01.000, and the End at 5.01.000.<br />
Start: 1<br />
After selecting the Start and Length parameters, press ENTER<br />
to execute. The “Are you sure?” message will appear. Press<br />
ENTER to confirm, EXIT to abort.<br />
After the cut, the following measure are moved back, to fill<br />
the cut measures.<br />
Start<br />
First measure where to begin cutting.<br />
Length<br />
Number of measures to be cut.<br />
PAGE 22 - EDIT: INSERT MEASURES<br />
In this page you can insert measures in the Song. You can also<br />
use this function to insert measures with a different meter<br />
(time signature).<br />
Meter: 4/4<br />
Start: 1<br />
After selecting the Meter, Start and Length parameters, press<br />
ENTER to execute. The “Are you sure?” message will appear.<br />
Press ENTER to confirm, EXIT to abort.<br />
Note: You cannot append measures after the end of the Song. To<br />
append measures use the Record or Copy function.<br />
Note: You cannot use this function on an empty Song.<br />
Meter<br />
Meter of the measures to be inserted.<br />
Start<br />
First of the inserted measures.<br />
Length:1<br />
Edit:Ins.Meas.<br />
Length:1<br />
Length<br />
Number of measures to be inserted.
Song Record mode<br />
Page 23 - Edit: Copy<br />
12b-7<br />
PAGE 23 - EDIT: COPY<br />
Here you can copy tracks or phrases.<br />
Edit:Copy<br />
Mode:Merge<br />
FromTrk:All ToTrk:All<br />
S:1 E:1 S:1 T1<br />
After setting the various parameters, press ENTER to execute.<br />
The “Are you sure?” message will appear. Press ENTER to<br />
confirm, EXIT to abort.<br />
Note: If you copy too many events on the same “tick”, the “Too<br />
many events!” message appears, and the copy operation is<br />
aborted.<br />
Mode<br />
Use this parameter to select the Copy mode.<br />
Merge<br />
Overwrite<br />
Copied data are merged with the data at the<br />
target position.<br />
Copied data replace all data at the target position.<br />
Warning: Deleted data cannot be recovered!<br />
FromTrk (From Track)<br />
ToTrk (To Track)<br />
Use these parameters to select the source and target track to<br />
copy.<br />
All All tracks. The target track cannot be selected.<br />
1…16 Selected source and target tracks.<br />
S/E<br />
The left “S/E” parameters are the starting and ending measure<br />
to copy. For example, if S=1 and E=4, the first four measures<br />
are copied.<br />
S<br />
The right “S” parameter is the first of the target measures.<br />
T<br />
Number of times the copy must be executed.
12b-8 Song Record mode<br />
Page 23 - Edit: Copy
Program operating mode<br />
Main page<br />
13-1<br />
13. PROGRAM <strong>OPERATING</strong> MODE<br />
The Program operating mode is where you can listen to<br />
individual Programs, and edit them.<br />
To select a Program, see the “Basic operations” chapter.<br />
In this mode, the selected Program can always be played<br />
across the full keyboard range.<br />
To automatically select the Program to be assigned to the<br />
last selected track, keep the SHIFT button pressed, and<br />
press the PROGRAM button.<br />
Hint: This is useful to see the Bank Select/Program Change<br />
numbers when programming a Song on an external sequencer.<br />
MAIN PAGE<br />
Here is the main page of the Program operating mode.<br />
Program icon<br />
Tempo<br />
GrandPiano<br />
Group:Piano<br />
MIDI CC00:121<br />
CC32:3<br />
PC: 0<br />
Page header<br />
Program icon<br />
When turned on, this icon shows that the instrument is in<br />
Program mode.<br />
Page header<br />
This line shows the selected Program name. Use the TEMPO/<br />
VALUE controls, or the PROGRAM/PERFORMANCE section<br />
to select a Program. (See “Selecting a Program” on<br />
page 6-3 for more information).<br />
Tempo<br />
This is the tempo of Sequencer 1. The Tempo is one of the<br />
AMSs (see “AMS (Alternate Modulation Source) list” on<br />
page 13-19). Use the SHIFT + DIAL combination to change<br />
it.<br />
A (Group)<br />
This non-editable parameter shows which group the Program<br />
is included into. A group is the equivalent of a PRO-<br />
GRAM/PERFORMANCE button.<br />
B (CC00)<br />
This non-editable parameter shows the value of the Control<br />
Change (CC) 00 message (or Bank Select MSB) for the<br />
selected Program.<br />
C (CC32)<br />
This non-editable parameter shows the value of the Control<br />
Change (CC) 32 message (a.k.a. Bank Select LSB) for the<br />
selected Program.<br />
D (PC)<br />
This non-editable parameter shows the value of the Program<br />
Change (PC) message for the selected Program. Values are in<br />
the standard 0-127 MIDI numbering format.<br />
Note: Some manufacturers could use the 1-128 numbering system;<br />
when connecting your <strong>PA80</strong> to an instrument of this kind,<br />
increment the PC value by 1 unit.<br />
Effects<br />
In Program mode, the Program exploits its own effects<br />
instead of relying on A-D effects. Two effect processors (FX1<br />
and FX2) are available.<br />
The MIDI channel<br />
In Program mode, <strong>PA80</strong> receives and transmits on the same<br />
channel of the Upper 1 track. If the Global channel is<br />
assigned, notes can be received also on this channel. See<br />
“Page 7 - MIDI IN Channels” on page 14-4 and “Page 11 -<br />
MIDI OUT Channels” on page 14-5 for more information.<br />
DIGITAL DRAWBARS PAGE<br />
DIGITAL DRAWBARS are different from normal Programs.<br />
Note: In Style Play and Backing Sequence mode, only a Digital<br />
Drawbar Program is available for the Realtime tracks, and one<br />
for the Style tracks. Save them into a Performance (see “The<br />
Write window” on page 9-4).<br />
Note: In Song Play mode, there is a Digital Drawbars Program<br />
for the Realtime tracks, one for Song tracks 1-8, another one for<br />
Song tracks 9-16.<br />
Note: In Song mode there is a Digital Drawbars Program for<br />
Song tracks 1-8, one for Song tracks 9-16.<br />
When you select the DIGITAL DRAWBARS bank, the Digital<br />
Drawbar page appears, and the current setting is assigned to<br />
the selected track.<br />
Drawbars<br />
|||||| 16' |||||| 2 2/3 '<br />
|||||| 5 1/3 ' |||||||| 2'<br />
|||||||| 8' ||||| 1 1/3 '<br />
|||||| 4' |||||||| 1'<br />
Use the VOLUME/VALUE (A-H) buttons to change each foot<br />
volume. Each foot refers to the pipe length in a pipe organ, in<br />
which the sound is produced by pipes of different length.<br />
Longer pipes mean a lower sound; therefore, the 16’ drawbar<br />
produces the lowest pitched sound, while the 1’ drawbar produces<br />
the highest pitched sound.
13-2 Program operating mode<br />
Sound Programs and Drum Programs<br />
Editing a Digital Drawbars Program<br />
When the Drawbars page is open, press PAGE+ to see the<br />
Drawbar Setting page.<br />
Drawbars setting<br />
Perc.:Off<br />
P.Length:3<br />
P.Vol.:127<br />
P.Mode:All<br />
NoisAtk:7<br />
DwWave:Vint<br />
MENU<br />
From any page, press MENU to open the Program edit menu.<br />
This menu gives access to the various Program edit sections.<br />
When in the menu, select an edit section using the VOLUME/<br />
VALUE (A-G) buttons, select an edit page using PAGE +, or<br />
press EXIT to exit the menu.<br />
When in an edit page, press EXIT to go back to the main page<br />
of the Program operating mode.<br />
Perc (Percussion)<br />
This parameter adds a percussive sound to the attack segment<br />
of the organ sound.<br />
Off No percussion.<br />
2 2 / 3 ’ Percussion added to the 2 2 / 3 ’ foot.<br />
4’ Percussion added to the 4’ foot.<br />
P.Length (Percussion Length)<br />
Decay speed of the percussive sound.<br />
0…99 Decay time.<br />
P.Vol. (Percussion Volume)<br />
Level of the percussive sound.<br />
0…99 Level.<br />
P.Mode (Percussion Mode)<br />
This parameters lets you decide if the percussion sound has<br />
to be triggered on the first note of a group of held notes, or to<br />
all notes.<br />
All The percussive attack is played on all notes of a<br />
chord.<br />
1st The percussive attack is played only on the fist<br />
note of a chord or a group of held notes.<br />
Release all notes to trigger the percussion<br />
again.<br />
NoiseAtk (Noise Attack)<br />
This parameter increases the noise component of the percussive<br />
attack.<br />
0…7 Level of the noise.<br />
DwWave (Drawbar Wave)<br />
Waveshape of the drawbars.<br />
Sine A simple sine wave.<br />
Vint A sample of the original tonewheel organ.<br />
SOUND PROGRAMS AND DRUM PROGRAMS<br />
Pa80 features two different kinds of Programs:<br />
• Sound Programs. These are normal instrument Programs,<br />
like pianos, strings, basses.<br />
• Drum Programs. These are drum and percussion kits,<br />
where each note of the keyboard is a different percussive<br />
instrument. You can find Drum Programs in the DRUM<br />
KIT and USER DK banks.<br />
Before pressing MENU to enter the edit environment, you<br />
should select a Program of the type you wish to edit or create.<br />
Notes pointing to special Drum Program features are marked<br />
by the icon.<br />
Prog Edit MENU<br />
Basic<br />
Samples<br />
Pitch<br />
Filter<br />
Each item in this menu corresponds to an edit section. Each<br />
edit section groups various edit pages.<br />
EDIT PAGE STRUCTURE<br />
Amp<br />
LFOs<br />
Effects<br />
Select an edit section from the Menu, and/or use the PAGE<br />
buttons to reach the desired page.<br />
Press EXIT to go back to the main page of the Program<br />
mode.<br />
All edit pages share the same structure.<br />
Program icon Page header Page number<br />
Parameters<br />
Samples<br />
|Osc1<br />
Selected: Osc1<br />
MS Hi Bank/Num: ROM<br />
L>AcousticPiano 0<br />
[H] Reverse: No<br />
Oscillator in edit<br />
Parameters value<br />
Program icon<br />
When switched on, this icon shows that the instrument is in<br />
Program mode.<br />
Page header<br />
The header shows the name of the current edit page.<br />
Oscillator in edit<br />
When in an edit page where selecting an oscillator is<br />
required, this area shows the selected oscillator. Use the F1-F4<br />
buttons to select one of the four available oscillators.<br />
Page number<br />
This area shows the current page number.<br />
Parameters<br />
Select an edit parameter using the A-D VOLUME/VALUE<br />
buttons. You can scroll the parameter list using the E-F<br />
(Scroll Up) and G-H (Scroll Down) VOLUME/VALUE buttons.
Program operating mode<br />
The Compare function<br />
13-3<br />
Parameter value<br />
Use the A-D VOLUME/VALUE buttons, or the TEMPO/<br />
VALUE controls, to change the parameter value.<br />
THE COMPARE FUNCTION<br />
While in edit, you can compare the current Program with its<br />
original values. You cannot edit the Program while you are in<br />
Compare mode.<br />
• Keep the SHIFT button pressed, and press ENTER to<br />
enter the Compare function. The PROGRAM LED<br />
begins flashing. Play on the keyboard to listen to the<br />
original Program.<br />
• Press SHITF + ENTER again to exit the Compare mode<br />
and return to the edited Program.<br />
HOW TO SELECT OSCILLATORS<br />
While in an edit page requiring an oscillator to be selected for<br />
editing, use the F1-F4 buttons to select one of the available<br />
oscillators.<br />
ERASE PROGRAM/OSCILLATOR<br />
You can initialize any parameter value, by using one of the<br />
following shortcuts:<br />
• While in the Basic page, keep the SHIFT button pressed,<br />
and press the DELETE button to initialize the whole<br />
Program to a default status.<br />
• While in an edit page where the “Osc” abbreviation<br />
appears in the upper right area of the display, keep the<br />
SHIFT button pressed, and press the DELETE button to<br />
initialize the currently selected oscillator to a default status<br />
After you press the shortcut, the “Init osc?” message appears.<br />
Press ENTER to confirm, EXIT to abort.<br />
THE ‘WRITE’ WINDOW<br />
This page appears when you press the WRITE button. Here<br />
you can save the Program into a User Program location in<br />
memory.<br />
WRITE to:<br />
Name: GrandPiano<br />
To: U1-01 <br />
1. Select a name and a location, then press ENTER to save<br />
the Program.<br />
2. The “Are you sure?” message appears. Press ENTER to<br />
confirm, or EXIT to abort.<br />
Warning: If you write over an existing User Program, the<br />
Program will be deleted and replaced by the one you are<br />
saving (“overwrite”). Please save on disk any Program you<br />
don’t want to lose.<br />
Name<br />
Use this parameter to change the Program’s name. Press the<br />
right A VOLUME/VALUE button to enter editing. Modify the<br />
name using the UP/DOWN buttons to move the cursor, and<br />
the DIAL to select a character. Press INSERT to insert a character<br />
at the cursor position, or DELETE to delete it<br />
To (Location number)<br />
Use the B VOLUME/VALUE buttons to select a different User<br />
Program location in memory. Otherwise, select this parameter<br />
and use the VOLUME/VALUE controls to select the location.<br />
Note: You can’t save over a Factory Program location.<br />
PAGE 1 - BASIC<br />
Here you can make basic settings for the Program, such as<br />
basic oscillator settings, the oscillator count, and the polyphonic<br />
mode.<br />
Oscillators<br />
Use this parameter to specify the basic Program type;<br />
whether it will use one or more oscillators (up to four).<br />
Drum Programs use only one oscillator.<br />
1…4 Number of oscillators the Program will use.<br />
The total amount of polyphony varies depending<br />
on the number of oscillators used by the<br />
Program (a maximum of 62 with only 1 oscillator,<br />
or a maximum of 15 with 4 oscillators).<br />
Mode<br />
This is the polyphonic mode of the Program.<br />
Poly The Program will play polyphonically, allowing<br />
you play chords.<br />
Mono The Program will play monophonically, producing<br />
only one note at a time.<br />
Single Trigger<br />
This parameter is available when the “Mode” parameter is set<br />
to Poly.<br />
Yes<br />
No<br />
When the same note is played repeatedly, the<br />
previous note will be silenced before the next<br />
note is sounded, so that the notes do not overlap.<br />
When the same note is played repeatedly, the<br />
previous note will not be silenced before the<br />
next note is sounded.<br />
Legato<br />
This parameter is available when the “Mode” parameter is set<br />
to Mono.<br />
Yes<br />
Basic<br />
Oascillators: 2<br />
Mode:<br />
Poly<br />
Single Trigger: No<br />
Legato:<br />
No<br />
Legato is on. When multiple note-on’s occur,<br />
the first note-on will retrigger the sound, and<br />
the second and subsequent note-on’s will not<br />
retrigger.
13-4 Program operating mode<br />
Page 2 - Sample (Sound Programs)<br />
When legato is on, multiple note-on’s will not<br />
retrigger the voice. If one note is already on<br />
and another note is turned on, the first voice<br />
will continue sounding. The oscillator sound,<br />
envelope, and LFO will not be reset, and only<br />
the pitch of the oscillator will be updated. This<br />
setting is effective for wind instrument sounds<br />
and analog synth-type sounds.<br />
No Legato is off. Notes will always be retriggered<br />
when note-on occurs.<br />
When legato is off, multiple note-on’s will<br />
retrigger the voice at each note-on. The oscillator<br />
sound, envelope, and LFO will be reset<br />
(and retriggered) according to the settings of<br />
the Program.<br />
Note: If “Legato” is On, certain multisamples or keyboard locations<br />
may produce an incorrect pitch.<br />
Priority<br />
This parameter is available when the “Mode” parameter is set<br />
to Mono. It specifies which note will be given priority to play<br />
when two or more notes are played simultaneously.<br />
Low Lowest note will take priority.<br />
High Highest note will take priority.<br />
Last Last note will take priority.<br />
PAGE 2 - SAMPLE (SOUND PROGRAMS)<br />
The multisample(s) (waveform) on which the Program will<br />
be based can be selected here for each of the four oscillators.<br />
Each oscillator can use 1 or 2 multisamples, each one<br />
assigned to the High or Low layer.<br />
Samples<br />
|Osc1<br />
Selected: Osc1<br />
MS Hi Bank/Num: ROM<br />
L>AcousticPiano 0<br />
[H] Reverse: No<br />
The internal Flash-ROM contains 340 different multisamples<br />
(preset multisamples). By selecting a CARD multisample,<br />
you can use a multisample read from the Card (if inserted in<br />
the slot).<br />
Selected<br />
Use this parameter to select an oscillator to put in edit. Alternatively,<br />
you can select oscillators using the F1-F4 buttons.<br />
MS Hi/Lo Bank/Num<br />
Use these parameters to select a different multisample for<br />
each of the High and Low layers. You can use velocity to<br />
switch between the two multisamples. Reverse, Offset and<br />
Level can be adjusted independently for the High and Low<br />
multisamples.<br />
The first line is where you select the bank (ROM or CARD),<br />
while the second line is for selecting the multisample. The<br />
Program number appears at the end of the second line.<br />
The multisample you select for the High layer will be triggered<br />
by velocities higher than the value of the “Velocity<br />
Switch” parameter (see page 13-4). If you do not wish to use<br />
velocity switching, set the switch to a value of 001, and select<br />
only the High multisample.<br />
ROM Select a preset multisample.<br />
CARD Select a Card multisample.<br />
Note: If you create a new Program based on a<br />
Card multisample, the card must be inserted<br />
before selecting the Program, or no sound will be<br />
heard.<br />
Note: Each multisample has an upper limit, and may not produce<br />
sound when played above that limit.<br />
[H/L] Reverse<br />
The multisample will be played in reverse. In the case of<br />
Flash-ROM or optional (CARD) multisamples that were<br />
originally specified to loop, the multisample will be played<br />
back in “one-shot” reverse mode. If the multisample was<br />
originally set to reverse, it will playback without change.<br />
Yes The multisample will playback in reverse.<br />
No The multisample will play back normally.<br />
[H/L] Use Offset<br />
These parameters specify the point where the multisample(s)<br />
will begin to play. For some multisamples this parameter will<br />
not be available.<br />
Yes The sound will begin from the offset location<br />
pre-determined for each multisample.<br />
No The sound will start from the beginning of the<br />
multisample waveform.<br />
[H/L] Level<br />
These parameters specify the level of each multisample.<br />
0…127 Multisample level.<br />
Note: Depending on the multisample, high settings of this<br />
parameter may cause the sound to distort when a chord is<br />
played. If this occurs, lower the level.<br />
Velocity Switch<br />
This is the velocity value dividing the High and Low layers for<br />
the selected oscillator. Notes struck harder than this value<br />
will be played by the High multisample.<br />
V-<strong>Zone</strong> Top/Bottom (Velocity <strong>Zone</strong>)<br />
Here you can specify the velocity range for the selected oscillator.<br />
Note: You cannot set the Bottom Velocity higher than the Top<br />
Velocity, nor the Top Velocity lower than the Bottom Velocity.<br />
0…127 Assigned velocity.<br />
Octave<br />
Use this parameter to adjust the pitch of the selected oscillator<br />
in octave units. The normal octave of the multisample is<br />
“0”.<br />
-2…+1 Octave transposition.<br />
Transpose<br />
Use this parameter to adjust the pitch of the selected oscillator<br />
in semitone steps over a range of ±1 octave.<br />
-12…+12 Transposition in semitones.<br />
Tune<br />
Use this parameter to adjust the pitch of the sample in onecent<br />
steps (a semitone is 100 cents) over a range of ±1 octave.<br />
-1200…+1200<br />
Fine-tune value in cents.
Program operating mode<br />
Page 2 - DK Samples (Drum Programs)<br />
13-5<br />
Delay (ms)<br />
This parameter sets a delay time from the note-on to the real<br />
beginning of the sound. With a setting of KeyOff, the sound<br />
will begin when note-off occurs. This is useful to create<br />
sounds such as the “click” that is heard when a harpsichord<br />
note is released. In this case, set the “Sustain Level” parameter<br />
to 0 (see page 13-12).<br />
Key Off The sound will begin when the note is released.<br />
0…5000 Delay time in milliseconds.<br />
PAGE 2 - DK SAMPLES (DRUM PROGRAMS)<br />
This page appears when you edit a Drum Program. Here you<br />
can select a different percussive sample for each layer (High<br />
and Low) on each key.<br />
DK Samples<br />
Key: C 2<br />
Assigned:<br />
Yes<br />
MS Hi Bank/Num: ROM<br />
BD-SoftRoom 4<br />
Key<br />
Key in edit. You can press a key on the keyboard to select a<br />
key.<br />
Assigned<br />
Use this parameter to turn the sample on/off.<br />
Yes The sample is assigned to the selected key.<br />
No The sample is not assigned. The sample<br />
assigned to the next highest assigned key is<br />
used instead.<br />
MS Hi/Lo Bank/Num<br />
Use these parameters to select a different multisample (drum<br />
kit) for each of the High and Low layers. For more information,<br />
see “MS Hi/Lo Bank/Num” on page 13-4.<br />
[H/L] Level<br />
These parameters specify the level of each multisample. For<br />
more information, see “[H/L] Level” on page 13-4.<br />
[H/L] Transpose<br />
These parameters transpose the selected multisample. Use<br />
them to change the pitch of the selected key.<br />
0 No transposition applied.<br />
-64…+63 Transpose value in semitones.<br />
[H/L] Tune<br />
Use these parameters to fine-tune the assigned sample.<br />
0 No fine-tuning.<br />
-99…+99 Fine-tuning value in cents (1/100 of a semitone).<br />
[H/L] Reverse<br />
The multisample will be played in reverse. For more information<br />
see “[H/L] Reverse” on page 13-4.<br />
[H/L] Use Offset<br />
These parameters specify the point where the multisample(s)<br />
will begin to play. For more information see “[H/L] Use Offset”<br />
on page 13-4.<br />
[H/L] Cutoff<br />
These parameters set the cutoff frequency for the filter<br />
applied to the selected sample.<br />
[H/L] Resonance<br />
These parameters set the resonance for the filter applied to<br />
the selected sample.<br />
[H/L] Attack<br />
These parameters are an offset to the selected sample’s EG<br />
Attack.<br />
[H/L] Decay<br />
These parameters are an offset to the selected sample’s EG<br />
Decay.<br />
Velocity Switch<br />
This is the velocity value dividing the High and Low layers for<br />
the selected sample/key. Notes stricken harder than this value<br />
will be played by the High multisample.<br />
Single Trigger<br />
Use this parameter to set the sample as a single-triggered one.<br />
Yes When the same key (note) is played repeatedly,<br />
the previous note will be stopped before the<br />
new note is triggered, so that they will not<br />
overlap.<br />
No When the same key (note) is played repeatedly,<br />
the previous note will not be stopped before<br />
the new note is triggered.<br />
Receive Note On<br />
Use this parameter to enable/disable the reception of the<br />
Note On (Key On) message.<br />
Yes The Note On message is normally received.<br />
No The Note On message is not received. Therefore,<br />
the corresponding key is muted.<br />
Receive Note Off<br />
Use this parameter to enable/disable the reception of the<br />
Note Off (Key Off) message.<br />
Yes The sound will stop as soon as you release the<br />
key.<br />
No The sound will continue playing up to the end<br />
of the sample. The Note Off message is<br />
ignored.<br />
Warning: If the “Single Trigger” parameter is set<br />
to No, and the sound is looped, the sound will<br />
play endlessly. In an “emergency” situation, use<br />
the Panic command (see “Panic command” on<br />
page B-2).<br />
Exclusive Group<br />
Exclusive Groups are sets of mutually exclusive keys, stopping<br />
each other. For example, if the Open Hi-Hat and Closed Hi-<br />
Hat are assigned the same Exclusive Group, playing an Open<br />
Hi-Hat will stop the Closed Hi-Hat playing.<br />
None No Exclusive Group assigned. The selected key<br />
will not be stopped by any other key.<br />
1…127 Exclusive Groups assigned to the selected key.<br />
When you play this key, all other keys assigned<br />
to the same Exclusive Group will be stopped,<br />
and this key will be stopped by other keys<br />
assigned to the same Exclusive Group.
13-6 Program operating mode<br />
Page 3 - Pitch<br />
Pan<br />
This parameter sets the position in the stereo panorama of<br />
the selected key.<br />
Send FX1<br />
This parameter sets the FX1 send level for of the selected key.<br />
Send FX2<br />
This parameter sets the FX2 send level for of the selected key.<br />
PAGE 3 - PITCH<br />
Here you can make pitch settings for each oscillator. These<br />
settings specify how keyboard location will affect the pitch of<br />
each oscillator, and select the controllers that will affect the<br />
oscillator pitch and specify the depth of control. You can also<br />
specify the amount of pitch change produced by the Pitch EG<br />
and by LFO1 and LFO2, switch portamento on/off and specify<br />
how it will apply.<br />
Selected<br />
Use this parameter to select an oscillator to put in edit. Alternatively,<br />
you can select oscillators using the F1-F4 buttons.<br />
Slope<br />
Normally you will leave this parameter at +1.0. Positive (+)<br />
values will cause the pitch to rise as you play higher notes,<br />
and negative (–) values will cause the pitch to fall as you play<br />
higher notes.<br />
With a value of 0, there will be no change in pitch, and the C4<br />
pitch will sound regardless of the keyboard location you play.<br />
The diagram shows how the Pitch Slope and pitch are related:<br />
-1.0…+<strong>2.0</strong><br />
Pitch<br />
2oct<br />
Selected: Osc1<br />
Slope: +1.0<br />
Joystick +X: +2<br />
Joystick -X: -2<br />
Pitch<br />
1oct<br />
1oct<br />
Pitch slope value.<br />
C4 C5<br />
|Osc1<br />
JS (+X)<br />
This parameter specifies how the pitch will change when the<br />
joystick is moved all the way to the right. A setting of 12 produces<br />
1 octave of change.<br />
For example if you set this to +12 and move the joystick all<br />
the way to the right, the pitch will rise one octave above the<br />
original pitch.<br />
-60…+12 Maximum pitch change in semitones.<br />
+2<br />
+1<br />
0<br />
–1<br />
Key<br />
JS (–X)<br />
This parameter specifies how the pitch will change when the<br />
joystick is moved all the way to the left. A setting of 12 produces<br />
1 octave of change.<br />
For example, if you set this to -60 and move the joystick all<br />
the way to the left, the pitch will fall five octaves below the<br />
original pitch. This can be used to simulate the downward<br />
swoops that a guitarist produces using the tremolo arm.<br />
-60…+12 Maximum pitch change in semitones.<br />
Pitch modulation<br />
AMS (Alternate Modulation Source)<br />
This parameter selects the source that will modulate the pitch<br />
of the selected oscillator. See “AMS (Alternate Modulation<br />
Source) list” on page 13-19.<br />
Intensity<br />
This parameter specifies the depth and direction of the effect<br />
produced by “AMS”. With a setting of 0, no modulation will<br />
be applied. With a setting of 1<strong>2.0</strong>0, the pitch will change up to<br />
one octave.<br />
For example, if you set “AMS” to After Touch and apply pressure<br />
to the keyboard, the pitch will rise if this parameter is set<br />
to a positive (+) value, or fall if this parameter is set to a negative<br />
(–) value. The range is a maximum of one octave.<br />
-1<strong>2.0</strong>0…+1<strong>2.0</strong>0<br />
Parameter value.<br />
Pitch EG modulation<br />
EG Intensity<br />
This parameter specifies the depth and direction of the modulation<br />
that the pitch EG specified on “Page 6 - Pitch EG” will<br />
apply to the pitch. With a setting of 1<strong>2.0</strong>0, the pitch will<br />
change a maximum of ±1 octave.<br />
-1<strong>2.0</strong>0…+1<strong>2.0</strong>0<br />
Parameter value.<br />
EG AMS (EG Alternate Modulation Source)<br />
This parameter selects the source that will modulate the pitch<br />
EG of the selected oscillator. See “AMS (Alternate Modulation<br />
Source) list” on page 13-19).<br />
Intensity (AMS Intensity)<br />
This parameter specifies the depth and direction of the effect<br />
that “AMS” will have. For example, if you set “AMS” to Velocity<br />
and set this value to +1<strong>2.0</strong>0, the velocity will control the<br />
range of pitch change produced by the pitch EG in a range of<br />
±1 octave. As you play more softly, the pitch change will draw<br />
closer to the pitch EG levels.<br />
Pitch change (level)<br />
Note-on<br />
Note-off<br />
Softly played<br />
(Intensity (Pitch EG) setting)<br />
Note-on<br />
Note-off<br />
Strongly played with<br />
a positive (+) value<br />
Note-on<br />
Note-off<br />
Strongly played with a<br />
negative (–) value<br />
Note: “Intensity” (Pitch EG) and AMS will be added to determine<br />
the depth and direction of the pitch modulation applied by<br />
the pitch EG.
Program operating mode<br />
Page 4 - Pitch LFO1<br />
13-7<br />
Portamento<br />
Portamento<br />
This parameter turns the portamento effect (smooth change<br />
in pitch from one note to the next) on/off, and specifies how<br />
it will be applied.<br />
Note: Portamento will also be switched when CC#65 (Portamento<br />
SW) is received.<br />
On Portamento will be applied.<br />
Off Portamento will not be applied.<br />
Portamento Time<br />
This parameter sets the portamento time. Increasing the<br />
value will produce a slower change in pitch.<br />
000…127 Portamento time in MIDI value.<br />
PAGE 4 - PITCH LFO1<br />
In this page you can set the LFO1 modulation parameters for<br />
the selected oscillator.<br />
be applied. With a setting of 1<strong>2.0</strong>0, the OSC1 LFO1 will apply<br />
a maximum of ±1 octave of pitch modulation. Negative (–)<br />
settings will invert the LFO waveform.<br />
For example if “AMS” is set to After Touch and you apply<br />
pressure to the keyboard, a positive (+) setting of this parameter<br />
will cause the pitch modulation created by LFO1 to be<br />
applied with the normal phase, and a negative (–) setting will<br />
cause the LFO to be applied with inverted phase.<br />
The “LFO1 Intensity”, “JS+Y” and “AMS” settings will be<br />
added to determine the depth and direction of the pitch<br />
modulation applied by LFO1.<br />
-1<strong>2.0</strong>0…+1<strong>2.0</strong>0<br />
Parameter value.<br />
PAGE 5 - PITCH LFO2<br />
In this page you can set the LFO2 modulation parameters for<br />
the selected oscillator. See “Page 4 - Pitch LFO1” for information<br />
on the various parameters.<br />
Pitch LF01 |Osc1<br />
Selected: Osc1<br />
Intensity: 0.00<br />
Joystick +Y: +0.07<br />
AMS<br />
ChannelAT<br />
Pitch LF02 |Osc1<br />
Selected: Osc1<br />
Intensity: 0.00<br />
Joystick +Y: +0.07<br />
AMS<br />
ChannelAT<br />
Selected<br />
Use this parameter to select an oscillator to put in edit. Alternatively,<br />
you can select oscillators using the F1-F4 buttons.<br />
Intensity<br />
This parameter specifies the depth and direction of the pitch<br />
modulation applied by the LFO1 settings you made on “Page<br />
17 - LFO1”. With a setting of 1<strong>2.0</strong>0, a maximum of ±1 octave<br />
of pitch modulation will be applied. Negative (–) values will<br />
invert the LFO waveform.<br />
-1<strong>2.0</strong>0…+1<strong>2.0</strong>0<br />
Intensity depth and direction.<br />
JS+Y (JoyStick +Y)<br />
This parameter specifies the depth and direction of the effect<br />
that joystick movement in the +Y direction (away from yourself)<br />
will have on the pitch modulation applied by the LFO1.<br />
As this value is increased, moving the joystick in the +Y<br />
direction will cause the LFO1 to produce deeper pitch modulation.<br />
With a setting of 1<strong>2.0</strong>0 a maximum of ±1 octave of<br />
pitch modulation will be applied. Negative (–) values will<br />
invert the LFO waveform.<br />
-1<strong>2.0</strong>0…+1<strong>2.0</strong>0<br />
Joystick action depth.<br />
Pitch LFO1 ‘Level’ modulation<br />
AMS (Alternate Modulation Source)<br />
This parameter selects the source that will control the depth<br />
of pitch modulation produced by the OSC1 LFO1. See “AMS<br />
(Alternate Modulation Source) list” on page 13-19.<br />
Intensity<br />
This parameter specifies the depth and direction of the effect<br />
that “AMS” will have. With a setting of 0, modulation will not<br />
PAGE 6 - PITCH EG<br />
Here you can make settings for the pitch EG, which creates<br />
time-variant changes in the pitch of the oscillators. The depth<br />
of pitch change produced by these EG settings on the oscillators<br />
is adjusted by the “Intensity (AMS1/2 Intensity)” parameter<br />
(see page 13-8).<br />
Pitch envelope<br />
Pitch EG<br />
Start Level: +0<br />
Attack Time: 39<br />
Attack Level: +0<br />
Decay Time: 0<br />
Time-varying pitch settings (when Pitch EG Intensity = +1<strong>2.0</strong>0)<br />
+99 = approximately 1 octave Attack Level<br />
Note-on<br />
Note-off<br />
0 = pitch when<br />
key is held<br />
(sustained)<br />
Start Level<br />
Attack<br />
Time<br />
–99 = approximately 1 octave<br />
Decay<br />
Time<br />
Release Time<br />
Time<br />
Release Level<br />
Start/Attack/Decay/Release Level<br />
These parameters specify the amount of pitch change. The<br />
actual amount of pitch change will depend on the “Intensity<br />
(AMS1/2 Intensity)” parameter (see below). For example,<br />
with an “Intensity” setting of +1<strong>2.0</strong>0, a “Level” setting of +99
13-8 Program operating mode<br />
Page 6 - Pitch EG<br />
would raise the pitch one octave, and a “Level” setting of –99<br />
would lower the pitch one octave.<br />
-99…+99 Parameter value.<br />
Start Level<br />
Specifies the amount of pitch change at note-on.<br />
Attack Level<br />
Specifies the amount of pitch change when the attack time<br />
has elapsed.<br />
Release Level<br />
Specifies the amount of pitch change when the release time<br />
has elapsed.<br />
Attack/Decay/Release Time<br />
These parameters specify the time over which the pitch<br />
change will occur.<br />
0…99 Parameter value.<br />
Attack Time<br />
Specifies the time over which the pitch will change from<br />
note-on until it reaches the pitch specified as the attack level.<br />
Decay Time<br />
Specifies the time over which the pitch will change after<br />
reaching the attack level until it reaches the normal pitch.<br />
Release Time<br />
Specifies the time over which the pitch will change from<br />
note-off until it reaches the pitch specified as the release level.<br />
Pitch EG ‘Level’ modulation<br />
Pitch EG change (level) (AMS=JS-Y/Velocity, Intensity= positive (+) value<br />
Note-on<br />
Note-on<br />
Note-on<br />
Note-off<br />
Note-off<br />
A note played softly with<br />
Start Level Swing set at 0,<br />
Attack Level Swing set to +,<br />
the Joystick pulled on<br />
A note played strongly with<br />
Start Level Swing set to 0,<br />
Attack Level Swing set to +,<br />
the Joystick pulled on<br />
Note-off<br />
A note played strongly with<br />
Start Level Swing set to 0,<br />
Attack Level Swing set to –,<br />
the Joystick pulled on<br />
AMS1/2 (L) (Alternate Modulation Source 1/2)<br />
These parameters select the source that will control the pitch<br />
EG “Level” parameters (“AMS (Alternate Modulation<br />
Source) list” on page 13-19).<br />
Intensity (AMS1/2 Intensity)<br />
These parameters specify the depth and direction of the effect<br />
applied by “AMS1”. With a setting of 0, the levels specified by<br />
“Start/Attack/Decay/Release Level” will be used.<br />
For example if “AMS1” is After Touch, pressing the keys to<br />
turn it on will change the “Level” parameters of the Pitch EG.<br />
As the absolute value of “Intensity” is increased, the pitch EG<br />
levels will change more greatly when the key pressure is<br />
released. The direction of the change is specified by “Start<br />
Level Swing” and “Attack Level Swing”. When the key pressure<br />
is released, the pitch EG levels will return to their own<br />
settings.<br />
If “AMS1” is set to Velocity, increasing the absolute value of<br />
“Intensity” will produce increasingly wider change in pitch<br />
EG levels for strongly-played notes. The direction of the<br />
change is specified by “Start Level Swing” and “Attack Level<br />
Swing”. As you play more softly, the pitch change will draw<br />
closer to the pitch EG levels.<br />
-99…+99 Parameter value.<br />
Start Level Swing<br />
This parameter specifies the direction of change in “Start<br />
Level” caused by “AMS1/2”. If “Intensity” is a positive (+)<br />
value, a setting of + will raise the EG level, and a setting of –<br />
will decrease it. With a setting of 0 there will be no change.<br />
Attack Level Swing<br />
This parameter specifies the direction of change in “Attack<br />
Level” caused by “AMS1/2”. If “Intensity” is a positive (+)<br />
value, a setting of + will raise the EG level, and a setting of –<br />
will decrease it. With a setting of 0 there will be no change.<br />
Pitch EG ‘Time’ modulation<br />
Pitch EG changes (Time) (AMS = Velocity, Intensity = positive (+) value)<br />
Note-on<br />
Note-on<br />
Note-on<br />
Note-off<br />
Note-off<br />
A note played softly with Attack<br />
Time Swing set to + and<br />
Decay Time Swing set to +<br />
Note-off<br />
A note played strongly with<br />
Attack Time Swing set to + and<br />
Decay Time Swing set to +<br />
A note played strongly with<br />
Attack Time Swing set to – and<br />
Decay Time Swing set to –<br />
AMS(T) (Alternate Modulation Source)<br />
This parameter selects the source that will control the “Time”<br />
parameters of the pitch EG (see “AMS (Alternate Modulation<br />
Source) list” on page 13-19).<br />
Intensity (AMS(T) Intensity)<br />
This parameter specifies the depth and direction of the effect<br />
that “AMS” will have on the “Time” parameters. With a setting<br />
of 0, the pitch EG times will be just as specified by the<br />
“Attack/Decay/Release Time” settings.<br />
The alternate modulation value at the moment that the EG<br />
reaches each point will determine the actual value of the EG<br />
time that comes next.<br />
For example, the decay time will be determined by the alternate<br />
modulation value at the moment that the attack level is<br />
reached.<br />
When this parameter is set to values of 16, 33, 49, 66, 82, or<br />
99, the specified EG times will speed up as much as 2, 4, 8, 16,<br />
32, or 64 times respectively (or slowed down to 1/2, 1/4, 1/8,<br />
1/16, 1/32, or 1/64 of the original time).<br />
For example if “AMS” is set to Velocity, increasing the absolute<br />
value of “Intensity” will allow strongly-played notes to<br />
increase the changes in pitch EG “Time” values. The direction<br />
of the change is specified by “Attack Time Swing” and<br />
“Decay Time Swing”. As you play more softly, the pitch EG<br />
times will more closely approach the actual settings of the<br />
pitch EG.<br />
-99…+99 Parameter value.<br />
Attack Time Swing<br />
This parameter specifies the direction in which “AMS” will<br />
affect the “Attack Time” parameter. With positive (+) values<br />
of “Intensity”, a setting of + will cause the time to be lengthened,<br />
and a setting of – will cause the time to be shortened.<br />
With a setting of 0 there will be no change.<br />
Decay Time Swing<br />
Specify the direction in which “AMS” will affect the “Decay<br />
Time”. With positive (+) values of “Intensity”, a setting of +<br />
will cause the time to be lengthened, and a setting of – will<br />
cause the time to be shortened. With a setting of 0 there will<br />
be no change.
Program operating mode<br />
Page 7 - Filter<br />
13-9<br />
PAGE 7 - FILTER<br />
Here you can make settings for the filters that will be used by<br />
the oscillators. You can select either a 24 dB/octave low pass<br />
filter with resonance, or a series connection of a 12 dB/octave<br />
low pass filter and a 12 dB/octave high pass filter.<br />
Resonance modulation<br />
The effect of resonance<br />
Low Pass<br />
Level<br />
Low resonance value<br />
High resonance value<br />
Filter<br />
|Osc1<br />
Selected: Osc1<br />
Type: LPF Resonant<br />
Trim: 99<br />
Frequency A: 7<br />
Selected<br />
Use this parameter to select an oscillator to put in edit. Alternatively,<br />
you can select oscillators using the F1-F4 buttons.<br />
Filter Type<br />
This parameter selects the type of filter (Low Pass Resonant,<br />
Low Pass & High Pass) for the selected oscillator. When the<br />
Low Pass & High Pass filter type is selected, the filter B will be<br />
activated.<br />
Low Pass Resonance: 24 dB/octave low<br />
pass filter with resonance<br />
Low Pass & High Pass: 12 dB/octave<br />
low pass filter and 12 dB/octave high pass<br />
filter in series<br />
Trim<br />
Use this parameter to adjust the level at which the audio signal<br />
output from the selected oscillator is input to filter A.<br />
Note: If this value is raised, the sound may distort if Resonance<br />
is set to a high value or when you play a chord.<br />
00…99 Trim level.<br />
Frequency A (Cutoff Frequency A)<br />
This parameter specifies the cutoff frequency of filter A.<br />
Level<br />
Low Pass<br />
12dB/oct<br />
24dB/oct<br />
Frequency<br />
This is a filter that cuts the highfrequency<br />
region above the cutoff<br />
frequency.<br />
This is the most common type of filter,<br />
and is used to cut part of the overtone<br />
components, making an originally bright<br />
timbre sound more mellow (darker).<br />
When the “Filter Type” is Low Pass<br />
Resonance, the cutoff will have a<br />
steeper slope.<br />
00…99 Cutoff frequency value.<br />
Resonance A<br />
The resonance emphasizes the overtone components that lie<br />
in the region of the cutoff frequency specified by “Frequency”,<br />
producing a more distinctive sound. Increasing this value will<br />
produce a stronger effect.<br />
00…99 Resonance value.<br />
AMS (Alternate Modulation Source)<br />
Selects the source that will control the “Resonance” level. See<br />
“AMS (Alternate Modulation Source) list” on page 13-19.<br />
Intensity (AMS Intensity)<br />
This parameter specifies the depth and direction of the effect<br />
that “AMS (Alternate Modulation Source)” will have on the<br />
resonance level specified by “Resonance A”.<br />
For example if Velocity has been selected, changes in keyboard<br />
velocity will affect the resonance.<br />
With positive (+) values, the resonance will increase as you<br />
play more strongly, and as you play more softly the resonance<br />
will approach the level specified by the “Resonance” setting.<br />
With negative (–) values, the resonance will decrease as you<br />
play more strongly, and as you play more softly the resonance<br />
will approach the level specified by the “Resonance” setting.<br />
The resonance level is determined by adding the “Resonance”<br />
and “Intensity (AMS Intensity)” values.<br />
-99…+99 Parameter value.<br />
Filter B<br />
Frequency B (Cutoff Frequency B)<br />
This parameter specifies the cutoff frequency of filter B. This<br />
parameter will be displayed when “Filter Type” is set to Low<br />
Pass & High Pass.<br />
Level<br />
High Pass<br />
12dB/oct<br />
Frequency<br />
00…99 Cutoff frequency value.<br />
PAGE 8 - FILTER MODULATION<br />
This filter cuts the low-frequency range that<br />
lies below the cutoff frequency. By cutting<br />
the lower overtones, it lightens the tone.<br />
These settings let you apply modulation to the cutoff frequency<br />
(“Frequency”) of the filter for the selected oscillator<br />
to modify the tone.<br />
Filter Mod |Osc1<br />
Selected: Osc1<br />
Tracking Low: B 3<br />
Tracking High: F 5<br />
Ramp Low: +48<br />
When “Filter Type” is Low Pass Resonance, parameters for<br />
filter B will not be editable (greyed out).<br />
Selected<br />
Use this parameter to select an oscillator to put in edit. Alternatively,<br />
you can select oscillators using the F1-F4 buttons.
13-10 Program operating mode<br />
Page 8 - Filter Modulation<br />
Filter keyboard tracking<br />
Tracking Low/High<br />
These settings specify keyboard tracking for the cutoff frequency<br />
of the filter for the selected oscillator. The way in<br />
which the cutoff frequency is affected by the keyboard location<br />
you play can be specified by the “Tracking Low”, “Tracking<br />
High”, “Ramp Low” and “Ramp High” parameters.<br />
C–1…G9 Lowest/Highest note in the range.<br />
Tracking Low<br />
Keyboard tracking will apply to the range below the specified<br />
note number.<br />
Tracking High<br />
Keyboard tracking will apply to the range above the specified<br />
note number.<br />
Ramp<br />
This parameter specifies the angle of keyboard tracking.<br />
-99…+99 Angle value.<br />
Here is how cutoff frequency is affected by keyboard location<br />
and the Ramp setting (“Intensity to A” and “Intensity to B” =<br />
+50):<br />
Cutoff frequency<br />
Low Ramp=+99<br />
Low Ramp=+43<br />
Low Ramp=0<br />
Low Ramp=–62<br />
Low Ramp=–99<br />
Low Key<br />
High Key<br />
High Ramp=+99<br />
High Ramp=+62<br />
High Ramp=0<br />
High Ramp=–43<br />
High Ramp=–99<br />
Ramp Low<br />
Ramp High<br />
If “Intensity to A” and “Intensity to B” are set to +50, “Ramp<br />
Low” is set to –62 and “Ramp High” is set to +62, the angle of<br />
the change in cutoff frequency will correspond to the keyboard<br />
location (pitch). This means that the oscillation that<br />
occurs when you increase the “Resonance A” will correspond<br />
to the keyboard location.<br />
If you set “Ramp Low” to +43 and “Ramp High” to –43, the<br />
cutoff frequency will not be affected by keyboard location.<br />
Use this setting when you do not want the cutoff frequency to<br />
change for each note.<br />
Tracking to A/B<br />
These parameters specify the note numbers at which keyboard<br />
tracking will begin to apply, and set the “Intensity to A”<br />
and “Intensity to B” parameters to specify the depth and<br />
direction of the change applied to filters A and B.<br />
For the range of notes between “Key Low” and “Key High”,<br />
the cutoff frequency will change according to the keyboard<br />
location (pitch).<br />
-99…+99 Parameter value.<br />
Key<br />
Filter EG modulation<br />
Changes in cutoff frequency<br />
Note-on<br />
Softly played<br />
Note-off<br />
Note-on<br />
Note-off<br />
Strongly played<br />
Setting to +<br />
Note-on<br />
Note-off<br />
Strongly played<br />
Setting to –<br />
Velocity to A<br />
This parameter specifies the depth and direction of the effect<br />
that velocity will have on the time-varying changes created by<br />
the filter EG (as set on “Page 11 - Filter EG”) to control the<br />
filter A cutoff frequency.<br />
With positive (+) values, playing more strongly will cause the<br />
filter EG to produce greater changes in cutoff frequency. With<br />
negative (–) values, playing more strongly will also cause the<br />
filter EG to produce greater changes in cutoff frequency, but<br />
with the polarity of the EG inverted.<br />
99…+99 Value of the Velocity to A parameter.<br />
Velocity to B<br />
This parameter specifies the depth and direction of the effect<br />
that velocity will have on the time-varying changes created by<br />
the filter EG to control the filter B cutoff frequency (see<br />
“Velocity to A”).<br />
99…+99 Value of the Velocity to B parameter.<br />
EG Intensity to A<br />
Specifies the depth and direction of the effect that the timevarying<br />
changes created by the filter 1 EG will have on the filter<br />
A cutoff frequency.<br />
With positive (+) settings, the sound will become brighter<br />
when the EG levels set by Filter EG “Level” and “Time”<br />
parameters are in the “+” area, and darker when they are in<br />
the “–” area.<br />
With negative (–) settings, the sound will become darker<br />
when the EG levels set by Filter EG “Level” and “Time”<br />
parameters are in the “+” area, and brighter when they are in<br />
the “–” area.<br />
-99…+99 Parameter value.<br />
EG Intensity to B<br />
Specifies the depth and direction of the effect that the timevarying<br />
changes created by the filter EG will have on the filter<br />
B cutoff frequency (see “EG Intensity to A”).<br />
-99…+99 Parameter value.<br />
EG AMS (Alternate Modulation Source)<br />
Selects the source that will control the depth and direction of<br />
the effect that the time-varying changes produced by the filter<br />
EG will have on the cutoff frequency of filters A and B. See<br />
“AMS (Alternate Modulation Source) list” on page 13-19.<br />
Intensity to A<br />
Specifies the depth and direction of the effect that “AMS” will<br />
have on filter 1A. For details on how this will apply, refer to<br />
“EG Intensity to A”.<br />
Intensity to B<br />
Specifies the depth and direction of the effect that “AMS” will<br />
have on filter B. For details on how this will apply, refer to<br />
“EG Intensity to A”.
Program operating mode<br />
Page 9 - Filter LFO1<br />
13-11<br />
Note: The sum of the settings for “Velocity to A/B”, “Intensity to<br />
A/B”, and “(AMS) Intensity to A/B” will determine the depth<br />
and direction of the effect produced by the filter EG.<br />
Filter A/B modulation<br />
AMS1(fA/B) (Alternate Modulation Source1 for filter A/B)<br />
Selects the source that will control modulation of the filter 1A<br />
cutoff frequency. See “AMS (Alternate Modulation Source)<br />
list” on page 13-19.<br />
Note: The filter B parameters will be displayed when “Filter<br />
Type” on page 13-9 is Low Pass & High Pass.<br />
Intensity<br />
Specifies the depth and direction of the effect that “AMS1”<br />
will have.<br />
When “AMS1” is JS X, a positive (+) value for this parameter<br />
will cause the cutoff frequency to rise when the joystick is<br />
moved toward the right, and fall when the joystick is moved<br />
toward the left. With a negative (–) value for this parameter,<br />
the opposite will occur.<br />
This value is added to the setting of the Filter A “Frequency”.<br />
AMS2 (Alternate Modulation Source2)<br />
Selects the source that will control modulation of the filter A<br />
cutoff frequency (see “AMS (Alternate Modulation Source)<br />
list” on page 13-19).<br />
Intensity<br />
Specifies the depth and direction of the effect that the<br />
selected source will have (see “Intensity” on page 13-11).<br />
PAGE 9 - FILTER LFO1<br />
Here you can use the filter LFO to apply cyclic modulation to<br />
the cutoff frequency of the filter (for the selected oscillator)<br />
to create cyclical changes in tone.<br />
Filter LFO1|Osc1<br />
Selected: Osc1<br />
Intensity to A: +0<br />
Intensity to B: +0<br />
Joystick -Y to A: +5<br />
Selected<br />
Use this parameter to select an oscillator to put in edit. Alternatively,<br />
you can select oscillators using the F1-F4 buttons.<br />
Intensity to A<br />
Specifies the depth and direction of the modulation that<br />
LFO1 (set on “Page 17 - LFO1”) will have on the cutoff frequency<br />
of filter A. Negative (–) settings will invert the phase.<br />
-99…+99 Parameter value.<br />
Intensity to B<br />
Specify the depth and direction of the modulation that LFO1<br />
will have on the cutoff frequency of filter B (see “Intensity to<br />
A”).<br />
-99…+99<br />
Change in cutoff<br />
Low setting<br />
Parameter value.<br />
Joystick –Y to A<br />
By moving the joystick in the Y direction (toward yourself),<br />
you can control the depth at which LFO1 modulates the cutoff<br />
frequency of filter A. This parameter specifies the depth<br />
and direction of the control.<br />
Higher settings of this parameter will produce greater<br />
increases in the effect of LFO1 on the filter when the joystick<br />
is moved toward yourself.<br />
-99…+99 Parameter value.<br />
Joystick –Y to B<br />
By moving the joystick in the Y direction (toward yourself),<br />
you can control the depth at which LFO1 modulates the cutoff<br />
frequency of filter B. This parameter specifies the depth<br />
and direction of the control (see “Joystick –Y to A”).<br />
Filter LFO1 modulation<br />
AMS (Alternate Modulation Source)<br />
Select a source that will control the depth and direction of<br />
cutoff frequency change for both filters A and B. See “AMS<br />
(Alternate Modulation Source) list”.<br />
Intensity to A<br />
Specifies the depth and direction of the effect that “AMS” will<br />
have on filter A.<br />
For example if “AMS” is After Touch, higher settings of this<br />
parameter will allow greater change to be applied to LFO1<br />
when you apply pressure to the keyboard.<br />
-99…+99 Parameter value.<br />
Intensity to B<br />
Specifies the depth and direction of the effect that “AMS” will<br />
have on filter B (see “Intensity to A”).<br />
PAGE 10 - FILTER LFO2<br />
High setting<br />
Adjusts the depth of the cyclic modulation applied by LFO2<br />
(set on “Page 18 - LFO2”) to the cutoff frequency of filters A<br />
and B. For more information on the parameters see “Page 9 -<br />
Filter LFO1” on page 13-11.<br />
Filter LFO2|Osc1<br />
Selected: Osc1<br />
Intensity to A: +0<br />
Intensity to B: +0<br />
Joystick -Y to A: +5
13-12 Program operating mode<br />
Page 11 - Filter EG<br />
PAGE 11 - FILTER EG<br />
Here you can make settings for the EG that will produce<br />
time-varying changes in the cutoff frequency of filters A and<br />
B for the selected oscillator. The depth of the effect that these<br />
settings will have on the filter cutoff frequency is determined<br />
by the “Velocity” and “Intensity” parameters.<br />
FilterEG |Osc1<br />
Selected: Osc1<br />
Start Level: +99<br />
Attack Time: 73<br />
Attack Level: +95<br />
Attack Time<br />
This parameter specifies the time over which the level will<br />
change from note-on until the attack level is reached.<br />
Decay Time<br />
This parameter specifies the time over which the level will<br />
change from the attack level to the break point level.<br />
Slope Time<br />
This parameter specifies the time over which the level will<br />
change after the decay time has elapsed until the sustain level<br />
is reached.<br />
Release Time<br />
This parameter specifies the time over which the level will<br />
change after note-on occurs until the release level is reached.<br />
Selected<br />
Use this parameter to select an oscillator to put in edit. Alternatively,<br />
you can select oscillators using the F1-F4 buttons.<br />
Filter envelope<br />
Filter EG ‘Level’ modulation<br />
Filter 1 EG changes (level) (AMS = Velocity, Intensity = a positive (+) value)<br />
Note-on<br />
Note-on<br />
Note-on<br />
Note-off<br />
Note-off<br />
Note-off<br />
The specified<br />
cutoff<br />
frequency<br />
Start<br />
Level<br />
Attack Level<br />
Note-on<br />
Attack<br />
Time<br />
Break<br />
Point<br />
Level<br />
Decay<br />
Time<br />
Note-off<br />
Sustain Level<br />
Slope<br />
Time<br />
Release<br />
Time<br />
Release<br />
Level<br />
Start/Attack/Break/Sustain/Release Level<br />
These are the envelope segment levels. The result will depend<br />
on the filter that was selected in “Filter Type”. For example,<br />
with the Low Pass Resonance filter, positive (+) values of EG<br />
Intensity will cause the tone to be brightened by positive (+)<br />
levels, and darkened by negative (–) levels.<br />
-99…+99 Level value.<br />
Start Level<br />
This parameter specifies the change in cutoff frequency at the<br />
time of note-on.<br />
Attack Level<br />
This parameter specifies the change in cutoff frequency after<br />
the attack time has elapsed.<br />
Break Point Level<br />
This parameter specifies the change in cutoff frequency after<br />
the decay time has elapsed.<br />
Sustain Level<br />
This parameter specifies the change in cutoff frequency that<br />
will be maintained from after the slope time has elapsed until<br />
note-off occurs.<br />
Release Level<br />
This parameter specifies the change in cutoff frequency that<br />
will occur when the release time has elapsed.<br />
Attack/Decay/Slope/Release Time<br />
These parameters specify the time over which the filter<br />
change will occur.<br />
0…99 Time value.<br />
Time<br />
Softly played note with Start Level<br />
Swing, Attack Level Swing, and<br />
Break Level Swing set to +<br />
Strongly played note with Start<br />
Level Swing, Attack Level Swing,<br />
and Break Level Swing set to +<br />
Strongly played note with Start<br />
Level Swing, Attack Level Swing,<br />
and Break Level Swing set to –<br />
AMS(L) (Alternate Modulation Source)<br />
This parameter selects the source that will control the “Level”<br />
parameters of the filter EG (“AMS (Alternate Modulation<br />
Source) list” on page 13-19).<br />
Intensity (AMS Intensity)<br />
This parameter specifies the depth and direction of the effect<br />
applied by “AMS”. With a setting of 0, the levels specified by<br />
“Frequency A (Cutoff Frequency A)” will be used.<br />
For example, if “AMS” is Velocity, and you set “Start Level<br />
Swing”, “Attack Level Swing” and “Break Level Swing” to +<br />
and set “Intensity” to a positive (+) value, the EG levels will<br />
rise as you play more strongly. If “Intensity” is set to a negative<br />
(–) values, the EG levels will fall as you play more<br />
strongly.<br />
-99…+99 Intensity value.<br />
Start Level Swing<br />
This parameter specifies the direction in which “AMS” will<br />
affect “Start Level”. When “Intensity” has a positive (+)<br />
value, a setting of + for this parameter will allow “AMS” to<br />
raise the EG level, and a setting of – will allow “AMS” to lower<br />
the EG level. With a setting of 0 there will be no change.<br />
Attack Level Swing<br />
This parameter specifies the direction in which “AMS” will<br />
affect “Attack Level”. When “Intensity” has a positive (+)<br />
value, a setting of + for this parameter will allow “AMS” to<br />
raise the EG level, and a setting of – will allow “AMS” to lower<br />
the EG level. With a setting of 0 there will be no change.<br />
Break Level Swing<br />
This parameter specifies the direction in which “AMS” will<br />
affect “Break Point Level”. When “Intensity” has a positive<br />
(+) value, a setting of + for this parameter will allow “AMS”<br />
to raise the EG level, and a setting of – will allow “AMS” to<br />
lower the EG level. With a setting of 0 there will be no<br />
change.
Program operating mode<br />
Page 12 - Amp<br />
13-13<br />
Filter EG ‘Time’ modulation<br />
Filter 1 EG changes (Time) (AMS = Velocity, Intensity = a positive (+) value)<br />
Note-on<br />
Note-on<br />
Note-on<br />
Note-off<br />
Note-off<br />
Note-off<br />
PAGE 12 - AMP<br />
These parameters control the volume and pan of the selected<br />
oscillator.<br />
Softly played note with Attack,<br />
Decay, Slope and Release<br />
Level Swings set to +<br />
Strongly played note with<br />
Attack, Decay, Slope and<br />
Release Level Swings set to +<br />
AMS1/2(T)<br />
Use this parameter to select the source that will control the<br />
“Time” parameters of the filter EG. See “AMS (Alternate<br />
Modulation Source) list” on page 13-19.<br />
Intensity<br />
This parameter specifies the depth and direction of the effect<br />
that “AMS1/2(T)” will have.<br />
For example, if “AMS1/2(T)” is set to FltKTr +/+, the EG<br />
“Time” parameters will be controlled by the Keyboard Tracking<br />
settings. With positive (+) values of this parameter, positive<br />
(+) values of “Ramp” will lengthen the EG times, and<br />
negative (–) values of “Ramp” will shorten the EG times. The<br />
direction of change is specified by “Attack Time Swing”,<br />
“Decay Time Swing”, “Slope Time Swing”, and “Release<br />
Time Swing”.<br />
With a setting of 0, the times specified by “Frequency A (Cutoff<br />
Frequency A)” will be used.<br />
If “AMS1/2(T)” is set to Velocity, positive (+) values of this<br />
parameter will cause EG times to lengthen as you play more<br />
strongly, and negative (–) values will cause EG times to<br />
shorten as you play more strongly.<br />
-99…+99 Intensity value.<br />
Attack Time Swing<br />
This parameter specifies the direction in which “AMS1/2(T)”<br />
will affect the attack time. With positive (+) values of “Intensity”,<br />
setting this parameter to + will allow AMS to lengthen<br />
the time, and setting this parameter to – will allow AMS to<br />
shorten the time. With a setting of 0 there will be no change.<br />
Decay Time Swing<br />
This parameter specifies the direction in which “AMS1/2(T)”<br />
will affect the decay time. With positive (+) values of “Intensity”,<br />
setting this parameter to + will allow AMS to lengthen<br />
the time, and setting this parameter to – will allow AMS to<br />
shorten the time. With a setting of 0 there will be no change.<br />
Slope Time Swing<br />
This parameter specifies the direction in which “AMS1/2(T)”<br />
will affect the slope time. With positive (+) values of “Intensity”,<br />
setting this parameter to + will allow AMS to lengthen<br />
the time, and setting this parameter to – will allow AMS to<br />
shorten the time. With a setting of 0 there will be no change.<br />
Release Time Swing<br />
This parameter specifies the direction in which “AMS1/2(T)”<br />
will affect the release time. With positive (+) values of “Intensity”,<br />
setting this parameter to + will allow AMS to lengthen<br />
the time, and setting this parameter to – will allow AMS to<br />
shorten the time. With a setting of 0 there will be no change.<br />
Amp<br />
|Osc1<br />
Strongly played note with<br />
Attack, Decay, Slope and<br />
Release Level Swings set to – Selected: Osc1<br />
Level: 120<br />
Pan:<br />
L001<br />
AMS: Note Number<br />
Selected<br />
Use this parameter to select an oscillator to put in edit. Alternatively,<br />
you can select oscillators using the F1-F4 buttons.<br />
Level<br />
Volume of the selected oscillator.<br />
Note: The volume of a Program can be controlled by CC#7 (volume)<br />
and #11 (expression). The resulting level is determined by<br />
multiplying the values of CC#7 and #11. The Global MIDI<br />
channel “MIDI Channel” (Global P1: 1–1a) is used for control.<br />
0…127 Volume level.<br />
Pan<br />
Pan (stereo position) of the selected oscillator.<br />
This parameter is not available when editing a Drum Program.<br />
Use the individual Pan control for each key (see<br />
“Pan” on page 13-6).<br />
Random The sound will be heard from a different location<br />
at each note-on.<br />
L001 Places the sound at far left.<br />
C064 Places the sound in the center.<br />
R127 Places the sound to far right.<br />
Note: This can be controlled by CC#10 (panpot). A CC#10<br />
value of 0 or 1 will place the sound at the far left, a value of 64<br />
will place the sound at the location specified by the “Pan” setting<br />
for each oscillator, and a value of 127 will place the sound at the<br />
far right. This is controlled on the global MIDI channel “MIDI<br />
Channel” (Global P1: 1–1a).<br />
Pan modulation<br />
AMS (Alternate Modulation Source)<br />
Selects the source that will modify pan (see “AMS (Alternate<br />
Modulation Source) list” on page 13-19). This change will be<br />
relative to the “Pan” setting.<br />
Intensity<br />
Specifies the depth of the effect produced by “AMS”. For<br />
example, if “Pan” is set to C064 and “AMS” is Note Number,<br />
positive (+) values of this parameter will cause the sound to<br />
move toward the right as the note numbers increase beyond<br />
the C4 note (i.e., as you play higher), and toward the left as<br />
the note numbers decrease (i.e., as you play lower). Negative<br />
(–) values of this parameter will have the opposite effect.<br />
-99…+99 Parameter value.
13-14 Program operating mode<br />
Page 13 - Amp Modulation<br />
PAGE 13 - AMP MODULATION<br />
These settings allow you to apply modulation to amp (for<br />
each oscillator) to modulate the volume.<br />
Amp Mod<br />
|Osc1<br />
Selected: Osc1<br />
Tracking Low: C 3<br />
Tracking High: A#4<br />
Ramp Low: +48<br />
Amplifier Modulation<br />
These parameters specify how the volume of the selected<br />
oscillator will be affected by velocity.<br />
Velocity Intensity<br />
[–99…+99]<br />
With positive (+) values, the volume will increase as you play<br />
more strongly. With negative (–) values, the volume will<br />
decrease as you play more strongly.<br />
Volume change (with positive (+) values of this parameter)<br />
Note-on<br />
Note-off<br />
Note-on<br />
Note-off<br />
Selected<br />
Use this parameter to select an oscillator to put in edit. Alternatively,<br />
you can select oscillators using the F1-F4 buttons.<br />
Amplifier keyboard tracking<br />
These parameters let you use keyboard tracking to adjust the<br />
volume of oscillator 1. Use the “Key” and “Ramp” parameters<br />
to specify how the volume will be affected by the keyboard<br />
location that you play.<br />
Tracking Low/High<br />
These settings specify the note number at which keyboard<br />
tracking will begin to apply. The volume will not change<br />
between “Tracking Low” and “Tracking High”.<br />
C–1…G9 Lowest/Highest note in the range.<br />
Tracking Low<br />
Keyboard tracking will apply to the range below the specified<br />
note number.<br />
Tracking High<br />
Keyboard tracking will apply to the range above the specified<br />
note number.<br />
Ramp<br />
These parameters specify the angle of keyboard tracking.<br />
-99…+99 Angle value.<br />
Here is an example of volume changes produced by keyboard<br />
location and “Ramp” settings:<br />
Volume<br />
Softly played<br />
-99…+99 Intensity value.<br />
EG AMS (Alternate Modulation Source)<br />
Selects the source that will control the volume of the amp for<br />
the selected oscillator (See “AMS (Alternate Modulation<br />
Source) list” on page 13-19). “Velocity” cannot be selected.<br />
Intensity<br />
This parameter specifies the depth and direction of the effect<br />
that “AMS” will have. The actual volume will be determined<br />
by multiplying the value of the changes produced by the amp<br />
EG with the values of Alternate Modulation etc., and if the<br />
levels of the amp EG are low, the modulation applied by<br />
Alternate Modulation will also be less.<br />
For example, if “AMS” is set to After Touch, positive (+) values<br />
of this parameter will cause the volume to increase when<br />
pressure is applied to the keyboard. However if the EG settings<br />
etc. have already raised the volume to its maximum<br />
level, the volume cannot be increased further.<br />
With negative (–) values of this parameter, the volume will<br />
decrease when pressure is applied to the keyboard.<br />
-99…+99 Intensity value.<br />
PAGE 14 - AMP LFO1<br />
Strongly played<br />
These parameters let you use “LFO1” (see “Page 17 - LFO1”<br />
on page 13-16) and “LFO 2” (see “Page 18 - LFO2” on<br />
page 13-18) to control the volume of the selected oscillator.<br />
Ramp Low=+99<br />
Ramp High=+99<br />
Ramp Low=0<br />
Ramp Low=–99<br />
Key Low<br />
Key High<br />
Ramp High=0<br />
Ramp High=–99<br />
Ramp Low<br />
With positive (+) values of this parameter, the volume will<br />
increase as you play notes below the “Tracking Low” note<br />
number. With negative (–) values, the volume will decrease.<br />
Ramp High<br />
With positive (+) values of this parameter, the volume will<br />
increase as you play notes above the “Key High” note number.<br />
With negative (–) values, the volume will decrease.<br />
Key<br />
Amp LFO1<br />
|Osc1<br />
Selected: Osc1<br />
Intensity: +0<br />
AMS: Joystick -Y<br />
Intensity: +0<br />
Selected<br />
Use this parameter to select an oscillator to put in edit. Alternatively,<br />
you can select oscillators using the F1-F4 buttons.<br />
Intensity<br />
This parameter specifies the depth and direction of the effect<br />
that “OSC1 LFO1” will have on the volume of oscillator 1.<br />
Negative (–) values will invert the LFO waveform.<br />
-99…+99 Intensity value.
Program operating mode<br />
Page 15 - Amp LFO2<br />
13-15<br />
Amplifier LFO1 modulation<br />
AMS (Alternate Modulation Source)<br />
Use this parameter to select a source that will control the<br />
depth by which “LFO1” will modulate the volume of oscillator<br />
1. See “AMS (Alternate Modulation Source) list” on<br />
page 13-19.<br />
Intensity<br />
As the absolute value of this setting is increased, the effect of<br />
“AMS” on “LFO1” will increase. Negative (–) values will<br />
invert the LFO waveform.<br />
-99…+99 Intensity value.<br />
PAGE 15 - AMP LFO2<br />
These parameters let you use “LFO1” (see “Page 17 - LFO1”<br />
on page 13-16) and “LFO 2” (see “Page 18 - LFO2” on<br />
page 13-18) to control the selected oscillator volume. See<br />
“Page 14 - Amp LFO1” for more information on parameter’s<br />
editing.<br />
Amp LFO2<br />
PAGE 16 - AMP EG<br />
|Osc1<br />
Selected: Osc1<br />
Intensity: +0<br />
AMS: Joystick -Y<br />
Intensity: +0<br />
These parameters let you create time-varying changes in the<br />
volume of the selected oscillator.<br />
Start Level<br />
This parameter specifies the volume level at note-on. If you<br />
want the note to begin at a loud level, set this to a high value.<br />
Attack Level<br />
This parameter specifies the volume level that will be reached<br />
after the attack time has elapsed.<br />
Break Level<br />
This parameter specifies the volume level that will be reached<br />
after the decay time has elapsed.<br />
Sustain Level<br />
This parameter specifies the volume level that will be maintained<br />
from after the slope time has elapsed until note-off<br />
occurs.<br />
Attack/Decay/Slope/Release Time<br />
These parameters specify the time over which the volume<br />
change will occur.<br />
0…99 Time value.<br />
Attack Time<br />
This parameter specifies the time over which the volume will<br />
change after note-on until it reaches the attack level. If the<br />
start level is 0, this will be the rise time of the sound.<br />
Decay Time<br />
This parameter specifies the time over which the volume will<br />
change from when it reaches the attack level until it reaches<br />
the break point level.<br />
Slope Time<br />
This parameter specifies the time over which the volume will<br />
change from when it reaches the break point level until it<br />
reaches the sustain level.<br />
Release Time<br />
This parameter specifies the time over which the volume will<br />
change after note-off until it reaches 0.<br />
Amp EG |Osc1<br />
Selected: Osc1<br />
Start Level: +99<br />
Attack Time: 73<br />
Attack Level: +95<br />
Amp EG ‘Level’ modulation<br />
Amp 1 EG changes (Level) (AMS=Velocity, Intensity = a positive (+) value)<br />
Note-on<br />
Note-on<br />
Note-on<br />
Note-off<br />
Note-off<br />
Note-off<br />
Selected<br />
Use this parameter to select an oscillator to put in edit. Alternatively,<br />
you can select oscillators using the F1-F4 buttons.<br />
Amp envelope<br />
Amplifier EG<br />
Attack Level<br />
Note-on<br />
Break Point<br />
Volume<br />
Start<br />
Level<br />
Attack<br />
Time<br />
Decay<br />
Time<br />
Slope<br />
Time<br />
Sustain<br />
Level<br />
Note-off<br />
Release Time<br />
Time<br />
Start/Attack/Break/Sustain/Release Level<br />
These parameters are the level of the envelope segment.<br />
0…99 Level value.<br />
Softly played note when Start Level<br />
Swing=0 and Attack Level Swing<br />
and Breack Level Swing are set to +<br />
Strongly played note when Start Level<br />
Swing=0 and Attack Level Swing and<br />
Breack Level Swing are set to +<br />
Strongly played note when Start Level<br />
Swing=0 and Attack Level Swing and<br />
Breack Level Swing are set to +<br />
AMS(L) (Alternate Modulation Source)<br />
This parameter specifies the source that will control the<br />
“Level” parameters of the amp EG. See “AMS (Alternate<br />
Modulation Source) list” on page 13-19.<br />
Intensity<br />
This parameter specifies the depth and direction of the effect<br />
that “AMS” will have. For example, if “AMS” is Velocity, setting<br />
“Start Level Swing”, “Attack Level Swing” and “Break<br />
Point Level Swing” to + and setting “Intensity” to a positive<br />
(+) value will cause the amp EG volume levels to increase as<br />
you play more strongly. Setting “Intensity” to a negative (–)<br />
values will cause the amp EG volume levels to decrease as you<br />
play more strongly. With a setting of 0, the levels will be as<br />
specified on “Page 16 - Amp EG”.<br />
-99…+99 Intensity value.
13-16 Program operating mode<br />
Page 17 - LFO1<br />
Start Level Swing<br />
This parameter specifies the direction in which “AMS” will<br />
change “Start Level”. If “Intensity” is set to a positive (+)<br />
value, setting this parameter to + will allow AMS to increase<br />
the EG level, and setting this parameter to – will allow AMS<br />
to decrease the EG level. With a setting of 0, no change will<br />
occur.<br />
Attack Level Swing<br />
This parameter specifies the direction in which “AMS” will<br />
change “Attack Level”. If “Intensity” is set to a positive (+)<br />
value, setting this parameter to + will allow AMS to increase<br />
the EG level, and setting this parameter to – will allow AMS<br />
to decrease the EG level. With a setting of 0, no change will<br />
occur.<br />
Break Point Level Swing<br />
This parameter specifies the direction in which “AMS” will<br />
change “Break Level”. If “Intensity” is set to a positive (+)<br />
value, setting this parameter to + will allow AMS to increase<br />
the EG level, and setting this parameter to – will allow AMS<br />
to decrease the EG level. With a setting of 0, no change will<br />
occur.<br />
Amp EG ‘Time’ modulation<br />
These parameters let you use an alternate modulation source<br />
to modify the amp EG times that were specified in “Attack/<br />
Decay/Slope/Release Time” on page 13-15.<br />
Amp 1 EG changes (Time)<br />
(AMS=Amp KTrk +/+, Intensity = a positive (+) value)<br />
(When Amp Keyboard Track “Low Ramp”= a positive (+) value, and<br />
“High Ramp” = a positive (+) value)<br />
Note-on<br />
Note-on<br />
Note-on<br />
Note-off<br />
Note-off<br />
Amp 1 EG changes (Time) (AMS=Velocity, Intensity= a positive (+) value)<br />
Note-on<br />
Note-off<br />
Softly played note with<br />
Attack, Decay, Slope and<br />
Release Time Swing at +<br />
Low-pitched note played with<br />
Attack, Decay, Slope, and<br />
Release Time Swing at +<br />
Note-on<br />
Note-off<br />
Strongly played note with<br />
Attack, Decay, Slope and<br />
Release Time Swing at +<br />
Note-on<br />
Note-off<br />
High -pitched note played with<br />
Attack, Decay, Slope, and<br />
Release Time Swing at –<br />
Note-off<br />
Strongly played note with<br />
Attack, Decay, Slope and<br />
Release Time Swing at –<br />
AMS1(T) (Alternate Modulation Source 1 - Time)<br />
This parameter specifies the source that will control the<br />
“Time” parameters of the amp EG (see “AMS (Alternate<br />
Modulation Source) list” on page 13-19). With a setting of<br />
Off, there will be no modulation.<br />
Intensity<br />
This parameter specifies the depth and direction of the effect<br />
that “AMS1” will have. For example, if “AMS1(T)” is Amp<br />
KTrk +/+, the (Amp) Keyboard Track settings (see “Amplifier<br />
keyboard tracking” on page 13-14) will control the EG<br />
“Time” parameters. With positive (+) values of this parameter,<br />
positive (+) values of “Ramp (Ramp Setting) will cause<br />
EG times to be lengthened, and negative (–) values of “Ramp<br />
(Ramp Setting)” will cause EG times to be shortened. The<br />
direction of the change is specified by “Attack Time Swing”,<br />
“Decay Time Swing”, “Slope Time Swing”, and “Release<br />
Time”.<br />
When “AMS1(T)” is Velocity, positive (+) values will cause<br />
EG times to lengthen as you play more strongly, and negative<br />
(–) values will cause EG times to shorten as you play more<br />
strongly. With a setting of 0, the EG times will be as specified<br />
by the “Amp envelope” parameters (see page 13-15).<br />
Attack Time Swing<br />
This parameter specifies the direction of the effect that<br />
“AMS1” will have on “Attack Time”. With positive (+) values<br />
of “Intensity”, setting this parameter to + will allow AMS1 to<br />
lengthen the time, and setting it to – will allow AMS1 to<br />
shorten the time. With a setting of 0 there will be no effect.<br />
Decay Time Swing<br />
This parameter specifies the direction of the effect that<br />
“AMS1” will have on “Decay Time”. With positive (+) values<br />
of “Intensity”, setting this parameter to + will allow AMS1 to<br />
lengthen the time, and setting it to – will allow AMS1 to<br />
shorten the time. With a setting of 0 there will be no effect.<br />
Slope Time Swing<br />
This parameter specifies the direction of the effect that<br />
“AMS1” will have on “Slope Time”. With positive (+) values<br />
of “Intensity”, setting this parameter to + will allow AMS1 to<br />
lengthen the time, and setting it to – will allow AMS1 to<br />
shorten the time. With a setting of 0 there will be no effect.<br />
Release Time<br />
This parameter specifies the direction of the effect that<br />
“AMS1” will have on “Release Time”. With positive (+) values<br />
of “Intensity”, setting this parameter to + will allow AMS1<br />
to lengthen the time, and setting it to – will allow AMS1 to<br />
shorten the time. With a setting of 0 there will be no effect.<br />
AMS2 (Alternate Modulation Source 2)<br />
This is another alternate modulation source for the Amp EG.<br />
See above “AMS1” parameters.<br />
PAGE 17 - LFO1<br />
In this and the next page you can make settings for the LFO<br />
that can be used to cyclically modulate the Pitch, Filter, and<br />
Amp of each oscillator. There are two LFO units for each<br />
oscillator. By setting the LFO1 or LFO2 Intensity to a negative<br />
(–) value for Pitch, Filter, or Amp, you can invert the LFO<br />
waveform.<br />
LFO1<br />
|Osc1<br />
Selected: Osc1<br />
Wave: Triangle Rand<br />
Frequency: 31<br />
Key Sync:<br />
On
Program operating mode<br />
Page 17 - LFO1<br />
13-17<br />
Wave<br />
This parameter selects the LFO waveform. The numbers that<br />
appear at the right of some of the LFO waveforms indicate<br />
the phase at which the waveform will begin.<br />
Here is how “Fade In” affects the LFO (when “Key Sync” is<br />
On):<br />
Note-on<br />
Fade<br />
Note-off<br />
Triangle 0<br />
Step Triangle – 4<br />
Triangle 90<br />
Triangle wave<br />
Step Triangle – 6<br />
Delay<br />
Frequency<br />
Set the LFO frequency. A setting of 99 is the fastest.<br />
00…99 Frequency rate.<br />
Key Sync<br />
This parameter specifies if the LFO is synchronized to key<br />
strokes.<br />
On<br />
Off<br />
Triangle<br />
Random<br />
Saw 0<br />
Saw 180<br />
Square<br />
Sine<br />
Guitar<br />
Exponential<br />
Triangle<br />
Exponential<br />
Saw Down<br />
Exponential<br />
Saw Up<br />
The LFO will start each time you play a note,<br />
and an independent LFO will operate for each<br />
note.<br />
The LFO effect that was started by the firstplayed<br />
note will continue to be applied to each<br />
newly-played note. (In this case, Delay and<br />
Fade will be applied only to the LFO when it is<br />
first started).<br />
Offset<br />
This parameter specifies the central value of the LFO waveform.<br />
For example, with a setting of 0 as shown in the following<br />
diagram, the vibrato that is applied will be centered on<br />
the note-on pitch. With a setting of +99, the vibrato will only<br />
raise the pitch above the note-on pitch, in the way in which<br />
vibrato is applied on a guitar.<br />
When “Wave” is set to Guitar, the modulation will occur only<br />
in the positive (+) direction even if you set “Offset” to 0.<br />
Here are offset settings and pitch change produced by vibrato<br />
-99…+99<br />
Pitch<br />
Pitch at note-on<br />
Phase will change<br />
randomly at each key-in Step Saw – 4<br />
Sawtooth down ↓<br />
Square wave<br />
Sine wave<br />
Guitar vibrato<br />
Offset value.<br />
Step Saw – 6<br />
Random1 (S/H):<br />
Conventional sample & hold (S/H) in which the<br />
level changes randomly at fixed intervals of<br />
time<br />
Random2 (S/H):<br />
Both the levels and the time intervals will<br />
change randomly.<br />
Random3 (S/H):<br />
The maximum level and minimum level will<br />
alternate at random intervals of time (i.e., a<br />
square wave with random period).<br />
Random4 (Vector)<br />
Random5 (Vector)<br />
Random6 (Vector)<br />
These types cause Random 1–3 to change<br />
smoothly. They can be used to simulate the<br />
instability of acoustic instruments etc.<br />
offset = –99 offset = 0 offset = +99<br />
Delay<br />
This parameter specifies the time from note-on until the LFO<br />
effect begins to apply. When “Key Sync” is Off, the delay will<br />
apply only when the LFO is first started.<br />
0…99 Delay time.<br />
Fade In<br />
This parameter specifies the time from when the LFO begins<br />
to apply until it reaches the maximum amplitude. When “Key<br />
Sync.” is Off, the fade will apply only when the LFO is first<br />
started.<br />
00…99 Fade rate.<br />
Frequency MIDI/Tempo Sync<br />
MIDI/Tempo Sync<br />
This parameter enables/disables the LFO synchronization<br />
with Sequencer 1 Tempo.<br />
On The LFO frequency will synchronize to the<br />
tempo (MIDI Clock) of Sequencer 1. In this<br />
case, the values you specified for “Frequency”<br />
(see page 13-17) and “Frequency modulation”<br />
(see page 13-17) will be ignored.<br />
Base Note/Times<br />
When “MIDI/Tempo Sync” is On, these parameters set a note<br />
length relative to “ (Tempo)” and the multiple (“Times”)<br />
that will be applied to it. These parameters will determine the<br />
frequency of the LFO1. For example if “Base Note” is (quarter<br />
note) and “Times” is 04, the LFO will perform one cycle<br />
every four beats.<br />
Even if you change the “ (Tempo)” setting of Sequencer 1,<br />
the LFO will always perform one cycle every four beats.<br />
Base Note<br />
This parameter is not available when editing a Drum Program.<br />
, , , , , , , <br />
Note value.<br />
Times<br />
This parameter is not available when editing a Drum Program.<br />
01...16 Beats before restarting the cycle.<br />
Frequency modulation<br />
You can use two alternate modulation sources to adjust the<br />
speed of the LFO1 for the selected oscillator.<br />
AMS1(F) (Alternate Modulation Source1)<br />
Selects the source that will adjust the frequency of the<br />
selected oscillator LFO1 (see “AMS (Alternate Modulation<br />
Source) list” on page 13-19). LFO1 can be modulated by<br />
LFO2.<br />
Intensity (AMS1 Intensity)<br />
This parameter specifies the depth and direction of the effect<br />
that “AMS1(F)” will have. When this parameter is set to a<br />
value of 16, 33, 49, 66, 82, or 99, the LFO frequency being can<br />
be increased by a maximum of 2, 4, 8, 16, 32, or 64 times<br />
respectively (or decreased by 1/2, 1/4, 1/8, 1/16, 1/32, or 1/64<br />
respectively).<br />
For example, if “AMS1(F)” is Note Number, positive (+) values<br />
of this parameter will cause the oscillator LFO to speed<br />
up as you play higher notes. Negative (–) values will cause the<br />
oscillator LFO to slow down as you play higher notes. This<br />
change will be centered on the C4 note.
13-18 Program operating mode<br />
Page 18 - LFO2<br />
If “AMS1(F)” is set to JS +Y, raising the value of this parameter<br />
will cause the oscillator LFO1 speed to increase as the joystick<br />
is moved away from yourself. With a setting of +99,<br />
moving the joystick all the way away from yourself will<br />
increase the LFO speed by approximately 64 times.<br />
-99…+99 Intensity value.<br />
AMS2(F) (Alternate Modulation Source2)<br />
Intensity (AMS2 Intensity)<br />
Make settings for a second alternate modulation source that<br />
will adjust the frequency of the oscillator LFO1 (see above<br />
“AMS1(F) (Alternate Modulation Source1)” and “Intensity<br />
(AMS1 Intensity)”).<br />
PAGE 18 - LFO2<br />
Here you can make settings for the LFO2, which is the second<br />
LFO that can be applied to the selected oscillator. See “Page<br />
17 - LFO1” for more information on the parameters value.<br />
However in “Frequency modulation”, the LFO cannot be<br />
selected as a modulation source in “AMS1” or “AMS2.”<br />
PAGE 19 - EFFECTS<br />
Here you can select two effects for the whole Program, switch<br />
them on/off, and specify chaining.<br />
Effects<br />
FX1: 53 RecSmthHall<br />
Send: 56<br />
FX2: 16 Chorus<br />
Send: 0<br />
Note: For details on the effects, refer to the “Effects” chapter in<br />
the User’s Manual.<br />
FX1/2<br />
Use these parameters to select the effect type for effect 1/2.<br />
See the “Effects” chapter in the User’s Manual for more information.<br />
Note: If 000: No Effect is selected, the output from the master<br />
effect will be muted.<br />
Send<br />
Send level for each effect.<br />
Drum samples have their own send level settings (see<br />
“Send FX1” and “Send FX2” on page 13-6). Use this<br />
parameter to adjust the general offset of the Drum Program.<br />
000…127 Effect level.<br />
Chain 2>1<br />
Use this parameter to send the output of effect 2 to the input<br />
of effect 1.<br />
000…127 Level of the signal exiting the effect 2 going<br />
back to the effect 1.<br />
Send to Master<br />
This parameters allows you to decide if the direct + effected<br />
signal must go to the Master, or just the effected signal.<br />
Yes Only the effected signal will be sent to the<br />
Audio Outputs. The direct (non-effected) signal<br />
will not be sent.<br />
No Both the effected signal and direct signals will<br />
be sent to the Audio Outputs.<br />
PAGE 20 - FX1 EDITING<br />
In this page you can edit the effected assigned to the FX1 (A<br />
or C) effect processor (usually reverb). See the “Effects” chapter<br />
in the User’s Manual for more information.<br />
PAGE 21 - FX2 EDITING<br />
In this page you can edit the effected assigned to the FX2 (B<br />
or D) effect processor (usually modulating effect). See the<br />
“Effects” chapter in the User’s Manual for more information.
Program operating mode<br />
AMS (Alternate Modulation Source) list<br />
13-19<br />
AMS (ALTERNATE MODULATION SOURCE) LIST<br />
Off<br />
Pitch EG<br />
Filter EG<br />
Amp EG<br />
LFO1<br />
LFO2<br />
Flt KTrk +/+ (Filter Keyboard Track +/+)<br />
Flt KTrk +/– (Filter Keyboard Track +/–)<br />
Flt KTrk 0/+ (Filter Keyboard Track 0/+)<br />
Flt KTrk +/0 (Filter Keyboard Track +/0)<br />
Amp KTrk +/+ (Amp Keyboard Track +/+)<br />
Amp KTrk +/– (Amp Keyboard Track +/–)<br />
Amp KTrk 0/+ (Amp Keyboard Track 0/+)<br />
Amp KTrk +/0 (Amp Keyboard Track +/0)<br />
Note Number<br />
Velocity<br />
Poly AT (Poly After Touch)<br />
After Touch<br />
Joystick X<br />
Joystick +Y<br />
Joystick –Y<br />
JS+Y & AT/2 (Joy Stick +Y & After Touch/2)<br />
JS–Y & AT/2 (Joy Stick –Y & After Touch/2)<br />
Ass.Pedal<br />
CC#18<br />
CC#17<br />
CC#19<br />
CC#20<br />
CC#21<br />
Damper<br />
CC#65<br />
Sostenuto<br />
CC#80<br />
CC#81<br />
CC#82<br />
CC#83<br />
Tempo<br />
Do not use Alternate Modulation<br />
Pitch EG<br />
Filter EG within the same oscillator<br />
Amp EG within the same oscillator<br />
LFO1 within the same oscillator<br />
LFO2 within the same oscillator<br />
Filter keyboard tracking within the same oscillator<br />
Filter keyboard tracking within the same oscillator<br />
Filter keyboard tracking within the same oscillator<br />
Filter keyboard tracking within the same oscillator<br />
Amp keyboard tracking within the same oscillator<br />
Amp keyboard tracking within the same oscillator<br />
Amp keyboard tracking within the same oscillator<br />
Amp keyboard tracking within the same oscillator<br />
Note number<br />
Velocity<br />
Polyphonic After Touch (transmitted from the Pa80 only as sequence data)<br />
After Touch (Channel After Touch)<br />
Joystick X (horizontal) axis<br />
Joystick +Y (vertical upward) direction (CC#01)<br />
Joystick –Y (vertical downward) direction (CC#02)<br />
Joystick +Y (vertical upward) direction and After Touch<br />
Joystick –Y (vertical downward) direction and After Touch<br />
Assignable foot pedal (CC#04)<br />
CC#18<br />
CC#17<br />
CC#19<br />
CC#20<br />
CC#21<br />
Ddamper pedal (CC#64)<br />
Portamento switch (CC#65)<br />
Sostenuto pedal (CC#66)<br />
CC#80<br />
CC#81<br />
CC#82<br />
CC#83<br />
Tempo (tempo data from Sequencer 1 clock or external MIDI clock)<br />
Flt KTrk +/+ (Filter Keyboard Track +/+)<br />
Flt KTrk +/– (Filter Keyboard Track +/–)<br />
Flt KTrk 0/+ (Filter Keyboard Track 0/+)<br />
Flt KTrk +/0 (Filter Keyboard Track +/0)<br />
Amp KTrk +/+ (Amp Keyboard Track +/+)<br />
Amp KTrk +/– (Amp Keyboard Track +/–)<br />
Amp KTrk 0/+ (Amp Keyboard Track 0/+)<br />
Amp KTrk +/0 (Amp Keyboard Track +/0)<br />
+/+ The direction of the effect will be determined<br />
by the sign (positive or negative) of the “Ramp<br />
Low” or “Ramp High” setting.<br />
+/– The direction of the effect will be determined<br />
by the sign of the “Ramp Low” setting, and by<br />
the opposite sign of the “Ramp High” setting<br />
(–50 for a setting of +50, and +50 for a setting<br />
of –50).<br />
0/+ “Ramp Low” will have no AMS effect. The sign<br />
of the “Ramp High” setting will determine the<br />
direction of its effect.
13-20 Program operating mode<br />
AMS (Alternate Modulation Source) list<br />
+/0 The sign of the “Ramp Low” setting will determine<br />
the direction of its effect. “Ramp High”<br />
will have no AMS effect.<br />
example of Amp<br />
Keyboard Track settings<br />
Amp<br />
Ramp Low<br />
= +50<br />
Ramp High<br />
= +50<br />
JS +Y & AT/2 (Joy Stick +Y & After Touch/2)<br />
The effect will be controlled by the joystick +Y (vertically<br />
upward) and by after touch. In this case, the effect of after<br />
touch will be only half of the specified intensity.<br />
JS –Y & AT/2 (Joy Stick –Y & After Touch/2)<br />
The effect will be controlled by the joystick –Y (vertically<br />
downward) and by after touch. In this case, the effect of after<br />
touch will be only half of the specified intensity.<br />
Key Low Key High<br />
Note Number<br />
AMS = Amp KTrk +/+<br />
+ max<br />
AMS Intensity = positive (+) value<br />
zero<br />
- max<br />
Depth and direction of modulation<br />
AMS = Amp KTrk +/–<br />
+ max<br />
AMS Intensity = positive (+) value<br />
zero<br />
Depth and direction of modulation<br />
- max<br />
AMS = Amp KTrk 0/+<br />
+ max<br />
AMS Intensity = positive (+) value<br />
zero<br />
- max<br />
Depth and direction of modulation<br />
AMS = Amp KTrk +/0<br />
+ max<br />
AMS Intensity = positive (+) value<br />
zero<br />
Depth and direction of modulation<br />
- max
Global edit environment (addendum)<br />
Octave Transpose on the MIDI IN<br />
14b-1<br />
14B. GLOBAL EDIT ENVIRONMENT (ADDENDUM)<br />
Some new functions have been added. Please add the following<br />
instructions to the “Global edit environment” chapter.<br />
OCTAVE TRANSPOSE ON THE MIDI IN<br />
The “Upper Octave”, “Lower Octave”, “Mute In” and “Octave<br />
In” parameters have been added to “Page 9 - Midi In Controls<br />
2” of the Global environment (see User’s Manual, page 14-5).<br />
The transpose parameters are useful to many MIDI accordion<br />
players, whose MIDI interface may transmit on an<br />
unexpected octave.<br />
On<br />
Off<br />
No data received via MIDI on a muted track<br />
can be played by Pa80.<br />
Data received via MIDI on a muted track can<br />
still play on the Pa80.<br />
SCALE TRANSPOSE POSITION<br />
The Scale Transpose Position is a new function allowing you<br />
to decide the relation between the Scale and the Master<br />
Transpose. The new function has been added to Page 2 (“Gbl:<br />
M.Transpose”) of the Global edit environment.<br />
Gbl:MidiIn Ctl 2<br />
UppOct:+1 OctIn:Off<br />
LowOct:+0 MuteIn:Off<br />
HarmOct:-1<br />
H.RngL:C-1 H.RngH:G8<br />
Gbl:M.Transpose<br />
Style/Realtime:On<br />
Sequsencer1/2 :On<br />
Midi In :Off<br />
Scales :Post-KB<br />
UppOct (Upper Octave)<br />
Octave transposition of data received on the MIDI IN for the<br />
Upper tracks. For example, if you select the +1 value, a<br />
received C4 will play a C5 on the Pa80.<br />
LowOct (Lower Octave)<br />
Octave transposition of data received on the MIDI IN for the<br />
Lower track. For example, if you select the +1 value, a<br />
received C4 will play a C5 on the Pa80.<br />
OctIn (Octave In)<br />
Enables/disables the octave transposition of data received via<br />
MIDI.<br />
On<br />
Off<br />
Data received via MIDI can be transposed,<br />
according to the selected Octave Transposition.<br />
For example, if the Octave Transposition is +1,<br />
a received C4 will actually play a C5.<br />
Data received via MIDI can’t be transposed by<br />
the Octave Transposition applied to the track.<br />
For example, if the Octave Transposition is +1,<br />
a received C4 will still play a C4.<br />
Mute In<br />
Use this parameter to determine if a muted track can still play<br />
data received via MIDI.<br />
Scales<br />
Post-KB<br />
Pre-OSC<br />
When this option is selected, notes will be<br />
transposed immediately after they leave the<br />
keyboard. The Scale will be applied to the<br />
transposed notes. For example, if you altered<br />
an E, and then set the Master Transpose to +1,<br />
the E key will play F, and the altered key will be<br />
E♭ (that will play an altered E).<br />
Transpose<br />
Scale<br />
Tone<br />
generator<br />
When this option is selected, all notes are<br />
transposed immediately before they enter the<br />
internal tone generator. Therefore, the Scale<br />
will be applied before transposition. For example,<br />
if you altered an E, and then set the Master<br />
Transpose to +1, the altered key will still be E<br />
(that will play an altered F).<br />
Scale<br />
Transpose<br />
Tone<br />
generator
14b-2 Global edit environment (addendum)<br />
Scale Transpose Position
Disk edit environment (addendum)<br />
Restore/Backup on the hard disk<br />
15b-1<br />
15B. DISK EDIT ENVIRONMENT (ADDENDUM)<br />
A new function has been added. Please add the following<br />
instructions to the “Disk edit environment” chapter.<br />
RESTORE/BACKUP ON THE HARD DISK<br />
The internal data backup is now allowed also on the hard<br />
disk. Previously, this operation was allowed only on floppy<br />
disks. Please, replace the following text to the text found on<br />
page 15-16 in the User’s Manual.<br />
Backup Data<br />
This command starts a backup of all internal factory data<br />
(Styles, Programs, Performances…) excluding the Operating<br />
System itself.<br />
Note: Should you not do a back-up and your internal data is<br />
changed, you can download the data from www.korgpa80.com,<br />
or ask your local <strong>KORG</strong> dealer.<br />
1. If you are making a backup on floppy disks, prepare 5<br />
formatted, empty disks (1.44MB, MS-DOS formatted).<br />
You can prepare this kind of disk using a PC or the Pa80<br />
itself (see “Page 5 - Format” on page 15-14 in the User’s<br />
Manual).<br />
Note: You can’t prepare Pa80 Backup disks on a Macintosh.<br />
After formatting, the Mac includes some invisible files<br />
in the root, that may interfere with the Pa80 Backup and<br />
Restore procedures.<br />
2. Select the Backup Data command.<br />
3. The “Backup to FD (Yes) or HD (No)?” message<br />
appears. Press ENTER/YES to select the floppy disk, or<br />
EXIT/NO to select the hard disk.<br />
4. The “Are you sure?” message appears. Press ENTER to<br />
continue, EXIT to abort.<br />
5. • If you selected the hard disk, the backup will start<br />
immediately.<br />
• If you selected the floppy disk, insert a disk and press<br />
ENTER<br />
6. When the Pa80 asks for it, insert a new disk into the<br />
floppy disk drive. Write the disk number on each disk’s<br />
label.<br />
Restore Data<br />
This command restores the backup of the internal factory<br />
data, executed with the “Backup Data” command.<br />
Note: Should your Factory Data disks become corrupt, you can<br />
download the data from www.korgpa80.com, or ask your local<br />
<strong>KORG</strong> dealer.<br />
Warning: Don’t play on the keyboard while restoring data, and<br />
stay in the Disk mode. Wait until the “Wait” message disappears,<br />
and the WRITE/DISK IN USE LED turns off.<br />
1. Select this command.<br />
2. The “Restore from FD (Yes) or HD (No)?” message<br />
appears. Press ENTER/YES to select the floppy disk, or<br />
EXIT/NO to select the hard disk.<br />
3. The “Are you sure?” message appears. Press ENTER to<br />
continue, EXIT to abort.<br />
4. • If you selected the hard disk, the restore will start<br />
immediately.<br />
• If you selected the floppy disk, the “Insert backup disk<br />
#1 and press Enter” message appears. Insert the first<br />
backup disk, and press ENTER.<br />
5. Wait until the first backup disk has been read. A message<br />
will appear: “Insert backup disk #2 and press Enter”.<br />
Insert the second backup disk and press ENTER.<br />
6. Repeat the same procedure with backup disks #3, #4 and<br />
#5. When the backup disk #5 has been loaded, the<br />
backup data has been restored into the internal memory.<br />
Note: After the last disk has been loaded, a “Some files<br />
missing” message may appear. This may refer to some User<br />
data, so it is not a problem. Press EXIT to exit the message.<br />
7. When the Wait message has disappeared, and the<br />
WRITE/DISK IN USE LED has turned off, turn the<br />
instrument off, then on again.
15b-2 Disk edit environment (addendum)<br />
Restore/Backup on the hard disk