Operational Manual & Parts Breakdown - Nemco Food Equipment
Operational Manual & Parts Breakdown - Nemco Food Equipment
Operational Manual & Parts Breakdown - Nemco Food Equipment

Create successful ePaper yourself
Turn your PDF publications into a flip-book with our unique Google optimized e-Paper software.
NEMCO PIZZA OVEN<br />
Model Series: 6215<br />
OPERATING INSTRUCTIONS<br />
INTRODUCTION<br />
1. Please read instructions before using this appliance.<br />
2. When using electrical appliances, always follow basic precautions to reduce the risk of fire, electric shock and injury to persons.<br />
3. Clean machine thoroughly before and after all uses using cleaning instructions below.<br />
SAFETY INSTRUCTIONS<br />
1. Plug electrical cord into a certified electrical outlet with a corresponding voltage rating as listed on the machine model labels.<br />
2. Always unplug the electric cord when appliance is not in use and before cleaning, adjusting or maintaining this machine. Do not<br />
operate with a damaged cord or plug or after the machine malfunctions, has been dropped or damaged. Use authorized service for<br />
examination, electrical or mechanical adjustment or repair.<br />
3. This machine will be HOT during use and for a short time after it is turned off – BE CAREFUL. To avoid burns, do not let bare skin<br />
touch hot surfaces. If provided, use handles when moving this appliance. Keep combustible materials away from appliance.<br />
4. Use extreme caution when any appliance is used by or near children and whenever the appliance is left operating and unattended.<br />
5. This appliance is not intended for use near or around water. Never locate appliance where it may fall into a water container.<br />
6. Do not insert or allow foreign objects to enter any ventilation or exhaust opening as this may cause an electrical shock, fire or<br />
damage to the appliance. Do not block air intakes or exhaust in any manner. Do not use on soft surfaces where openings may<br />
become blocked.<br />
PREPARATION<br />
1. Remove all packing pieces and lift unit out of the box.<br />
2. Remove any outside packaging.<br />
3. Set unit on a flat surface.<br />
4. Position unit near the power outlet. Avoid the use of extension cords. Do not run cord under carpeting or cover with runners or the<br />
like. Arrange cord where it will not be tripped over.<br />
5. This appliance has hot and live electrical parts inside. Do not use it in areas where gasoline, paint or flammable liquids are used or<br />
stored.<br />
Caution: To reduce the risk of fire, the appliance is to be mounted on floors of noncombustible construction with noncombustible<br />
flooring and surface finish and with no combustible material against the underside thereof, or on noncombustible slabs or arches having<br />
no combustible material against the underside thereof. Such construction shall in all cases extend not less than 12 inches beyond the<br />
equipment on all sides.<br />
6. Remove any white plastic coating that may be affixed to stainless steel surfaces.<br />
7. If unit fails to work properly when first operated call NEMCO customer service at 1-800-782-6761.<br />
ELECTRICAL REQUIREMENTS<br />
Refer to the product tag (serial plate) on the back of the unit for voltage and wattage requirements. Be sure to plug unit into grounded<br />
outlet with sufficient power.<br />
WARNING: DURING NORMAL OPERATIONS THE EXTERIOR OF THE UNIT IS HOT.<br />
OPERATION<br />
1. Plug the unit into the power supply.<br />
2. Place product on rack.<br />
3. Rotate timer/switch knob to desired “timed” setting. Power is on when timer is on. For best results, pre-heat oven 6-8 minutes.<br />
4. Bell sounds to indicate when set time is complete.<br />
5. To disconnect appliance, turn controls to off and remove plug from outlet.<br />
NOTE: UNIT USES A TIMER SWITCH, WHICH SHUTS OFF THE HEATING ELEMENTS AT THE END OF TIMED<br />
CYCLE. MAXIMUM ON TIME IS 15 MINUTES.<br />
CLEANING<br />
NOTE: Proper maintenance plays an important part in the life span and functioning of the unit.<br />
1. Turn the temperature control to the OFF position. Unplug the power cord.<br />
2. Allow the unit to cool 30 minutes.<br />
3. The rack and crumb pan can be removed from the unit and washed in hot, soapy water. Wipe dry.<br />
4. Clean exterior of unit with a damp sponge and mild soap. Be sure to dry unit.<br />
5. Do not immerse in water or other liquid. Avoid splashing water into the motor unit.<br />
DO NOT IMMERSE UNIT!<br />
SUGGESTED COOKING TIMES FOR PIZZAS<br />
12” Frozen 1-2 Toppings No Pre-heat 10-11 Minutes<br />
Pre-heat<br />
7-8 Minutes<br />
12” Fresh 1-2 Toppings No Pre-heat 7-8 Minutes<br />
Pre-heat<br />
6-7 Minutes<br />
NOTE: Baking times will vary according to number and type of ingredients. Adjust baking time as desired.<br />
ADDITIONAL USES: Cookies, pretzels, bread sticks, and similar products.<br />
1
SERVICE INSTRUCTIONS<br />
For warranty or service information, please refer to the attached “<strong>Nemco</strong> <strong>Food</strong> <strong>Equipment</strong> Warranty Service Procedures.”<br />
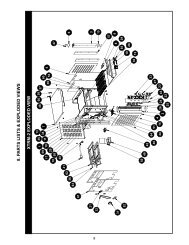
PIZZA OVEN 6215 SERVICE PARTS LIST<br />
45063 2 Acorn Nut<br />
45374 1 Cord Set<br />
45375 1 Strain Relief<br />
45920 1 Timer Knob (was 66629)<br />
45921 1 Crumb Pan Knob<br />
45949 4 Rubber Grommet for Foot<br />
55077 4 Foot Pad<br />
66602 1 Rack<br />
66605 1 Crumb Pan<br />
66626 1 Thermostat<br />
66627 1 Element, 900W - 120V<br />
66628 1 Element, 550W - 120V<br />
47136 1 Timer Dial<br />
66631 1 Handle<br />
66671 1 Timer/Switch<br />
66678 1 Crumb Pan Assembly<br />
W6215 1 Wire Set<br />
66603 1 Door Assembly<br />
NEMCO FOOD EQUIPMENT 301 Meuse Argonne, Hicksville, OH 43526<br />
1-800-782-6761 Toll Free 419-542-6690 Fax 45878<br />
www.nemcofoodequip.com 1/12/2011<br />
2