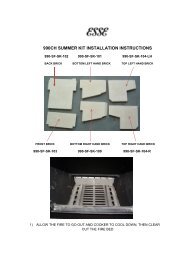
ESSE 900 WN Users Manual - Pivot Stove & Heating
ESSE 900 WN Users Manual - Pivot Stove & Heating
ESSE 900 WN Users Manual - Pivot Stove & Heating

Create successful ePaper yourself
Turn your PDF publications into a flip-book with our unique Google optimized e-Paper software.
INFORMATION FOR USE WHEN ORDERING SPARES:<br />
10/09<br />
Model: _______________________________________<br />
Serial Number:_________________________________<br />
Colour: _____________________________________<br />
CONDITIONS OF GUARANTEE<br />
Your <strong>ESSE</strong> cooker is guaranteed against defects arising from faulty manufacture for three years, subject to the following express conditions:<br />
• This cooker must be commissioned by your <strong>ESSE</strong> Dealer (or an authorised HETAS engineer) upon installation. The details must be recorded on the<br />
Commissioning card and registered with <strong>ESSE</strong> by returning the completed card. The guarantee period commences upon delivery of the cooker<br />
(subject to receipt of the correctly completed card).<br />
• The cooker has been used for normal domestic purposes only, and in accordance with the manufacturer’s instructions.<br />
• The cooker is serviced annually by the <strong>ESSE</strong> Dealer or authorised HETAS engineer, and the Service record completed. The cooker must not be<br />
serviced, maintained, repaired taken apart or tampered with by any person not authorised by us.<br />
• Any cooker or detective part replaced shall become the Company’s property.<br />
EXCLUSIONS<br />
This guarantee does not cover:<br />
• Parts deemed to be replaceable in the normal usage of the cooker. These parts are listed herewith: all firebricks, firebox bottom plate, combustor,<br />
airslider oven accessories.<br />
• Enamel damage; the vitreous coating on your cooker is in effect an extremely thin layer of glass and as such displays all the characteristics of glass.<br />
It can easily be damaged by impact, or by spillage of cold liquids onto a hot surface. Such damage cannot be covered under this guarantee. (See also<br />
intermittent use of your cooker, below).<br />
This guarantee is personal to the original purchaser and is non-transferable.<br />
INTERMITTENT USE OF YOUR COOKER<br />
In the event of intermittent use and prolonged shutdown, it should be noted that in some circumstances enamel may be displaced due to ingress of damp.<br />
Whilst this is rare, it is most likely to occur in situations where the unused cooker remains in a unheated property. There is a layer (known as the<br />
groundcoat) between the vitreous enamel surface and the cast iron. Groundcoat is porous and if exposed (e.g. after a chip in the vitreous enamel coat), may<br />
allow damp to penetrate behind the vitreous enamel and spread through the groundcoat. Surface oxidisation of the cast iron may thereafter occur, causing<br />
the vitreous enamel to fall off. Such damage will not be covered by your warranty. We recommend that a light coating of petroleum jelly be applied to any<br />
damaged areas when the cooker is not in use to help keep out the damp, in addition to following instructions in your Operating manual.<br />
CUSTOMER CARE<br />
In the event you should require spare parts, please order through your <strong>ESSE</strong> dealer.<br />
Should you have cause for dissatisfaction with your cooker, you should contact your <strong>ESSE</strong> dealer, who will, in most instances, be able to offer you<br />
immediate assistance. You will be required to give the following details.<br />
• Your name, address and postcode.<br />
• Your telephone/contact details.<br />
• Clear and concise details of the fault.<br />
• Model and serial number of the cooker (found on the inside panel of the control oven door).<br />
• Purchase date (please note that a valid purchase receipt or guarantee documentation is required for in-guarantee service calls).<br />
We will then check that we have an accurately completed warranty card, if not then any work carried out may be changed.<br />
We will access the nature of the complaint and either send replacement parts for your dealer to fit, send an engineer to inspect & report, or send an engineer<br />
to remedy. If the fault is not actually due to faulty workmanship but some other cause such as misuse or failure to install correctly, a charge will be made to<br />
cover the cost of the visit and any new parts required, even during the warranty period. Home visits are made between 08.30-1700 hrs Monday to Friday,<br />
and are arranged for either a morning or afternoon appointment.<br />
<strong>ESSE</strong> Engineering Limited, Ouzledale Foundry, Long Ing, Barnoldswick, Lancashire BB18 6BN<br />
Tel: 01282 813235 Fax: 01282 816876 e-mail: enquiries@esse.com<br />
THIS APPLIANCE MUST BE COMMISSIONED BY A HETAS REGISTERED ENGINEER OR A COMPETENT PERSON.<br />
THE WARRANTY CARD MUST BE RETURNED TO ENSURE GUARANTEE VALIDITY Website: http://www.esse.com On-line 8 store: http://esseparts.com
INTRODUCTION<br />
We are pleased that you have chosen an <strong>ESSE</strong> Woodfired range cooker. We would ask you to read the following<br />
instructions very carefully. Correctly installed and operated, your <strong>ESSE</strong> will give satisfactory service for many years.<br />
We feel certain that you will enjoy the warmth and comfort of your <strong>ESSE</strong> and, perhaps more importantly, you will<br />
more than enjoy the superb quality of the cooking.<br />
CONTENTS<br />
Safety notes Page 2 Operating the Oven and Hob Page 6<br />
Your cooker Page 3 Types of Fuel Page 7<br />
Before Using Your Cooker Page 4 The Hotplate Page 7<br />
Tools & Accessories Page 4 Flueway Cleaning Page 7<br />
Lighting and Controlling the Fire – De-ashing Page 5<br />
SAFETY NOTES<br />
• All local regulations, including those referring to national and European standards need to be complied with<br />
when installing the appliance.<br />
YOUR COOKER<br />
Your woodfired range cooker is a combination appliance providing a hot plate, fast and slow ovens. The air-slider is<br />
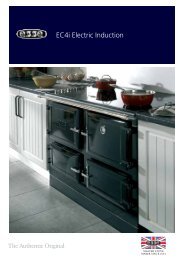
used in conjunction with the firebox door for initial light up and subsequential burning rate control. The firebox door<br />
has a 2-stage catch. Closed on position 1 the door is locked slightly ajar to boost primary air for hotter temperatures<br />
and position 2 closes the door completely (see Fig. 2). Do not use logs which are too long as they can damage the<br />
lining on the rear of the firedoor.<br />
The firebox linings i.e. brick and steel base are to remain permanently fixed in position.<br />
There are two hinged stainless steel lift up covers to conserve heat losses from the hotplate when it is not in use.<br />
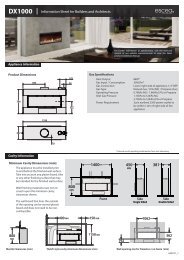
A flue damper is fitted in the bottom of the fluebox and is in the open position when the lever is pointing to the rear<br />
of the cooker. This is used on initial light up and also gives a cooler oven temperature when open (see Fig.3a).<br />
The cooker has two ovens; the upper oven is fitted with a thermometer for general use and a lower oven suitable for<br />
slow cooking and warming.<br />
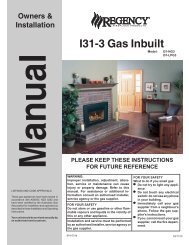
Caution: During cooking ensure steam vents (see Fig.1) in both ovens are kept clear so any cooking steam is<br />
properly vented away via the flue.<br />
Fig.1 – Your Cooker<br />
• A suitable and compliant flue is essential for this appliance to operate properly. It must be capped to prevent<br />
ingress of rain and regulated with a flue regulator where there is excessive draft. External flues must be<br />
insulated (see installation instructions). Failure to connect this appliance to a suitable, properly working flue<br />
will seriously inhibit the cooker’s performance.<br />
• Properly installed, operated and maintained, this appliance will not emit fumes into the dwelling. However<br />
occasional fumes from de-ashing and re-fuelling may occur. Persistent fume emission is potentially dangerous<br />
and must not be tolerated. If fume emission does persist, open doors and windows to ventilate the room. Let the<br />
fire burn out or eject and safely dispose of fuel from the appliance. Once the fire is cold, check the flue and<br />
chimney for blockages and clean if required. Do not attempt to re-light the fire until the cause of the fume<br />
emission has been identified and corrected. Seek expert advice if necessary.<br />
• An adequate air supply for combustion and ventilation is essential. Air openings provided for this purpose<br />
muse not be restricted. Also if simultaneous operation of other heating appliances is required within the kitchen<br />
ensure that there is sufficient ventilation.<br />
• Should it be likely that children, aged or infirm people approach the appliance whilst the fire door is open, then<br />
a fireguard manufactured in accordance with BS 6539 should be used. Also warn children not to sit or stand on<br />
the appliance or use it as a ‘step-stool’ for access cupboards or shelves etc above the appliance.<br />
• Care must be taken not to close the inner firebox door against any logs protruding from the fire. Damage to the<br />
inner door lining will occur. See label.<br />
• Avoid the use of aerosol sprays in the vicinity of the cooker when it is in operation and do not heat any<br />
unopened airtight containers.<br />
• Ensure that precautions are taken when deep fat frying, never leave the appliance unattended and ensure you<br />
have fire safety equipment available such as a fire blanket in case of emergency.<br />
• When operating the cooking stove use the tools provided and follow these instructions carefully.<br />
Warning!: Do not place towels on the handrail when the fire door is open, keep pets and children away and ensure<br />
that any curtains in the vicinity of the appliance cannot ignite even when displaced by a prevailing draught. Some<br />
of the cooker surfaces can be hot when in use.<br />
2<br />
BEFORE USING YOUR COOKER<br />
Check that the plastic protection coating has been removed from each hotplate cover, and from the inside of the<br />
doors. This should have been done during installation but if the plastic has been left on it will melt on firing the<br />
cooker and cause damage to the linings.<br />
The hotplate surface should be wiped with a dishcloth or similar, which has been soaked with hot water and a<br />
detergent liquid. Finally dry off the hotplate with an absorbent material.<br />
3
Fig.2 – Two Stage Door Catch<br />
TOOLS AND ACCESSORIES<br />
The following items are supplied with your <strong>ESSE</strong> cooker:<br />
Accessories<br />
1x ROASTING TIN<br />
1x BAKING TRAY<br />
2x WIRE SHELVES (all shelves fit in either oven)<br />
1x GLOVE<br />
Fig.4 – Tools for Cleaning and Maintenance<br />
Fig.3a – Flue Damper and Flue Box Door<br />
Fig.3b – Flue damper closed<br />
Tools<br />
ASH SHOVEL<br />
LIFTING TOOLS (for lifting off the hotplate)<br />
FLUE RAKE<br />
FLEXIBLE FLUE CLEANING BRUSH<br />
WIRE BRUSH<br />
LIGHTING AND CONTROLLING THE FIRE<br />
In order to light the fire check that the flue damper is in the open position (see Fig.3a) and the fluebox door is closed.<br />
Open the firebox door. Open the primary air slider (on inner firebox door). Open the inner firebox door and place<br />
paper, kindling and small logs on the floor of the firebox and light. Close the inner and outer firebox doors to the<br />
first catch position (see Fig.2) and leave the fire for 20 minutes to become established then re-fuel. Close the firebox<br />
door. Once the fire is established and the ovens are up to the required temperature, use the primary air slider to<br />
control the burning rate and oven temperature. Try not to re-open the firebox door after refuelling for at least 20<br />
minutes, as it is likely to smoke back out of the door. By closing the flue damper (see Fig.3b) the oven will become<br />
hotter.<br />
The cooker must not be run with the firebox door open. When you need to refuel the fire, open the door slowly, to<br />
avoid smoke and flames entering the room.<br />
Secondary air enters over the top of the fire through built-in air vents in the combustion box and works continuously<br />
by design.<br />
The flue box door is fitted with a screw control (see Fig.3a). This may be fully or partially opened, to reduce the flue<br />
pull on the fire and thus air extended burning times. Its effect is dependant upon prevailing flue conditions, which<br />
may vary according to wind and weather. If there is any sign of smoke leakage from this control, ensure it is closed.<br />
Fuel Loads<br />
The firebox can be loaded o capacity or as required depending on your usage requirement. Do not force wood into<br />
the firebox and always ensure that the fire door can be closed without touching the loaded logs.<br />
Slow Combustion<br />
In order to achieve overnight burning a layer of ash needs to be built up in the firebox, when this is done load the<br />
firebox and close the primary air slider, flue damper and firebox door. Avoid opening the firebox door until next<br />
required. Over night burning is best achieved using properly seasoned firewood. To re-inflame, use kindling wood<br />
first before adding larger logs.<br />
In the event of a chimney fire close all cooker controls and take appropriate action (see page 6).<br />
If the draught strength in the chimney is too much, overnight burning may not be possible without fitting a stabiliser.<br />
To boost the hotplate or oven temperature – open the firebox door and open the primary air slider for 10 to 15<br />
minutes. To boost the hotplate temperature and not oven – open the damper in the flue (see Fig.3a).<br />
Open the fluebox door using the screw control (see fig.3a) to slow down the burning rate of the cooker, for example<br />
when a cool oven is required.<br />
DO NOT use a poker when tending the fire; this could damage the brick lining.<br />
De-Ashing<br />
Only remove small amounts of ash from the firebox. When de-ashing, leave 30mm to 40mm depth of ash in the<br />
bottom of the firebox for the best performance. Always use the glove to open and close the door. Never hang tea<br />
towels or material above the fire door when the door is open on the first catch setting, or when re-fuelling or deashing.<br />
Note: Your cooker should not be used as an incinerator and non recommended fuels shall not be used.<br />
4<br />
5
OPERATING THE OVEN AND HOB<br />
The temperature of the hotplate is graduated from left to right. The left side is hotter and so is used for boiling and<br />
the right side is for simmering. The hotplate should never me removed whilst there is a live fire in the firebox.<br />
The oven doors and firebox door are opened by lifting the handles manually (note they will become hot during use,<br />
so please use a gloved hand).<br />
The oven and hob are heated directly by the fire. Oven the fire is established the flue box damper should be closed<br />
(pulled forward). This position will force the heat from the fire to circulate around the flue ways, thus heating up the<br />
hob and the oven.<br />
The hob lids can be left down when the hob is not in use to keep the hotplates warm. In order to reduce oven<br />
temperature the flue damper should be in the open position. This will allow heat to escape directly up the chimney.<br />
The temperature gauge on the oven door only provides an indication of the oven temperature, but since it is In the<br />
door itself, the thermometer will react to show the oven temperature but the reaction will be slightly delayed as<br />
opposed to instantaneous.<br />
The ovens are fitted with anti-pull out stops to prevent shelves from being pulled out accidentally. To remove the<br />
shelf pull forward until stops, lift the front end, pull out of the oven. Use reverse procedure to refit the oven shelves.<br />
TYPES OF FUEL<br />
Wood<br />
For best results use well seasoned hardwood such as Oak, Ash or Beech. Allow wood to dry out under cover in wellventilated<br />
conditions for at least twelve months. Wood is ready for burning when radial cracks appear in the end of<br />
the logs. Burning wood that is not seasoned will result in tar being deposited in the cooker and flueways.<br />
This build-up of tar is a hazard and if it ignites may cause a chimney fire. In the event of a chimney fire, close the air<br />
controls on the appliance and call the fire brigade for assistance. Resinous softwoods burn well and give a high<br />
output for short periods but is not as efficient and do not last as long as hardwood.<br />
Warning!: This appliance is not suitable for use with solid mineral fuels, e.g. Coal, Coke, Anthracite, etc.<br />
THE HOTPLATE<br />
SHUTTING DO<strong>WN</strong> PROCEDURE<br />
Allow the fire to burn out and close all air controls.<br />
Long Term Shut Down<br />
If the cooker is to be shut down for long periods ie during summer months or if the appliance is in a second home<br />
that is not used at all the time, precautions should be taken to avoid damage from condensation and corrosion. If<br />
possible remove the hotplate and leave all air controls open and the bolster lids up to ensure maximum ventilation of<br />
the appliance whilst not in use for long periods.<br />
MAINTENANCE & FLUEWAY CLEANING<br />
Important: The fire must be out and the cooker cold.<br />
Used correctly with properly seasoned firewood your cooker will not need professional maintenance or servicing.<br />
Regular home maintenance is however essential to keep the cooker working optimally. This includes periodic<br />
cleaning of the cookers flue ways.<br />
In order to clean the flueway of the cooker, first remove the hotplate screws and lift it clear of the cooker using the<br />
two hotplate lifting handles. Also remove the fluestrip plate located between the two oven doors and the fluebox<br />
door. Use the flue cleaning brush and flue rake to gather the soot and ash towards the front of the ovens then remove<br />
using a flex-nozzle vacuum cleaner. DO NOT use the cooker when any of the access points are removed.<br />
See separate maintenance guide for more information about regular maintenance and cleaning. It is recommended<br />
that the chimney and flu connected to the cooker are cleaned annually by a qualified chimney sweep.<br />
Note: Where the chimney is believed to have served an open fire installation it is possible that a higher flue gas<br />
temperature from a closed appliance may loosen deposits that were firmly adhered, with the consequent risk of<br />
flue blockage. It is therefore recommended that the chimney be swept a second time within a month of regular use<br />
after installation.<br />
The hotplate is surface found and intended for use with machined base utensils. As heat passes from the hotplate to<br />
the utensil almost directly by conduction, good contact is essential and a thin-bottomed utensil will result in poor<br />
heating performance, especially if the bottom uneven.<br />
It is important to use pots and pans that have a ground base and are flat-bottomed on the hotplate. Cookware made of<br />
stainless steel, cast iron, aluminium, glass and earthenware is suitable for your <strong>ESSE</strong>. The hottest part of the<br />
hotplates the left-hand end while the area over the oven is cooler. Quick boils on the former and then transfer for<br />
simmering on the latter. For deep fat frying, bring to temperature on the ‘right’ side. Introduce cold food and the<br />
return to temperature on the ‘hotter’ side.<br />
Cooking directly on the hotplate is another facility – griddle scones, burgers, sausages, steaks and even Welsh<br />
Rarebit can be cooked directly on the surface.<br />
Meringues can be dried on a baking tray sitting on the hob overnight.<br />
Additionally, by using a barbecue griller you can produce your own toasted sandwiches on the top oven.<br />
The hotplate can be rubbed down with a proprietary cleaning pad if necessary, but normally should need no attention<br />
unless spillage is allowed to harden on its surface.<br />
Always keep hotplate covers down except when using the hotplate.<br />
6<br />
CONSUMABLE SPARE PARTS<br />
1. Combustor (shown right)<br />
2. Brick Linings<br />
3. Ash pit base<br />
7