Keymaker for MB trucks. - noimmo
Keymaker for MB trucks. - noimmo
Keymaker for MB trucks. - noimmo

Create successful ePaper yourself
Turn your PDF publications into a flip-book with our unique Google optimized e-Paper software.
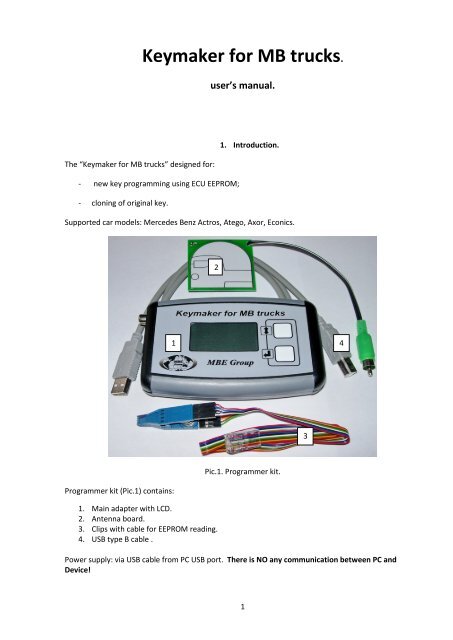
<strong>Keymaker</strong> <strong>for</strong> <strong>MB</strong> <strong>trucks</strong>.<br />
user’s manual.<br />
1. Introduction.<br />
The “<strong>Keymaker</strong> <strong>for</strong> <strong>MB</strong> <strong>trucks</strong>” designed <strong>for</strong>:<br />
- new key programming using ECU EEPROM;<br />
- cloning of original key.<br />
Supported car models: Mercedes Benz Actros, Atego, Axor, Econics.<br />
2<br />
1<br />
4<br />
3<br />
Pic.1. Programmer kit.<br />
Programmer kit (Pic.1) contains:<br />
1. Main adapter with LCD.<br />
2. Antenna board.<br />
3. Clips with cable <strong>for</strong> EEPROM reading.<br />
4. USB type B cable .<br />
Power supply: via USB cable from PC USB port. There is NO any communication between PC and<br />
Device!<br />
1
2. How to connect.<br />
Connect antenna cable and USB cable to according connectors of Main adapter.<br />
Plug in USB cable to USB port of PC.<br />
Now programmer is ready <strong>for</strong> working.<br />
3. New key programming<br />
Prepare Programmer according (see point 1), connect clips to EEPROM microchip from ECU (clear it<br />
from vanish be<strong>for</strong>e it), wait of appearance of Main menu mode on LCD (pic.2).<br />
1<br />
2<br />
Pic.2 Main Menu.<br />
Pic.3. Model Selection.<br />
Select “NEW” line from Main menu with button 1 and press button 2.<br />
You will jump in Car Model Selection menu (pic.3).<br />
Select model you need with button 1. Press button 2. Car’s made year selection menu will appear on<br />
LCD (pic.4).<br />
Pic.4. Car’s made year selection.<br />
Pic.5 EEPROM data.<br />
Select year of made with button 1 and then press button 2. Data from ECU EEPROM will be written in<br />
second line of LCD menu (pic.5).<br />
Put transponder chip or keyblank with transponder on Antenna board (pic.6).<br />
2
Pic.6. Transponder chip (keyblank) placed on Antenna board.<br />
Press button 2. You will see “WAIT..” (pic.7) during the programming.<br />
Pic.7 Transponder chip writing.<br />
Pic.8. Writing finished successfully.<br />
If transponder writing successfully finished “write ok”(pic.8) will appear on LCD. Press button 2 <strong>for</strong> go<br />
back to Main Menu.<br />
Possible ERRORS.<br />
If programmer detects errors during writing it reports about them on LCD. Use button 2 <strong>for</strong> going back<br />
to Main Menu <strong>for</strong> trying writing again.<br />
NO EEPROM ANSWER.<br />
Check clearing of EEPROM chip pins and contact quality between clips and EEPROM chip. Check<br />
connection of clips cable and programmer.<br />
ERROR A.<br />
Programmer can’t detect transponder chip in antenna area, it’s possible that there is no transponder<br />
inside keyblank or transponder ID is wrong. Aloud transponders – ID T5.<br />
ERROR B, ERROR C.<br />
Wrong transponder’s answer <strong>for</strong> programmer’s commands.<br />
Check if you place transponder chip properly on antenna board. Try to move a bit it’s placing.<br />
3
4. Original key cloning.<br />
Prepare Programmer according (see point 1), wait of appearance of Main menu mode on LCD (pic.9).<br />
1<br />
2<br />
Pic.9. Main Menu.<br />
Pic.10.<br />
Select “COPY” line from Main menu with button 1 and press button 2 (pic.9).<br />
You will see Place Original on LCD(pic.10).<br />
Place original key on antenna board like on pic.6. Press button 2 <strong>for</strong> reading key data. You will see<br />
“WAIT..” (pic.12) during the reading and PLACE TARGET when programmer will be ready <strong>for</strong> writing of<br />
new transponder chip (pic.11).<br />
Pic.11.Original key has been read by programmer.<br />
Pic.12. Reading and writing LCD picture.<br />
Put transponder chip or keyblank with transponder on Antenna board (pic.6).<br />
Press button 2. You will see “WAIT..” (pic.12) during the programming.<br />
If transponder writing successfully finished “copy ok”(pic.13) will appear on LCD. Press button 2 <strong>for</strong> go<br />
back to Main Menu.<br />
4
Pic.13. Transponder has been written successfully.<br />
Cloning ERRORS<br />
If programmer detects errors during writing it reports about them on LCD. Use button 2 <strong>for</strong> going back<br />
to Main Menu <strong>for</strong> trying writing again.<br />
ERROR 5.<br />
Programmer can’t read original key, it’s possible there is no transponder inside the keyblank.<br />
ERROR A.<br />
Programmer can’t write new transponder chip, it’s possible there is no chip inside keyblank or wrong<br />
transponder ID.<br />
ERROR B, ERROR C.<br />
Wrong transponder’s answer <strong>for</strong> programmer’s commands.<br />
Check if you place transponder chip properly on antenna board. Try to move a bit it’s placing.<br />
5