SmartJoist Design Guide 2011.pub - Tilling Timber
SmartJoist Design Guide 2011.pub - Tilling Timber
SmartJoist Design Guide 2011.pub - Tilling Timber

You also want an ePaper? Increase the reach of your titles
YUMPU automatically turns print PDFs into web optimized ePapers that Google loves.
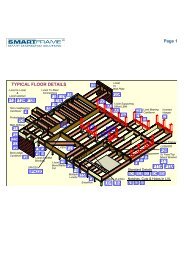
TYPICAL <strong>SmartJoist</strong> FLOOR DETAILS (Cont’d)<br />
1.2 STAGES OF BLOCKING/<br />
BRACING<br />
1.2.1 TEMPORARY (DURING<br />
CONSTRUCTION) END BLOCKING<br />
Temporary or during construction blocking of the ends of<br />
joists over external wall must comply with the<br />
requirements as shown in the “SAFETY WARNING” on<br />
page 6 and as shown in the “TYPICAL <strong>SmartJoist</strong> FLOOR<br />
FRAMING” diagram on page 14.<br />
This is summarised as:<br />
• Temporary struts, fastened to top of <strong>SmartJoist</strong>, connected<br />
back to braced supports.<br />
• Temporary floor sheeting nailed to the first 1200 mm<br />
of joists at the end of the bay, in combination with<br />
struts, if no connection to a braced wall can be made.<br />
2.0 INTERIOR SUPPORTS<br />
2.1 ENDS OF SIMPLE SPANS<br />
Where <strong>SmartJoist</strong>s are discontinuous over interior supports,<br />
install the temporary strut bracing as per “SAFETY<br />
WARNING” on page 6.<br />
2.2 CONTINUOUS SPANS<br />
Continuous joists over internal supports do not require<br />
blocking, other than the temporary top flange struts as<br />
shown in the “SAFETY WARNING” on page 6, except in<br />
the following circumstances:<br />
• Load bearing walls bear onto the joists at their support.<br />
(Details F7 or F8 apply)<br />
• Shear resistance is required in internal walls (This is a<br />
function of shear resistance, and is not related to the<br />
structural adequacy of the joist itself.)<br />
3.0 BLOCKING AND WALL PLATES<br />
1.2.2 PERMANENT END<br />
BLOCKING/BRACING<br />
Permanent blocking (bracing) to be effective in providing<br />
adequate transfer of racking and shear loads through the<br />
floor diaphragm must comply with the details as shown in<br />
“TYPICAL <strong>SmartJoist</strong> FRAMING” diagram on page 14. In<br />
essence, fully block the ends of all joists at their bearing<br />
point on external walls, as per one of the options shown in<br />
details F1- F4.<br />
This permanent blocking/bracing provides:<br />
Wall plates in the frame are required to transfer vertical<br />
loads into the support structure below. These wall plates<br />
may be supported at 450 or 600 mm ctrs, thus acting as<br />
a beam between supports, bending about its weaker axis.<br />
When concentrated loads act at the centre of this wall<br />
plate, the bending and deflection effects can be quite significant.<br />
The full blocking of external and load bearing<br />
walls, as shown in details F1-F4, can act as a beam transferring<br />
these loads to the support structure below, thus<br />
reducing the beam effect of the wall plates.<br />
Unless there is a requirement for double wall plates for a<br />
reason OTHER than the beam effect between supports,<br />
walls blocked as per detail F1-F4 and general notes #2,<br />
#3, and #4 provide sufficient beam action to allow single<br />
wall plates.<br />
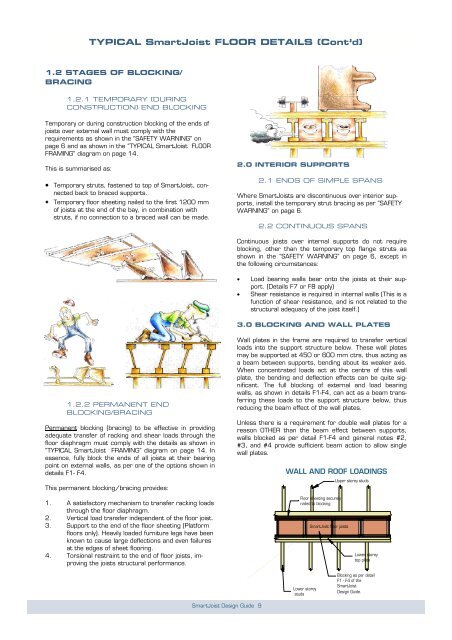
WALL AND ROOF LOADINGS<br />
Upper storey studs<br />
1. A satisfactory mechanism to transfer racking loads<br />
through the floor diaphragm.<br />
2. Vertical load transfer independent of the floor joist.<br />
3. Support to the end of the floor sheeting (Platform<br />
floors only). Heavily loaded furniture legs have been<br />
known to cause large deflections and even failures<br />
at the edges of sheet flooring.<br />
4. Torsional restraint to the end of floor joists, improving<br />
the joists structural performance.<br />
Floor sheeting securely<br />
nailed to blocking<br />
<strong>SmartJoist</strong> floor joists<br />
Lower storey<br />
top plate<br />
Lower storey<br />
studs<br />
Blocking as per detail<br />
F1 - F4 of the<br />
<strong>SmartJoist</strong><br />
<strong>Design</strong> <strong>Guide</strong>.<br />
<strong>SmartJoist</strong> <strong>Design</strong> <strong>Guide</strong> 9