Durastone Panels Installation Instructions - Entre Prises Climbing ...
Durastone Panels Installation Instructions - Entre Prises Climbing ...
Durastone Panels Installation Instructions - Entre Prises Climbing ...

You also want an ePaper? Increase the reach of your titles
YUMPU automatically turns print PDFs into web optimized ePapers that Google loves.
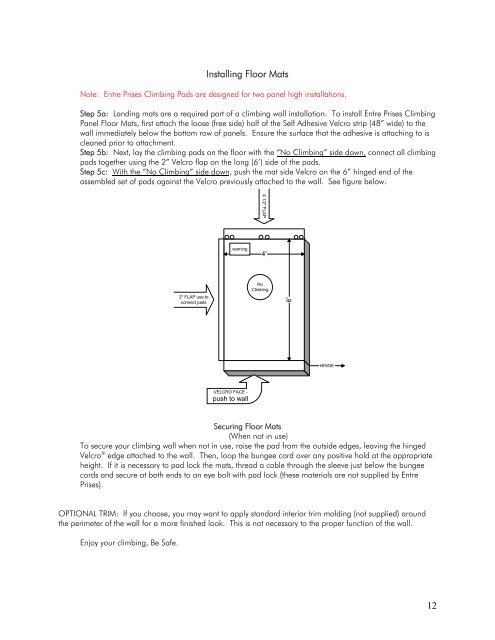
Installing Floor Mats<br />
Note: <strong>Entre</strong> <strong>Prises</strong> <strong>Climbing</strong> Pads are designed for two panel high installations.<br />
Step 5a: Landing mats are a required part of a climbing wall installation. To install <strong>Entre</strong> <strong>Prises</strong> <strong>Climbing</strong><br />
Panel Floor Mats, first attach the loose (free side) half of the Self Adhesive Velcro strip (48” wide) to the<br />
wall immediately below the bottom row of panels. Ensure the surface that the adhesive is attaching to is<br />
cleaned prior to attachment.<br />
Step 5b: Next, lay the climbing pads on the floor with the “No <strong>Climbing</strong>” side down, connect all climbing<br />
pads together using the 2” Velcro flap on the long (6’) side of the pads.<br />
Step 5c: With the “No <strong>Climbing</strong>” side down, push the mat side Velcro on the 6” hinged end of the<br />
assembled set of pads against the Velcro previously attached to the wall. See figure below.<br />
4 1/2" FLAP<br />
warning<br />
4'<br />
2" FLAP use to<br />
connect pads<br />
No<br />
<strong>Climbing</strong><br />
6'<br />
HINGE<br />
VELCRO FACE -<br />
push to wall<br />
Securing Floor Mats<br />
(When not in use)<br />
To secure your climbing wall when not in use, raise the pad from the outside edges, leaving the hinged<br />
Velcro ® edge attached to the wall. Then, loop the bungee cord over any positive hold at the appropriate<br />
height. If it is necessary to pad lock the mats, thread a cable through the sleeve just below the bungee<br />
cords and secure at both ends to an eye bolt with pad lock (these materials are not supplied by <strong>Entre</strong><br />
<strong>Prises</strong>).<br />
OPTIONAL TRIM: If you choose, you may want to apply standard interior trim molding (not supplied) around<br />
the perimeter of the wall for a more finished look. This is not necessary to the proper function of the wall.<br />
Enjoy your climbing, Be Safe.<br />
12