Specifications of the First Strike FS1 Satellite ... - First Strike Meters
Specifications of the First Strike FS1 Satellite ... - First Strike Meters Specifications of the First Strike FS1 Satellite ... - First Strike Meters
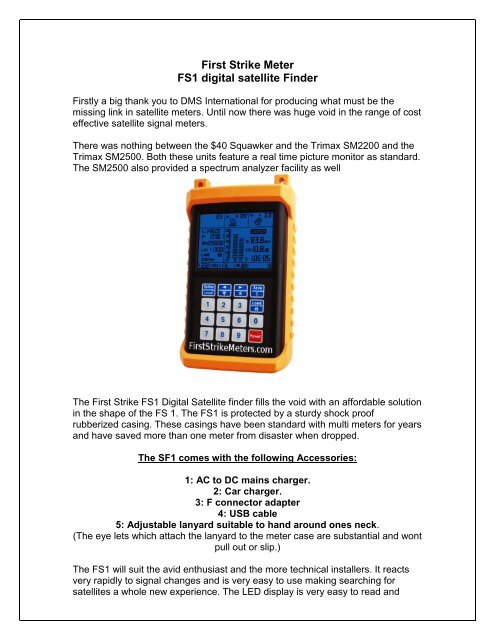
First Strike Meter FS1 digital satellite Finder Firstly a big thank you to DMS International for producing what must be the missing link in satellite meters. Until now there was huge void in the range of cost effective satellite signal meters. There was nothing between the $40 Squawker and the Trimax SM2200 and the Trimax SM2500. Both these units feature a real time picture monitor as standard. The SM2500 also provided a spectrum analyzer facility as well The First Strike FS1 Digital Satellite finder fills the void with an affordable solution in the shape of the FS 1. The FS1 is protected by a sturdy shock proof rubberized casing. These casings have been standard with multi meters for years and have saved more than one meter from disaster when dropped. The SF1 comes with the following Accessories: 1: AC to DC mains charger. 2: Car charger. 3: F connector adapter 4: USB cable 5: Adjustable lanyard suitable to hand around ones neck. (The eye lets which attach the lanyard to the meter case are substantial and wont pull out or slip.) The FS1 will suit the avid enthusiast and the more technical installers. It reacts very rapidly to signal changes and is very easy to use making searching for satellites a whole new experience. The LED display is very easy to read and
- Page 2 and 3: easier to set up. It comes with a U
- Page 4 and 5: Both of these pictures were taken o
- Page 6: Specifications of the First Strike
<strong>First</strong> <strong>Strike</strong> Meter<br />
<strong>FS1</strong> digital satellite Finder<br />
<strong>First</strong>ly a big thank you to DMS International for producing what must be <strong>the</strong><br />
missing link in satellite meters. Until now <strong>the</strong>re was huge void in <strong>the</strong> range <strong>of</strong> cost<br />
effective satellite signal meters.<br />
There was nothing between <strong>the</strong> $40 Squawker and <strong>the</strong> Trimax SM2200 and <strong>the</strong><br />
Trimax SM2500. Both <strong>the</strong>se units feature a real time picture monitor as standard.<br />
The SM2500 also provided a spectrum analyzer facility as well<br />
The <strong>First</strong> <strong>Strike</strong> <strong>FS1</strong> Digital <strong>Satellite</strong> finder fills <strong>the</strong> void with an affordable solution<br />
in <strong>the</strong> shape <strong>of</strong> <strong>the</strong> FS 1. The <strong>FS1</strong> is protected by a sturdy shock pro<strong>of</strong><br />
rubberized casing. These casings have been standard with multi meters for years<br />
and have saved more than one meter from disaster when dropped.<br />
The SF1 comes with <strong>the</strong> following Accessories:<br />
1: AC to DC mains charger.<br />
2: Car charger.<br />
3: F connector adapter<br />
4: USB cable<br />
5: Adjustable lanyard suitable to hand around ones neck.<br />
(The eye lets which attach <strong>the</strong> lanyard to <strong>the</strong> meter case are substantial and wont<br />
pull out or slip.)<br />
The <strong>FS1</strong> will suit <strong>the</strong> avid enthusiast and <strong>the</strong> more technical installers. It reacts<br />
very rapidly to signal changes and is very easy to use making searching for<br />
satellites a whole new experience. The LED display is very easy to read and
easier to set up. It comes with a USB lead so that <strong>the</strong> s<strong>of</strong>tware can be updated<br />
via your PC.<br />
Setting up.<br />
The first parameters to be loaded are your Longitude and Latitude. For New<br />
Zealand it is Long: 174 / Lat: 36S you must enter N for north <strong>of</strong> <strong>the</strong> equator or S<br />
for south <strong>of</strong> <strong>the</strong> equator.<br />
The reason for this is that when you load <strong>the</strong> satellites orbital slot <strong>the</strong> meter will<br />
give you an Azimuth bearing an Elevation angle and also Polarization <strong>of</strong>fset.<br />
In my case I loaded Optus D1 at 160 E which produced <strong>the</strong> following readings:<br />
1: Azimuth <strong>the</strong> arrow faced <strong>the</strong> approximate position <strong>of</strong> 160 E<br />
2: Elevation 45 degrees - that’s close enough.<br />
3 The polarization angle for horizontal polarization 18 V<br />
The Display<br />
The top three displays consist <strong>of</strong> Azimuth / Elevation and Polarization.<br />
The model I have has a circle and arrow pointing to where <strong>the</strong> satellite is located<br />
Below <strong>the</strong>se indicators are:<br />
(LEFT HAND SIDE)<br />
L: This is for <strong>the</strong> satellite longitude 146.<br />
F: Transponder Frequency 12301<br />
S/R symbol Rate 22600<br />
LO LNBF local oscillator frequency can be user selected.<br />
However for universal LNBF’s covering lo and hi band <strong>the</strong> 22k switch needs to be<br />
selected when <strong>the</strong> hi band 10.600 is selected.<br />
LNB Horiz / Vert polarization 13/18V<br />
22 KHz on /<strong>of</strong>f<br />
The bottom display features from left to right<br />
1: The Transponder number in my case No 1 is Optus D1 12456. No 2 Optus<br />
12483<br />
2: Longitude / Latitude. Speaker on /<strong>of</strong>f battery indicator.
Main Window: (RIGHT HAND SIDE)<br />
LOCK: This display only activates in once <strong>the</strong> receiver threshold is exceeded<br />
S / Q: Signal and quality bar graph indicators<br />
S = Signal indicator in dBuv<br />
S/N =Signal to Noise in dB<br />
B: = Bit Error Rate (only activates once <strong>the</strong> receiver threshold is exceeded)<br />
Loading <strong>the</strong> frequencies<br />
Although <strong>the</strong> meter comes with preloaded satellite parameters, I choose to<br />
manually load <strong>the</strong> frequencies I use <strong>the</strong> most.<br />
These are:<br />
Optus D1 12456 / 22500 & 12483 /22500<br />
Optus C1 12407 / 30000<br />
Optus D3 12744 / 22500<br />
Asia Sat 4 3960 /27500<br />
Using <strong>the</strong> meter<br />
Once <strong>the</strong>se parameters were loaded it was time to actually use <strong>the</strong> meter. The<br />
input cable screwed onto <strong>the</strong> right hand side input F connector and <strong>the</strong> power<br />
button depressed. .The LCD display produced all <strong>the</strong> information in <strong>the</strong> top and<br />
left hand display area.<br />
By pressing any number, <strong>the</strong> right hand side activates and <strong>the</strong> meter is primed<br />
ready for action.<br />
The first noticeable items missing are <strong>the</strong> LOCKED and <strong>the</strong> BIT ERROR display.<br />
These do not illuminate until such times as <strong>the</strong> receiver threshold has been<br />
exceeded. Once <strong>the</strong> receiver threshold has been exceeded (Based on <strong>the</strong> FEC)<br />
same as your satellite receiver <strong>the</strong> LOCK display is active and <strong>the</strong> Bit Error Rate<br />
also shows a reading.
Both <strong>of</strong> <strong>the</strong>se pictures were taken on a I hug 35cm dish mated with GenCen<br />
0.3Db LNBF<br />
Optus D1 12456 Locked Optus D1 12483<br />
Locked<br />
Optus D1 12456 /12483 / 22500 Location 160 degrees East<br />
Signal Strength 79% Signal quality 82%<br />
Signal strength 78.9 dBuv<br />
S/N 12.6dB / 12.1dB<br />
BER 1.0E-05<br />
Once <strong>the</strong> signal is connected, <strong>the</strong> meter will detect LNBF noise and display a<br />
signal level indicating that <strong>the</strong> LNBF is operating. Set <strong>the</strong> dish to <strong>the</strong> correct<br />
elevation, and slowly move <strong>the</strong> dish to where <strong>the</strong> satellite should be located. As<br />
<strong>the</strong> signal increases <strong>the</strong> Audio tone gets louder and sharper. When <strong>the</strong> signal<br />
reaches <strong>the</strong> receiver threshold point <strong>the</strong> Signal locks and <strong>the</strong> bit error rate is also<br />
displayed. At this time <strong>the</strong> audio signal should be a steady high pitched tone.<br />
From here it is a very simple exercise to peak <strong>the</strong> dish to gain optimum<br />
performance.<br />
To make cross pole adjustments, simply peak <strong>the</strong> signal for maximum and <strong>the</strong>n<br />
adjust over by rotating <strong>the</strong> LNBF and <strong>the</strong>n slowly come back to <strong>the</strong> maximum<br />
position. You can do this also for Vertical and horizontal if both polarities are<br />
active so that a null position between <strong>the</strong>m is obtained.<br />
I tried this several times with different LNBF’s during <strong>the</strong> tests I carried out on<br />
several different dish sizes. I can report that every time when checked with a<br />
Spectrum Analyzer <strong>the</strong> Cross pole null was perfectly adjusted.<br />
Conclusion<br />
During our testing it was very apparent that this meter is very user friendly. It has<br />
a lot more in <strong>the</strong> way <strong>of</strong> features than I have outlined .It has a default channel<br />
plan as well as a user channel plan which can be copied to <strong>the</strong> channel plan if<br />
required.
The meter can be powered by connecting <strong>the</strong> receiver lead directly to <strong>the</strong> output<br />
terminal if required - similar to how a Squawker is connected to use <strong>the</strong> receiver<br />
power LNBF power output. As <strong>the</strong> meter requires an input <strong>of</strong> 13.5 volts it does<br />
not matter which polarization your STB is locked on to.<br />
Looking through <strong>the</strong> specifications, it is very interesting to note <strong>the</strong> RF input<br />
values range from 30 dBuv which = -77dBm to 105dBuv. Most modern day STB’s<br />
work on RF input level ranging from -25 Dbm which = 82 dBuv so you can see<br />
that this unit is very sensitive indeed which is a big plus for locating weak signals.<br />
The back light function is also a very handy addition. This can be used in low light<br />
conditions as well as in direct sunlight. This is where a lot <strong>of</strong> LCD displays suffer<br />
due to glare on <strong>the</strong> display face.<br />
Finally <strong>the</strong> use <strong>of</strong> <strong>the</strong> lanyard makes carrying this meter a very easy exercise as it<br />
can be strung around ones neck allowing <strong>the</strong> use <strong>of</strong> both hands if one has to<br />
climb ladders.<br />
I must congratulate DMS International with launching a piece <strong>of</strong> KIT that will<br />
serve both <strong>the</strong> enthusiast and <strong>the</strong> installer. This is no mean feat as <strong>the</strong> cost <strong>of</strong><br />
this meter is very competitive. O<strong>the</strong>r meters on <strong>the</strong> market today do not have as<br />
many features or are as easy to use as <strong>the</strong> FIRST STRIKE <strong>FS1</strong><br />
ORDER TODAY FROM JX SATELLITE<br />
admin@jayx.co.nz
<strong>Specifications</strong> <strong>of</strong> <strong>the</strong> <strong>First</strong> <strong>Strike</strong> <strong>FS1</strong> <strong>Satellite</strong><br />
Finder Meter<br />
• Input Frequency Range: 950~2150MHz<br />
•Signal field intensity range: 30dBuV-105dBuV<br />
• Measurement Unit: dBmV; dBµV; dBm<br />
• Measurement Accuracy: ±1.5dB<br />
• Input Resistance: 75 ohm<br />
• Symbol Rate: 2Msps-45Msps<br />
• Connector: F type<br />
• Measurement type: signal strength; bit error rate; S/N<br />
• QPSK switch: automatic identification<br />
• 22K control: supported<br />
• Audio-output: Speaker<br />
• Display: Code segment wide-temperature LCD<br />
• Memory content: 300 reserved locations for global satellite<br />
channels; 100 user-defined channels<br />
• LNB Power Supply: 13V, 18V,


