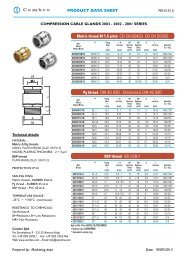
Untitled
Untitled
Untitled

You also want an ePaper? Increase the reach of your titles
YUMPU automatically turns print PDFs into web optimized ePapers that Google loves.
1<br />
Insert the CD<br />
into your computer.<br />
Wait a few seconds.<br />
The installation procedure<br />
will be launched<br />
automatically.<br />
DO NOT CONNECT THE PLOTTER YET<br />
2<br />
Install the plotter horizontally.<br />
The driver installation procedure differs depending on whether<br />
the plotter is connected with the parallel cable or the USB<br />
cable.<br />
Click Driver disk<br />
Select the option:<br />
Do you want to print a<br />
test page? No<br />
Click Next<br />
<br />
In My Computer select<br />
the following location:<br />
C:\<br />
Program files\<br />
Plot Advance\<br />
Driver\<br />
MP303-04\<br />
WIN2K_XP\<br />
Select the<br />
folder WIN2K_XP<br />
then click OK.<br />
<br />
In the language selection<br />
window,<br />
click OK<br />
In the first window,<br />
Click Next<br />
Select only<br />
Plot Advance<br />
Click Next<br />
Click Install<br />
<br />
Continue the wizard<br />
until program installation<br />
is completed.<br />
If this message<br />
appears during<br />
installation click Yes<br />
When installation is completed,<br />
the Plot Advance icon will appear on your desktop.<br />
Remove the CD<br />
PLOTTER INSTALLATION WITH PARALLEL CABLE<br />
Connect the plotter to the computer using the parallel cable.<br />
On the Windows task<br />
bar, select Start, then<br />
click the Printers and<br />
Faxes item.<br />
Alternatively, go to<br />
Control Panel and open<br />
Printers and Faxes by<br />
double clicking.<br />
Click Next<br />
<br />
Click the Add Printer<br />
item in the box on the<br />
left.<br />
The printer wizard will<br />
be launched.<br />
Select only the option:<br />
Local printer<br />
connected to your<br />
computer.<br />
Click Next<br />
<br />
Select the option:<br />
Use the following port.<br />
<br />
In the drop-down<br />
menu, select the port<br />
LPT1<br />
Click Next<br />
Click Browse<br />
In My Computer select<br />
the following location:<br />
C:\<br />
Program files\<br />
Plot Advance\<br />
Driver\<br />
MP303-04\<br />
WIN2K_XP\<br />
Select the file<br />
OEMSETUP.inf,<br />
then click Open<br />
<br />
The installation location<br />
you have just selected<br />
is indicated in<br />
the box at the bottom.<br />
Click OK<br />
Select the plotter<br />
model from the list<br />
Graphtec MP303-04<br />
Click Next<br />
<br />
Give the printer a name<br />
(by default: Graphtec<br />
MP303-04)<br />
Select the option: Do<br />
you want to use this<br />
printer as the default<br />
printer? No<br />
Click Next<br />
<br />
Select the option: Do<br />
not share this printer<br />
Click Next<br />
<br />
Complete the printer<br />
wizard by clicking<br />
End<br />
Windows XP runs a<br />
compatibility check<br />
between the driver<br />
you are installing and<br />
the operating system.<br />
The following alarm<br />
message is normal and<br />
should be ignored.<br />
Click Continue to complete<br />
the installation<br />
process.<br />
After a few seconds, the Graphtec MP303-04 icon will appear<br />
in the Printers and faxes window.<br />
PRINTER INSTALLATION WITH USB CABLE<br />
Connect the plotter to the computer using the USB cable.<br />
Turn the plotter on at the switch on the side.<br />
The operating system will detect the presence of the new hardware<br />
connected.<br />
Wait for the new hardware installation wizard to be launched.<br />
Select the option:<br />
Install from a list or<br />
specified location<br />
(Advanced)<br />
Click Next<br />
Select the option:<br />
Find the best driver<br />
available in these<br />
locations and the<br />
following option:<br />
<br />
<br />
<br />
Include the following<br />
location in the search:<br />
Click Browse<br />
The installation location<br />
you have just selected<br />
is indicated in<br />
the text box.<br />
Click Next<br />
Windows XP runs a<br />
compatibility check<br />
between the driver<br />
you are installing and<br />
the operating system.<br />
The following alarm<br />
message is normal and<br />
should be ignored.<br />
Click Continue<br />
Should the following<br />
window requesting<br />
the file ‘MP303.GPD’<br />
appear, proceed as<br />
follows.<br />
Click Browse…<br />
Select the same driver<br />
location, as illustrated<br />
in the picture opposite.<br />
C:\<br />
Program files\<br />
Plot Advance\<br />
Driver\<br />
MP303-04\<br />
WIN2K_XP\<br />
Select the requested<br />
file MP303.GPD<br />
Click Open<br />
The location you have<br />
just selected is indicated<br />
in the box at the<br />
bottom.<br />
Click OK<br />
Complete the new<br />
hardware wizard by<br />
clicking End.<br />
After a few seconds,<br />
the Graphtec<br />
MP303-04 icon will<br />
appear in the Printers<br />
and Faxes window.
3 4<br />
5<br />
DEFAULT PRINTER SETTINGS<br />
In the Paper tab, set<br />
the field values as<br />
follows:<br />
English<br />
07 I 107<br />
Once the plotter installation is completed, you will need to configure<br />
the plotter.<br />
The printer you have just installed will now be featured in the<br />
Printers and Faxes folder in Windows.<br />
Right click on the Graphtec MP303-04 plotter and select Properties<br />
in the drop-down menu.<br />
Paper Source: Cut Paper<br />
Paper Size: Free Size<br />
Plot Area: 450x297mm<br />
Margin: Enhanced<br />
Rotated: 0<br />
Orientation: Landscape<br />
Unit: mm<br />
Once you have installed the plotter, you will need to configure<br />
the Plot Advance program.<br />
Launch Plot Advance by double clicking the program<br />
icon on your desktop.<br />
The first time the program is launched, it will give the following<br />
warning:<br />
Turn the plotter on then press CHART HOLD.<br />
The display indicates Ready, and the plotter is ready<br />
to operate.<br />
The Graphtec MP303-04 plotter is already set correctly by<br />
Cembre. Check the following settings only in the event of a<br />
plotter malfunction.<br />
Installing the Graphtec MP303-04<br />
plotter on Windows XP<br />
Read the Installation and Maintenance Manual<br />
before commencing this pocedure<br />
Click the Advanced<br />
tab<br />
Click Default…<br />
Click the Options tab.<br />
Set the Step Size<br />
property: 0.025 mm<br />
Click OK in all the<br />
open windows to confirm<br />
the new settings<br />
and return to Printers<br />
and faxes.<br />
Right click on the Graphtec MP303-04 plotter and select Printing<br />
preferences… in the drop-down menu<br />
In the Printing preferences<br />
window, repeat<br />
the same configurations<br />
as the DEFAULT<br />
PRINTER SETTINGS.<br />
Click OK to confirm<br />
the new settings and<br />
return to Printers and<br />
faxes.<br />
Right click on the Graphtec MP303-04 plotter icon and select<br />
Set as Default Printer in the drop-down menu.<br />
After printing with Plot Advance for the first time, re-set the<br />
printer you usually use for documents as the default printer.<br />
Click OK<br />
In the initial window,<br />
click the<br />
Utility menu<br />
followed by<br />
Customizations...<br />
<br />
Set the field values as illustrated in the figure below.<br />
In Default Printer select the Graphtec MP303-04 plotter.<br />
In Default Printer for documents select the printer FP-GL you usually<br />
use for documents.<br />
Then click Offset<br />
Set the field values as<br />
illustrated in the figure<br />
opposite.<br />
To centre the printing<br />
on the media, insert<br />
the values for<br />
Offset X, Offset Y,<br />
Offset X 1 and<br />
Offset Y 1 indicated<br />
on the test sheet.<br />
These values are<br />
indicative and should<br />
subsequently be modified<br />
by printing a few<br />
test pages.<br />
Click OK.<br />
Click F2 - Save to<br />
save the settings and<br />
confirm by clicking<br />
Yes.<br />
Sort Off<br />
Press MODE to enter the settings menu.<br />
The words Pen Type Manual. should be displayed.<br />
If another type of pen is set, press or until the<br />
display indicates the words<br />
Pen Type Manual.<br />
Press ENTER to modify the pen settings.<br />
Press or to select the pen to modify.<br />
Press Expand or to modify Step the speed 25 of the pen.<br />
Press MODE to modify the pen pressure.<br />
The<br />
Speed<br />
correct pen<br />
M<br />
settings are:<br />
NormalSp<br />
Once you have checked these parameters, press ENTER.<br />
The words Pen Type Manual. are displayed.<br />
Press<br />
<br />
to browse the menu.<br />
The words Setup DipSW. are displayed.<br />
Pres ENTER to modify the print settings.<br />
The first line of the display indicates a graphic representation<br />
of the switches (i.e. the print options), and on the second line<br />
the value of the switch being modified.<br />
Press or to select the switch to modify.<br />
Press or to modify the switch value.<br />
The correct switch settings are:<br />
FP-GL<br />
Sort Off<br />
<br />
<br />
No.=ALL<br />
Sp 1,FoL<br />
Expand<br />
Speed M<br />
Once you have checked these parameters, press No.=ALL ENTER.<br />
Sp 1,FoL<br />
If modifications have been made, the display indicates<br />
Reset? ENTorCAN.<br />
Press ENTER to confirm and save the new settings.<br />
If no modifications have been made, the display indicates<br />
Setup DipSW.<br />
Press MODE to exit the settings menu.<br />
The plotter returns to Ready and is ready for use.<br />
<br />
<br />
Thank you for your attention<br />
Step 25<br />
NormalSp<br />
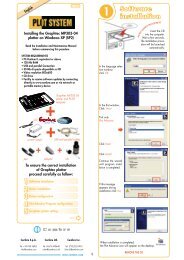
SYSTEM REQUIREMENTS<br />
• PC-Pentium II, equivalent or above<br />
• 128 Mb RAM<br />
• USB and parallel Connection<br />
• 30 Mb di spazio disponibile su HD<br />
• Video resolution 800x600<br />
• CD drive<br />
• Facility to receive software updates by connecting<br />
directly to www.cembre.com or via network or<br />
portable memory device<br />
pen<br />
1<br />
2<br />
3<br />
4<br />
5<br />
CD<br />
power supply<br />
PLOT<br />
LABEL<br />
+<br />
+<br />
USB and parallel cable<br />
SUITE<br />
+ +<br />
adapter<br />
Graphtec MP303-04<br />
plotter and PS-PLT plate<br />
ink<br />
To ensure a correct installation<br />
of Graphtec plotter<br />
proceed carefully as follow:<br />
Cembre S.p.A.<br />
Tel: +39 030 36921<br />
info@cembre.com<br />
Software installation<br />
Driver installation<br />
Driver configuration<br />
Plot Advance Program Configuration<br />
Setting the Graphtec plotter<br />
Cembre Ltd.<br />
Tel: 01675 470440<br />
sales@cembre.co.uk<br />
cont.<br />
Cembre Inc.<br />
Tel: (732) 225-7415<br />
salesUS@cembre.com<br />
www.cembre.com