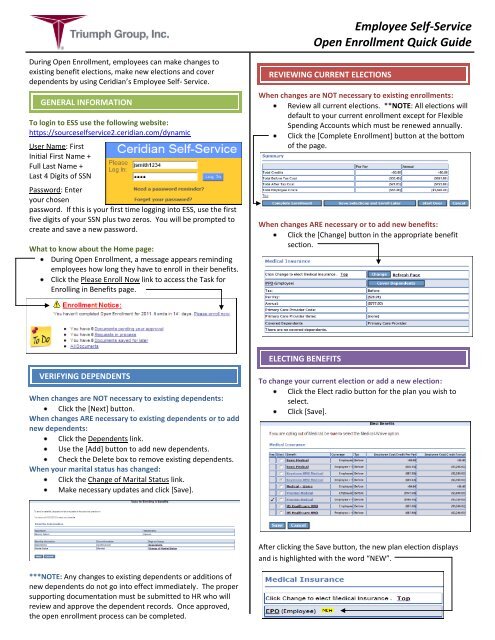
Employee Self-Service Open Enrollment Quick Guide
Employee Self-Service Open Enrollment Quick Guide
Employee Self-Service Open Enrollment Quick Guide

You also want an ePaper? Increase the reach of your titles
YUMPU automatically turns print PDFs into web optimized ePapers that Google loves.
<strong>Employee</strong> <strong>Self</strong>-<strong>Service</strong><br />
<strong>Open</strong> <strong>Enrollment</strong> <strong>Quick</strong> <strong>Guide</strong><br />
During <strong>Open</strong> <strong>Enrollment</strong>, employees can make changes to<br />
existing benefit elections, make new elections and cover<br />
dependents by using Ceridian’s <strong>Employee</strong> <strong>Self</strong>- <strong>Service</strong>.<br />
GENERAL INFORMATION<br />
To login to ESS use the following website:<br />
https://sourceselfservice2.ceridian.com/dynamic<br />
User Name: First<br />
Initial First Name +<br />
Full Last Name +<br />
Last 4 Digits of SSN<br />
Password: Enter<br />
your chosen<br />
password. If this is your first time logging into ESS, use the first<br />
five digits of your SSN plus two zeros. You will be prompted to<br />
create and save a new password.<br />
What to know about the Home page:<br />
During <strong>Open</strong> <strong>Enrollment</strong>, a message appears reminding<br />
employees how long they have to enroll in their benefits.<br />
Click the Please Enroll Now link to access the Task for<br />
Enrolling in Benefits page.<br />
REVIEWING CURRENT ELECTIONS<br />
When changes are NOT necessary to existing enrollments:<br />
Review all current elections. **NOTE: All elections will<br />
default to your current enrollment except for Flexible<br />
Spending Accounts which must be renewed annually.<br />
Click the [Complete <strong>Enrollment</strong>] button at the bottom<br />
of the page.<br />
When changes ARE necessary or to add new benefits:<br />
Click the [Change] button in the appropriate benefit<br />
section.<br />
ELECTING BENEFITS<br />
VERIFYING DEPENDENTS<br />
When changes are NOT necessary to existing dependents:<br />
Click the [Next] button.<br />
When changes ARE necessary to existing dependents or to add<br />
new dependents:<br />
Click the Dependents link.<br />
Use the [Add] button to add new dependents.<br />
Check the Delete box to remove existing dependents.<br />
When your marital status has changed:<br />
Click the Change of Marital Status link.<br />
Make necessary updates and click [Save].<br />
To change your current election or add a new election:<br />
Click the Elect radio button for the plan you wish to<br />
select.<br />
Click [Save].<br />
After clicking the Save button, the new plan election displays<br />
and is highlighted with the word “NEW”.<br />
***NOTE: Any changes to existing dependents or additions of<br />
new dependents do not go into effect immediately. The proper<br />
supporting documentation must be submitted to HR who will<br />
review and approve the dependent records. Once approved,<br />
the open enrollment process can be completed.
<strong>Employee</strong> <strong>Self</strong>-<strong>Service</strong><br />
<strong>Open</strong> <strong>Enrollment</strong> <strong>Quick</strong> <strong>Guide</strong><br />
If additional changes are necessary:<br />
Continue to click [Change] in each section for the plans<br />
to which you wish to make changes.<br />
Continue to Save each change.<br />
COVERING DEPENDENTS/ELECTING BENEFICIARIES<br />
When dependents ARE being covered by a plan:<br />
The Current Elections page will display a warning as a<br />
reminder to select your dependents covered by the<br />
plan.<br />
Click the [Covered Dependents] button for those plans<br />
with dependent coverage.<br />
Check the Cover box and then select the dependent<br />
from the drop down box.<br />
COMPLETING ENROLLMENT<br />
Once you begin to make changes on the Current Elections page,<br />
you have four options:<br />
Complete <strong>Enrollment</strong> – Click this button when you<br />
have finished making all of your elections. Even if you<br />
are not making changes to existing elections, use this<br />
button. The elections are immediately sent to the HR<br />
application for processing.<br />
Save Selections and Enroll Later – Click this button<br />
when you are not ready to submit your new elections.<br />
The changes will be saved and displayed when you<br />
return later. When you are ready to save your<br />
elections, use the Enroll Now link from the Home page<br />
to return to the Current Elections page and select<br />
Complete <strong>Enrollment</strong> to process any benefit changes.<br />
Start Over – Click this button when you wish to clear<br />
any previously made changes. Your benefit elections<br />
will be reset to the previous choices.<br />
Cancel – Click this button when you want to return to<br />
the ESS Home Page. No changes will be saved.<br />
Printing Benefit Confirmation Statements<br />
When beneficiaries must be designated:<br />
Click the [Beneficiaries] button for those plans that<br />
require a beneficiary designation.<br />
To print a Benefit Confirmation Statement immediately after<br />
completing your enrollment:<br />
From the Benefit Confirmation Statement page, click<br />
[OK].<br />
When the statement appears, click [Print].<br />
Click the radio button and select existing dependents<br />
from the Dependent as Beneficiary dropdown.<br />
Click the radio button and enter the name of<br />
beneficiaries who are not dependents in the Non-<br />
Dependent box and select a Relation.<br />
Enter the percentage designation for each Primary<br />
beneficiary (the total must equal 100%).<br />
Enter the percentage designation for each Secondary<br />
beneficiary (the total must equal 100%).<br />
To print a Benefit Confirmation Statement from the Home<br />
Page:<br />
From the Home page, click Benefit Confirmation<br />
Statement link.<br />
When the statement appears, click [Print].<br />
Remember to Logout of ESS correctly:<br />
Use the Logout link<br />
on the top menu.