Xplorer4 - NTech USA
Xplorer4 - NTech USA
Xplorer4 - NTech USA

Create successful ePaper yourself
Turn your PDF publications into a flip-book with our unique Google optimized e-Paper software.
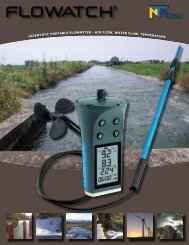
Instruction Manual<br />
visit www.ntechusa.com/support.html for full<br />
manual with all other languages<br />
FEATURES:<br />
• Instant Windspeed<br />
• Maximum Windspeed<br />
• Temperature (air/water)<br />
• Wind chill<br />
• Wind Direction (Digital Compass)<br />
• Altitude<br />
• 48 Hour History of Altitude<br />
• Relative and Absolute Air Pressure<br />
• 48 Hour History of Pressure<br />
• Waterproof<br />
• Backlight
INDEX<br />
TOPIC<br />
PAGES<br />
Technical Specifications .. . . . . . . . . . . . . . . . . . . . . . . . . . . . . . . . . . . . . . . . . . . 2<br />
Brief Instructions................................................. 3-4<br />
General Information............................................... 5<br />
Warranty................................................... 5<br />
Care & Maintenance .. . . . . . . . . . . . . . . . . . . . . . . . . . . . . . . . . . . . . . . . . . 5-6<br />
Switching On & Off. .............................................. 6<br />
Permament Operation.......................................... 6<br />
Battery........................................................ 7<br />
Backlight .. . . . . . . . . . . . . . . . . . . . . . . . . . . . . . . . . . . . . . . . . . . . . . . . . . . . . 7<br />
Modes and Mode Changing.. . . . . . . . . . . . . . . . . . . . . . . . . . . . . . . . . . . . . . . . . 8<br />
Wind speed..................................................... 9<br />
Maximum Wind Speed. ........................................ 9<br />
Temperature.. . . . . . . . . . . . . . . . . . . . . . . . . . . . . . . . . . . . . . . . . . . . . . . . . . . 10<br />
Wind Chill...................................................... 11<br />
Wind Direction/Digital Compass. ..................................... 12<br />
Calibration of Compass.. . . . . . . . . . . . . . . . . . . . . . . . . . . . . . . . . . . . . . . . 12<br />
Altitude. . . . . . . . . . . . . . . . . . . . . . . . . . . . . . . . . . . . . . . . . . . . . . . . . . . . . . . . 13-14<br />
Maximum Altitude. ........................................... 14<br />
Calibration of Altitude.. . . . . . . . . . . . . . . . . . . . . . . . . . . . . . . . . . . . . . . . . 14<br />
Air Pressure .. . . . . . . . . . . . . . . . . . . . . . . . . . . . . . . . . . . . . . . . . . . . . . . . . . . 15-17<br />
Absolute & Relative Pressure.. . . . . . . . . . . . . . . . . . . . . . . . . . . . . . . . . . . . 15<br />
Calibration of Pressure .. . . . . . . . . . . . . . . . . . . . . . . . . . . . . . . . . . . . . . . . 16<br />
Recording Modes.. . . . . . . . . . . . . . . . . . . . . . . . . . . . . . . . . . . . . . . . . . . . . . . . 17<br />
Activating/Deactivating History. .................................. 18<br />
Viewing History Records .. . . . . . . . . . . . . . . . . . . . . . . . . . . . . . . . . . . . . . . 18<br />
General Reset.. . . . . . . . . . . . . . . . . . . . . . . . . . . . . . . . . . . . . . . . . . . . . . . . . . 18<br />
Other <strong>NTech</strong> Products.............................................. BACK<br />
Contact Information............................................... BACK<br />
2
TECHNICAL SPECIFICATIONS<br />
Size and weight: 3.5 x 1.5 x 0.75 in, 2 oz. (41 x 93 x 17 mm, 53 g)<br />
Operational temperature: -22°F to +140°F (-30°C to +60°C)<br />
Waterproof:<br />
1 meter for short duration; does not float<br />
Battery:<br />
1 CR2032 button cell<br />
Battery Life:<br />
Approx. 30,000 1-minute measurements; 500 hours<br />
With recording on, approx. 25,000 measurements; 416 hours<br />
WIND SPEED:<br />
2 measurements per second with 0.1 unit resolution<br />
Measuring range:<br />
1.1 to over 93 mph (150 km/h, 42 m/s, 81 knots, 136 fps)<br />
Accuracy: +/- 3%<br />
TEMPERATURE:<br />
Measuring range:<br />
Accuracy:<br />
2 measurements per second with 0.1°F/C resolution<br />
-58°F to 212°F (-50°C -- 100°C)<br />
+/- 0.5°F (0.3°C)<br />
COMPASS:<br />
2 measurements per second with 1° resolution<br />
Measuring range: 0° to 359°<br />
Accuracy: +/- 4°<br />
ALTITUDE:<br />
1 measurement per second with 3ft (1m) resolution<br />
Measuring range: -2,300 to 29,500 ft (-700 to 9,000 m)<br />
(above 9,999 ft, only meters will be displayed)<br />
Accuracy: +/- 10 ft (+/- 3 m)<br />
PRESSURE:<br />
Measuring range:<br />
Accuracy:<br />
1 measurement per second with 0.01 inhg (1 hPa) resolution<br />
8.86 to 32.50 inHg (200 to 1100 hPa)<br />
+/- 0.03 inhg (1 hPa)<br />
All accuracies are based on ideal situations. Actual accuracies will depend on airflow, proper<br />
use, and time to adjust to surrounding variances.<br />
3
BRIEF INSTRUCTIONS<br />
For complete instructions on each feature, please refer to the instruction manual<br />
GENERAL OPERATION<br />
The SKYWATCH Xplorer features one-button operation. The battery is already installed. To turn on, press<br />
and release the button on the front of the unit, located beneath the LCD screen. The display will show<br />
the same screen as when it was turned off last after about four seconds. Press and release the button<br />
to cycle through each mode. While in a mode, press and hold the button to enter different screens and<br />
features. The SKYWATCH Xplorer will automatically shut off one minute after the last button press. This<br />
feature can be temporarily disabled by pressing the button while the LCD is flashing.<br />
WIND SPEED<br />
Wind speed is measured by holding the Xplorer upright into the wind. The small impeller rotates, which<br />
creates a magnetic field read by the Xplorer. Wind speed is displayed at the top in all modes other than<br />
pressure or altitude history. Maximum wind speed can be displayed in the bottom. To change units,<br />
select the maximum wind speed mode, then press and hold the button. After five seconds the units will<br />
change; release when the desired units are displayed.<br />
TEMPERATURE<br />
Temperature is measured by a thermometer adhered to the inside of the back metal plate. This avoids<br />
any possible damage to an exposed sensor, but it may take several minutes to adjust to ambient<br />
air temperature. Contacting the back plate to a surface that is in the environment will speed up the<br />
adjustment. Water temperature can also be measured by immersion. The two temperature modes are<br />
temperature and windchill. To change the units between C and F, while in either temperature mode<br />
press and hold the button for three seconds and release when the desired unit is displayed.<br />
4
WIND DIRECTION/COMPASS<br />
The digital compass allows for accurate wind direction measurement. Find the direction of wind by<br />
holding the Xplorer upright facing into the wind. The compass will show the degrees off North, 0 is<br />
North, 90 is East, 180 is South, and 270 is West. When used for the first time, the compass needs<br />
to be calibrated before any reading is possible. An initial calibration is necessary, and calibration<br />
when in a new environment will assure the most accurate readings. While in the compass mode, press<br />
and hold the button for two seconds, release when “CAL” is displayed on the top. Slowly turn in a 360<br />
degree circle, about four seconds per quarter turn. When the small circle is complete on the bottom<br />
screen, press the button once to accept.<br />
ALTITUDE & AIR PRESSURE<br />
The SKYWATCH Xplorer 4 has a precise Swiss barometer for measuring altitude and air pressure.<br />
Altitude is measured on the basis of air pressure - this is true in EVERY altimeter, including those found<br />
on aircraft. The Xplorer 4 is designed to perform an adjustment each time it is turned on to adjust to<br />
a close altitude reading. However it is necessary to calibrate to a known altitude before beginning an<br />
ascent or descent. While in an altitude or pressure mode, press and hold the button for FOUR seconds<br />
to change between meters and feet, or hPa and inHg. Please refer to the instruction manual for detailed<br />
instructions on calibration of air pressure and altitude.<br />
ALTITUDE AND PRESSURE HISTORY<br />
There is one history mode for altitude and two history modes for air pressure. By default the recording<br />
is off; to turn recording of history on, while in any history mode press and hold the button until the<br />
top screen shows anything other than “0h”. To scroll backward through history, from 0h (current)<br />
to 1h, 2h...48h simply press and hold the button. Release the button to stop at a specific time, for<br />
example “6h” will display the measurement from 6 hours before. This is useful for tracking changing<br />
air pressure, or for noting ascent or descent.<br />
5
GENERAL INFORMATION<br />
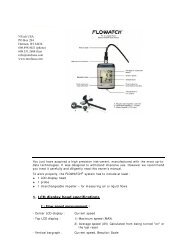
Thank you for purchasing <strong>NTech</strong> <strong>USA</strong>’s SKYWATCH ® Xplorer 4. This instrument is manufactured by JDC<br />
Electronic SA, based in Switzerland, designed and tested to meet the highest standards.<br />
The Xplorer 4 is fitted with a precision replaceable impeller and internal sensors to measure your<br />
environment. It is suitable for a range of activities including hang gliding, kiteboarding, hunting,<br />
shooting, hiking, climbing, or atmospheric monitoring.<br />
The SKYWATCH ® Xplorer range has been designed to withstand short-term immersion in water at a<br />
depth of up to three feet.<br />
IMPORTANT!<br />
This instrument is designed as an aid to users who are in an open air environment, but IT<br />
CANNOT replace advice and warnings from the local weather station. This means that you<br />
should regularly check and compare the measurements provided by your instrument with the<br />
information put out by local sources. <strong>NTech</strong> <strong>USA</strong> and JDC ELECTRONIC SA can in no way be held<br />
responsible for any consequences, direct or indirect, or for any prejudice, which might result from<br />
the use of this instrument.<br />
WARRANTY<br />
<strong>NTech</strong> <strong>USA</strong> warrants this product for 2 years from date of purchase, with proper receipt or product<br />
registration, or one year from date of manufacture with no receipt. Warranty does not necessarily cover<br />
misuse, physical damage, or battery. Please contact us with any problems!<br />
CARE AND MAINTENANCE<br />
Avoid items such as hair, thread, sand and other dust materials getting into the impeller, as they could<br />
cause defective rotation of the impeller and therefore a loss of precision. If a hair or a piece of thread<br />
should manage to get into the impeller, extract it gently using tweezers; in the case of dust or sand,<br />
you can run clean water over the impeller. The Xplorer 4 features a removable, replaceable impeller.<br />
6
Avoid exposing the instrument to extreme climatic conditions for over-long periods. While it uses<br />
components resistant to such temperatures, we recommend that you do not expose your instrument to<br />
strong sources of heat, for example under the windscreen of a vehicle. DO NOT EXPOSE the instrument<br />
to powerful chemicals. Such products could damage it.<br />
SWITCHING ON<br />
The Xplorer 4 features a one-button operation. Thus, this one button will perform several operations<br />
depending on the mode and the amount of time it is depressed. To turn on the Xplorer, press and<br />
release the button. The startup will show the software version (in this example 1.28), the model<br />
number (1, 2, 3, or 4), then show measurements.<br />
SWITCHING OFF<br />
Switching off automatically (Auto-off): Your SKYWATCH® Xplorer goes off automatically 1 minute<br />
after the button was last pressed or after the wind was last measured. This means that it does not stop<br />
while the impeller is still turning (more than 10 seconds).<br />
Switching off manually: In order to switch Xplorer off manually (valid in every mode), hold the<br />
button pressed down until it switches off, then release.<br />
Permanent operation possible: Either at the time of the manual switching off by releasing the<br />
button during the flashing of the large digits, or at the time of automatic switching off by pressing<br />
briefly on the button during the flashing. During permanent operation, any pressure on the button<br />
returns Xplorer into automatic off mode.<br />
7
BATTERY<br />
Your SKYWATCH® Xplorer gets its power supply from a replaceable lithium battery 3V type CR2032.<br />
To change the battery:<br />
1. Unscrew the metal back (6 screws). Place screws in safe location.<br />
2. Unscrew the screw of the battery cover.<br />
3. Gently bend back the cover in order to extract the battery.<br />
4. Put in the new battery observing the polarity (+ upwards), then screw back the battery<br />
cover. Make sure that the tiny tongue in the centre of the top is raised so that it touches<br />
the metal back.<br />
5. Before refitting the back make sure that the seal is clean and securely positioned<br />
in its slot.<br />
6. Refit the back and the 6 screws.<br />
IMPORTANT! This operation must be carried out with care! ANY DEFECTIVE MANIPULATION<br />
DURING THE REPLACEMENT OF THE BATTERY CAN CAUSE LASTING DAMAGE TO YOUR<br />
INSTRUMENT. IN CASE OF DOUBT CONSULT YOUR WATCH DEALER OR REPAIRER, OR<br />
CONTACT NTECH <strong>USA</strong>.<br />
Normal battery life: approximately 30,000 measurements of 1 minute (auto-off) and more than 20<br />
years when off without records. With records approximately 25,000 measurements of 1 minute (autooff),<br />
but 7 years maximum when off.<br />
BACKLIGHT<br />
To get the backlight to light up keep the button pressed for 1 second and as soon as the backlight lights<br />
up, release the button. The backlight remains illuminated for 3 seconds. If within the 5 seconds which<br />
follow you re-illuminate the backlight, it stays lit up for 15 seconds. Beyond these 5 seconds, it lights<br />
up again for 3 seconds. Note: the backlight lights up in the same way in all modes. When the button<br />
is held, for example to change the units, the backlight will flash on briefly and turn off. IMPORTANT:<br />
intensive use of the backlight reduces the life of the battery approximately 100 x greater than without<br />
backlight.<br />
8
MODES AND MODE CHANGING<br />
To change the mode on the SKYWATCH Xplorer 4, briefly press and release the button. The cycle of<br />
the nine modes is:<br />
1. wind + maximum wind<br />
2. wind + temperature<br />
3. wind + wind chill temperature<br />
4. wind + compass<br />
5. wind + altitude and maximum altitude (press and hold the button for 2 seconds to view maximum<br />
altitude, press and release to switch back to current altitude)<br />
6. wind + relative and absolute pressure (press and hold the button for 2 seconds to view absolute<br />
pressure - QFE, press and release to switch back to relative pressure - QNH)<br />
7. history of pressure difference<br />
8. history of relative pressure values<br />
9. history of altitude<br />
max wind temp wind chill compass altitude pressure press. trend press. history alt. history<br />
Within each mode pressing and holding the button will perform different functions, such as changing<br />
the units, calibration, and viewing past history. Pressing and holding the button for 1 second while<br />
in any mode will turn on the backlight. Pressing and holding the button continuously will turn off the<br />
Xplorer; depending on the mode this will be between 6 and 30 seconds. When turned on, the Xplorer<br />
will display the last mode viewed when turned off.<br />
9
MODE: INSTANT WIND SPEED WITH MAXIMUM<br />
Choice of wind speed measurement unit:<br />
To select the wind speed measurement units, the Xplorer must be in the instant<br />
wind speed and maximum wind speed mode. By keeping the button pressed for<br />
approximately 4 seconds, the units start to change. You can choose between the<br />
following units : km/h (kilometers per hour), mph (miles per hour), knots, m/s<br />
(metres per second), and fps (feet per second). When the unit of your choice<br />
appears, release the button and the unit of measurement is thereby selected. This<br />
unit will remain on all wind measurements until changed, even after the Xplorer is<br />
turned off.<br />
Measurement of speed:<br />
For the measurement to be as exact as possible it is necessary to align the instrument along the axis<br />
of the wind.<br />
Display:<br />
The display of the current speed is done on the large digits and the maximum speed reached on the<br />
small digits with the indication max.<br />
Deletion of the maximum:<br />
The maximum is retained even when the instrument is off. In order to reset it to zero keep the button<br />
pressed for at least 2 seconds, then release it.<br />
Accuracy:<br />
Measuring range:<br />
Measuring cycle:<br />
Resolution:<br />
Display range:<br />
+/-3% from 1.1 mph to 93 mph<br />
from 1.0 to over 93 mph (42 m/s, 81 knots, 150 km/h, 136 fps)<br />
2 measurements per second<br />
to one decimal place up to 99.9, then in whole units<br />
from 0.0 to 299 units (accuracy is reduced when over the stated range)<br />
10
MODE: INSTANT WIND SPEED WITH AMBIENT TEMPERATURE<br />
Choice of temperature measurement unit:<br />
To select the temperature measurement units, the Xplorer must be in the instant<br />
wind speed and temperature OR wind chill. By keeping the button pressed down<br />
for at least 2 seconds the units start to change. The units possible are °C (degrees<br />
Celsius) and °F (degrees Fahrenheit) When the unit of your choice appears, release<br />
the button and the unit of measurement is thereby selected.<br />
Measuring ambient temperature:<br />
Note: the temperature sensor is integrated with the metal back of the casing, and<br />
therefore it is the temperature of the back of the casing which is displayed. This special feature makes<br />
it possible to measure very accurately the temperatures such as:<br />
• water (springs, streams, etc.) by immersing the instrument several centimeters;<br />
• surfaces (ground, metal parts, refrigerator interiors etc) by laying as closely as possible the back<br />
of the instrument on the surface to be measured;<br />
• ambient air, either by allowing the instrument to reach the air temperature, which can take<br />
several minutes, or even several dozens of minutes according to the wind speed (avoid direct<br />
sun rays and contact of the back of the casing with your fingers). Otherwise, to get a rapid and<br />
precise measurement, but the back of the casing into contact with an object which is the same<br />
temperature as the air (vehicle bodywork, metal barrier, smooth walls etc.) avoiding surfaces in<br />
dark colors and exposed to sunlight).<br />
Display:<br />
The display of the instant wind speed is done on the large digits while the ambient temperature is<br />
displayed on the small digits.<br />
Measuring cycle:<br />
Measuring range:<br />
Accuracy:<br />
2 measurements per second with 0.1°F/C resolution<br />
-58°F to 212°F (-50°C to 100°C)<br />
+/- 0.5°F (0.3°C)<br />
11
MODE: CURRENT WIND SPEED WITH WIND CHILL TEMPERATURE<br />
Choice of temperature measurement unit:<br />
See previous section, Wind Speed with Ambient Temperature.<br />
Wind Chill Information:<br />
Low temperatures present a danger to the human body and this danger is aggravated<br />
by the speed of the wind. The Xplorer 4 shows immediately the temperature felt by<br />
the body and warns of risks of frostbite and hypothermia.<br />
The wind chill factor is calculated on the<br />
basis of ambient temperature and wind<br />
speed. In the event of wind, it gives an<br />
indication of the loss of heat by the body if<br />
the temperature is less than 50°F (10°C).<br />
This is the formula which was adopted in<br />
January 2003 by the United States Federal<br />
Office for Meteorological Coordination with<br />
the Meteorological Service of Canada (MSC),<br />
the US Department of Defence (DoD) and<br />
the United States National Oceanic and<br />
Atmospheric Administration (NOAA).<br />
Example: an ambient temperature of 0°F and a wind of 20 mph act on your body as if the temperature<br />
were -15°F!<br />
Measuring cycle:<br />
Measuring range:<br />
Accuracy:<br />
2 measurements per second with 0.1°F/C resolution<br />
-99°F to 40°F (-37°C to 4°C)<br />
(above 40°F (4°C), the temperature shown is ambient temperature)<br />
+/- 1°F (0.5°C)<br />
12
MODE: INSTANT WIND SPEED WITH ELECTRONIC COMPASS<br />
Compass display:<br />
The compass display is given in degrees on the small digits. The<br />
Xplorer shows magnetic north, and not geographical north!<br />
Measurement:<br />
To carry out a measurement as accurate as possible, hold your<br />
instrument perfectly vertical, as when measuring wind speed.<br />
If the Xplorer is tilted, it will show rather than an incorrect<br />
reading, unlike many electronic compasses.<br />
Calibration:<br />
IMPORTANT! Calibrate your Xplorer before the first use and at each change of environment or battery.<br />
When the instrument is first started from the factory, it will only display for the compass.<br />
Hold the button pressed down for approximately 3 seconds and release when is displayed. Keeping<br />
the Xplorer completely vertical, slowly turn in a complete circle; it should take approximately 20<br />
seconds to complete one turn. The progression of the screen will be as follows:<br />
first 90° 180° 270° 360° (full circle) successful calibration<br />
Upon successful calibration, press the button to confirm and return to the compass mode. To obtain an<br />
accurate calibration, the impeller MUST NOT turn! If there is wind, shelter the impeller between your<br />
thumb and your index finger.<br />
Note : The earth’s magnetic field are disturbed by metal environments, buildings, power lines, vehicle<br />
interiors, magnetic fields generated by any electrical equipment and by magnets. In order to obtain<br />
accurate measurements, move away from the source of disturbance or to recalibrate.<br />
13
MODE: CURRENT WIND SPEED WITH ALTITUDE<br />
Choice of altitude measurement unit:<br />
The altitude can be shown in m (metres) and ft (feet). Please note that above 9,999<br />
feet the Xplorer 4 will only read in meters due to the limit on the LCD. To change<br />
the units press and hold the button for approximately 4 seconds and the units will<br />
change. Release the button when the desired units are displayed and the instrument<br />
returns to the mode of measuring the instant wind speed with display of the altitude.<br />
This setting will remain until changed again, even after turning the Xplorer 4 off.<br />
Altitude explanation:<br />
ALL altimeters calculate altitude based on a known elevation, and<br />
measure the change in air pressure to determine the change in<br />
altitude, often measured as the height above Mean Sea Level<br />
(MSL). The Xplorer 4 uses a Swiss barometer, which is used for<br />
both the air pressure reading and altimeter functions. The terms<br />
altitude and elevation are often used interchangeably, however<br />
technically elevation is a point on the earth’s surface (mountains for<br />
example) and altitude points above the earth’s surface (airplanes<br />
and structures for example). The altitude displayed by the Xplorer<br />
4 is the height above mean sea level.<br />
Mount McKinley has a larger bulk and<br />
rise than Mount Everest. Even though<br />
the summit of Everest is about 9,000 feet<br />
(2,700 m) higher as measured from sea<br />
level, its base sits on the Tibetan Plateau<br />
at about 17,000 feet (5,200 m), giving it<br />
a real vertical rise of a little more than<br />
12,000 feet (3,700 m). The base of Mount<br />
McKinley is roughly a 2,000-foot plateau,<br />
giving it an actual rise of 18,000 feet<br />
(5,500 m).has a lower elevation of 20,000<br />
feet, yet because its base is at 2,000 feet,<br />
the actual vertical rise is 18,000 feet -<br />
6,000 feet more than Mt. Everest!<br />
Altitude and air pressure relationship:<br />
Air pressure decreases approximately 0.01 inHg for every 10 feet<br />
increase in altitude (at altitudes below 5,000 ft above MSL). Since altitude is based on air pressure,<br />
the change in air pressure from weather patterns will affect the altimeter reading. For example an<br />
incoming storm can lower barometric air pressure by 0.06 inHg in an hour, resulting in a change in<br />
altitude measured of 60 feet. This is a normal occurrence! Altimeter and barometer readings will also<br />
be affected by an external pressure source, for example a well-sealed building or a moving car. The<br />
Xplorer will take between 5 and 20 seconds to adjust to a new altitude reading. The SKYWATCH Xplorer<br />
4 uses a sensitive Swiss barometer and can sense a change in altitude of one foot (0.3 meters).<br />
14
MODE: CURRENT WIND SPEED WITH ALTITUDE (CONTINUED)<br />
Display of the maximum altitude:<br />
Hold the button pressed down for approximately 2 seconds and at the moment<br />
when the indication is displayed, release the button; in this way the instrument goes<br />
into the mode for measuring the instant wind speed with display of the maximum<br />
altitude. In order to quit this mode press once on the button. The instrument then<br />
returns to the wind/altitude mode. To delete the maximum altitude, while in the<br />
maximum altitude mode, press and hold the button for approximately 2 seconds,<br />
then release it. The maximum altitude will revert to the current altitude.<br />
Calibration of the altitude:<br />
Before using the Xplorer to measure altitude, be sure to calibrate it to a known altitude. Alternatively,<br />
it can be calibrated to the local reported relative air pressure, please see the next section<br />
on air pressure. The difference in altitude can always be measured without calibration.<br />
While in the altimeter mode, press and hold the button for 3 seconds until appears<br />
in the large digits and release. Press and hold the button to increase the altitude in steps<br />
of 1 unit. To reduce the altitude, release the button briefly then once again press and<br />
hold the button. As the button is held, the altitude will increase/decrease at a faster rate.<br />
If the altitude requires a large change and the button is held down for many seconds,<br />
the Xplorer 4 may start to flash to turn off. Simply release the button, then repeat to adjust. Once the<br />
altimeter reading is correct, release the button, then briefly press it once. Please note that the altimeter<br />
will revert to meters when the altitude is above 9,999 feet. There are many sources for local elevation,<br />
you can check www.earthtools.org for a good source.<br />
Measurement frequency: 1 measurement per second with 3ft (1m) resolution<br />
Measuring range: -2,300 to 29,500 ft (-700 to 9,000 m)<br />
(above 9,999 ft, only meters will be displayed)<br />
Accuracy:<br />
+/- 10 ft (+/- 3 m) change in altitude<br />
15
MODE: CURRENT WIND SPEED WITH BAROMETRIC AIR PRESSURE<br />
Choice of air pressure measurement unit:<br />
The air pressure can be shown in inHg (inches of Mercury) or hPa (hectoPascals,<br />
the same as mb millibars). To change the units press and hold the button for<br />
approximately 4 seconds and the units will change. Release the button when the<br />
desired units are displayed and the instrument returns to the mode of measuring<br />
the instant wind speed with display of the air pressure. This setting will remain until<br />
changed again, even after turning the Xplorer 4 off.<br />
Air pressure explanation:<br />
Barometric air pressure is the measurement of the weight of air in<br />
the atmosphere above the measurement point. At higher elevations,<br />
there is less air mass above, thus a lower pressure. Local atmospheric<br />
pressure variations are an important aspect of weather. Low and High<br />
pressure fronts develop and dissipate constantly, and are a major factor<br />
in weather. Low pressure fronts generally bring cloudy and stormy<br />
weather, while High pressure fronts bring clear, cool weather. Extreme<br />
Low pressure fronts occur in centers of hurricanes and tornados.<br />
In the Northern hemisphere, winds<br />
will rotate counterclockwise around<br />
Low pressure fronts, and clockwise<br />
around High pressure fronts. In the<br />
Southern Hemisphere the directions<br />
are reversed. While High pressure<br />
generally involves clearing weather,<br />
it can also bring strong winds.<br />
The instrument offers 2 modes for displaying pressure: QFE pressure and QNH pressure. These two<br />
abbreviations (QFE and QNH) are taken from the famous “Q” code. This code was instituted by the<br />
London conference of 1912. It is made up of a list of three letter indicators, valid for all the countries<br />
of the world, used most often in the aeronautical world.<br />
QFE: Atmospheric pressure at ground level, also known as absolute pressure. This reading is not<br />
adjustable, it is an absolute reading of the exact barometric air pressure.<br />
QNH: Atmospheric pressure obtained by calculation at sea level in standard atmospheric conditions,<br />
also known as relative pressure. This is the pressure mentioned in meteorological bulletins or on the<br />
television. This setting is calibrated according to exact altitude.<br />
16
Choice of Pressure Measurement Unit:<br />
The air pressure can be shown in inHg (inches of Mercury) and hPa (hectoPascals/millibars). To change<br />
the units press and hold the button for approximately 4 seconds and the units will change. Release the<br />
button when the desired units are displayed and the instrument returns to the mode of measuring the<br />
instant wind speed with display of the air pressure. This setting will remain until changed again, even<br />
after turning the Xplorer 4 off.<br />
Display of absolute pressure (QFE):<br />
Keep the button pressed down for approximately 2 seconds and at the very moment<br />
when the indication (QFE) is displayed in the large digits, release it. The instrument then<br />
goes into the mode for displaying absolute pressure. To quit this mode, press once on the<br />
button, and the instrument returns to the mode wind speed and QNH/relative pressure.<br />
Calibration of relative pressure (QNH):<br />
Before using the Xplorer to measure relative air pressure, be sure to calibrate it to<br />
a known relative air pressure reading. Alternatively, it can be calibrated to a known<br />
altitude, please see the previous section on altitude. While in the air pressure mode,<br />
press and hold the button for 3 seconds until appears in the large digits and release.<br />
Press and hold the button to increase the air pressure in steps of 0.01 inHg or 1<br />
hPa. To reduce the air pressure, release the button briefly then once again press and hold<br />
the button. As the button is held, the air pressure will increase/decrease at a faster rate.<br />
If the air pressure requires a large change and the button is held down for many seconds, the Xplorer<br />
4 may start to flash to turn off. Simply release the button, then repeat to adjust. Once the air pressure<br />
reading is correct, release the button, then briefly press it once.<br />
Comments:<br />
• If QNH figure is steady (is not flashing) this indicates the current relative pressure (QNH) credible<br />
due to a slow change, indicative of a change in weather patterns, not altitude change.<br />
• The QNH sign flashes if this pressure has changed since the last calibration.<br />
• If the QNH figure is flashing, it indicates the QNH pressure entered at the last calibration.<br />
• A rise in altitude or a meteorological variation when the recording is not active makes the QNH<br />
figure flash.<br />
17
• Calibration of the QNH or of the altitude (known datum) makes it possible to re-adjust the Xplorer<br />
in relation to the measured ambient pressure. This varies continually according to the altitude and<br />
the current meteorological conditions.<br />
• The only reference for the Xplorer is the air pressure which it is measuring, from which it deduces<br />
the altitude. Any variations in this pressure makes the altitude change: 9 metres per hPa a low<br />
altitudes, 14 metres at 5,000 metres, and this is why it is necessary to calibrate as often as<br />
possible to maintain a credible display (even airline pilots have this to comply with!).<br />
Historical Recording Modes:<br />
The Xplorer 4 records the air pressure, even when it is OFF, every hour for the past 48 hours. By default<br />
this setting is turned OFF to save battery economy. There are three recording modes, for air pressure<br />
trend, relative air pressure (QNH) and altitude. However all three records are stored based on the air<br />
pressure at the time of measurement and the current calibration of altitude/QNH.<br />
Trend: This is the difference in pressure over the last 24 hours (or 48 hours, or 1 hour etc.).<br />
This is valid if the Xplorer is in the same place (same altitude). A negative figure indicates<br />
a drop in pressure, a positive figure, an increase. Pressure naturally varies during the day,<br />
and the weather trend is more accurate at 12 to 24 hours. Increasing air pressure generally<br />
indicates clearing weather, decreasing air pressure worsening weather, and steady pressure<br />
no weather change. A large drop in air pressure (0.06 inHg within 12 hours) can indicate an<br />
approaching storm. A large increase in air pressure can bring strong winds.<br />
QNH: This is the relative pressure at 24 hours ago (or 48 hours, etc.). Valid if the Xplorer<br />
is at the same place and is recalibrated.<br />
Altitude: If you set off for a mountain walk or go paragliding, you can check the altitudes<br />
achieved hour by hour. The altitude will be accurate if you force the QNH calibration of the<br />
Xplorer on the weather pressure that was present when you recorded.<br />
18
Activating/deactivating the history:<br />
The Xplorer 4 recording mode is set to OFF. To turn the recording mode on, with the Xplorer 4 on,<br />
briefly press the button to one of the three recording modes (“0h” displayed at the top. Press and hold<br />
the button at least two seconds until a number other than 0h is displayed. To deactivate recording,<br />
press and hold the button until “0h” is again displayed.<br />
Display of a particular moment in the record:<br />
When in either of the three recording modes, press and hold the button to change the time in past<br />
displayed. The Xplorer 4 will progress from 1h, then 24h, then 48h, and next hour by hour, from 1h<br />
to 48h. Release the button when the time is displayed. To continue recording, be sure to leave it on a<br />
time other than 0h!<br />
Comments:<br />
• If you consult the record and you leave displayed 5 h for example, the next time you switch on the<br />
Xplorer, it will display 24 h if there has been a new pressure measurement, this being generated<br />
by the internal clock (one measurement per hour).<br />
• On releasing on 0h, the record will no longer do a measurement each hour (but will retain the<br />
current contents) thereby giving you battery economy.<br />
• In going back to active record mode (anything other an 0h) the current measurement is stored as<br />
the starting time and displayed under 1h.<br />
• If there is no record in a time slot (for example it has only recorded for 10 hours and you are<br />
trying to view the record from 24 hours ago), it will display<br />
General Reset:<br />
This mode resets by default all figures and removes the calibration of the compass. In<br />
order to carry out a general reset, switch off the instrument as normal. Then hold the<br />
button pressed down. At the moment where all the LCD digits appear release it briefly,<br />
then press and hold the button down until it turns off. You can then start up your<br />
instrument in the normal way.<br />
19
Products available through <strong>NTech</strong> <strong>USA</strong>:<br />
WIND METERS<br />
Xplorer 1: Wind speed only<br />
Xplorer 2: Adds Temperature<br />
Xplorer 3: Adds Digital Compass<br />
Xplorer 4: Adds Air Pressure and Altitude<br />
EOLE: “Cup-style” Wind Speed<br />
METEOS: “Cup-Style” Wind plus Temperature<br />
ATMOS: “Cup-Style” Wind, Temperature, Humidity<br />
OTHER PRODUCTS<br />
FLOWATCH: Flow of water/fluids<br />
SPEEDWATCH: Wireless Boat Knotmeter<br />
POROSIMETER: Porosity of fabrics<br />
North American Sales & Support:<br />
<strong>NTech</strong> <strong>USA</strong><br />
PO Box 284<br />
Holmen, WI 54636<br />
www.ntechusa.com<br />
info@ntechusa.com<br />
608.498.4021<br />
Developed and manufactured by:<br />
JDC Electronic SA<br />
Switzerland<br />
www.jdc.ch


![NTech USA 2009 Catalog for Print [no background colors]](https://img.yumpu.com/38638283/1/190x245/ntech-usa-2009-catalog-for-print-no-background-colors.jpg?quality=85)