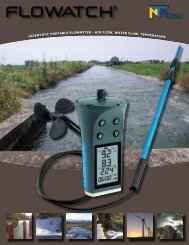
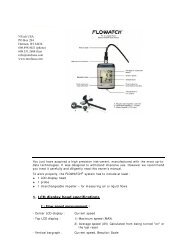
Old GEOS 9 Manual - NTech USA
Old GEOS 9 Manual - NTech USA
Old GEOS 9 Manual - NTech USA

You also want an ePaper? Increase the reach of your titles
YUMPU automatically turns print PDFs into web optimized ePapers that Google loves.
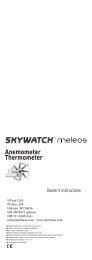
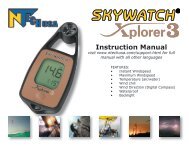
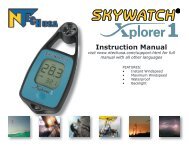
Owner’s Instructions
Owner’s Instructions SKYWATCH ®<br />
You have just acquired a high precision instrument, manufactured<br />
using the most up-to-date technology. The Skywatch<br />
was designed to handle intense use and extreme conditions.<br />
Please take the time to carefully read your instructions so<br />
as to understand all the great features this unit has to offer.<br />
Buttons Uses:<br />
Turn your on by pushing either the wind or mode<br />
button.<br />
Push the wind button to choose between maximum or average<br />
wind speed.<br />
Press and hold the wind button to switch the wind speed<br />
measurement unit: km/h, m/s, knots or mph.<br />
Push the mode button to choose between current temperature,<br />
WindChill Factor, pressure, pressure historical records and<br />
altitude.<br />
Press and hold the mode button to switch temperature unit:<br />
˚C or ˚F.<br />
Geos<br />
Extreme values of wind speed and temperature can be deleted<br />
by pressing both the wind and mode buttons simultaneously.<br />
Push the clock button to set the clock timer.<br />
1 2 3<br />
1. Button wind<br />
2. Button clock<br />
3. Button mode<br />
Current Temperature:<br />
The temperature sensor is located on the left corner, over the<br />
display. In the event of severe temperature changes, allow a All segments<br />
few moments for the sensor to reach the current temperature. of the LCD<br />
Select the current temperature with the mode button. Current temperature is displayed<br />
at the bottom of the LCD either in ˚C or ˚F. To change the unit of measurement, press<br />
the mode button for 2 seconds.<br />
Please note that holding the instrument in your hands for a while may influence the<br />
temperature reading. The sensor is very sensitive.
Temperature in Celcius and<br />
Fahrenheit degree<br />
Changing of temperature unit<br />
(ºC and ºF)<br />
Minimum and Maximum Temperatures:<br />
Minimum and Maximum temperatures are permanently displayed.<br />
Extreme values will flash on the bargraph. When your instrument<br />
is on standby, temperature is measured every thirty (30)<br />
minutes, allowing a recording of the extreme values, even when<br />
the instrument is turned off.<br />
Extreme temperature values can be deleted by pressing both the<br />
wind and mode buttons simultaneously.<br />
Wind-chill Factor:<br />
The wind-chill factor is a calculation of the effect of wind on<br />
temperature. It portrays an indication of the loss of heat by<br />
your body in case of temperatures below 37˚C and the augmentation<br />
of the heat with a temperature over 37˚C and wind.<br />
For instance, with a 0˚C current temperature and a 40 km/h<br />
blowing wind, your body will use as much heat as if it would<br />
be exposed to a temperature of -15 ˚C with no wind. This value<br />
of -15˚C is called wind-chill factor. Wind-chill factor can be<br />
selected by pressing the mode button. The corresponding<br />
symbol is then displayed in the bottom of the LDC.<br />
Minimum and maximum temperature<br />
measurement displayed<br />
with flashing lines on the bargraph<br />
Wind-chill<br />
factor mode<br />
Pressure:<br />
The pressure sensor is located inside the instrument. The indicated pressure is the<br />
actual pressure at the instrument’s altitude and not the reported pressure at sea level.
The pressure can be influenced by 3 main factors:<br />
1. Altitude. Pressure decreases with altitude. In similar meteorological conditions, if<br />
pressure is 1013 hPa at the sea level, it will be only 977 hPa at 300m or 794 hPa<br />
at 2,000 m.<br />
2. Meteorological conditions. Atmospheric pressure changes according to the weather.<br />
During nice weather, pressure at the sea level can reach 1050 hPa and if the<br />
weather gets bad, it can go down to 980 hPa.<br />
3. The wind. The wind can exert a pressure on objects that it<br />
hits. With a 100 km/h wind blowing, this additional pressure<br />
may vary from +/- 10 hPa, depending the position of the<br />
instrument. However, for windspeed bellow 30 km/h, this<br />
influence is insignificant.<br />
Pressure measurement can be selected by pushing the mode<br />
button. Pressure in hPa is then displayed at the bottom of<br />
the LCD.<br />
Current pressure<br />
Historical Pressure Record:<br />
The instrument automatically records the pressure of the past 3, 6, 9 and 12 hours.<br />
The historical pressure record can be selected by pushing the mode button. Pressure<br />
in hPa is then displayed at the bottom of the LDC.<br />
The pressure from 3 hours ago is represented by the segment number 3. Pressure from<br />
6, 9 and 12 hours ago are represented respectively by segments 6, 9 and 12.<br />
Historical pressure record with segments 3, 6, 9 and 12<br />
on the left bargraph<br />
Altitude:<br />
Altitude is calculated according to barometric pressure. This is why a difference of pressure<br />
will influence the indicated altitude. It is necessary to calibrate your instrument<br />
before using this function (for instance before mountain climbing or ballooning).<br />
Altitude can be selected by pushing the mode button. Altitude is then displayed in meters<br />
at the bottom of the LCD.
Calibration: Calibration can be done only if the instrument is set in altitude mode. To<br />
enter calibration mode, both mode and wind button need to be pushed at the same<br />
time. All other information will disappear<br />
from the LCD. In this mode, the mode<br />
button increases the altitude and the wind<br />
button decreases it.<br />
Once the reference altitude has been<br />
correctly entered, you can leave the calibration<br />
mode by pressing both buttons<br />
mode and wind at the same time.<br />
Altitude<br />
Altitude<br />
calibration mode<br />
Relative humidity:<br />
The humidity sensor is located on the left upper side of the display. In the case of a<br />
severe humidity change, allow a few moments for the sensor to react and display the<br />
new relative humidity level.<br />
The relative humidity range goes from 0 to 100%. (0% meaning that the air is<br />
completely dry and 100% meaning an air saturated with water.) This limit depends<br />
on the quantity of water contained in the air and its temperature. Note that you will<br />
need less water in cold air than in warm air to reach 100% relative humidity.<br />
The following points have to be taken into consideration when measuring humidity:<br />
1. Relative humidity depends on temperature. By moving the instrument from a warm<br />
spot to a cold one, the measured value may differ.<br />
2 Humidity is not homogeneously spread out in the atmosphere so two very close<br />
measured areas can give two different readings.<br />
3. The sweat and breath of a person very close to the sensor can influence the results<br />
of the measurement.<br />
Relative humidity can be selected by pushing the mode button. It is then indicated<br />
in % at the lower corner of the display with the symbol %<br />
Note: Humidity sensor was calibrated during the assembling of<br />
your . It will be possible to re-calibrate it in our factory<br />
later on.<br />
Relative humidity<br />
in percent
Dew point:<br />
Dew point is calculated by mixing the humidity rate and current<br />
temperature. It indicates at what temperature condensation will<br />
appear.<br />
Dew point can be selected by pushing the mode button. It is<br />
then indicated in ˚C or ˚F in the lower corner of the display<br />
with the symbol<br />
Current Wind Speed:<br />
Dew point<br />
The impeller at the top is the wind sensor. For accurate measurements, it is<br />
necessary for the ball propeller to be wide opened (you can pivot it) and to be aligned<br />
with the axis of the wind. The wind vane will help you to find the wind direction. When<br />
not in use, it is better to twist the ball propeller into the sphere for optimal protection.<br />
Note: if you measure the wind 30˚ off the wind axis, the result will be wrong of only<br />
by 2%.<br />
Current wind speed is permanently displayed<br />
in the middle of the LCD.<br />
By pushing on the wind button for more<br />
than 2 seconds, you can switch your unit<br />
of measurement. Optional units of measurement<br />
include: MPH, KPH, knots, and<br />
m/s<br />
The Beaufort scale on the left of the<br />
display always indicates the instant wind<br />
speed. The speed displayed is averaged<br />
over 2 seconds.<br />
Average and Maximum Wind Speed:<br />
The average wind speed calculation is based on measurements made over the past<br />
60 seconds. So after 70 seconds of use, measurements taken during the first ten<br />
seconds will not be taken into consideration<br />
to calculate the average wind speed.<br />
This balanced measurement mode allows<br />
an accurate display of the windspeed,<br />
without being influenced by the wind speed<br />
irregularities.<br />
Average and maximum wind speed can be<br />
selected by pushing the wind button. These<br />
speeds are displayed in the top of the LCD,<br />
Instant windspeed,<br />
here 5.1km/h<br />
Maximum<br />
windspeed<br />
Beaufort scale<br />
Average<br />
windspeed
with a AV symbol for average wind speed and MAX symbol for maximum wind speed.<br />
Maximum wind speed can be deleted by pressing the wind and mode buttons simultaneously.<br />
Standby:<br />
The instrument turns itself to standby after 3 minutes without<br />
touching any buttons. In the stand by mode, only the clock is<br />
displayed. A pressure on a button and the instrument turns on.<br />
Clock Timer:<br />
The clock is displayed only in standby mode. Press and hold the<br />
middle button for 1-2 seconds to set the clock. The mode button increases minutes<br />
and the wind button increases hours. Another push on the middle button sets the<br />
instrument back in normal mode.<br />
Press and hold the middle button to switch the clock between 24 or 12 hours - with<br />
AM and PM indication displayed.<br />
Note: The clock setting can not be done when the<br />
is in standby.<br />
Standby mode<br />
Ball propeller:<br />
The ball propeller has to be wide opened and aligned with the wind axis in order<br />
to get accurate windspeed measurement. Use the wind vane for a good alignment<br />
with the wind.<br />
After using your instrument, twist the ball propeller into the sphere for optimal<br />
protection.<br />
The ball propeller can be popped out but for replacement only. This operation may<br />
affect the strength of the plastic so we do not recommend it.<br />
Compass:<br />
The<br />
features a high precision, Swiss needle compass.<br />
Wind Vane:<br />
The Wind vane is located just below the ball propeller. Turn the instrument so that the<br />
wind blows on the wind vane and indicates wind direction. Then align your instrument<br />
with the axis of the wind for an accurate reading. Wind direction can be determined<br />
by using the compass in conjunction with the wind vane.<br />
A turning wind vane means that it is not well aligned with the wind axis. Be aware that<br />
holding the instrument in front of you may disturb the airflow through the wind vane.
Batteries:<br />
The is powered by a 3V type CR2032 Lithium battery,. The features<br />
an extra battery that allows for convenient replacement at any time and place.<br />
Battery replacement:<br />
Unscrew the cover on the back of the instrument.<br />
Insert the battery on the bottom, positive side (+) facing you. A second<br />
replacement battery HAS to be put on the top of first battery and HAS<br />
to be inserted with negative side (-) facing you - the + side against the<br />
+ side.<br />
Screw the cover back with the 2 screws M2,5 x 5.<br />
Maintenance advises:<br />
We have used only electronic components that resists to high temperature but we<br />
still strongly recommend that you do not expose your instrument to temperatures<br />
above 65˚C.<br />
This instrument is weatherproof but not waterproof. Do not submerge it.<br />
In order to avoid dirt around the impeller axis, we strongly recommend to twist the<br />
ball propeller into the sphere when not in use.<br />
Despite the rugged casing, avoid dropping your instrument and exposing it to<br />
shock. This limited warranty shall be in effect for one year after the date of purchase<br />
by the original consumer purchaser. During this limited warranty period, JDC Electronic<br />
SA will repair or replace without charges any defective product with a<br />
comparable product. This limited warranty will not apply to any instrument that has<br />
been misused, improperly installed, repaired, altered or which has been the subject<br />
of any negligence or accident.<br />
The speed measurement principle of the SKYWATCH ® Geos is based on magnetic<br />
transmission. The turning impeller creates a magnetic field that is detected by the<br />
SKYWATCH ® Geos (JDC Electronic SA patent). If the SKYWATCH ® Geos is close to<br />
another magnetic field (from a computer, electronic appliance, etc...), it may display<br />
unexpected values but only if the impeller is not turning. This is not effecting the<br />
normal use of the SKYWATCH ® Geos.
Conversion table of several Measurement Units<br />
Beaufort knots km/h mph m/s fps<br />
1 1 - 3 1 - 5 1 - 3 1 - 2 1 - 4<br />
2 4 - 6 6 - 11 4 - 7 2 - 3 5 - 10<br />
3 7 - 10 12 - 19 8 - 12 4 - 5 11 - 17<br />
4 11 - 16 20 - 28 13 - 18 6 - 7 18 - 25<br />
5 17 - 21 29 - 38 19 - 24 8 - 10 26 - 34<br />
6 22 - 27 39 - 49 28 - 31 11 - 13 35 - 44<br />
7 28 - 33 50 - 61 32 - 38 14 - 16 45 - 55<br />
8 34 - 40 62 - 74 39 - 46 17 - 20 56 - 67<br />
9 41 - 47 75 - 88 47 - 55 21 - 24 68 - 80<br />
10 48 - 55 89 - 102 56 - 64 25 - 28 81 - 92<br />
11 56 - 63 103 - 117 65 - 73 29 - 32 93 - 106<br />
12 >64 >118 >74 >33 >107<br />
Technical Specifications<br />
Response<br />
Accuracy Resolution Minimum Maximum Sampling time<br />
Current 0.1 knots 108 knots<br />
wind ±4% 0.1 mph 0 125 mph 1 sec 3 sec<br />
speed 0.1 km/h 202 km/h<br />
0.1 m/s 56 m/s<br />
Average 0.1 knots 108 knots<br />
wind ±4% 0.1 mph 0 125 mph — —<br />
speed 0.1 km/h 202 km/h<br />
0.1 m/s 56 m/s<br />
Current ±0.5 °C 1 °C -30 °C 50 °C 1 sec 5 min 1)<br />
temperature ±(0.9 °F) 1 °F -22 °F 122 °F<br />
Wind-chill - 2) 1 °C — — 1 sec —<br />
factor 1 °F<br />
Pressure 3) ±2 mbar 1 mbar 300 mbar 1100 mbar 1 hour —<br />
Altitude ±2 m 4) 1 m -500m 8000m — —<br />
1) measured in still air<br />
2) based on a formula provided by the Midwestern Climate Center, <strong>USA</strong>:<br />
wc = 91.4 - (0.474677 - 0.020425 v + 0.303107 sqrt(v)) (91.4-T)<br />
where wc = wind-chill factor (°F), v = wind speed (mph) and T = temperature (°F)<br />
3) absolute pressure. (Pressures 3, 6, 9, 12 hours ago are displayed.)<br />
Hygrometer part<br />
Temperature<br />
Response<br />
use Precision Resolution Minimum Maximum Sampling time<br />
-10°C...50°C ±3 %rH 1 %rH 0 %rH 99 %rH 1,5 sec 5 min
Limited warranty:This limited warranty shall be in effect for one year after the date<br />
of purchase by the original consumer purchaser. During this limited warranty period, JDC<br />
Electronic SA will repair or replace without charges any defective product with a comparable<br />
product. This limited warranty will not apply to any instrument that has been misused,<br />
improperly installed, repaired, altered or which has been the subject of any negligence or<br />
accident.The speed measurement principle of the SKYWATCH ® Geos is based on magnetic<br />
transmission. The turning impeller creates a magnetic field that is detected by the<br />
SKYWATCH ® Geos (JDC Electronic SA patent).If the SKYWATCH ® Geos is close to another<br />
magnetic field (from a computer, electronic appliance, etc...), it may display unexpected values<br />
but only if the impeller is not turning.

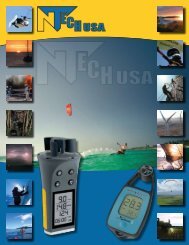


![NTech USA 2009 Catalog for Print [no background colors]](https://img.yumpu.com/38638283/1/190x245/ntech-usa-2009-catalog-for-print-no-background-colors.jpg?quality=85)