WET LAB DNA Barcoding: From Samples to Sequences - Northwest ...
WET LAB DNA Barcoding: From Samples to Sequences - Northwest ...
WET LAB DNA Barcoding: From Samples to Sequences - Northwest ...

You also want an ePaper? Increase the reach of your titles
YUMPU automatically turns print PDFs into web optimized ePapers that Google loves.
<strong>WET</strong> <strong>LAB</strong><br />
CLASS SET<br />
16. Load the 15 μl of your PCR “gel” sample in<strong>to</strong><br />
the appropriate well of your gel, using Table 3.1<br />
as your guide.<br />
Figure 3.4 illustrates how <strong>to</strong> place your pipette<br />
tip just above the well before releasing the<br />
sample in<strong>to</strong> the well. It is important not <strong>to</strong><br />
push your pipette tip <strong>to</strong>o deeply in<strong>to</strong> the well,<br />
or you risk poking it through the bot<strong>to</strong>m of<br />
the well and creating a leak.<br />
17. Have one member of your group load 15 μl of<br />
molecular weight standard in the appropriate<br />
well of your gel, using Table 3.1 as your guide.<br />
18. Have another member of your group load the<br />
15 μl of the Negative Control “gel” sample in<br />
the appropriate well of your gel, using Table 3.1<br />
as your guide.<br />
Figure 3.4: Loading <strong>Samples</strong> in<strong>to</strong> a Well. Image Source: Navaho,<br />
Wikimedia Commons.<br />
19. Plug one end of each of the electrode cords<br />
in<strong>to</strong> your gel box, and plug the other ends in<strong>to</strong> the power supply.<br />
Be sure <strong>to</strong> connect the black cords <strong>to</strong> the black electrodes and the<br />
red cords <strong>to</strong> the red electrodes.<br />
20. Turn on the gel power supply <strong>to</strong> approximately 100 volts. Be sure<br />
the power supply is registering volts, and not amps. On some gel<br />
boxes, there is a but<strong>to</strong>n or switch <strong>to</strong> select “constant volts” or<br />
“constant amps;” you should select “constant volts.”<br />
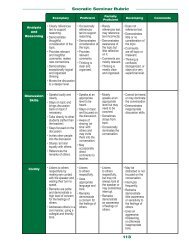
Using Bioinformatics: Genetic Research<br />
21. Keep an eye on your gel, or set a timer. Most gels run for about<br />
40–50 minutes, though smaller gels may run faster. As the gel<br />
runs, the <strong>DNA</strong> loading dye will be visible in the gel. You should<br />
s<strong>to</strong>p the gel by turning off the power supply when the bot<strong>to</strong>m<br />
blue band of loading dye is about 1–2 centimeters from the<br />
bot<strong>to</strong>m of the gel (about ¾ of the way down the gel).<br />
22. Your instruc<strong>to</strong>r will tell you how <strong>to</strong> visualize your gel.<br />
23. Review Figure 3.5, which shows the size of each <strong>DNA</strong> band in<br />
your molecular weight standard.<br />
Figure 3.5: Molecular Weight Standard<br />
(1 kB <strong>DNA</strong> ladder from Fermentas).<br />
Image Source: Thermo Scientific.<br />
On your separate sheet of paper or in your lab notebook, answer each of the following questions:<br />
Question 1. What did you do in this labora<strong>to</strong>ry experiment and why?<br />
Question 2. What skills did you learn or practice?<br />
Question 3. Was your PCR successful? Did you have a <strong>DNA</strong> band in your sample well? If so, what was the<br />
approximate size of your <strong>DNA</strong> (also called your “PCR product”)?<br />
362<br />
©<strong>Northwest</strong> Association for Biomedical Research—Updated Oc<strong>to</strong>ber 2012