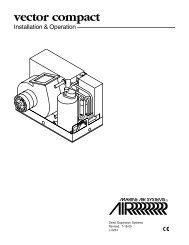
146 Owner's Manual 2008.pdf - Marlow-Hunter, LLC
146 Owner's Manual 2008.pdf - Marlow-Hunter, LLC
146 Owner's Manual 2008.pdf - Marlow-Hunter, LLC

Create successful ePaper yourself
Turn your PDF publications into a flip-book with our unique Google optimized e-Paper software.
Remove the scratches by lightly hand wet sanding<br />
the surface with 600 grit sandpaper. Sand only<br />
until the scratches are removed (to retain as much<br />
thickness as possible). This will create a dull<br />
surface. To improve the surface<br />
Cosmetic damage is defined as a problem that<br />
does not affect the overall structure of the part or<br />
area. They are usually appearance concerns, such<br />
as scratches, surface mars, and minor dents. It is<br />
very important to ascertain the full extent of the<br />
damaged area. If any jagged edges or cracks are<br />
present, see the consequential damage section.<br />
Mask off the damaged area, lightly hand sand (220<br />
grit) the damaged area to remove any surface<br />
ridges and to promote adhesion. Sand in<br />
This type of damage can be holes, cracks, or large<br />
dents. Cracks, even those found around holes,<br />
must be prevented from growing. To do this, the<br />
ends must be found and blunted (by drilling small<br />
holes). Once this is done, the crack can be ground<br />
or routed into a V groove. This allows it to be filled<br />
easily and promotes a good bond. We suggest<br />
using a Dremel tool, being sure to work in a wellventilated<br />
area.<br />
Mask off the damaged area and lay down a bead<br />
of Plexus adhesive in a 1:1 ratio into the damaged<br />
area, slightly under filling the V groove.<br />
GENERAL CARE<br />
SHALLOW SURFACE SCRATCHES<br />
COSMETIC DAMAGE<br />
CONSEQUENTIAL DAMAGE<br />
SAFETY<br />
Use of solvents requires adequate ventilation,<br />
keeping in mind that they are usually highly<br />
flammable. Use proper procedures to avoid<br />
injury. In some instances, the use of these<br />
materials is controlled. Check all regulations<br />
prior to using.<br />
Keep in mind that a repair can only attempt to<br />
match the performance predicted in the original<br />
part. The repair may not be quite as strong or stiff<br />
as the original part. The overall part/system<br />
behavior has probably changed.<br />
gloss, sand the area with 1000 grit, then 1500 grit<br />
sandpaper. The surface should be starting to<br />
recover some of the gloss. To further increase the<br />
gloss level, polish the area with ultra fine polish<br />
(automotive polishes suitable for clearcoat).<br />
one direction only. In a well-ventilated area, apply<br />
a thin layer of Plexus adhesive in a 1:1 ratio to the<br />
damaged area. After the Plexus has dried, smooth<br />
the area with a fine (220 grit) sandpaper. Now,<br />
apply a thin layer of MA310 Plexus or Marine Tex<br />
to fill in any imperfections, and allow to dry. Lightly<br />
sand with a 220 grit sandpaper, followed by a 400<br />
grit sandpaper, then a 600 grit sandpaper. Finally,<br />
apply an Krylon Fusion to match the color.<br />
The Plexus will expand as it hardens. Skim the<br />
excess Plexus (if any) from the repair area<br />
keeping it level with the surrounding area. Allow to<br />
dry for 1 hour. Sand the damaged area until the<br />
surface is flush with the surrounding area. Apply a<br />
thin layer of MA310 Plexus or Marine Tex to fill<br />
any voids. Allow the filler to dry, then wet sand<br />
with 220, 400, then 600 grit sandpaper.<br />
After sanding the repaired area flush to the<br />
surrounding area, paint can then be applied.<br />
Recommended paints are 1501 Krylon Fusion<br />
2320 gloss white.<br />
CONSIDERATIONS:<br />
Always follow all warnings and instructions given<br />
by the manufacturers of the products used for<br />
repairs.<br />
This information is provided for your guidance<br />
only. We urge you to make all tests you deem<br />
appropriate prior to use. No warranties, either<br />
expressed or implied, including warranties or<br />
merchantability or fitness for a particular purpose,<br />
are made regarding products described or<br />
information set forth, or that such products or<br />
information may be used without infringing patents<br />
of others.<br />
PAGE 19