146 Owner's Manual 2008.pdf - Marlow-Hunter, LLC
146 Owner's Manual 2008.pdf - Marlow-Hunter, LLC
146 Owner's Manual 2008.pdf - Marlow-Hunter, LLC

Create successful ePaper yourself
Turn your PDF publications into a flip-book with our unique Google optimized e-Paper software.
Route 441, Post Office Box 1030 Alachua, FL 32616; Tel: (386) 462-3077; Fax: (386) 462-4077; info@huntermarine.com<br />
HUNTER MARINE CORPORATION<br />
ROUTE 441, POST OFFICE BOX 1030<br />
ALACHUA, FLORIDA 32616<br />
Tel: (386) 462-3077<br />
Fax: (386) 462-4077<br />
E-MAIL: info@huntermarine.com
INTRODUCTION PAGE<br />
HUNTER OWNER’S MANUAL<br />
TABLE OF CONTENTS<br />
PAGE<br />
• Table of Contents .............................................................................................i<br />
• Welcome to The <strong>Hunter</strong> Marine Family............................................................1<br />
• <strong>Hunter</strong> Warranty……………………………………………………………………..2-8<br />
• Brief History......................................................................................................9<br />
• Glossary of Sailing Terms….………………………………...…………………….10-13<br />
• Float Plan.........................................................................................................14<br />
• Explanation of Safety Precautions...................................................................15<br />
• Safe Boating Tips.............................................................................................16-1 ~16-2<br />
• Launch & Retrieving Procedures......................................................................17<br />
• General Care....................................................................................................18-19<br />
• Lighting Warning...............................................................................................20<br />
• Advanced Composite Process .........................................................................21<br />
About Your <strong>Hunter</strong> <strong>146</strong><br />
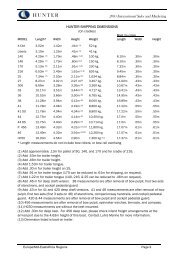
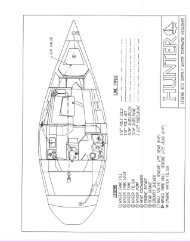
• Dimensions and Capacities................................................................................22<br />
• <strong>146</strong> Quick Step Rigging Guide...........................................................................22~1<br />
• <strong>146</strong> Standing & Running Rigging Specifications................................................22~2<br />
• Mainsheet Purchase Details...............................................................................23<br />
• Boom Vang Details.............................................................................................24<br />
• Standing Rigging (Forestay & Furling Details)....................................................25<br />
• Centerboard Assembly.........................................................................................26<br />
• Centerboard Details...............…………………………............................................27<br />
• Rudder & Tiller Details.............................................................................................28<br />
• Standard Forestay Standing Rigging..................................................................29<br />
i
Welcome to<br />
THE HUNTER MARINE FAMILY<br />
Congratulations on your new sailing yacht<br />
manufactured by <strong>Hunter</strong> Marine. We have<br />
engineered and constructed your boat to be as<br />
fine a yacht as any afloat. In order to get the<br />
best performance and most enjoyment from<br />
your boat you should be familiar with its<br />
various elements and their functions. For your<br />
sailing pleasure and safety, please take time to<br />
study this manual.<br />
We stand behind the quality of your boat with a<br />
warranty, which you should review. To insure<br />
the validity of your warranty, please complete<br />
the attached card and send it to us within ten<br />
(10) days of the purchase date. Section 15 of<br />
the U.S. Federal Boat Safety Act requires<br />
registration of a boat’s first owner. The<br />
warranty data should also be recorded in the<br />
space below for your own reference.<br />
This manual has been compiled to help you<br />
operate your craft with safety and pleasure. It<br />
contains details of the craft; equipment<br />
supplied or fitted, systems, and information on<br />
operation and maintenance. Please read it<br />
carefully, and familiarize yourself with the craft<br />
before using it. If this is your first sailboat or<br />
you are changing to a type of craft you are not<br />
familiar with, please ensure that you obtain<br />
proper handling and operating experience<br />
before you assume command of the craft. Your<br />
dealer or national sailing federation or yacht<br />
club will be pleased to advise you of local sea<br />
schools or competent instructors.<br />
PLEASE KEEP THIS MANUAL IN A SAFE<br />
PLACE AND HAND IT OVER TO THE NEW<br />
OWNER IF YOU SELL THE CRAFT.<br />
You should also complete the warranty cards<br />
for your engine and other accessories. These<br />
are enclosed in the manufacturers’ manuals<br />
that are packaged with your owner’s manual.<br />
OWNER INFORMATION CARD<br />
HULL IDENTIFICATION NUMBER IS ON THE STARBOARD AFT SIDE OF THE HULL OR TRANSOM. THIS NUMBER<br />
MUST BE GIVEN IN ALL NECESSARY CORRESPONDENCE.<br />
HULL NO.<br />
DATE DELIVERED TO OWNER<br />
YACHT NAME<br />
OWNER NAME<br />
STREET ADDRESS<br />
CITY STATE/COUNTRY ZIP CODE<br />
HOME PORT<br />
ENGINE MODEL SERIAL NO. PROPELLER SIZE<br />
DEALER<br />
PHONE<br />
STREET ADDRESS<br />
CITY STATE/COUNTRY ZIP CODE<br />
PAGE 1
<strong>Hunter</strong> • Warranty<br />
<strong>Hunter</strong> offers a limited warranty on every <strong>Hunter</strong> boat sold through an authorized <strong>Hunter</strong><br />
dealer. A copy of this warranty is included here, and in your Operator's <strong>Manual</strong>. If for some<br />
reason you are not able to understand, read, or view this manual, please contact your local<br />
dealer for a replacement copy.<br />
We stand behind the quality of your boat with a warranty, which you should review. To insure<br />
the validity of your warranty, please complete the attached card and send it to us within ten<br />
(10) days of the purchase date. Section 15 of the U.S. Federal Boat Safety Act requires registration<br />
of a boat’s first owner. The warranty data should also be re-corded in the space below<br />
for your own reference.<br />
The following warranties apply to all 2008 Model Year boats produced by<br />
HUNTER MARINE CORPORATION:<br />
LIMITED ONE-YEAR WARRANTY<br />
<strong>Hunter</strong> Marine warrants to the first-use purchaser and any subsequent owner during the warranty<br />
period that any part manufactured by <strong>Hunter</strong> will be free of defects caused by faulty<br />
workmanship or materials for a period of twelve (12) months from the date of delivery to the<br />
first-use purchaser under normal use and service. During this period, as the sole and exclusive remedy,<br />
<strong>Hunter</strong>'s obligation under the warranty is limited to the repair or replacement of any such defective part.<br />
LIMITED FIVE-YEAR HULL STRUCTURE AND BOTTOM BLISTER WARRANTY<br />
<strong>Hunter</strong> warrants to the first-use purchaser and any subsequent owner during the warranty period<br />
that the hull of each boat will be free from structural defects in materials and workmanship<br />
for a period of five (5) years from the date of delivery to the first-use purchaser under normal<br />
use and service.<br />
This limited warranty applies only to the structural integrity of the hull and the supporting pan/grid or<br />
stringer system. Hulls, pan/grid or stringers modified in any way or powered with engines other than the<br />
type and size installed or specified by <strong>Hunter</strong> are not covered by this limited warranty. As the sole and<br />
exclusive remedy, <strong>Hunter</strong>'s obligation under the warranty is limited to repair or replacement of any<br />
such defective part.<br />
2
<strong>Hunter</strong> • Warranty<br />
<strong>Hunter</strong> also warrants to the first-use purchaser and any subsequent owner during the warranty<br />
period that the boat will be free from gelcoat blistering on underwater surfaces of the<br />
hull, excluding the keel and rudder, for a period of five (5) years from the date of delivery to<br />
the first-use purchaser under normal use and service. During this period, <strong>Hunter</strong> will supply or<br />
reimburse an authorized <strong>Hunter</strong> dealer for all of the parts and labor required to repair a blistered<br />
underwater surface of the hull. The labor cost reimbursement will be based on the Labor<br />
Allowance Schedule established by <strong>Hunter</strong> from time to time, however if the repair is performed<br />
by a non-<strong>Hunter</strong> dealer, the repair cost must be authorized by <strong>Hunter</strong> in advance and be based<br />
on a reasonable number of hours as determined by <strong>Hunter</strong>. <strong>Hunter</strong> will not pay transportation,<br />
hauling, launching, bottom paint, storage, dockage, cradling rental, rigging and derigging, or<br />
other similar costs. It is recommended that the repair be done during a seasonal haul out for<br />
service or storage.<br />
PLEASE KEEP THIS MANUAL IN A SAFE PLACE AND HAND IT OVER TO THE<br />
NEW OWNER IF YOU SELL THE CRAFT.<br />
You should also complete the warranty cards for your engine, and other accessories.These are<br />
enclosed in the manufacturers’ manuals that are packaged with your owner's manual.<br />
When purchased from <strong>Hunter</strong> or dealer with a new Boat.<br />
HUNTER EXPRESSLY DISCLAIMS THE IMPLIED WARRANTIES OF<br />
MERCHANTABILITY AND FITNESS. NEITHER HUNTER OR THE SELLING DEALER SHALLL<br />
HAVE ANY RESPONSIBILITY FOR LOSS OF USE OF A BOAT, LOSS OF TIME,<br />
INCONVENIENCE, COMMERCIAL LOSS, OR CONSEQUENTIAL DAMAGES.<br />
3
<strong>Hunter</strong> • Warranty<br />
The following circumstances will void the bottom blister limited warranty:<br />
(1) If the gel-coat has been sanded, sandblasted, or subjected to abrasion or impact.<br />
(2) If the instructions provided in the <strong>Hunter</strong> Owner’s <strong>Manual</strong> are not followed according to<br />
<strong>Hunter</strong>’s required bottom preparation procedures.<br />
These limited warranties do not cover:<br />
RESTRICTIONS APPLICABLE TO WARRANTIES<br />
(1.) Paint, window glass, Gelcoat, upholstery damage, plastic finishes, engines, engine parts,<br />
bilge pumps, stoves, blowers, pressure water pumps, propellers, shafts, rudders, controls,<br />
instruments, keels and equipment not manufactured by HUNTER. Any warranty made by the<br />
manufacturer of such items will be, if possible, given on to the first use purchaser.<br />
(2.) Problems caused by improper maintenance, storage, cradling, blocking, normal wear and<br />
tear, misuse, neglect, accident, corrosion, electrolysis or improper operation.<br />
(3) Boats used for commercial activities including charter.<br />
THESE LIMITED WARRANTIES ARE YOUR SOLE AND EXCLUSIVE REMEDIES AND ARE EXPRESSLY IN<br />
LIEU OF ANY AND ALL OTHER REMEDIES AND WARRANTIES EXPRESSED AND IMPLIED, INCLUDING THE<br />
WARRANTIES OF MERCHANTABILITY AND FITNESS FOR A PARTICULAR PURPOSE, WHETHER ARISING<br />
BY LAW, CUSTOM, CONDUCT, OR USAGE OF TRADE. SOME STATES DO NOT ALLOW LIMITATIONS ON<br />
HOW LONG AN IMPLIED WARRANTY LASTS, SO THE ABOVE LIMITATION MAY NOT APPLY TO YOU. IN THE<br />
EVENT THAT IMPLIED WARRANTIES ARE FOUND TO EXIST UNDER THE LAW OF A PARTICULAR STATE,<br />
NOTWITHSTANDING THE EXCLUSION CONTAINED HEREIN, THE DURATION OF ANY SUCH IMPLIED<br />
WARRANTY SHALL BE LIMITED TO THE DURATION OF THE APPLICABLE LIMITED WARRANTY STATED<br />
HEREIN. THE PURCHASER ACKNOWLEDGES THAT NO OTHER REPRESENTATIONS WERE MADE TO<br />
HIM OR HER WITH RESPECT TO THE QUALITY OR FUNCTION OF THE BOAT. ANY ORAL STATEMENT OR<br />
PRINTED MATERIAL ADVERTISING THE BOAT WHICH SPEAKS TO ANY PERFORMANCE CHARACTERISTIC<br />
OF THE BOAT OR ANY OF ITS COMPONENTS SHALL BE CONSIDERED AND CON-STRUED AS AN ESTIMATED<br />
DESCRIPTION ONLY AND SHOULD NOT BE RELIED UPON AS AN EXPRESS WARRANTY OR AS THE BASIS<br />
OF THE BARGAIN FOR THE BOAT OR ANY OF ITS COMPONENTS.<br />
ANY CONSEQUENTIAL, INDIRECT OR INCIDENTAL DAMAGES WHICH MAY BE INCURRED ARE EXCLUDED<br />
AND PURCHASER’S REMEDY IS LIMITED TO REPAIRS OR REPLACEMENT OF ANY PART(S) JUDGED<br />
DEFECTIVE BY HUNTER MARINE. SOME STATES DO NOT ALLOW THE EXCLUSION OR LIMITATION OF<br />
INCIDENTAL OR CONSEQUENTIAL OR INDIRECT DAMAGES, SO THE ABOVE LIMITATION OR EXCLUSION<br />
MAY NOT APPLY TO YOU. THIS WARRANTY GIVES YOU SPECIFIC LEGAL RIGHTS, AND YOU MAY ALSO<br />
HAVE OTHER RIGHTS WHICH VARY FROM STATE TO STATE.<br />
4
<strong>Hunter</strong> • Warranty<br />
OWNER INFORMATION CARD<br />
HULL IDENTIFICATION NUMBER IS ON THE STARBOARD AFT SIDE OF THE HULL OR<br />
TRANSOM. THIS NUMBER MUST BE GIVEN IN ALL NECESSARY CORRESPONDENCE.<br />
HULL NO.<br />
DATE DELIVERED TO OWNER<br />
YACHT NAME<br />
OWNER NAME<br />
STREET ADDRESS<br />
CITY STATE/COUNTRY ZIP CODE<br />
HOME PORT<br />
ENGINE MODEL SERIAL NO. PROPELLER SIZE<br />
DEALER<br />
PHONE<br />
STREET ADDRESS<br />
CITY STATE/COUNTRY ZIP CODE<br />
CUSTOMER SERVICE / WARRANTY<br />
5
<strong>Hunter</strong> • Warranty<br />
WARRANTY REGISTRATION<br />
GS<br />
These limited warranties shall not be effective unless the HUNTER Warranty Registration Form<br />
and Pre-Delivery Service Record, which are furnished with each new boat, are filled out completely<br />
and re-turned to HUNTER within ten (10) days of delivery.<br />
Return of the Warranty Registration Form to HUNTER, signed by both Dealer and Owner, is critical.<br />
Warranty coverage cannot be initiated until the completed form is received at HUNTER.<br />
All repairs and/or replacements will be made by an authorized <strong>Hunter</strong> dealer, or at the option of<br />
<strong>Hunter</strong>, at the <strong>Hunter</strong> plant. If the repairs are of such a nature that the warranty work must be<br />
performed at the HUNTER plant, transportation costs to and from the HUNTER plant shall be<br />
paid by the owner. The labor cost reimbursement will be based on a Labor Allowance Schedule<br />
established by HUNTER and where not applicable, on a reasonable number of hours as determined<br />
by HUNTER. Any repairs and replacements must be approved in advance by an authorized<br />
HUNTER service representative.<br />
TRANSFER OF LIMITED WARRANTIES<br />
For 1995 and later hull numbers, the limited warranties will be transferred to a subsequent purchaser<br />
of the boat if:<br />
(1) A notice of the transfer of ownership of the boat is given by the subsequent purchaser in<br />
writing to <strong>Hunter</strong> within thirty (30) days of the transfer.<br />
(2) The notice shall include the name, address and telephone number of the subsequent purchaser,<br />
the date of purchase, the hull number and the name of the seller of the boat.<br />
<strong>Hunter</strong> will mail to the subsequent purchaser notice of the expiration dates of the limited warranties<br />
(see form letter, attached). The transfer of the ownership of the boat will not extend the<br />
expiration dates of the limited warranties.<br />
CUSTOMER SATISFACTION SURVEYS<br />
During the first year of ownership, the first purchaser will receive two Customer Satisfaction<br />
Surveys - the first (CSS#1) will be received shortly after taking delivery and focuses on the<br />
dealer’s ability to sell and commission the boat, and the Owner’s initial satisfaction. The second<br />
survey (CSS#2), nine to ten months into ownership, “measures” dealer service capability and<br />
allows the owner to evaluate most of the boat’s functional systems and characteristics. Both<br />
surveys are dependent upon receipt of the first purchaser’s Warranty Registration Form.<br />
6
<strong>Hunter</strong> • Warranty<br />
SAMPLE FORM LETTER<br />
March 12, 1997<br />
Mr. John Smith<br />
1456 Joy Street<br />
Sarasota, FL 34266<br />
Dear Mr. Smith,<br />
Thank you for providing written notice of transfer of ownership. We are pleased you have<br />
selected a <strong>Hunter</strong> sailboat and we will make every effort to assure <strong>Hunter</strong> ownership will be a<br />
satisfying experience for you.<br />
Based on the information you have provided, d, we are pleased to notify you of the expiration<br />
dates of the limited warranties.<br />
• The limited one-year New Boat warranty anty expires (d)_____________________.<br />
• The limited five-year Hull Structure and Bottom Blister warranty expires (d)___<br />
____________________.<br />
Should you require assistance at any time during ownership, we encourage you to contact<br />
your <strong>Hunter</strong> dealer or to call us directly at 386-462-3077.<br />
Please confirm the information at the bottom of the page and advise us if any corrections<br />
are required.<br />
_____________________________________<br />
Customer Service Manager<br />
------------------------------------------------------------------------------------------------------------<br />
Hull No: HUN_________________________ Model:___________________________<br />
Telephone: (H)________________________(B)________________________________________<br />
Date of Purchase:_______________________________________________________<br />
Purchased From: Name:________________________________________________________<br />
___<br />
SAMPLE<br />
Address:_________________________________________________________<br />
City/State_________________________________Zip_____________________<br />
( ) Private Owner ( ) Dealer<br />
7
<strong>Hunter</strong> • Warranty<br />
Notes:<br />
8
HUNTER MARINE’S OWNER AND FOUNDER<br />
WARREN R. LUHRS<br />
BRIEF BACKGROUND<br />
Warren Luhrs was born in East Orange,<br />
New Jersey in 1944 into a family with an<br />
established tradition in the maritime and<br />
transportation industries. His greatgrandfather,<br />
Henry, was a railroad and<br />
clipper-shipping pioneer in America,<br />
while his great-uncle John helped build<br />
the famous St. Petersburg to Moscow<br />
railroad for Czar Alexander II.<br />
Henry Luhrs owned shares in twentytwo<br />
different ocean-going vessels –<br />
barks, brigs, and schooners - and was<br />
the principal owner of the bark Sophia<br />
R. Luhrs, named for his wife. He was<br />
also a partner with Albert Sprout, who<br />
managed the shipyard where the Sophia<br />
R. Luhrs was built in Melbridge, Maine.<br />
Warren Luhrs’ father Henry worked at a<br />
small boat manufacturer in Morgan,<br />
New Jersey, and later started his own<br />
company, continuing the Luhrs’ family<br />
sea tradition during the great<br />
depression. During World War II he<br />
repaired boats and installed ice<br />
sheathing on their bows for the Coast<br />
Guard.<br />
After the War, Henry built 27-foot fishing<br />
boats and in 1948 began to construct<br />
custom-built pleasure craft. He then<br />
turned to skiffs and in 1952 incorporated<br />
as Henry Luhrs Sea Skiffs, where he<br />
constructed lapstrake sea skiffs using<br />
assembly-line techniques. Henry<br />
personally “shook down” his prototypes<br />
on family trips up the Hudson River to<br />
Lake Champlain.<br />
The sea skiff is a class of boat that has<br />
been very popular, owing to its<br />
seaworthiness. It features a sharp bow,<br />
which reduces pounding in surf or choppy<br />
seas, and a hull whose forward section is<br />
rounded below the waterline to increase<br />
stability in rough water or a following sea.<br />
Such skiffs can either be smooth sided or<br />
of a lapstrake construction.<br />
Inspired by Henry Ford, Henry Luhrs’<br />
aimed to give the average man the<br />
opportunity to enjoy the luxury of boating<br />
by building an affordable and reliable<br />
boat. He was both designer and engineer,<br />
and his progressive new models exhibited<br />
his talent for innovation. He successfully<br />
changed the line of the bow from straight<br />
to curved at a time when the industry<br />
trend was a straight square effect, and he<br />
is believed to be the first designer-builder<br />
to popularize a small boat with a fly<br />
bridge.<br />
In 1960, Luhrs acquired the Ulrichsen<br />
Boat Company of Marlboro, New Jersey.<br />
It was here that Luhrs’ Alura fiberglass<br />
division was located. In 1965, Henry sold<br />
his company to Bangor Arrostook<br />
Railroad, which was to become the<br />
recreational conglomerate Bangor-Punta.<br />
It was also during this period that<br />
Silverton of Tom’s River, New Jersey was<br />
purchased by John and Warren Luhrs.<br />
Today, Warren R. Luhrs and his brother<br />
John own the Luhrs Group of marine<br />
manufacturers, which consists of Silverton<br />
Marine, Mainship Motor Yachts, and<br />
Luhrs Fishing Boats with its Alura division,<br />
as well as <strong>Hunter</strong> Marine, which<br />
exclusively manufactures sailboats.<br />
In January of 1996, the Luhrs family<br />
transferred a portion of the Luhrs Group to<br />
its employees through an ESOP program.<br />
PAGE 9
GLOSSARY OF SAILING TERMS<br />
A<br />
Aback: describes a sail when the wind<br />
strikes it on the lee side.<br />
Abaft: towards the boat’s stern.<br />
Abeam: at right angles to the centerline<br />
of the boat.<br />
Aft: at or near the stern.<br />
Amidships: the center of the boat,<br />
athwartships and fore and aft.<br />
Anti-fouling: a poisonous paint compound<br />
used to protect the underwater<br />
part of a hull from marine growths.<br />
Apparent wind: The direction and<br />
speed of the wind felt by the crew. It<br />
is a combination of true wind and that<br />
created by the movement of the boat.<br />
Astern: behind the boat; to go astern<br />
is to drive the boat in reverse.<br />
Athwartships: at right angles to the<br />
fore and aft line of the boat.<br />
B<br />
Back: when a wind backs, it shifts anticlockwise.<br />
Back a sail: to sheet it to windward<br />
so that the wind fills on the side that<br />
is normally to leeward.<br />
Backstay: a stay that supports the<br />
mast from aft and prevents its forward<br />
movement.<br />
Ballast: extra weight, usually lead or<br />
iron, placed low in the boat or externally<br />
on the keel to provide stability.<br />
Ballast keel: a mass of ballast bolted<br />
to the keel to increase stability and<br />
prevent a keel boat from capsizing.<br />
Batten: a light, flexible strip fed into a<br />
batten pocket at the leech of the sail<br />
to support the roach.<br />
Beam: 1, the maximum breadth of a<br />
boat; 2, a transverse member that<br />
supports the deck; 3, on the beam<br />
means that an object is at right angles<br />
to the centerline.<br />
Bear away: to steer the boat away<br />
from the wind.<br />
Bearing: the direction of an object<br />
from an observer, measured in degrees<br />
true or magnetic.<br />
Beat: to sail a zigzag course towards<br />
the wind, close-hauled on alternate<br />
tacks.<br />
Belay: to make fast a rope around a<br />
cleat, usually with a figure-of-eight<br />
knot.<br />
Bend: 1, to secure a sail to a spar<br />
before hoisting; 2, to moor a boat; 3,<br />
a sleeping place on board.<br />
Bight: a bend or loop in a rope.<br />
Bilge: the lower, round part inside the<br />
hull where the water collects.<br />
Block: a pulley in a wooden or plastic<br />
case, consisting of a sheave around<br />
which a rope runs. It is used to<br />
change the direction of pull.<br />
Boot-topping: a narrow colored<br />
stripe painted between the bottom<br />
paint and the topside enamel.<br />
Bottlescrew: see Rigging screw.<br />
Broach: when a boat running downwind<br />
slews broadside to the wind and<br />
heels dangerously. It is caused by<br />
heavy following seas or helmsman’s<br />
error.<br />
Broad reach: the point of sailing between<br />
a beam reach and a run, when<br />
the wind blows over a quarter.<br />
Bulkhead: a partition wall in a boat<br />
normally fitted athwartships<br />
C<br />
Caulk: to make the seams between<br />
wooden planks watertight by filling<br />
with cotton, oakum or a compound.<br />
Cavitation: the formation of a vacuum<br />
around a propeller, causing a loss in<br />
efficiency.<br />
Center-board: a board lowered<br />
through a slot in the keel to reduce<br />
leeway.<br />
Center-line: center of the boat in a<br />
fore and aft line.<br />
Center of effort (COE): the point at<br />
which all the forces acting on the sails<br />
are concentrated.<br />
Center of lateral resistance (CLR):<br />
the underwater center of pressure<br />
about which a boat pivots when<br />
changing course.<br />
Chain pawl: a short lug which drops<br />
into a toothed rack to prevent the anchor<br />
chain running back.<br />
Chain plate: a metal plate bolted to<br />
the boat to which the shrouds or<br />
backstays are attached.<br />
Chart datum: reference level on a<br />
chart below which the tide is unlikely<br />
to fall. Soundings are given below<br />
chart datum. The datum level varies<br />
according to country and area.<br />
Chine: the line where the bottom of<br />
the hull meets the side at an angle.<br />
Cleat: a wooden, metal or plastic fitting<br />
around which rope is secured.<br />
Clevis pin: a locking pin through<br />
which a split ring is passed to prevent<br />
accidental withdraw.<br />
Clew: the after, lower center of a sail<br />
where the foot and leech meet.<br />
Close-hauled: the point of sailing<br />
closest to the wind; see also beat.<br />
Close reach: the point of sailing between<br />
close-hauled and a beam<br />
reach, when the wind blows forward of<br />
the beam.<br />
Close-winded: describes a boat able<br />
to sail very close to the wind.<br />
Coaming: the raised structure surrounding<br />
a hatch, cockpit, etc., which<br />
prevents water entering.<br />
Cotter pin: soft, metal pin folded back<br />
on itself to form an eye.<br />
Course: the direction in which a vessel<br />
is steered, usually given in degrees;<br />
true, magnetic or compass.<br />
Cringle: 1, a rope loop, found at either<br />
end of a line of reef points; 2, an<br />
eye in a sail.<br />
D<br />
Dead run: running with the wind blowing<br />
exactly aft, in line with the centerline.<br />
Deviation: the difference between the<br />
direction indicated by the compass<br />
needle and the magnetic meridian;<br />
caused by object aboard.<br />
Displacement: 1, the weight of water<br />
displaced by a boat is equal to the<br />
weight of the boat; 2, a displacement<br />
hull is one that displaces its own<br />
weight in water and is only supported<br />
by buoyancy, as opposed to a planning<br />
hull which can exceed its hull, or<br />
displacement, speed.<br />
Downhaul: a rope fitted to pull down<br />
a sail or spar.<br />
Draft: the vertical distance from the<br />
waterline to the lowest point of the<br />
keel.<br />
Drag: 1, an anchor drags when it fails<br />
to hole; 2, the force of wind on the<br />
sails, or water on the hull, which impedes<br />
the boat’s progress.<br />
Drift: 1, to float with the current or<br />
wind; 2, US the speed of a current<br />
110<br />
PAGE 10
GLOSSARY OF SAILING TERMS<br />
(rate UK); 3, UK: the distance a boat<br />
is carried by a current in a given time.<br />
Drogue: a sea anchor put over the<br />
stern of a boat or life raft to retard drift.<br />
Drop keel: a retractable keel which<br />
can be drawn into the hull, when entering<br />
shallow waters and recovering<br />
on to a trailer.<br />
E<br />
Eye of the wind: direction from which<br />
the true wind blows.<br />
F<br />
Fair: well-faired line or surface is<br />
smoother with no bumps, hollows or<br />
abrupt changes in directions.<br />
Fairlead: a fitting through which a line<br />
is run to alter the lead of the line.<br />
Fathom: the measurement used for<br />
depths of water and lengths or rope. 1<br />
fathom = 6 ft. or 1.83m.<br />
Fid: a tapered tool used for splicing<br />
heavy rope and for sail-making, often<br />
hollow.<br />
Fiddle: a raised border for a cabin table,<br />
chart table etc., to prevent objects<br />
falling off when the boat heels.<br />
Fix: the position of the vessel as plotted<br />
from two or more position lines.<br />
Forestay: the foremost stay, running<br />
from the masthead to the stemhead,<br />
to which the headsail is hanked.<br />
Freeboard: vertical distance between<br />
the waterline and the top of the deck.<br />
G<br />
Genoa: a large headsail, in various<br />
sizes, which overlaps the mainsail and<br />
is hoisted in light to fresh winds on all<br />
points of sailing.<br />
Gimbals: two concentric rings, pivoted<br />
at right angles, which keeps objects<br />
horizontal despite the boat’s motion,<br />
e. g. compass and cooker.<br />
Go about: to turn the boat through the<br />
eye of the wind to change tack.<br />
Gooseneck: the fitting attaching the<br />
boom to the mast, allowing it to move<br />
in all directions.<br />
Goosewing: to boom-out the headsail<br />
to windward on a run by using a<br />
whisker pole to hold the sail on the<br />
opposite side to the mainsail.<br />
Ground tackle: general term used for<br />
anchoring gear.<br />
Guard rail: a metal rail fitted around<br />
the boat to prevent the crew falling<br />
overboard.<br />
Gudgeon: a rudder fitting. It is the eye<br />
into which the pintle fits.<br />
Guy: a steadying rope for a spar; a<br />
spinnaker guy controls the fore and aft<br />
position of the spinnaker pole; the<br />
foreguy holds the spinnaker pole forward<br />
and down.<br />
Gybe: to change from one tack to another<br />
by turning the stern through the<br />
wind.<br />
H<br />
Halyard: rope used to hoist and lower<br />
sails.<br />
Hank: fitting used to attach the luff of<br />
a sail to a stay.<br />
Hatch: an opening in the deck giving<br />
access to the interior.<br />
Hawes pipe: see Navel pipe.<br />
Head-topwind: when the bows are<br />
pointing right into the wind.<br />
Headfoil: a streamlined surround to a<br />
forestay, with a groove into which a<br />
headsail luff slides.<br />
Heads: the toilet.<br />
Headway: the forward movement of a<br />
boat through the water.<br />
Heave-to: to back the jib and lash the<br />
tiller to leeward; used in heavy<br />
weather to encourage the boat to lie<br />
quietly and to reduce headway.<br />
Heaving line: a light line suitable for<br />
throwing ashore.<br />
Heel: to lean over to one side.<br />
I<br />
Isobars: lines on a weather map joining<br />
places of equal atmospheric pressure.<br />
J<br />
Jackstay: a line running fore and aft,<br />
on both sides of the boat, to which<br />
safety harnesses are clipped.<br />
Jury: a temporary device to replace<br />
lost or damaged gear.<br />
K<br />
Keel: the main backbone of the boat<br />
to which a ballast keel is bolted or<br />
through which the centerboard<br />
passes.<br />
Kicking strap: a line used to pull the<br />
boom down, to keep it horizontal, particularly<br />
on a reach or run.<br />
L<br />
Lanyard: a short line attached to one<br />
object, such as a knife, with which it is<br />
secured to another.<br />
Leech: 1, the after edge of a triangle<br />
sail; 2, both side edges of a square<br />
sail.<br />
Leehelm: the tendency of a boat to<br />
bear away from the wind.<br />
Lee shore: a shore on to which the<br />
wind blows.<br />
Leeward: away from the wind; the direction<br />
to which the wind blows.<br />
Leeway: the sideways movement of a<br />
boat off its course as a result of the<br />
wind blowing on one side of the sails.<br />
Lifeline: a wire or rope rigged around<br />
the deck to prevent the crew falling<br />
overboard.<br />
Limber holes: gaps left at the lower<br />
end of frames above the keel to allow<br />
water to drain to the lowest point of<br />
the bilges.<br />
List: a boat’s more or less permanent<br />
lean to one side, owing to the improper<br />
distribution of weight, e.g., ballast<br />
or water.<br />
Log: 1, an instrument for measuring a<br />
boat’s speed and distance traveled<br />
through the water; 2, to record in a<br />
book the details of a voyage, usually<br />
distances covered and weather.<br />
Luff: the forward edge of a sail. To luff<br />
up is to turn a boat’s head right into<br />
the wind.<br />
Luff groove: a groove in a wooden or<br />
metal spar into which the luff of a<br />
headsail is fed.<br />
Lurch: the sudden roll of a boat.<br />
M<br />
Marlin spike: a pointed steel or<br />
wooden spike used to open up the<br />
strands of rope or wire then splicing.<br />
Mast Step: the socket in which the<br />
base of the mast is located.<br />
Measured mile: a distance of one<br />
nautical mile measured between<br />
buoys or transits/ranges ashore, and<br />
marked on the chart.<br />
PAGE 11
GLOSSARY OF SAILING TERMS<br />
Member: a part of the skeleton of the<br />
hull, such as a stringer laminated into<br />
fiberglass hull to strengthen it.<br />
Meridian: an imaginary line encircling<br />
the Earth that passes through the<br />
poles and cuts at right angles through<br />
the Equator. All lines of longitude are<br />
meridians.<br />
Mizzen: 1, the shorter, after-mast on a<br />
ketch or yawl; 2, the fore and aft sail<br />
set on this mast.<br />
N<br />
Navel pipe: a metal pipe in the foredeck<br />
through which the anchor chain<br />
passes to the locker below.<br />
Noon Sight: a vessel’s latitude can<br />
be found, using a sextant, when a<br />
heavenly body on the observer’s meridian<br />
is at its greatest altitude. The<br />
sight of the sun at noon is the one<br />
most frequently taken.<br />
O<br />
Off the wind: with the sheets slacked<br />
off, not close-hauled.<br />
On the wind: close-hauled.<br />
Out haul: a rope used to pull out the<br />
foot of a sail.<br />
Overall length (OAL): the boat’s extreme<br />
length, measured from the<br />
foremost past of the bow to the aftermost<br />
part of the stern, excluding bowspirt,<br />
self-steering gear etc.<br />
P<br />
Painter: the bow line by which a dinghy,<br />
or tender, is towed or made fast.<br />
Pintle: a rudder fitting with a long pin<br />
that fits into the gudgeon to form a<br />
hinged pivot for the rudder.<br />
Pitch: 1, the up and down motion of<br />
the bows of a boat plunging over the<br />
waves; 2, the angle of the propeller<br />
blades.<br />
Point of sailing: the different angles<br />
from which a boat may sail; the boat’s<br />
course relative to the direction of the<br />
wind.<br />
Port: the left-hand side of the boat,<br />
looking forward (opp. of starboard).<br />
Port tack: a boat is on a port tack<br />
when the wind strikes the port side<br />
first and the mainsail is out to starboard.<br />
A boat on the port tack gives<br />
way to a boat on a starboard tack.<br />
Position line/ Line of position: a line<br />
drawn on a chart, as a result of taking<br />
a bearing, along which the boat’s position<br />
must be, i.e. two position lines<br />
give a fix.<br />
Pulpit: a metal guard rail fitted at the<br />
bows of a boat to provide safety for<br />
the crew.<br />
Pushpit: a metal guard rail fitted at<br />
the stern.<br />
Q<br />
Quarter: the portion of the boat midway<br />
between the stern and the beam;<br />
on the quarter means about 45 degrees<br />
abaft the beam.<br />
R<br />
Rake: the fore and aft deviation from<br />
the perpendicular of a mast or other<br />
feature of a boat.<br />
Range: 1, see transit; 2, of tides, the<br />
difference between the high and low<br />
water levels of a tide; 3, the distance<br />
at which a light can be seen.<br />
Rating: a method of measuring certain<br />
dimensions of a yacht to enable it<br />
to take part in handicap races.<br />
Reach: to sail with the wind approximately<br />
on the beam; all sailing points<br />
between running and close-hauled.<br />
Reef: to reduce the sail area by folding<br />
or rolling surplus material on the<br />
boom or forestay.<br />
Reefing pennant: strong line with<br />
which the luff or leech cringle is pulled<br />
down to the boom when reefing.<br />
Rhumb line: a line cutting all meridians<br />
at the same angle; the course followed<br />
by a boat sailing in a fixed direction.<br />
Riding light to anchor light: an allaround<br />
white light, usually hoisted on<br />
the forestay, to show that a boat under<br />
50 ft. (15m.)is at anchor. It must be<br />
visible for 2 mls. (3 km.).<br />
Rigging screw: a deck fitting with<br />
which the tensions of standing rigging,<br />
e.g. stays, shrouds, etc. are adjusted.<br />
Roach: the curved part of the leech of<br />
a sail that extends beyond the direct<br />
line from head to clew.<br />
Run: to run with the wind aft and with<br />
the sheets eased well out.<br />
Running rigging: all the moving<br />
lines, such as sheets and halyards,<br />
used in the setting and trimming of<br />
sails.<br />
S<br />
Scope: the length of rope or cable<br />
paid out when mor anchoring.<br />
Scuppers: 1, holes in the toe rail that<br />
allow water to drain off the deck; 2,<br />
drain cockpit through hull.<br />
Seacock: a valve that shuts off an<br />
underwater inlet or outlet passing<br />
through the hull.<br />
Seize: to bind two ropes together, or a<br />
rope to a spar, with a light line.<br />
Serve: to cover and protect a splice or<br />
part of a rope with twine bound tightly<br />
against the lay.<br />
Serving mallet: tool with a grooved<br />
head, used when serving a rope to<br />
keep the twine at a constant and high<br />
tension.<br />
Set: 1, to hoist a sail; 2, the way in<br />
which the sails fit; 3, the direction of<br />
tidal current or steam.<br />
Shackle: a metal link with a removable<br />
bolt across the end; of various<br />
shapes: D, U.<br />
Sheave: a grooved wheel in a block<br />
or spar for a rope to run on.<br />
Sheet: the rope attached to the clew<br />
of a sail or to the boom, enabling it to<br />
be controlled or trimmed.<br />
Shrouds: ropes or wires, usually in<br />
pairs, led from the mast to the chain<br />
plates at deck level to prevent the<br />
mast falling sideways; part of the<br />
standing rigging.<br />
Sloop: a single-masted sailing boat<br />
with a mainsail and one head sail.<br />
Spar: a general term for any wooden<br />
or metal pole, e.g., mast or boom,<br />
used to carry or give shape to sails.<br />
Spindrift: spray blown along the surface<br />
of the sea.<br />
Spinnaker: a large, light, balloon<br />
shaped sail set when reaching or running.<br />
Splice: to join ropes or wire by unlaying<br />
the strands and interweaving<br />
them.<br />
Split pin: see cotter pin.<br />
Spreaders: horizontal struts attached<br />
to the mast, which extends to the<br />
shrouds and help to support the mast.<br />
PAGE 12
GLOSSARY OF SAILING TERMS<br />
Stall: a sail stalls when the airflow<br />
over it breaks up, causing the boat to<br />
lose way.<br />
Stanchion: upright metal post bolted<br />
to the deck to support guardrails or<br />
lifelines.<br />
Standing part: the part of a line not<br />
used when making a knot; the part of<br />
a rope that is made fast, or around<br />
which the knot is tied.<br />
Standing rigging: the shrouds and<br />
stays that are permanently set up and<br />
support the mast.<br />
Starboard: right-hand side of a boat<br />
looking forward (opp. of port).<br />
Starboard tack: a boat is the starboard<br />
tack when the wind strikes the<br />
starboard side first and the boom is<br />
out to the port.<br />
Stay: wire or rope which supports the<br />
mast in a fore and aft direction; part of<br />
the standing rigging.<br />
Steerage way: a boat has steerage<br />
way when it has sufficient speed to allow<br />
it to be steered, or to answer the<br />
helm.<br />
Stem: the timer at the bow, from the<br />
keel upward, to which the planking is<br />
attached.<br />
Sternway: the backward, stern-first<br />
movement of a boat.<br />
Stringer: a fore and aft member, fitted<br />
to strengthen the frames.<br />
T<br />
Tack: 1, the lower forward corner of a<br />
sail; 2, to turn the boat through the<br />
wind so that it blows on the opposite<br />
sides of the sails.<br />
Tacking: working to windward by sailing<br />
close-hauled on alternate courses<br />
so that the wind is first on one side of<br />
the boat, then on the other.<br />
Tack pennant: a length of wire with<br />
an eye in each end, used to raise the<br />
tack of a headsail some distance off<br />
the deck.<br />
Tackle: a purchase system comprising<br />
of rope and blocks that is used to<br />
gain mechanical advantage.<br />
Tang: a strong metal fitting by which<br />
standing rigging is attached to the<br />
mast or other spar.<br />
Tender of dinghy: a small boat used<br />
to ferry stores and people to a yacht.<br />
Terminal fitting: fitting at the end of a<br />
wire rope by which a shroud or stay<br />
can be attached to the mast, a tang or<br />
a rigging screw/ turnbuckle.<br />
Tide: the vertical rise and fall of the<br />
oceans caused by the gravitational attraction<br />
of the moon.<br />
Toe rail: a low strip of metal or molding<br />
running around the edge of the<br />
deck.<br />
Topping lift: a line from the masthead<br />
to a spar, normally the boom, which is<br />
used to raise it.<br />
Topsides: the part of a boat’s hull that<br />
is above the waterline.<br />
Track: 1, the course a boat has made<br />
good; 2, a fitting on the mast or boom<br />
into which the slides on a sail fit; 3, a<br />
fitting along which a traveller runs,<br />
used to alter the angle of the sheets.<br />
Transit: two fixed objects are in transit<br />
when seen in line; two transit give<br />
position fix.<br />
Traveller: 1, a ring or hoop that can<br />
be hauled along a spar; 2, a fitting that<br />
slides in a track and is used to alter<br />
the angle of the sheets.<br />
Trim: 1, to adjust the angle of the<br />
sails, by means of sheets, so that they<br />
work most efficiently; 2, to adjust the<br />
boat’s load, and thus the fore and aft<br />
angle at which it floats.<br />
True wind: the direction and speed of<br />
the wind felt when stationary, at anchor<br />
or on land.<br />
Turnbuckle: see Rigging screw.<br />
U<br />
Under way: a boat is under way when<br />
it is not made fast to shore, at anchor<br />
or aground.<br />
Uphaul: a line used to raise something<br />
vertically, e.g., the spinnaker<br />
pole.<br />
V<br />
Veer: 1, the wind veers when it shifts<br />
in clockwise direction; 2, to pay out<br />
anchor cable or rope in a gradual,<br />
controlled way.<br />
W<br />
Wake: the disturbed water left astern<br />
of a boat.<br />
Waterline: the line along the hull at<br />
which a boat floats.<br />
Waterline length (WL): the length of<br />
a boat from stem to stern at the waterline.<br />
It governs the maximum speed of<br />
displacement hull and effects a boats<br />
rating.<br />
Weather helm: ( opp. of lee helm).<br />
Weather side: the side of a boat on<br />
which the wind is blowing.<br />
Wetted surface: the area of the hull<br />
under water.<br />
Whisker pole: a light pole used to<br />
hold out the clew of a headsail when<br />
running.<br />
Winch: a mechanical device, consisting<br />
usually of a metal drum turned by<br />
a handle, around which a line is<br />
wound to give the crew more purchasing<br />
power when hauling taut a line,<br />
e.g. a jib sheet.<br />
Windage: those parts of a boat that<br />
increase drag, e.g., rigging, spars,<br />
crew, etc.<br />
Windlass: a winch with a horizontal<br />
shaft and a vertical handle, used to<br />
haul up the anchor chain.<br />
Windward: the direction from which<br />
the wind blows; towards the wind<br />
(opp. of leeward).<br />
Y<br />
Yawl: a two masted boat with a mizzen<br />
stepped aft of the rudder stock/<br />
post.<br />
PAGE 13
FLOAT PLAN<br />
1. Name of person reporting and telephone number:<br />
2. Description of boat<br />
NAME<br />
TYPE<br />
MAKE LENGTH REGISTRATION#<br />
HULL COLOR STRIPE COLOR DECK COLOR<br />
OTHER DISTINGUISHING MARKS<br />
3. Number of Persons aboard<br />
NAME AGE PHONE #<br />
ADDRESS<br />
NAME AGE PHONE #<br />
ADDRESS<br />
NAME AGE PHONE #<br />
ADDRESS<br />
4. Engine<br />
TYPE H.P. FUEL CAPACITY<br />
5. Safety equipment<br />
PFDs Flares Mirror Flashlight<br />
Food Water EPIRB Raft/Dinghy<br />
6. Radio<br />
TYPE<br />
FREQUENCIES<br />
7. Trip Expectations<br />
DEPARTURE TIME DATE FROM<br />
DESTINATION RETURN DATE NO LATER THAN<br />
8. Automobile:<br />
LICENSE # STATE MAKE<br />
COLOR<br />
9. If not returned by-<br />
PARKED AT<br />
Contact the Coast Guard or-<br />
CALL -<br />
AT-<br />
PAGE 14
EXPLANATION OF SAFETY PRECAUTIONS<br />
This manual contains safety precautions that must be observed when operating<br />
or servicing your boat.<br />
Review and understand these instructions.<br />
Denotes an extreme intrinsic hazard exists which would<br />
result in high probability of death or irreparable injury if proper<br />
precautions are not taken<br />
Denotes a hazard exists which can result in injury or death if<br />
proper precautions are not taken<br />
Denotes a reminder of safety practices or directs attention to<br />
unsafe practices which could result in personal injury or damage<br />
to the craft or components<br />
PAGE 15
SAFE BOATING TIPS<br />
BE PREPARED<br />
Take a safe boating course. In the U.S.,<br />
contact your local Boating Industry for details.<br />
Carry all safety equipment required by the<br />
laws that apply to your area. Requirements<br />
are generally available from the<br />
Coast Guard or your local boating industry.<br />
As the owner of the craft, obtaining<br />
and maintaining necessary<br />
safety equipment is your responsibility.<br />
For more information about<br />
equipment required, contact local<br />
boating authorities<br />
MINIMUM RECOMMENDED SAFETY EQUIPMENT<br />
• Required life saving equipment,<br />
including life vests and throwables.<br />
• First Aid kit<br />
• Anchor with sufficient line and/or<br />
chain<br />
• Flashlight with good batteries<br />
• Binoculars<br />
• Appropriate navigational charts<br />
• Flares<br />
• Noise emitting device<br />
LIFE JACKETS<br />
A life jacket may save your life, but<br />
only if you wear it. Keep jackets in a<br />
readily accessible place – not in a<br />
closed compartment or stored under<br />
other gear. Remove them from any<br />
packaging, and keep throwable floatation<br />
devices ready for immediate use.<br />
FIRE EXTINGUISHERS<br />
• Sufficient food and water provisions<br />
• Sunglasses and block<br />
• Blanket<br />
• Oar(s)<br />
The legally required on-board safety<br />
equipment may vary by region or body<br />
of water. Please check with local authorities<br />
prior to departure for a safety<br />
examination.<br />
It is very important that children, handicapped<br />
people, and non-swimmers wear<br />
lifejackets at all times. Make sure all passengers<br />
are properly instructed in use of<br />
life saving gear<br />
Approved fire extinguishers are required<br />
on most boats, local authorities<br />
can provide details. All passengers<br />
should know the location and operating<br />
procedure of each fire extinguisher.<br />
Fire extinguishers are normally<br />
classified according to fire type.<br />
Be familiar with the type of fire extinguishers<br />
you have on board.<br />
PAGE 16-1
SAFE BOATING TIPS<br />
FLARES<br />
Most boats operating on coastal waters<br />
are required to carry approved<br />
visual distress signals, therefore check<br />
with your local authorities as to which<br />
types are required.<br />
FIRE/EXPLOSION HAZARD; Pyrotechnic<br />
signaling devices can cause injury and<br />
property damage if not handled properly.<br />
Follow manufacturer’s directions regarding<br />
the proper use of signaling devices.<br />
DRUGS AND BOATING<br />
Consumption of alcohol while boating<br />
is not recommended. The combination<br />
of noise, sun, wind, and motion act to<br />
produce fatigue on the water, and can<br />
exaggerate the effects of alcohol.<br />
IMPAIRED OPERATION HAZARD<br />
Operating any boat while is intoxicated or<br />
under the influence of drugs is both dangerous<br />
and illegal. Impaired vision or<br />
judgment on the water can lead to accidents<br />
and personal injury<br />
BEFORE GETTING UNDERWAY<br />
• Leave a float plan (example included).<br />
• Perform a pre-departure checklist<br />
(example included).<br />
• Check the weather. Do not venture<br />
out if the weather is, or will<br />
be, threatening.<br />
WHILE UNDERWAY<br />
• Keep a good lookout. Keep a<br />
watch to the leeward under the<br />
headsail. Keep away from swimmers,<br />
divers, and skiers.<br />
• Know and obey local boating laws.<br />
• Respect bad weather, and be prepared<br />
for quickly changing conditions.<br />
COLLISION HAZARD<br />
Use extra caution in shallow water or<br />
where underwater/floating objects may be<br />
present. Hitting an object at speed or severe<br />
angle can seriously injure people and<br />
damage your boat<br />
PAGE 16-2
LAUNCHING & RETRIEVING PROCEDURES<br />
1. Remove any and all tie down straps and<br />
ropes securing the boat to the trailer, as well as<br />
any lines securing the rudder in the upright<br />
position or on centerline. The only attachment<br />
of the boat to the trailer should be the strap<br />
from the bow eye to the trailer winch.<br />
2. The spar can be raised before or after<br />
launch, depending on the time available before<br />
and the docking facilities available after launch.<br />
Beware of nearby power lines before<br />
raising spar.<br />
LAUNCHING<br />
5. Load all loose gear and provisions aboard<br />
by lowering the swim ladder in the transom.<br />
6. Back the boat and trailer down the ramp until<br />
the back wheels of the vehicle are just clear of<br />
the water, Retrieve the bow and stern lines as<br />
necessary. Loosen the trailer winch and bow<br />
strap.<br />
7. Once the boat is floating free, push the boat<br />
clear of the trailer guides to the available dock,<br />
maintaining control with the mooring lines.<br />
3. Attach the necessary bow and stern mooring<br />
lines and fenders if necessary. Do not lower<br />
the fenders over the side until the boat is clear<br />
of the trailer.<br />
4. Initially slacken the trailer winch and<br />
familiarize yourself with its gear switch action<br />
and return the winch to the locked position.<br />
8. Slowly pull the empty trailer out of the water,<br />
being careful that boat and people stay clear.<br />
9. Park the trailer and vehicle and return to the<br />
boat.<br />
1. Raise centerboard and rudder.<br />
2. Back trailer into water.<br />
3. Maneuver boat between trailer guides and<br />
up to the winch.<br />
4. Connect bow strap and with winch in correct<br />
gear, winch boat up and snug against bow<br />
stop.<br />
5. Center boat between upright aft trailer<br />
guides.<br />
RETRIEVING<br />
6. Slowly pull boat from water until the weight<br />
of the boat is on the trailer.<br />
7. Confirm alignment on trailer. Put trailer back<br />
in water if necessary to realign boat.<br />
8. Make sure that rudder is pinned or tied in<br />
upright position so that the tip doesn’t drag on<br />
ground.<br />
9.De-rig and unstep mast if not already done.<br />
Beware of nearby power lines when<br />
lowering mast.<br />
10. Tie boat to trailer, and secure mast.<br />
PAGE 17
G E N E R A L C A R E<br />
Your new <strong>Hunter</strong> is built using the ACP<br />
process. This is not a Fiberglass® boat!<br />
NOTICE<br />
The outer skin is a weatherable ABS plastic<br />
known as Luran® S and is built by BASF. The<br />
outer plastic skin is approximately .170” thick.<br />
Luran® S (acrylonitrile/styrene/acrylate) should<br />
be cleaned regularly. Normal accumulations of<br />
dirt can be removed simply by occasional<br />
rinsings with water. If your boat is operated in<br />
salt water, more frequent rinsing will be<br />
required. To remove dirt, grease or oil, use<br />
soap and water or isopropyl alcohol. For<br />
stubborn stains, you can use mineral spirits but<br />
never leave a rag with mineral spirits on it lying<br />
on your boat.<br />
You can wax the surface if you would like, but<br />
be aware this will make the boat slippery. For<br />
light scratches you can use a wax with a light<br />
rubbing compound or a mirror glaze which is<br />
available at any hardware store.<br />
CLEANING LURAN® S SURFACES<br />
For more extensive repairs, contact the factory.<br />
When storing, please open the drain plugs so<br />
the boat can breathe. When trailering make<br />
sure the boat is well supported so as not to<br />
dent the hull.<br />
CLEANING ACRYLIC<br />
! C A U T I O N<br />
Never leave a rag with mineral spirits<br />
sitting on the boat as this will attack the<br />
plastic and void the warranty. Never<br />
use acetone or other solvents. They will<br />
damage the finish on your boat.<br />
Use only mild soap and water to clean acrylics.<br />
Do not use products containing solvents such as<br />
ammonia, which is found in many window<br />
cleaners.<br />
! C A U T I O N<br />
Use care when cleaning acrylic.<br />
Dry cloth and many glass<br />
cleaners will scratch. Solvents<br />
will attack the surface.<br />
! W A R N I N G<br />
Cleaning agents and paint ingredients may be flammable and/or<br />
explosive, or dangerous to inhale. Be sure to use adequate<br />
ventilation, and appropriate safety clothing (gloves, safety glasses,<br />
respirator, etc.). __________________________________________<br />
P A G E 18
Remove the scratches by lightly hand wet sanding<br />
the surface with 600 grit sandpaper. Sand only<br />
until the scratches are removed (to retain as much<br />
thickness as possible). This will create a dull<br />
surface. To improve the surface<br />
Cosmetic damage is defined as a problem that<br />
does not affect the overall structure of the part or<br />
area. They are usually appearance concerns, such<br />
as scratches, surface mars, and minor dents. It is<br />
very important to ascertain the full extent of the<br />
damaged area. If any jagged edges or cracks are<br />
present, see the consequential damage section.<br />
Mask off the damaged area, lightly hand sand (220<br />
grit) the damaged area to remove any surface<br />
ridges and to promote adhesion. Sand in<br />
This type of damage can be holes, cracks, or large<br />
dents. Cracks, even those found around holes,<br />
must be prevented from growing. To do this, the<br />
ends must be found and blunted (by drilling small<br />
holes). Once this is done, the crack can be ground<br />
or routed into a V groove. This allows it to be filled<br />
easily and promotes a good bond. We suggest<br />
using a Dremel tool, being sure to work in a wellventilated<br />
area.<br />
Mask off the damaged area and lay down a bead<br />
of Plexus adhesive in a 1:1 ratio into the damaged<br />
area, slightly under filling the V groove.<br />
GENERAL CARE<br />
SHALLOW SURFACE SCRATCHES<br />
COSMETIC DAMAGE<br />
CONSEQUENTIAL DAMAGE<br />
SAFETY<br />
Use of solvents requires adequate ventilation,<br />
keeping in mind that they are usually highly<br />
flammable. Use proper procedures to avoid<br />
injury. In some instances, the use of these<br />
materials is controlled. Check all regulations<br />
prior to using.<br />
Keep in mind that a repair can only attempt to<br />
match the performance predicted in the original<br />
part. The repair may not be quite as strong or stiff<br />
as the original part. The overall part/system<br />
behavior has probably changed.<br />
gloss, sand the area with 1000 grit, then 1500 grit<br />
sandpaper. The surface should be starting to<br />
recover some of the gloss. To further increase the<br />
gloss level, polish the area with ultra fine polish<br />
(automotive polishes suitable for clearcoat).<br />
one direction only. In a well-ventilated area, apply<br />
a thin layer of Plexus adhesive in a 1:1 ratio to the<br />
damaged area. After the Plexus has dried, smooth<br />
the area with a fine (220 grit) sandpaper. Now,<br />
apply a thin layer of MA310 Plexus or Marine Tex<br />
to fill in any imperfections, and allow to dry. Lightly<br />
sand with a 220 grit sandpaper, followed by a 400<br />
grit sandpaper, then a 600 grit sandpaper. Finally,<br />
apply an Krylon Fusion to match the color.<br />
The Plexus will expand as it hardens. Skim the<br />
excess Plexus (if any) from the repair area<br />
keeping it level with the surrounding area. Allow to<br />
dry for 1 hour. Sand the damaged area until the<br />
surface is flush with the surrounding area. Apply a<br />
thin layer of MA310 Plexus or Marine Tex to fill<br />
any voids. Allow the filler to dry, then wet sand<br />
with 220, 400, then 600 grit sandpaper.<br />
After sanding the repaired area flush to the<br />
surrounding area, paint can then be applied.<br />
Recommended paints are 1501 Krylon Fusion<br />
2320 gloss white.<br />
CONSIDERATIONS:<br />
Always follow all warnings and instructions given<br />
by the manufacturers of the products used for<br />
repairs.<br />
This information is provided for your guidance<br />
only. We urge you to make all tests you deem<br />
appropriate prior to use. No warranties, either<br />
expressed or implied, including warranties or<br />
merchantability or fitness for a particular purpose,<br />
are made regarding products described or<br />
information set forth, or that such products or<br />
information may be used without infringing patents<br />
of others.<br />
PAGE 19
A.C.P.<br />
ADVANCED COMPOSITE PROCESS<br />
• ACP: The most innovative Boatbuilding process<br />
today<br />
ACP is a plastic based process which uses and outer plastic skin, a central foam core and<br />
an inner fiberglass skin. The outer plastic skin is 1/4” thick and is a on extrusion of high<br />
impact resistant ABS and UV resistant plexiglas. The plastic components are formed by<br />
using a process known as thermoforming which uses a vacuum to draw heated plastic onto<br />
a mold.<br />
Repairs can be made quickly, cleanly and easily using our two part patch kit. Should you<br />
have any questions, a <strong>Hunter</strong> service consultant can walk you through almost any repair<br />
over the phone.<br />
• Send in the reinforcements<br />
This plastic skin is then reinforced with a foam core by placing the plastic hull in a<br />
matched mold with a 1” gap between the plastic and the mold. Liquid foam is then injected<br />
into the void under high pressure. The foam expands, conforming to the shape of the hull,<br />
and becomes the middle layer of the composite.<br />
The third strain consists of fiberglass cloth. The cloth in attached to the mold during the<br />
foaming process and is integrated into the hull as the foam expands.<br />
• Benefits<br />
◊ Strength: ACP is five times stronger than fiberglass and because there are no<br />
fiber to breakdown , the hull will not become “soft”.<br />
◊ Cost: the ACP process is less labor intensive resulting in a lower priced boat.<br />
◊ Environmentally Friendly: The ACP process is much more<br />
environmentally friendly then fiberglass production. The amended Clean Air Act,<br />
which took effect in 1996, greatly restricted all fiberglass manufactured by putting a<br />
severe limit on styrene emissions.<br />
PAGE 21
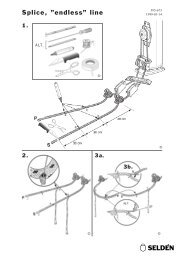
Quick Step <strong>146</strong> Rigging Guide<br />
1. Find a level place near the launching area to<br />
raise the mast. Make sure there are no<br />
overhead power lines or obstructions where<br />
you will be rigging or on the path to the<br />
water.<br />
2. Untie the mast and rigging from the trailer.<br />
The side-shrouds should have quick-levered<br />
shroud adjusters on them and the roller<br />
furling forestay pigtail should have the upper<br />
swivel attached to it.<br />
3. Attach the jib (rolled up) to the upper swivel<br />
and tie it off to the mast at the base and<br />
make sure your main halyard is secured to<br />
the mast.<br />
4. If by yourself, remove the forward<br />
compartment cover and cover battens.<br />
5. Pin the shroud adjusters to the chain plates<br />
and open up them up. Walk the mast back<br />
and insert the base of the mast into the mast<br />
step aligning the pegs in the mast with the<br />
grooves in the step.<br />
6. Raise the mast from inside the boat keeping<br />
the mast as close to the centerline of the<br />
boat as possible while going up. It helps to<br />
be far back in the cockpit and facing<br />
forward with the mast in front of you and<br />
a wide stance.<br />
7. Now have someone attach the forward pin<br />
through the roller furling drum and the lower,<br />
wire thimble of the jib. (If by yourself,<br />
carefully attach the jib thimble through<br />
the roller-furling drum. Keep downward<br />
tension on the rolled-up jib to prevent the<br />
mast from falling backwards)<br />
8. Close the levered shroud adjusters to tighten<br />
rig. There should be no slack in the rig at<br />
this point. If you need to move the pins on<br />
the adjusters, just open them and carefully<br />
raise or lower the pins until you achieve the<br />
desired rig tension. (The main halyard tied<br />
off on the shroud anchor points can be<br />
used to hold the mast up while you adjust<br />
the pins)<br />
9. Remove the boom and attach to the<br />
gooseneck fitting on the mast with the pin<br />
and ring. Run the mainsail slugs into the<br />
groove of mast and attach the main halyard.<br />
Run the outhaul line from the clew of the sail<br />
(if it is not already attached) through the eye<br />
on the back of the boom and forward to the<br />
cleat on the side of the boom.<br />
10. Run your mainsheet if you have not done so<br />
and attach the upper block to the boom.<br />
Make sure there are no twists and the cleat<br />
is working properly. (The angle of the cleat<br />
on the lower mainsheet block can be<br />
changed by loosening the screw in the<br />
middle of the lower block and rocking the<br />
cleat assembly up or down and then<br />
tightened)<br />
11. Make sure your roller furling line is run up<br />
through the drum and out the top with a stop<br />
knot. Lead your jib sheets back through the<br />
swivel cleats on the forward edge of the<br />
seats. Make sure the line runs from the jib<br />
through the eye or fairlead and them through<br />
the cleat. Tie stop knots on the end of<br />
sheets and test the furling system.<br />
12. Attach the Rudder/Tiller assembly and you<br />
are ready to hoist the main and/or unfurl the<br />
jib once the boat is pointed into the wind.<br />
PAGE 22-1
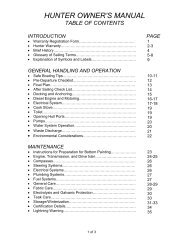
H-<strong>146</strong> Line Chart<br />
Standard Line Bag<br />
Mainsheet Jib Sheet Main Halyard Outhaul Vang Roller Furling<br />
3/8" @ 28 1/4" @ 20' 1/4" @ 42' 3/16" @ 10' 1/4"LS @ 12' 5/32" @ 12'<br />
add shackle<br />
add vang block<br />
28 20 42 10 12 12<br />
Centerboard Control:<br />
Roller Furler pigtails:<br />
shockcord: 5 1/2' of 5/16" North - 17 1/2"<br />
line: 7' of 3/16"<br />
Long Batten with<br />
End:<br />
Standard Main: All<br />
battens sewn in<br />
Performance: 41"<br />
Centerboard Flaps: 40"<br />
Bow Battens: 1-23 1/4"<br />
1-27"<br />
Roller Furler Tubing: 42" x 5/8" ID<br />
Cockpit Drain Tubing: 28" x 5/8" ID<br />
Non-Skid: 2pcs - 6" wide x 7' long<br />
Rudder Pin: 7 7/8"<br />
FORESTAY (1)<br />
1/8 1x19<br />
MARINE EYE<br />
SHROUDS (2)<br />
1/8 1x19<br />
JIB FURLING TAIL<br />
FORK W/PIN<br />
1'5-1/2"<br />
MARINE EYE<br />
PAGE 22-2