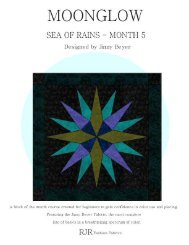
by Jinny Beyer - Plum Creek Quilts
by Jinny Beyer - Plum Creek Quilts
by Jinny Beyer - Plum Creek Quilts

Create successful ePaper yourself
Turn your PDF publications into a flip-book with our unique Google optimized e-Paper software.
Night – 53" x 53"<br />
Day – 53" x 53"<br />
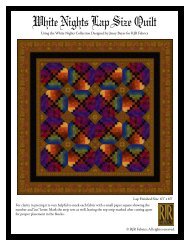
<strong>by</strong> <strong>Jinny</strong> <strong>Beyer</strong><br />
Featuring fabrics from the <strong>Jinny</strong> <strong>Beyer</strong> Palette
Night and Day<br />
Designed <strong>by</strong> <strong>Jinny</strong> <strong>Beyer</strong><br />
Finished Quilt: 53" x 53"<br />
Instructions <strong>by</strong> Shannon Murray<br />
Please read the pattern instructions carefully before you begin.<br />
All seams are 1/4".<br />
Skill Level: Beginner<br />
An original design <strong>by</strong> <strong>Jinny</strong> <strong>Beyer</strong>, Night and Day are eye catching quilts that maximize use of fabric. The two quilts are<br />
made from only two strip-pieced sets. Fabric that would generally be set aside as scrap when making the Night quilt is<br />
utilized for use in a second quilt, Day. By changing the orientation of the strip sets and changing the background and border<br />
from dark to light, you get two quilts with dramatically different results.<br />
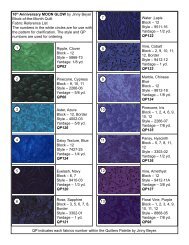
Fabric Requirements and Cutting Directions<br />
Fabric Fabric Fabric No. Cutting<br />
Key Swatch Palette 9 No. Directions Yardage<br />
1 5747-6 Cut 8 strips 11/2" the width of the<br />
#68 fabric (approximately 42").<br />
2 5745-5 Cut 8 strips 11/2" the width of the<br />
#69 fabric (approximately 42").<br />
3 9414-26 Cut 8 strips 11/2" the width of the<br />
#70 fabric (approximately 42").<br />
4 6739-5 Cut 8 strips 11/2" the width of the<br />
#71 fabric (approximately 42").<br />
5 4730-5 Cut 8 strips 11/2" the width of the<br />
#72 fabric (approximately 42").<br />
6 6740-5 Cut 8 strips 11/2" the width of the<br />
#73 fabric (approximately 42").<br />
7 4730-6 Cut 8 strips 11/2" the width of the<br />
#75 fabric (approximately 42").<br />
8 2266-11 Cut 4 strips 11/2" the width of the<br />
#50 fabric (approximately 42").<br />
9 5747-5 Cut 4 strips 11/2" the width of the<br />
#51 fabric (approximately 42").<br />
10<br />
1/2 Yard<br />
1/2 Yard<br />
1/2 Yard<br />
1/2 Yard<br />
1/2 Yard<br />
1/2 Yard<br />
1/2 Yard<br />
1/4 Yard<br />
1/4 Yard<br />
6739-3<br />
#52<br />
Strips for the Strip Set: Cut 4 strips<br />
1<br />
11/4 Yards<br />
1/2" x 42" lengthwise.<br />
Border 2 for Night quilt: cut<br />
4 strips 11/2" x 45" lengthwise<br />
Border 2 for Day quilt: cut<br />
4 strips 11/2" x 42" lengthwise.<br />
11 1702-10 Cut 4 strips 11/2" the width of the<br />
#53 fabric (approximately 42").<br />
12 4731-5 Cut 4 strips 11/2" the width of the<br />
#54 fabric (approximately 42").<br />
1<br />
1/4 Yard<br />
1/4 Yard
Fabric Requirements and Cutting Directions (continued)<br />
Fabric Fabric Fabric No. Cutting<br />
Key Swatch Palette 9 No. Directions Yardage<br />
13 4731-1 Cut 4 strips 11/2" the width of the<br />
#2 fabric (approximately 42").<br />
14 6739-1 Cut 4 strips 11/2" the width of the<br />
#1 fabric (approximately 42").<br />
For Night Quilt only:<br />
Border 1 & 3: Cut 4 strips 11/4" 15<br />
x 45"<br />
9410-14 and 4 strips 51/2" #48<br />
x 55" lengthwise.<br />
Background: Cut 16 of Template B.<br />
Binding: Save remaining fabric for<br />
the binding.<br />
For Day Quilt only:<br />
Border 1 & 3: Cut 4 strips 11/4" 16<br />
x 45"<br />
9812-1 and 4 strips 51/2" #110<br />
x 55" lengthwise.<br />
Background: Cut 16 of Template B.<br />
Binding: Save remaining fabric for<br />
the binding.<br />
Any<br />
Backing Coordinating<br />
Fabric<br />
Strip Piecing<br />
Follow the example shown in Figure 1 for strip piecing the<br />
two strip sets together.<br />
NOTE: When strip piecing, alternate the direction of the<br />
seam. Sew left to right, then right to left – this helps to keep<br />
the fabric from stretching.<br />
Fabric 1<br />
Fabric 2<br />
Fabric 3<br />
Fabric 4<br />
Fabric 5<br />
Fabric 6<br />
Fabric 7<br />
Fabric 8<br />
Fabric 9<br />
Fabric 10<br />
Fabric 11<br />
Fabric 12<br />
Fabric 13<br />
Fabric 14<br />
Strip Set 1 Strip Set 2<br />
Make 8 Make 4<br />
Figure 1<br />
2<br />
1/4 Yard<br />
1/4 Yard<br />
2 3/4 Yards<br />
2 3/4 Yards<br />
31/2 Yards<br />
per quilt<br />
Layout for Cutting Templates A & B<br />
Each Strip Set 1 will yield 2 Night and 2 Day Large<br />
(Template A) triangles. Each Strip Set 2 will yield 2 Night, 2<br />
Night reverse, 2 Day and 2 Day reverse small (Template B)<br />
triangles. Cut all strip-pieced sets. Final cuts will be:<br />
Strip-Pieced Set #1: From Template A<br />
Night: 8<br />
Day: 8<br />
Strip-Pieced Set #2: From Template B and B(r)<br />
Night: B – 8<br />
B(r) – 8<br />
Day: B – 8<br />
B(r) - 8<br />
Refer to Figure 2 for a cutting layout to maximize the use of<br />
fabric. When cutting, label triangles accordingly so the two<br />
quilts will not be confused.<br />
Note: The tips of the triangle templates will extend slightly<br />
beyond, approximately 1/8", the edge of your strips set. See<br />
figure 2.
Day<br />
B<br />
Piecing the Block<br />
Day<br />
A<br />
For Night Quilt:<br />
1. Sew together the stripped triangle cut from Template B<br />
to the dark background fabric cut from Template B.<br />
2. Regular block - Make 8.<br />
3. Reverse block - Make 8.<br />
4. Follow Figure 3 to ensure proper placement.<br />
B<br />
B<br />
Make 8<br />
B<br />
D<br />
Figure 2<br />
Figure 3<br />
B B<br />
Make 8<br />
Make 8 Block Size 9 7/8" Make 8 Block Size 9 7/8"<br />
Figure 4<br />
For Day Quilt:<br />
1. Sew together the blocks following steps 1 – 6 above,<br />
substituting the light background for the dark background.<br />
3<br />
Dayay<br />
B<br />
Day<br />
A<br />
B<br />
Day<br />
5. Add the large stripped triangle cut from Template A to the<br />
triangles from Figure 3.<br />
6. Follow Figure 4 for proper placement. (Color photo of<br />
regular block is on the next page.)
Assembling the Quilt<br />
Day Block Night Block<br />
1. Sew together 4 regular blocks in a pinwheel pattern as<br />
shown in Figure 5. Make 2.<br />
2. Sew together 4 reverse blocks in a pinwheel pattern as<br />
shown in Figure 6. Make 2.<br />
Make 2 Make 2<br />
Figure 5 Figure 6<br />
4<br />
3. Sew together the four large pinwheel blocks as shown in<br />
Figure 7.<br />
This completes the quilt top, minus the borders.<br />
Figure 7
Bordering the Quilt<br />
1. Fold each border strip in half and finger press a crease at<br />
the center point. Sew together the three border strips<br />
aligning the finger pressed mid-point. Make 4. See Figure<br />
8 for example.<br />
NOTE: When strip piecing, alternate the direction of the<br />
seam. Sew left to right, then right to left – this helps to keep<br />
the fabric from stretching.<br />
The middle border for Night and Day is the same – Fabric<br />
10. The inner and outer border will match the background<br />
fabrics for both quilts. Dark fabric for Night and light fabric<br />
for Day.<br />
Finger Pressed Seam to align mid-point:<br />
Figure 8<br />
2. Place one of the border strip sets horizontally across the<br />
middle of the quilt, centering your finger pressed mid-point<br />
at the exact center of the quilt. Use a 45˚ triangle to mark<br />
the miter along one end of the strip, positioning the triangle<br />
Figure 9<br />
5<br />
at the edge of the quilt as indicated in Figure #9 (see<br />
arrow). Cutting where the arrow indicates, at the exact<br />
edge of the quilt top, allows for the seam allowance. Mark,<br />
then cut the miter.<br />
3. Cut the miter on the opposite end of the same border strip<br />
in the same fashion.<br />
4. Using the first mitered border strip set as a pattern, place<br />
it on the remaining three border sets. Cut these strip sets<br />
identical in size to the first, with perfect 45 degree mitter.<br />
5. Begin <strong>by</strong> pinning the finger pressed mid-point of one of<br />
the border sets to the middle of one of the edges of the<br />
quilt. Pin the corners next, then ease in any fullness,<br />
carefully pinning all along the edge.<br />
6. Sew one of the border strip sets to the quilt stopping short<br />
of the 1/4" seam allowance at each corner.<br />
7. Repeat steps 5 and 6 for the remaining 3 sides of the quilt.<br />
8. Sew the miters in all four corners remembering not to sew<br />
through the seam allowances.<br />
9. Layer the backing, batting and quilt top; baste.<br />
10. Quilt, bind and finish as desired.
Templates<br />
(NOT shown to scale, ENLARGE 200% when printing)<br />
A<br />
6<br />
B & B(r)<br />
0 1" 2" 3"<br />
Use this 3" scale to insure the accuracy of your printout.