LTR450 Coil Kit
LTR450 Coil Kit
LTR450 Coil Kit

Create successful ePaper yourself
Turn your PDF publications into a flip-book with our unique Google optimized e-Paper software.
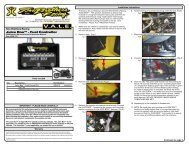
Dynatek <strong>Coil</strong> <strong>Kit</strong> DCK3-1<br />
2006+ Suzuki LT-R450<br />
Congratulations on your purchase of a Dynatek Ignition <strong>Coil</strong> <strong>Kit</strong>. Please take a moment to read these instructions completely before<br />
installing the ignition coil. The installation will only take about 30 minutes.<br />
This kit includes: Dynatek Ignition 0.5ohm Mini-<strong>Coil</strong><br />
Spark plug wire, terminal and boot<br />
Electrical plug-in wiring adaptor<br />
<strong>Coil</strong> mounting “Z” bracket, bolt, lock nuts & washers<br />
This is a complete kit, and includes everything needed to install the ignition coil.<br />
Note: The stock sparkplug boot will be reused in this application.<br />
Note: The fuel tank will have to be removed to gain access to the sparkplug boot.<br />
Note: Route all wires carefully. Secure wires in factory loops or use cable ties to ensure electrical wires do not chafe or touch anything<br />
hot. Pay close attention to the wiring detail and wire crimping, successful installation depends on this.<br />
Tools Required: 10mm, 12mm, and 14mm socket wrench<br />
10mm combination wrench<br />
5mm Allen wrench<br />
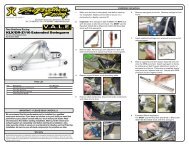
Installation<br />
1) Turn ignition key off.<br />
2) Remove the gas tank, to gain access to the sparkplug boot. Remove sparkplug boot from the sparkplug.<br />
3) Disconnect the stock coil primary wires at the 2-position blue connector.<br />
4) Remove the two 12mm coil bracket-to-frame mounting bolts.<br />
5) Remove the 14mm coil bracket-to-engine mounting bolt. Be careful not to drop the washer behind this bracket.<br />
6) Remove the stock ignition coil and bracket from the ATV. Remove the coil from the bracket by removing the two 10mm<br />
nuts from the two 5mm Allen bolts.<br />
7) Remove the stock spark plug boot from the sparkplug wire. Hold the sparkplug wire near the boot and unscrew the boot<br />
counterclockwise.<br />
8) Set aside: Stock coil and wire(minus the rubber cap), the Allen bolts, spacers and nuts.<br />
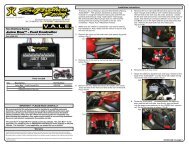
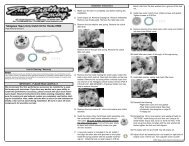
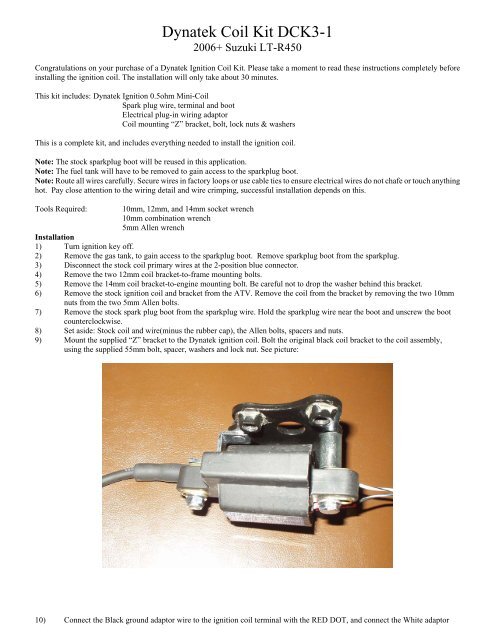
9) Mount the supplied “Z” bracket to the Dynatek ignition coil. Bolt the original black coil bracket to the coil assembly,<br />
using the supplied 55mm bolt, spacer, washers and lock nut. See picture:<br />
10) Connect the Black ground adaptor wire to the ignition coil terminal with the RED DOT, and connect the White adaptor
wire to the unmarked ignition coil terminal.<br />
11) Plug the sparkplug wire boot onto the coil output tower, push the rubber boot onto the coil tower to eliminate any gap as<br />
this is a potential source of high-voltage arcing.<br />
12) Install the <strong>Coil</strong> to the stock location, adjust Dyna coil for any clearance issues.<br />
13) Route the sparkplug wire in the stock location, if the sparkplug wire is too long, then cut it to the proper length.<br />
14) Press in and screw the stock sparkplug boot onto the Dynatek supplied sparkplug wire. Screw it in clockwise until it is<br />
bottomed out.<br />
15) Check the wiring, make sure connections are tight and secure.<br />
16) Tighten all coil mounting bolts, install gas tank in the reverse order.<br />
17) Start the engine. Installation is complete!<br />
2801304A REV. 8-09-06