A300 Greeter Operations Manual.pdf - Essnashville.com
A300 Greeter Operations Manual.pdf - Essnashville.com
A300 Greeter Operations Manual.pdf - Essnashville.com

Create successful ePaper yourself
Turn your PDF publications into a flip-book with our unique Google optimized e-Paper software.
Audio <strong>Greeter</strong><br />
Model <strong>A300</strong><br />
Operating Instructions<br />
Intended Use<br />
The 3M Audio <strong>Greeter</strong>, Model <strong>A300</strong>, is designed for use with an inter<strong>com</strong> system in a quick service drive-thru<br />
restaurant to play digitally stored messages through a menu speaker.<br />
FCC Information<br />
This device <strong>com</strong>plies with part 15 of the FCC Rules. Operation is subject to the following two conditions: (1) This device<br />
may not cause harmful interference, and (2) this device must accept any interference received, including interference that<br />
may cause undesired operation.<br />
Changes or modifications not expressly approved by the party responsible for <strong>com</strong>pliance could void the user’s authority<br />
to operate the equipment
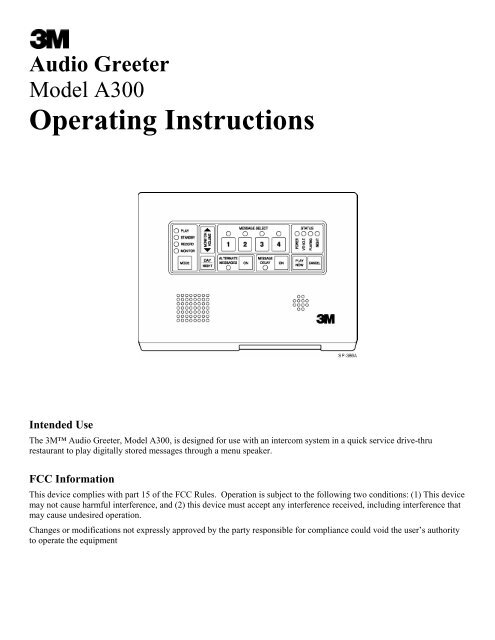
Description<br />
The 3M Audio <strong>Greeter</strong>, Model <strong>A300</strong>, is a digital audio recorder that plays stored messages.<br />
Up to four fifteen-second messages can be automatically triggered by a standard vehicle detector or manually started by<br />
the control panel. Combinations of messages can be selected to play each time a vehicle enters the drive-thru area, or<br />
several selected messages can play alternately.<br />
Messages can be delayed up to 15 seconds after a vehicle is detected. A DAY/NIGHT button can lower the menu sign<br />
speaker volume for night operation. When using a 3M C960/C860 Inter<strong>com</strong> System with a C921BA Base Station, any<br />
message playing over the menu speaker will be cancelled when the order-taker presses the TALK button for at least one<br />
second. A short tap of the TALK button will cancel only the alert tones, allowing the message to continue and be heard<br />
in the headset/beltpack.<br />
Messages can be recorded through the included external plug-in microphone, the internal microphone, or the auxiliary<br />
input jack. Messages longer than 15 seconds can be recorded by selecting 2 or more message numbers. They will be<br />
played back without a pause between them. Messages will be retained even if the <strong>A300</strong> is turned off or is unplugged from<br />
the AC outlet.<br />
Operation<br />
1. To Turn the <strong>A300</strong> On:<br />
Slide the ON/OFF switch, located on the bottom of the <strong>A300</strong>, to ON. The POWER STATUS light will <strong>com</strong>e on.<br />
The <strong>A300</strong> is designed to remain ON all the time.<br />
2. Recording Messages<br />
To Record a Message Using the External Microphone:<br />
Plug the external microphone into the 1/8-inch MIC jack located on the bottom of the <strong>A300</strong>.<br />
Press the MODE button until the RECORD light <strong>com</strong>es on.<br />
Press and hold one of the MESSAGE SELECT number buttons. Speak in a normal voice about three inches from<br />
the microphone.<br />
NOTE: Messages may be up to 15 seconds long.<br />
Release the MESSAGE SELECT number button after <strong>com</strong>pleting the message. The MESSAGE SELECT light<br />
will begin blinking after 12 seconds of recording. (This indicates three seconds remaining.)<br />
• To Record a Message Using the Internal Microphone:<br />
Unplug the external microphone from the 1/8-inch MIC jack located on the bottom of the <strong>A300</strong>.<br />
Press the MODE button until the RECORD light <strong>com</strong>es on.<br />
Press and hold one of the MESSAGE SELECT number buttons. Speak in a normal voice about three inches from<br />
the internal microphone grill.<br />
NOTE: Messages may be up to 15 seconds long.<br />
Release the MESSAGE SELECT number button after <strong>com</strong>pleting the message. The MESSAGE SELECT light<br />
will begin blinking after 12 seconds of recording. (This indicates three seconds of recording time remaining.)<br />
• To Record a Message Longer than 15 Seconds:<br />
After recording up to 15 seconds of a longer message, press and hold the next MESSAGE SELECT number<br />
button. Finish the message by speaking in a normal voice about three inches from the internal microphone.<br />
• To Record a Message Using the Auxiliary Input (from a cassette player with a pre-recorded message):<br />
Connect the auxiliary output of the cassette player to the AUX IN RCA jack located on the bottom of the <strong>A300</strong>.<br />
Press the MODE button until the RECORD light <strong>com</strong>es on.<br />
Press and hold one of the MESSAGE SELECT number buttons.<br />
Start the cassette player.<br />
Release the MESSAGE SELECT number button after the message has ended. The MESSAGE SELECT light<br />
will begin blinking after 12 seconds of recording. (This indicates three seconds of recording time remaining.)<br />
2
3. Monitoring Recorded Messages<br />
• To Listen to Recorded Messages through the internal speaker only:<br />
Press the MODE button until the MONITOR light <strong>com</strong>es on.<br />
Press the desired MESSAGE SELECT number buttons.<br />
Press the PLAY NOW button. The messages will be heard through the <strong>A300</strong> internal speaker, but not at the<br />
menu speaker.<br />
Press the CANCEL button to immediately stop the message.<br />
4. Playing Messages<br />
• To Begin Playing Messages Automatically at the Menu Speaker (triggered by a vehicle detector):<br />
Press the MODE button until the PLAY light <strong>com</strong>es on.<br />
Press the desired MESSAGE SELECT number button. Multiple messages can also be selected. They will be<br />
played in ascending order to the outside speaker each time a vehicle enters the drive-thru area. There will be no<br />
pause between multiple selected messages. If a message is still playing when the vehicle leaves the drive-thru<br />
area, the message will stop and the <strong>A300</strong> will be reset for the next vehicle.<br />
• To Change to Another Pre-Recorded Message:<br />
Press the desired MESSAGE SELECT number button. Multiple messages can be selected or deselected by<br />
observing the indicator lights.<br />
• To Alternate Messages:<br />
Press the ALTERNATE MESSAGES ON button. Multiple messages must be selected for the ALTERNATE<br />
MESSAGES light to <strong>com</strong>e on. A different message will play each time a vehicle enters the drive-thru area.<br />
• To Play Messages <strong>Manual</strong>ly:<br />
Press the desired MESSAGE SELECT number buttons.<br />
Press the PLAY NOW button. This will play the selected messages at the menu speaker one time only. The<br />
PLAYING status light will <strong>com</strong>e on and remain on until the messages are <strong>com</strong>pleted.<br />
5. Stopping Messages<br />
• To Stop Playing Messages Automatically:<br />
Press the MODE button until the STANDBY light <strong>com</strong>es on. If a message is currently playing, it will finish. No<br />
more messages will be triggered.<br />
Press the MODE button until the PLAY light <strong>com</strong>es on to resume playing messages automatically.<br />
• To Stop Playing a <strong>Manual</strong>ly Started Message:<br />
Press the CANCEL button. The message will immediately stop.<br />
6. Additional Operator Controls<br />
• To Delay the Start of Messages:<br />
Press the "MESSAGE DELAY" ON button. The MESSAGE DELAY light will <strong>com</strong>e on. Automatically<br />
triggered messages will be delayed for an internally preset time. Press the MESSAGE DELAY button a second<br />
time to cancel the delay.<br />
• To Lower the Volume of the Outside Speaker for Night Time Use:<br />
Press the DAY/NIGHT button to decrease the volume to the menu sign speaker at night. The NIGHT status light<br />
will <strong>com</strong>e on and remain on until the DAY/NIGHT button is pressed again.<br />
3
• To Adjust the Volume of the Internal Monitor Speaker:<br />
Press the MONITOR VOLUME up or down arrow to raise or lower the volume heard through the internal<br />
monitor speaker. A buzz will indicate the end of the adjustment range.<br />
7. Internal Adjustments (These controls are located inside the case of the <strong>A300</strong>. Please contact your 3M authorized<br />
dealer for assistance in adjusting these controls.)<br />
• Menu Sign Speaker Volume Control<br />
This controls the volume of the messages at the menu sign speaker.<br />
• Audio Output to Headset Volume Control<br />
This controls the volume of the messages that are routed back to the inter<strong>com</strong>, allowing the order-taker to monitor<br />
the outgoing messages.<br />
• Message Delay Time<br />
The automatic start of messages can be programmed for a delay of 1 to 15 seconds.<br />
• Automatic Message Repeat<br />
Messages can be set to play once or play continuously each time the <strong>A300</strong> is triggered by a vehicle. If multiple<br />
messages are selected, there will be a three-second pause between the last selected message and the first selected<br />
message.<br />
Food Services Trade Department<br />
Printed in U.S.A.<br />
3M Center, Building 551-1E-02 © 3M 2002<br />
St. Paul, MN 55144-1000<br />
78-6912-0714-2 Rev F