NETWORK LAB MANUAL – PART 2 Exercise 1:
NETWORK LAB MANUAL – PART 2 Exercise 1:
NETWORK LAB MANUAL – PART 2 Exercise 1:

You also want an ePaper? Increase the reach of your titles
YUMPU automatically turns print PDFs into web optimized ePapers that Google loves.
<strong>NETWORK</strong> <strong>LAB</strong> <strong>MANUAL</strong> <strong>–</strong> <strong>PART</strong> 2<br />
<strong>Exercise</strong> 1:<br />
To learn to check for zebra package and start the zebra daemon and understand how to log<br />
into the daemon command line interface.<br />
NOTE: For complete and detailed information, look at<br />
http://www.zebra.org/zebra/index.html.<br />
To do: Make sure zebra is installed on the machine. (Checking for any package can be done<br />
using the command whereis). If it is not, you need to install the rpm or get the tar.gz file and<br />
make and make install the package.<br />
How To: Check if there is a file called /usr/local/etc/zebra.conf or<br />
/usr/local/etc/zebra/zebra.conf. If there is, then proceed; otherwise, create this file and type<br />
the following into the file and save it:<br />
hostname <br />
password <br />
enable password <br />
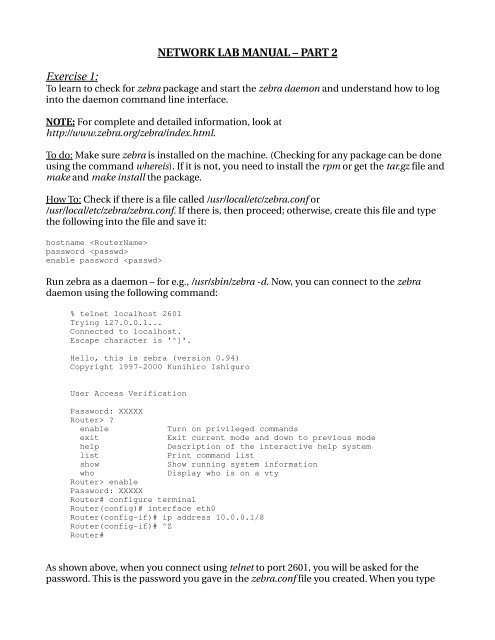
Run zebra as a daemon <strong>–</strong> for e.g., /usr/sbin/zebra d. Now, you can connect to the zebra<br />
daemon using the following command:<br />
% telnet localhost 2601<br />
Trying 127.0.0.1...<br />
Connected to localhost.<br />
Escape character is '^]'.<br />
Hello, this is zebra (version 0.94)<br />
Copyright 19972000 Kunihiro Ishiguro<br />
User Access Verification<br />
Password: XXXXX<br />
Router> ?<br />
enable<br />
exit<br />
help<br />
list<br />
show<br />
Turn on privileged commands<br />
Exit current mode and down to previous mode<br />
Description of the interactive help system<br />
Print command list<br />
Show running system information<br />
Display who is on a vty<br />
who<br />
Router> enable<br />
Password: XXXXX<br />
Router# configure terminal<br />
Router(config)# interface eth0<br />
Router(configif)# ip address 10.0.0.1/8<br />
Router(configif)# ^Z<br />
Router#<br />
As shown above, when you connect using telnet to port 2601, you will be asked for the<br />
password. This is the password you gave in the zebra.conf file you created. When you type
the password, you will be able to telnet to the command line interface of zebra.<br />
Typing enable takes you to the administrator level. The password here is the password in the<br />
zebra.conf file that is on the line enable password .<br />
All configuration can be done only from the administrator level. The commands available<br />
for nonadministrators are typically only the readonly commands such as show.<br />
NOTE: At any point of time, if you are not clear about what commands are available or what<br />
are the options to a command, just press ?. This will display the set of commands that are<br />
relevant in the current context as well as the next parameter expected for the current<br />
command being typed.<br />
SUMMARY OF CISCO COMMAND STRUCTURE AND USAGE<br />
Zebra uses Cisco's CLI. Cisco's CLI has a hierarchical structure where when you enter a<br />
command, you enter into the submode corresponding to that command. For e.g., if you<br />
want to configure any parameters, you need to type configure terminal at the prompt. This<br />
takes you into the config submode. Now, if you want to configure any interface parameters,<br />
you need to enter the following: interface eth0, where eth0 is the ethernet interface you are<br />
configuring. This takes you to the configif submode. In any submode, commands relevant<br />
in that context only can be used. As noted above, at any point, the set of commands that are<br />
relevant can be found by using ?. To get out of the submode to its immediate upper level,<br />
use the command exit. To get out of all submodes altogether and get to the topmost<br />
command level, use the command end.<br />
NOTE: Cisco's CLI also accepts any prefixstring of a command that is unique in that<br />
context. For e.g., instead of configure terminal as stated above, you can just type conf t.<br />
Similarly, you can type int eth0. For getting into the administrator level, you can just type en<br />
and so on.<br />
<strong>Exercise</strong> 2:<br />
To learn to configure typical network parameters using zebra<br />
To do: Configure the IP addresses of the router using zebra CLI (commandline interface).<br />
How to: Telnet into zebra CLI as in <strong>Exercise</strong>1. Once you get to the administrator mode, get<br />
to the configure submode and then to the interface submode as detailed in the summary<br />
above. Then, type the command to configure the IP address as given below:<br />
Router#conf t<br />
Router(config)#int eth0<br />
Router(configif)#ip address 10.1.0.1/16<br />
At any point, if you want to undo the previous configuration, such as the IP address<br />
configured above, prefix the whole command by a no. This negates the previous<br />
configuration. Thus, to remove the IP address 10.1.0.1/16<br />
Router(configif)#no ip address 10.1.0.1/16
Verify: Use the standard Linux command ifconfig to check that the IP address has taken<br />
effect. If it has not, try doing the following:<br />
Router#conf t<br />
Router(config)#int eth0<br />
Router(configif)#shut<br />
Router(configif)#no shut<br />
This will shutdown the interface and bring it up again.<br />
Configure all interfaces of the router as above.<br />
<strong>Exercise</strong> 3:<br />
To learn to check the current configuration and save it.<br />
How to: To check current configuration, do the following:<br />
Router#show runningconfig or<br />
Router#sh run<br />
To save the configuration, do the following:<br />
Router#write memory or<br />
Router#wr mem<br />
Verify: cat the zebra.conf file to verify that the configuration is now reflected in the file.<br />
Another way is to restart the zebra service and checking that all saved configuration is<br />
restored. Restarting of zebra can be done as follows from the Linux terminal:<br />
service zebra restart<br />
<strong>Exercise</strong> 4:<br />
To learn to start RIP Daemon (ripd).<br />
How to: Similar to zebra.conf, a ripd.conf file has to be created in /usr/local/etc or<br />
/usr/local/etc/zebra directory. It has the same contents as the initial zebra.conf file.<br />
Start ripd with the command /ripd d. Or, service ripd start.<br />
Verify: To connect to ripd CLI, telnet to port 2602. It should prompt for password, if a<br />
password has been given in ripd.conf file.<br />
<strong>Exercise</strong> 4:<br />
To learn to configure RIP parameters.<br />
How to: To enable RIP you need to do the following:<br />
Router#conf t<br />
Router(config)#router rip<br />
Router(configrip)#network 10.1.0.0/16<br />
Router(configrip)#network 10.2.0.0/16
The above set of commands enables RIP on the router and starts advertising networks<br />
10.1.0.0 and 10.2.0.0 on the interfaces where they need to be advertised.<br />
Verify: Start capture of packets in ethereal and check that RIP packets are seen on the<br />
interfaces.<br />
To enable or disable splithorizon in RIP, do the following:<br />
Router(configrip)#splithorizon<br />
Router(configrip)#no splithorizon<br />
By default, splithorizon is enabled.<br />
<strong>Exercise</strong> 5:<br />
To verify that dynamic routing is happening and routes are learnt.<br />
How to: First, go to neat command in RedHat Linux deactivate all interfaces, save the<br />
configuration and exit. Ensure that there are no interfaces up and configured by typing<br />
ifconfig and checking that only the loopback interface is seen. After starting zebra and ripd<br />
daemons in that order and configuring their parameters, RIP packets should be exchanged<br />
between all routers and routes learnt dynamically. Verify this by using either route n or<br />
netstat rn commands. At the end of the learn cycle, all machines from all LANs should be<br />
reachable from one another.<br />
Verify: If splithorizon is disabled, check that temporary routing loops occur in certain<br />
topologies.