Formation Skydiving Progression Manual - British Parachute ...
Formation Skydiving Progression Manual - British Parachute ...
Formation Skydiving Progression Manual - British Parachute ...

Create successful ePaper yourself
Turn your PDF publications into a flip-book with our unique Google optimized e-Paper software.
BRITISH PARACHUTE ASSOCIATION<br />
5 Wharf Way, Glen Parva, Leicester LE2 9TF<br />
Telephone: Leicester 0116 278 5271 Fax: 0116 247 7662<br />
E mail: skydive@bpa.org.uk Website: www.bpa.org.uk<br />
FORMATION<br />
SKYDIVING<br />
PROGRESSION<br />
MANUAL
Date of publication: May 2013<br />
© 2013 <strong>British</strong> <strong>Parachute</strong> Association Ltd. Material in this publication may be freely reproduced<br />
providing the source is acknowledged<br />
2
Contents<br />
Chapter 1: <strong>Manual</strong> Objectives Page 4<br />
Chapter 2: Introduction –Why FS1? Page 5<br />
Chapter 3: The BPA Operations <strong>Manual</strong> Page 6<br />
Chapter 4: Your Learning Experience Page 8<br />
Chapter 5: The Skydives Page 10<br />
Chapter 6: FS1 Qualifying Skydive Page 13<br />
Appendices<br />
Appendix A: FS Skills Theory - Neutral Position Page 17<br />
Appendix B: FS Skills Theory - Fall Rates Page 20<br />
Appendix C: FS Skills Theory - Rotational & Transitional Moves Page 21<br />
Appendix D: FS Skills Theory - Grip Taking Page 22<br />
Appendix E: FS Skills Theory - Tracking Page 23<br />
Appendix F: FS Skills Theory - Dive and Approach a<br />
Target/Swoop to Pin Page 25<br />
Appendix G: FS Skills Theory - Exits Page 27<br />
Figures<br />
Figure 1 Expected Points for FS1 Qualifying Skydive Page 13<br />
Figure 2 FS1 Skydive <strong>Formation</strong> Choices Page 15<br />
Figures A.1-6 The Neutral Body Position Page 17-19<br />
Figure B.7 Slow Fall Page 20<br />
Figure B.8 Fast Fall Page 20<br />
Figure C.9 Forwards Movement Page 21<br />
Figure C.10 Backwards Movement Page 21<br />
Figure C.11 Left Turn Page 21<br />
Figure C.12 Side-slide to Right Page 21<br />
Figure E.13 Low Angle of Attack Page 23<br />
Figure E.14 High Angle of Attack Page 23<br />
Figure F.15 No Lift Dive Position Page 25<br />
Figure G.16 Front Float Exit Page 28<br />
Figure G.17 Centre Float Exit Page 29<br />
Figure G.18 Rear Float Exit Page 30<br />
Figure G.19 Inside Diver Exit Page 31<br />
Figure G.20 4-Way Stair-Step Diamond Exit Page 33<br />
3
Chapter 1: <strong>Manual</strong> Objectives<br />
The aim of this manual is to act as an information manual for skydivers aiming to attain the<br />
<strong>Formation</strong> <strong>Skydiving</strong> Grading System (FS1) and to assist skydivers in achieving a good<br />
foundation in <strong>Formation</strong> <strong>Skydiving</strong>. This foundation can then be used to progress further in<br />
formation skydiving.<br />
The main objectives of this manual are to provide you with guidance that will help you decide how<br />
to prepare yourself for your FS1 progression. It will also provide guidance on how to go about<br />
arranging and tackling your FS1 progression in order for it to provide you with a good foundation<br />
so that you are able to progress further in formation skydiving.<br />
Training programmes and methods other than those contained in this manual are acceptable<br />
provided they meet the requirements of the BPA Operations <strong>Manual</strong><br />
(Section 2, Paragraph 6.4.1).<br />
4
Chapter 2: Introduction – Why FS1?<br />
This manual contains information required to help you obtain FS1. Moving on from your initial<br />
skydiving training, you need to obtain the appropriate skills to be able to jump with other skydivers<br />
safely.<br />
Whether you have just finished your Accelerated Free Fall (AFF) course, Category System<br />
course, just become an ‘A’ licence parachutist, or even if you have been doing lots of solo jumps<br />
to gain experience in the air since obtaining your ‘A’ licence, there are new steps to now consider.<br />
You might be thinking about working towards your ‘B’ licence. In which case you need to gain<br />
your Canopy Handling (CH) Grade 2 and Jump Master (JM) Grade 1 qualifications. Your next<br />
step, however, should you wish to jump with others, is to obtain <strong>Formation</strong> <strong>Skydiving</strong> (FS) Grade<br />
1. Whilst working on your FS1, you can also work on the qualifications for your ‘B’ Licence above,<br />
and it is a good idea to consider starting this now. The requirements for FS1 are laid down in the<br />
BPA Operations <strong>Manual</strong> (Section 2, Paragraph 6.4.1). These specific skills will be introduced in<br />
the next Chapter.<br />
There is no substitution for good coaching but from a preparation point of view it will help you to<br />
read through the information in this manual. Bear in mind, however, that the level of skill you wish<br />
to attain, (as long as it fulfils the requirements in the BPA Operations <strong>Manual</strong> [Section 2,<br />
Paragraph 6.4.1]) may differ from that of another skydiver, as it will need to be relevant to the<br />
level you are about to progress on to. For instance, if a skydiver has a particular passion to join a<br />
4-way team they will have differing goals to someone who would like to progress straight on to<br />
free-flying, as they would differ for a skydiver interested in big-ways, vs. fun jumps with friends or<br />
one of the several canopy disciplines. You may not have a specific goal in mind yet and the FS1<br />
progression will be a great place to spend time finding out more about the options available and<br />
the skills needed to progress in those options. The FS1 skydive is simply a stepping stone to give<br />
the basic skills to progress in many, if not all, of the numerous skydiving disciplines and can be<br />
tailored to suit the individual’s needs.<br />
These disciplines may feel like they are a long way off, and being able to skydive with friends or<br />
people you don’t even know is the foundation for years of fun. When you have achieved FS<br />
Grade 1 you will have a great set of basic skills that will help you to stay safe jumping with others,<br />
and that you can build on and improve. With this good understanding and good basic ability you<br />
will be able to continue to learn in any discipline you may choose.<br />
5
Chapter 3: The BPA Operations <strong>Manual</strong><br />
The BPA Operations <strong>Manual</strong> is where we can find all of the information we need to, for instance,<br />
find out which grading systems are designed for which skydivers and parachutists and what the<br />
requirements are for each of the grades.<br />
The “Grading System” is found in Section 2, Paragraph 6 of the Ops <strong>Manual</strong>. It states that,<br />
“Once a parachutist has obtained Category 8 (or, prior to obtaining Category 8 in some<br />
cases. e.g. CH1), that parachutist’s continuation training will continue via a choice of<br />
various disciplines:”<br />
To expand on this, the FS1 Grade, associated coaching and basic skills are designed for:<br />
a) The student who through the Category System has qualified Category 8 and successfully<br />
completed CH Grade 1 and obtained their BPA ‘A’ Licence.<br />
b) The student who, on the Accelerated Free Fall Course (AFF), has qualified Category 8<br />
and successfully completed CH Grade 1 and obtained their BPA ‘A’ Licence.<br />
c) Any BPA ‘A’ Licence Holder and above who wants to revisit their basic techniques or<br />
improve their understanding.<br />
The <strong>British</strong> <strong>Parachute</strong> Association Operations <strong>Manual</strong> states the following with regard to the FS1<br />
grade:<br />
“6.4. <strong>Formation</strong> <strong>Skydiving</strong> (FS)<br />
6.4.1. To obtain Grade 1 in <strong>Formation</strong> <strong>Skydiving</strong> (FS1) the parachutist must, be<br />
introduced to FS by a CCI/Advanced Instructor nominated FS1 Grade<br />
parachutist or equivalent of proven FS instructional/coaching ability, have<br />
received a full safety brief and demonstrated the ability to:<br />
a) Control fall rate and turn in place.<br />
b) Dive and approach a target and achieve docking techniques.<br />
c) Break-off turn and track away to obtain clear airspace for<br />
deployment.<br />
d) Maintain good altitude awareness throughout the skydive.<br />
e) Control horizontal movement (forwards, backwards and<br />
sideways).<br />
f) Complete four points of 4-way FS.<br />
N.B.(1) Prior to obtaining FS1, an ‘A’ Licence parachutist may make 2-way<br />
jumps, when not carrying out coaching jumps, provided he/she has<br />
received a full safety brief and the other parachutist is at least a ‘C’<br />
Licence FS1 parachutist or equivalent, approved by the CCI.<br />
N.B.(2) Prior to obtaining FS1, during coaching jumps, no more than one non-<br />
FS1 parachutist per group (maximum of a 4-way), all other parachutists<br />
must be at least FS1 grade or equivalent, including an FS coach or<br />
equivalent.<br />
6
N.B.(3) Training programmes other than those contained in the BPA <strong>Formation</strong><br />
<strong>Skydiving</strong> (FS) <strong>Manual</strong>s are acceptable for training for FS1, provided all<br />
the requirements of sub-para 6.4.1. (above) are met.<br />
N.B.(4) The qualifications to become an FS coach may be found on BPA Form<br />
134.”<br />
You will have many questions that may sound something like: How many jumps do I have to do?<br />
What if I “fail” a jump? When can I do my 4-way jump? When will I get my “sticker” so that I can<br />
jump with my friends?<br />
Chapter 5 of this manual will discuss the different skydives you may have to complete in more<br />
detail. However, the emphasis on the word “may” is important. Unlike AFF or the Category<br />
System, the FS1 progression is not designed to be a list of specific skydives with a “Pass” or<br />
“Fail” outcome. This phase of your skydiving is very specific to you and you obtaining the skills<br />
required above. Of course, this also means that you have the opportunity to repeat any skills you<br />
wish to, until you are happy with your own level of proficiency. Essentially, you are able to set<br />
your own goals above and beyond the minimum requirement of the BPA Operations <strong>Manual</strong> and<br />
to arrange your own progression to achieve them.<br />
It is important to note that the 4-way skydive that is often the skydive that is completed just before<br />
receiving the grading sticker is not the only aim. It is part of a series of skills that should be<br />
demonstrated before the FS1 grading can be awarded. If a skydiver can, for example, perform<br />
well on a 4-way skydive, but is unable to dive and approach a target safely, the requirements for<br />
FS1 have not been met.<br />
7
Chapter 4: Your Learning Experience<br />
Before you start your FS journey, there are a few things worth considering that may improve your<br />
experience and help you achieve your goal more effectively.<br />
Your Coach:<br />
Your FS coach is going to be someone who has been awarded an FS Coach rating by the BPA.<br />
This means that they are able to coach you in all of the aspects stated in the BPA Operations<br />
<strong>Manual</strong> that are required to obtain your FS1 qualification.<br />
There are many coaches out there. Not all of them will be the right coach for you and there are<br />
many different factors to consider when choosing your coach but, most importantly, find someone<br />
who fulfils your individual FS needs best and if you feel that your coach is not the right one for<br />
you, then do not be afraid to consider someone else. There are multiple reasons why a coach<br />
may not be the right one for you as everyone has differing teaching and learning techniques, but<br />
your coach also has to understand your goals and why you have them to teach you in a way that<br />
works for you.<br />
Whilst FS Coaches all have the same FS coaching qualification, they may come from very<br />
different backgrounds/disciplines/experience levels. Some may, for instance be at a Drop Zone<br />
(DZ) every weekend doing 1-to-1 FS coaching, some may be <strong>British</strong> or World Champion<br />
skydivers who take time out from their chosen discipline to coach and some are full time coaches<br />
for whom it is their livelihood. Any of them could be the coach for you. Some coaches may charge<br />
for their coaching, some do it for the price of their jump ticket, some even for free. At some DZs,<br />
the DZ will pay the coaches for the jumps they do at the end of the day. Some DZs or skydiving<br />
teams offer coaching from a group of coaches that all have the same coaching ethos, and<br />
therefore can offer continuity and quality that is consistent between several people. This often<br />
works well as the coaches are all working together with the same goal. If you are lucky enough to<br />
find a coach who will teach you for free, remember that this is your learning experience, not<br />
theirs, and be sure that the experience is right for you!<br />
A Picture Paints a Thousand Words:<br />
An FS coach has to have a ‘C’ licence and is therefore qualified to wear a camera to jump. It is<br />
not a “requirement” for a coach to film you, however, the benefit of being able to see your skydive<br />
as part of your de-brief is immeasurable. In addition to the debriefing points you expect (i.e. what<br />
went well, and where the improvements can be made), occasionally, the skydive you thought that<br />
you just completed is very different to the one you actually did, and this gives both you and the<br />
coach the chance to discuss what those differences were, why they happened and, if correction is<br />
required, how to correct them.<br />
Feel free to ask your coach if they are planning to video your jumps before you jump with them. If<br />
not, ask them if they can wear a camera for your jumps, as the benefit is so great that there is no<br />
real reason why they wouldn’t wear one if asked to. However, bear in mind that not all coaches<br />
have access to a video camera.<br />
After you have jumped it is of great benefit to ask your coach for the footage of your jumps. The<br />
benefits firstly include the fact that you are able to watch your skydives yourself as a way of<br />
reviewing and revising your skills and remembering the improvement points you were given.<br />
Secondly, if you are able to show your coach the last jumps you did, it is a great tool for the<br />
coaches to remind themselves, or in the case of a new coach learn about your skydiving so far. If<br />
you have footage of your jumps, consider keeping it with your logbook and taking it along with<br />
you next time.<br />
8
Continuity and Consistency:<br />
You may already have an idea of how often you are able to jump and how many jumps you want<br />
to do each time you go to the DZ. Bear in mind, however, that your FS coaching will benefit<br />
enormously from being able to jump regularly. Several weeks or even months between each jump<br />
will not make your FS1 an impossible achievement, but may slow your progress down as your<br />
body will take longer to remember the skills previously learned. This could result in you needing<br />
to do many more jumps overall than if you were able to jump more regularly over a shorter period.<br />
Changing coaches can be a very positive step as you may find that a different coach works much<br />
better with you and suits your style as an individual more appropriately. However, bear in mind<br />
that formation skydiving is far less prescriptive than the AFF or Category System course you may<br />
have just completed and there are differing, but equally acceptable methods to achieve the same<br />
aim in formation skydiving. This may mean that a change of coach can leave you feeling<br />
frustrated or as if you have taken a retrograde step when, or if, a new method is introduced. For<br />
instance, even some of the best formation skydivers in the world use significantly different<br />
methods to turn in place, so don’t be surprised to find different methods out there.<br />
Wind Tunnel:<br />
The FS1 qualification is a skydiving qualification that is designed to enable you to be able to jump<br />
safely with others. It is designed for skydivers and the greater part of what you are learning that<br />
keeps you safe cannot be practised in a wind-tunnel (e.g. swoop to pin, tracking, altitude<br />
awareness) However, it would be wrong not to mention the benefits of being able to practise<br />
some of the aspects of formation skydiving in a wind tunnel. If you are lucky enough to be near<br />
enough to a wind tunnel or ever have the opportunity to go and to be coached by a skydiver then<br />
it is of great benefit. Based on the “free-fall” time you get in a wind tunnel it can be great value for<br />
money and allows you to work on your body-position and stability in detail, without the additional<br />
considerations required in free-fall.<br />
9
Chapter 5: The Skydives<br />
As previously mentioned, unlike the very structured style of the AFF or the Category System<br />
course, your FS progression is not based on a set of specific jumps, but on a series of skills that<br />
you must be able to demonstrate the ability to perform. We’ve seen that these skills are detailed<br />
in the BPA Operations <strong>Manual</strong>, but how do we turn those skills into individual skydives for you to<br />
complete with your FS coach?<br />
This chapter is designed to give you an idea of some of the skydives that you might do with your<br />
FS coach, and a clearer idea of what makes this progression something that is different for every<br />
skydiver, and should be tailored to each individual.<br />
Take another look at the BPA Operations <strong>Manual</strong> requirements:<br />
“6.4. <strong>Formation</strong> <strong>Skydiving</strong> (FS)<br />
6.4.1. To obtain Grade 1 in <strong>Formation</strong> <strong>Skydiving</strong> (FS1) the parachutist must, be<br />
introduced to FS by a CCI/Advanced Instructor nominated FS1 Grade<br />
parachutist or equivalent of proven FS instructional/coaching ability, have<br />
received a full safety brief and demonstrated the ability to:<br />
a) Control fall rate and turn in place.<br />
b) Dive and approach a target and achieve docking techniques.<br />
c) Break-off turn and track away to obtain clear airspace for<br />
deployment.<br />
d) Maintain good altitude awareness throughout the skydive.<br />
e) Control horizontal movement (forwards, backwards and<br />
sideways).<br />
f) Complete four points of 4-way FS.”<br />
Whilst bearing in mind that these are the minimum requirements for FS1, some example skydives<br />
that your FS coach may want to carry out with you to fulfil these requirements are as follows:<br />
Skill I:<br />
Skill II:<br />
Skill III:<br />
Skill IV:<br />
Skill V:<br />
Skill VI:<br />
Skill VII:<br />
Fast and Slow Fall<br />
Forwards and backwards<br />
Side-slides<br />
Grip taking<br />
360 degree turns<br />
Swoop to pin<br />
4-way skydive<br />
However, as your FS coach is unlikely to approach your Club Chief Instructor (CCI) for your FS1<br />
unless they believe you will be safe to jump with others and that you at least understand the<br />
principles you need to follow on every jump with others to stay safe, it is unlikely that your<br />
progression will look like this.<br />
10
A more realistic progression may look a little bit more like this, in any order, with any number of<br />
repeats of each jump:<br />
Skill I:<br />
Skill II:<br />
Skill III:<br />
Skill IV:<br />
Skill V:<br />
Skill VI:<br />
Skill VII:<br />
Skill VIII:<br />
Skill IX:<br />
Skill X:<br />
Skill XI:<br />
Body position<br />
Fast and slow fall<br />
90 & 180 degree turns<br />
360 degree turns<br />
Side-slides<br />
Forwards and backwards<br />
Grip taking (multiple 2-way drill dives)<br />
Dive and approach a target (aka. swoop to pin/dive to pin)<br />
Tracking<br />
3-way skydive<br />
4-way skydive<br />
Remember, each jump will be tailored to you, your experience levels and skill level. All of these<br />
examples may need to be repeated several times, until you have demonstrated the ability to<br />
complete the skills described in the BPA Operations <strong>Manual</strong>.<br />
Even if you ‘ace’ each skill on each jump, your FS coach needs to see that you will be safe<br />
jumping with others. For instance, if you manage each skill well, but do not, for example,<br />
demonstrate good eye contact or more importantly altitude awareness; expect to continue your<br />
FS progression until you do.<br />
A couple of the jumps above involve demonstrating skills that are virtually impossible to practise<br />
in any wind tunnel but are arguably the most important skills needed for your FS progression.<br />
Being able to dive and approach a target safely and successfully at the beginning of a formation<br />
skydive and being able to track away from it at the end before deploying your parachute are skills<br />
that are fundamental to both your own safety and the safety of others. These skills may be<br />
practised alongside other skills during your progression, (e.g. unlinked exits and tracking off at the<br />
end of each jump) but there is great merit in using individual skydives to concentrate on these<br />
skills on their own. Before you are awarded your FS1, make sure you are confident at both. Both<br />
are great fun to practise and you never know when you will find yourself felling very grateful for<br />
having them – tracking to some clear airspace to deploy your parachute or being able to safely<br />
but dynamically dock onto that big-way formation after being the last person to dive out of the<br />
plane!<br />
It can be seen from this chapter that the FS progression with regard to jump numbers is not an<br />
exact science and that your FS coach(es) will tailor your progression specifically to you.<br />
It is not the intention of this manual to be exact about the individual skills required either. The<br />
reason for this is that there are many different techniques that can be used to achieve the same<br />
goal. Even some of the top FS jumpers in the world would teach you how to use your body<br />
position to perform, for example a 360 degree turn using very different techniques. They all work,<br />
some equally well, but what is important is to try the technique taught by your FS coach and<br />
ultimately to find a technique that works for you. If you are interested in the basic theory behind<br />
how to use your body to perform each move, this can be found at the end of this manual, in<br />
Appendices A to G.<br />
It is recommended that you have a basic understanding of the theory discussed in these<br />
appendices before you start your FS progression. Even if your chosen coach teaches you slightly<br />
different techniques to those shown in the appendices, they will still evolve around the same<br />
principles.<br />
11
Chapter 6: The FS1 Qualifying Skydive<br />
Introduction to 4 Way <strong>Formation</strong> <strong>Skydiving</strong><br />
Successful 4-way formation skydiving requires the same priorities and basic discipline as 2-way<br />
FS.<br />
The Priorities of FS<br />
1. Be on level – Fall rate issues, the biggest challenge in FS.<br />
2. Be in your slot – Translate or rotate to get where you need to be, then stop.<br />
3. Get a grip – Pick up grips<br />
4. Continue to fly – There should be no tension on the grips when on the grips, you should<br />
be in a neutral position and when the grips are released you should be able to stay in<br />
place.<br />
To correctly apply all four priorities requires self-discipline. You have already demonstrated the<br />
discipline and skills necessary to do 4-way, so it is more of a confirmation of these skills than<br />
learning a new one. Treat the FS1 skydive as a 2-way and look across the formation to the<br />
person opposite you, just as you would on a 2-way with the coach opposite, and use him/her as a<br />
reference to the fall rate and distance.<br />
The FS1 qualification will be awarded by the CCI after reviewing the video of the skydive, and/or<br />
discussion with the FS Coach. Whilst in accordance with the BPA Operations <strong>Manual</strong>, the<br />
MINIMUM requirement in order to be awarded the FS1 is to achieve a four point 4-way, the<br />
following guidance is offered to CCIs, FS coaches and students.<br />
12
The number of “points” achievable is, in its most basic sense, proportional to the amount of freefall<br />
time available on that skydive. i.e. if you are in free-fall for twice the amount of time, with the<br />
same ability level, you should be able to achieve twice the number of points. However, it is well<br />
known that other factors can affect the “score” of a skydive, such as the exit, conditions etc., and<br />
these factors should be taken into account by the CCI when considering awarding the FS1. The<br />
following guidance is based on an average day where FS1 candidate “A”, jumping from 10,000ft<br />
without a linked exit, is able to achieve four points. In order to demonstrate an equivalent level of<br />
skill to candidate “A”, the number of points that should reasonably be expected from any other<br />
candidate from a given altitude using a linked/unlinked exit is as follows:<br />
Altitude<br />
Min Points Expected<br />
Using Linked Exit<br />
Min Points Expected<br />
Exit Not Linked<br />
10,000ft 5 4<br />
11,000ft 6 5<br />
12,000ft 7 6<br />
13,000ft 8 7<br />
14,000ft 9 8<br />
15,000ft 10 9<br />
Fig. 1 Expected Points for FS1 Qualifying Skydive<br />
The expected points above do not overwrite the requirements as described in 6.4.1 (f) of the BPA<br />
Operations <strong>Manual</strong>. However, they offer the CCI guidance when taking into account all factors on<br />
any given FS1 skydive, based on free fall altitude (and therefore, time) available.<br />
The FS1 Skydive<br />
Part of completing a good FS skydive is how it is constructed and briefed. Whilst there is no<br />
requirement to brief this skydive, it is of great benefit to understand the shapes you are going to<br />
be part of forming. This is a perfect opportunity to learn as much as you can about planning,<br />
organising, briefing and de-briefing a skydive.<br />
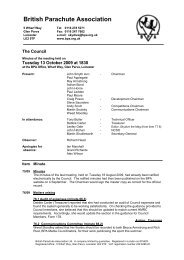
In most circumstances you will take the position or “slot” of “Point” although you may discuss with<br />
your coach should you have a strong desire to take a different “slot”.<br />
Considering the diagrams below, you would be the red skydiver (top right). If you have a black<br />
and white document, ask your FS coach to point out which skydiver in each formation is “Point”.<br />
Your FS1 skydive should include one of each of the following four selections to make a four point<br />
4-way.<br />
a) Bow (H) or Side-body (P) [e.g. side-ways move to formation]<br />
13
) Unipod (A) or Star (M) [e.g. face in and take two grips]<br />
c) Murphy-flake (C) or Phalanx (Q) [e.g. outfacing with leg grip(s) taken]<br />
d) Satellite (O) or Meeker (E) [e.g. round formation that includes grip taking and having<br />
grips taken on]<br />
Fig.2 FS1 Skydive <strong>Formation</strong> Choices<br />
14
Preparation<br />
The following elements of preparation are important to ensure your 4-way skydive goes as<br />
planned:<br />
Puzzle<br />
Before you work out the puzzle of the sequence learn the sequence by the names of each<br />
formation. Say the names to yourself and repeat this sequence until you can easily remember it.<br />
Next relate each name to the name of the formation. Look at the pictures and learn the names of<br />
the formations. Once you know the names, look at your slot within that formation. On the FS1<br />
skydive, if for instance, you will take the slot of “Point” you need to study the red jumper in the<br />
formation. Also study the red jumper’s position relation to the others in the formation, in particular<br />
to the “Tail”, who in this instance will be opposite you.<br />
Once you have a mental image of where you need to be on each formation, you are half way to<br />
solving the puzzle.<br />
The Dirt Dive: The ‘dirt dive’ involves all four jumpers walking through the dive sequence. Simply<br />
walk through the dive in slow time just to build the familiarity with the formations and the grips you<br />
need to take or present. Establish eye contact with the skydiver opposite you when in each<br />
formation.<br />
Angles<br />
To work on the angles of each formation all four jumpers will lie on a creeper and go through the<br />
formations. Creeper work is the most realistic preparation for FS because you get a similar visual<br />
reference on the ground that you will in the air. As you go through each formation, crossreference<br />
on the skydiver opposite and learn where you are in relation to him/her. As you move,<br />
continue to reference against the skydiver opposite as if it was a 2-way. When in the right place<br />
look at the grip you need to take, take the grip then look back at the skydiver opposite. THINK,<br />
MOVE, STOP, PICK UP GRIPS.<br />
Keys<br />
The key is the signal to move on to the next formation. The key comes from whoever is best<br />
suited to see that the formation is built and ready. In these dive sequences, the jumper flying the<br />
outside centre position is most likely to give all keys.<br />
Exit<br />
The exit is a very important part of the preparation. It gives the skydivers to work out their position<br />
in the aircraft door and how they are going to exit the aircraft in the formation, presented to the<br />
relative airflow. A mock-up of the aircraft door will be used, and the count will be practiced. This is<br />
a vital part of the skydive to get right, and should be learned and visualised along with the rest of<br />
the skydive.<br />
Secret Stuff<br />
The secret stuff is basically any top tips for a particular dive or team. The top tips on an FS1<br />
qualifying dive are relax, cross reference, be on level, be in your slot, get a grip but don’t chase it,<br />
continue to fly and most of all enjoy!<br />
15
Appendix A: FS Skills Theory – The Neutral<br />
Body Position<br />
In any discipline of skydiving, you must start from a position of balance. To be balanced is to be<br />
neutral or in a state of equilibrium. It is in this state that you can provide a good stable foundation<br />
from which to progress in any direction.<br />
The neutral flying position is the starting and ending point to whatever you do in formation<br />
skydiving. Before you transition into making any move, you must be balanced, static and neutral.<br />
To fully understand and master this skill, it helps to build a relationship with the air travelling<br />
around your body. Think of every inch of your body being an effective surface area. Use your<br />
sense of feel as your body cuts through the air, pushing the air out of the way as you travel<br />
through it. Maintain a relaxed neutral position and constant feel of air pressure on ALL FOUR<br />
LIMBS.<br />
The following series of diagrams aim to give an idea of the body position you should be aiming for<br />
as a formation skydiver. The exact position to be adopted will vary for each individual, so follow<br />
the guidance of your coach, but bear in mind the following elements of theory involved in finding<br />
your own neutral position.<br />
TORSO RELAXED AND STRAIGHT: The Torso is the catalyst to everything you do in freefall.<br />
As the torso is the centre of your body as a whole, it has a direct influence on how both the upper<br />
and lower limbs behave. Your torso is the key to your balance because it represents your whole<br />
body’s centre of gravity. At the centre of your torso is your spine.<br />
A good neutral position will require a very relaxed arch. The spine also needs to be straight and<br />
its worth knowing that no matter what move you make as you progress through your FS1, your<br />
torso should always remain straight as shown in Fig.1.<br />
Fig. A.1<br />
Fig. A.2<br />
16
HEAD: Just think head up. If your torso is in a good position then your head will be too as it is<br />
an extension of the spine.<br />
ARMS AND LEGS: To achieve a balanced neutral flying position you must understand that the<br />
human body is symmetrical in its structure. Pay particular attention to this fact, since the action of<br />
positioning your limbs when flying will create a reaction of either solid powerful moves or a series<br />
of inconsistent compensations. Maintain symmetry with your limbs and you will maintain balance.<br />
The student positioning of the arms can be seen as a bad habit if you want to improve your flying<br />
position. Having a wide arm stance is great for stability - think of a narrow boat with out-riggers.<br />
However, your arms need to be in a position of mobility i.e. in a grip-taking position, as well as<br />
maintaining equal air pressure to that of the legs. Lying on the floor and propping your chin up on<br />
your fists as if watching the TV, then dropping your hands away from your chin, forwards, can<br />
gain a reasonably accurate approximation of the arm position to be aimed for.<br />
Your elbows should be wider and lower than your shoulders as shown in Fig.3. It’s common for<br />
your hands to be too close to the face. Think about creating more surface area as shown in Fig. 4<br />
by extending the arms forwards.<br />
Fig. A.3 Fig. A.4<br />
A common area for improvement for students and even experienced skydivers is in their leg<br />
position. As we know, being wide in a stance provides great stability. However legs being too<br />
wide can cause problems such as de-arching of the hips. Legs are also often too bent which<br />
reduces the overall effective surface area of the body in freefall. One of the reasons these<br />
problems arise is due to the fact that you rely on feeling for leg positioning as you can’t see what<br />
they are actually doing and our sense of feel is often deceiving. Bear in mind that your legs,<br />
especially if in a bootie suit, are much bigger than your arms so they play a vital role in your<br />
position.<br />
Fig A.5<br />
17
A good visual reference to what your legs are doing is to look at your arms. If you are falling<br />
straight down (i.e. not back sliding) and you can see that your arms are close to your head then<br />
your legs are possibly tucked up or too bent. To find your neutral leg position, stand over a mat<br />
with feet about shoulder width apart then crouch down, lean forward and lie on your front without<br />
parting your legs any further. Next consciously think point toes but not straight up but about 45<br />
degrees to the ground as shown in diagram fig. 5 & 6. Your toes are an extension of your legs.<br />
Fig. A.6<br />
18
Appendix B: FS Skills Theory - Fall Rates<br />
A World Champion in 4-Way FS once said: “Fall rate issues are the biggest challenge in<br />
formation skydiving”<br />
In formation skydiving we are always changing our body position, which will affect our fall rates.<br />
This is a problem, which will always arise no matter who we jump with. <strong>Formation</strong> skydiving<br />
requires you to be on the same level as everybody else; learning how to control your fall rate is<br />
the No 1 priority after achieving a good neutral flying position.<br />
After we exit an aircraft, we accelerate towards the earth until we reach terminal velocity. We all<br />
accelerate at the same rate regardless of our size or mass due to the effect of gravity alone, but<br />
because of air resistance our terminal velocities will vary.<br />
Since formation skydiving is about falling relative to each other we must learn to change our fall<br />
rates. In preparation for jumping with someone of a differing weight to you, it might be worth<br />
considering the use of weight belt(s) to assist in averaging out the expected fall-rate. However if<br />
we need to adjust rates once we are in free fall, then all we can do is change the air resistance.<br />
The amount of air resistance depends on the amount of our surface area. The more surface area,<br />
the more air resistance, the less surface area, the less air resistance as shown in fig 9 and 10.<br />
Fig. B.7 Slow Fall<br />
Fig. B.8 Fast Fall<br />
To increase fall rate several different changes in body-position can be made. Firstly, the very<br />
best attempt to arch from the hips and lift the head up must be made. Also, bringing the arms in<br />
towards the face or pointing the elbows down will reduce air resistance at the top half of the body.<br />
An equal reduction in air resistance must also be made at the lower body in order to remain in a<br />
neutral position. This can be achieved by tucking the feet up by bending the knees and/or<br />
squeezing the knees together.<br />
The opposite moves are made to reduce our fall rate, whilst maintaining eye contact with the<br />
person or formation we are aiming to fall relative to. This is achieved not by looking directly up (as<br />
we have seen above that lifting the head increases fall rate) but by laying the head to one side<br />
and looking above from the side. So roll the shoulders, suck in the abdomen; straighten legs and<br />
arms, to create the largest, flat surface area possible for the slowest fall-rate you can achieve.<br />
You do not need to be as radical as the diagrams above if you only wish to go up or down in<br />
relation to the other person by a foot or two.<br />
19
Appendix C: FS Skills Theory - Translational and<br />
Rotational Moves<br />
As we pointed out in Appendix A, all moves start from the neutral flying position. Before we make<br />
a move we should be in a position of balance. The resistance, which holds us in place, is this<br />
same force that we use to move. So as far as physical effort goes, the amount of input to create a<br />
move is at its greatest when starting and stopping. Whatever input we use to initiate a move, we<br />
have to use the same amount of input to stop it.<br />
It’s better to translate to close distance to a target before making the rotation. Backwards<br />
movement is used in formation skydiving but usually as a fix to a problem. If you need to present<br />
your leg grips to another skydiver then it should be as part of a turn in place. Flying backwards<br />
and not being able to see what’s behind us is far less efficient and more technically difficult to do<br />
accurately than maintaining eye contact with the formation and making the turn close in.<br />
Rotational moves are normally quicker because our centre point isn’t moving when we turn in<br />
place. After you initiate a move, before you stop it there is a period when you go back into a<br />
neutral position. So we begin in a neutral position, we initiate a move, we go back to neutral, we<br />
stop the move with an opposite position then we resume a neutral position.<br />
The pictures below give an idea of the body positions your coach may suggest you use to<br />
perform each move. However the specifics of each move are not an exact science and the way<br />
your coach describes each move will be formulated in a way that works for you before you<br />
attempt them in the air.<br />
Fig. C.9 Forwards movement<br />
Fig. C.10 Backwards<br />
movement<br />
Fig. C.11 Left Turn<br />
20<br />
Fig. C.12 Side-slide to Right
Appendix D: FS Skills Theory - Grip Taking<br />
If ever there is a need to be in a neutral position before making a move, it is when taking grips.<br />
One of the many advantages of the neutral position over the conventional student position is that<br />
it’s a good grip taking position.<br />
There has always been the tendency to backslide away from the grips you are trying to take, and<br />
the more you reach, the more you backslide. The reason is obvious, as you know how to<br />
backslide deliberately. When your arms are pushed out in front of you they create lift, which in<br />
turn will push you back. Basically, taking grips involves arms and legs but the amount is subtle<br />
and is more closely related to being in a neutral position then any other move.<br />
If formation skydiving is all about scoring points then it is because the grips are taken to complete<br />
a formation in order to score. But understand that grip taking is last in the list of priorities.<br />
The priorities of FS:<br />
1. Be on Level: Fall rate issues, the biggest challenge in formation<br />
skydiving.<br />
2. Be in your slot: Translate or rotate to get where you need to be, then<br />
stop.<br />
3. Get a grip: Pick up grips<br />
4. Continue to fly: There should be no tension on the grips. When on grips you<br />
should be in a neutral position and when the grip is released you<br />
should be able to stay in position.<br />
21
Appendix E: FS Skills Theory -Tracking<br />
With the ever-increasing performance of canopies the need for horizontal separation on<br />
deployment must also be ever increasing. To increase horizontal separation before deployment,<br />
we need to improve our ability to track.<br />
You have already demonstrated the ability to track; if you hadn’t you would still have student<br />
status. However, this is one of the skills we are unable to practise in the wind tunnel and often by<br />
this stage, you have only spent about the last five seconds of every skydive performing it. All<br />
skydiving skills require time to practise and time to get the feel for a new skill but so far tracking is<br />
the last thing we do. When the formation skydiving part has stopped, remember the tracking is<br />
still a vital part of the skydive.<br />
Tracking is a life saving skill and should be taken seriously as a result. It is the move we learn<br />
here for you to know how to achieve distance from others in your formation before deploying your<br />
parachute. The longer (in time) that you are able to maintain the tracking position before reaching<br />
your deployment altitude, the further you will be from other members of your formation. To<br />
achieve this, we need to gain as much lift as possible. When tracking the angle of attack and the<br />
shape of your body are the two factors that influence the amount of lift we aim to achieve.<br />
Lift increases as the angle of attack increases right up until the stall point. The angle of attack is<br />
the angle that the object meets the relative air. Relative air is relative to the direction you are<br />
travelling in.<br />
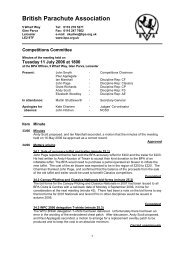
The higher than angle of attack, the higher the amount of lift, and the lower the<br />
angle of attack, the less lift. The following figures show the two extremes and it<br />
should be obvious that the better position for gaining distance from a formation is<br />
shown in figure E.14.<br />
Fig. E.13 Low Angle of Attack<br />
Fig. E.14 High Angle of Attack<br />
22
We also mentioned body position as a factor in achieving a good track. We do everything we<br />
can with our torso to achieve lift by rolling the shoulders, sucking in the abdomen.<br />
Mastering a good track position requires a good understanding of what you are trying to achieve<br />
and having a well rehearsed routine and checklist.<br />
When learning to track, an example of a routine we can use is known as the seven-stage track.<br />
When learning it, it will take approximately seven seconds to get into the optimum tracking<br />
position before deployment and it is not recommended to attempt the seven-stage method if you<br />
intend to start if below a height of 5000ft. However, it can be practised on a tracking dive initially,<br />
and then used as the method at the end of each skydive for separation once proficient.<br />
The Seven-stage Track<br />
1. Slow Fall and Turn<br />
Since the idea is to create as much lift and air pressure as possible, start to build up air<br />
pressure by adopting a slower fall rate position as you turn 180 degrees into your clear air<br />
space. De-arch! (Even consider stretching arms out forwards as per your slow fall<br />
position to assist in creating lift)<br />
2. Legs<br />
When you are facing your clear airspace extend your legs fully for maximum air<br />
deflection, legs straight, point toes, press shins on the relative air.<br />
3. Arms<br />
As you start to move, sweep back your arms to either side of your torso in a slow and<br />
controlled way. Palms of hands down.<br />
4. Look Left and Right<br />
When tracking into clear airspace maintain observation, look for other trackers and - even<br />
worse – canopies.<br />
5. Look Above and Below<br />
As above.<br />
6. Flare<br />
When flaring, go back into slow fall position for maximum air deflection and drag.<br />
7. Pull<br />
Provided you tracked off at 5000ft and had no problems during the track, you should now<br />
be at about 3500ft.<br />
We have already mentioned that tracking is a survival skill. The aim of the FS1 progression is to<br />
teach you the skills necessary to perform 4-way formation skydiving and as the very nature of<br />
formation skydiving is to be able to skydive in bigger groups, the need to be able to track off into<br />
clear airspace becomes more apparent. If the skydive all goes to plan and enough time is allowed<br />
between groups on exit and at break off everyone turns 180 degrees away from the centre of a<br />
formation then finding a clear airspace is easy. However things don’t always go to plan and the<br />
ability to be able to change your heading, as an avoidance manoeuvre whilst tracking is vital.<br />
Whilst tracking, the most effective way to change your heading is to use your head. Your heading<br />
comes from being symmetrical and the keystone to this symmetry is the head. The head acts like<br />
a rudder but at the front instead of the back. If you are heading towards an unexpected obstacle,<br />
look at clear airspace and point your nose in the direction you want to go.<br />
23
Appendix F: FS Skills Theory - Dive to and<br />
Approach a Target/Swoop to Pin<br />
To dive and approach a target or to “swoop to pin” would normally be performed if you were part<br />
of a large formation load and were one of the last to leave the aircraft. Being the last to leave the<br />
aircraft creates a few problems to the skydiver and so requires lots of practice to get it right which<br />
is why it is usually left to the most skilful or experienced skydivers on the load.<br />
If you are inexperienced in big ways then it is advisable to be as close to the door as possible on<br />
exit. However if you want to challenge yourself, and have more fun, then try getting further back<br />
in the line up.<br />
The first challenge you have when leaving the aircraft, some time after the formation is the<br />
distance between you and whoever has already left. The distance is both vertical and horizontal<br />
and you should close the vertical distance as much possible before closing the horizontal<br />
although the last few hundred feet can be a combination of the two.<br />
The second challenge when swooping down to a formation is eye contact. We rely heavily on<br />
what we see in FS as a visual reference to where we are in relation to others but when swooping<br />
we may lose sight of who is below us in order to maintain a vertical dive approach. Because we<br />
can’t rely on visual feedback we need to rely on timing and anticipation, which obviously improves<br />
with practice. However, if you do lose sight of anyone below, it is better to stop and locate the<br />
other skydiver(s) and then continue. Also, a top tip is that it is ALWAYS better to recover out of a<br />
swoop too early and be high on the formation than to be too late and go low on a formation.<br />
It is vital to be proficient at this skill for your safety and enjoyment in formation skydiving. Too fast<br />
approaching the formation and you are putting yourself and others on your formation at risk of<br />
collision and possible injury, too slow and you may not make it to the formation at all.<br />
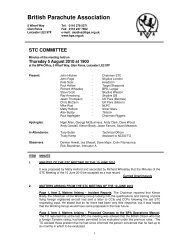
Reducing the vertical distance is the first priority and to do this we have to use the vertical dive or<br />
the no lift dive position as shown in F.15.<br />
The vertical dive position is also known as a no lift dive position<br />
because it creates minimum lift as it has a very low angle of attack in<br />
relation to the relative air. Obviously, this is the quickest way to lose<br />
vertical distance due to minimum air resistance. To transition into this<br />
position you start from a dive exit then swoop back the arms and<br />
extend the legs as if you were tracking. Try to maintain visual contact<br />
with your formation at all times – if possible.<br />
The “Stadium” Approach. How much time you spend in the vertical<br />
dive position whilst reducing vertical distance depends on how long<br />
you wait before leaving the aircraft after the target but remember it is<br />
better to be too early than too late. By maintaining eye contact with<br />
your coach or formation as you reduce the vertical separation your<br />
head will naturally lift, which assists in your transition from the vertical<br />
dive to a “flatter” position. As your angle of attack changes it produces<br />
more air pressure on the underside of your body, slowing your rate of<br />
descent.<br />
Be aware that you are now travelling at a much higher speed than you<br />
have experienced before. To reduce speed quickly from this position<br />
we can use the body flare. Judging when to flare requires anticipation<br />
and its best to err on the side of caution and aim to be early.<br />
Fig. F.15<br />
24
Ideally you will be 100ft above your target and to close the remaining distance use a combination<br />
of fast fall and forward movement. A good approach would be at a 45-degree angle down towards<br />
your target but aim to set up on level and 10ft out. Close remaining distance on level, stop, and<br />
pick up grips. If you transition too early and still have a few hundred feet to go, then you can<br />
transition back into a vertical dive for a few seconds before flaring out again.<br />
If you imagine the seats in a football stadium, steep at the top, shallow near the pitch, it should<br />
give you a good idea of the shape of the swoop we are trying to achieve. It is ideal to practise this<br />
skill at least twice, but at least as many times as required until safe and proficient.<br />
25
Appendix G: FS Skills Theory - Exits<br />
The exit is the starting point to a skydive and it’s important to get off to a good start in order not to<br />
use up valuable time having to regroup as a formation.<br />
To be successful on exit, the whole formation (whatever its size) should be on the same<br />
geometric plane, and flying without undue tension or rotation. To achieve this the group needs the<br />
following 3 things:<br />
1. Timing<br />
2. Presentation<br />
3. Placement<br />
Timing<br />
Timing refers to how synchronous all jumpers are during the exit. It would be ideal for all jumpers<br />
to hit the air at the same time, however this is difficult from an aircraft with a door on the side of<br />
the fuselage. The precise time for individual jumpers to exit depends on their slot in the formation<br />
but, whatever your slot, all jumpers work off the same timing known as the pulse or count. The<br />
“count” as it is often known can differ significantly between coaches/teams. Some will use an<br />
“Out/In/Out” count, some a shake, followed by an “Up/Down/Out”, some even use the traditional<br />
“Ready/Set/Go”. You have to know what count is going to be used so that the timing of the exit is<br />
known. This timing needs to be consistent and well rehearsed on the ground.<br />
Presentation<br />
Presentation refers to an individual’s attitude in relation to the relative air. To be able to have<br />
good presentation individual jumpers need to present their flying surface (the under surface of<br />
their body) onto the air. As a group, a formation should avoid being too flat as this can cause a<br />
formation to fold itself. So it’s better to be steep.<br />
Placement<br />
Placement refers to an individual’s slot within a formation. Your placement is the foundation to<br />
your timing and presentation. When you exit an aircraft in a formation, you need to know where to<br />
place your body in relation to other jumpers.<br />
As you progress through the FS1 system, your coach will vary the type of 2-way exits you use.<br />
This will develop your awareness for different jobs on exit. When you are going for your FS1<br />
qualifying dive you will exit as part of a 4-way formation and having an overall awareness for<br />
different jobs on exit will aid your success on the launch.<br />
Every formation exit is different and to describe the technique used for each one in detail here<br />
would be impossible. The following pages give some examples of some of the different exit<br />
positions and techniques you may experience for both 2- and 4-way exits and the technique<br />
involved.<br />
26
Example 2-Way Exits<br />
On a 2-way exit, each jumper will have a different job. This is because each jumper will have a<br />
different slot in the door and each slot has a different name. The most commonly known slots are:<br />
Front Float (F.F.)<br />
Centre Float (C.F.)<br />
Rear Float (R.F.)<br />
Inside Diver (I.D.)<br />
Front Float<br />
Front Float is one of three ‘floater’ exit positions. The front float exit position is used when both<br />
jumpers decide to exit from a position in the door, which is outside the aircraft. The other jumper<br />
would be in the centre float position in the centre of the door<br />
Position in the door<br />
Climb out and assume a position as far forward in the door as possible. Hold the bar/rail with both<br />
hands and get balanced with your centre of mass over your right foot. Get presented by trailing<br />
your left leg. If you are launching a linked exit, the centre float will take your right arm grip with his<br />
left hand. When you are ready, look at the C.F. and watch for the count.<br />
On exit<br />
As the count comes, move with the C.F. but, as your placement on exit is higher in relation to the<br />
C.F. be aware of the power required to place yourself correctly above them. As you exit, maintain<br />
presentation and keep eye contact.<br />
Fig G.16<br />
27
Centre Float<br />
The centre float exit position can be used with the other jumper either inside or outside of the<br />
aircraft. The job of the centre float is one of controlling the exit and this slot would normally initiate<br />
the count.<br />
Position in the door<br />
Climb out and assume a position in the centre of the door. Hold the bar/rail with both hands and<br />
get balanced with your centre of mass over your right foot. Get presented by trailing your left leg.<br />
If you are launching a 2-way linked exit with a front float, take the front floater's right arm grip with<br />
your left hand. Other exits may require the other jumpers to take up grips on you.<br />
On exit<br />
If you are giving the count, ensure that the other jumper is ready and get eye contact. As you exit,<br />
push off with your right foot and get your hips away from the door. Think presentation and<br />
maintain eye contact.<br />
Fig. G.17<br />
28
Rear Float<br />
The rear float exit position is used when both jumpers decide to exit from a position in the door,<br />
which is outside the aircraft. On a 2-way, the other jumper would be in the centre float position in<br />
the centre of the door.<br />
Position in the door<br />
Climb out and assume a position at the rear of the door and wait for the centre float to get into<br />
position. Once the C.F. is in position take their right arm grip then, for practice, hang down as low<br />
as possible with your right arm fully extended. Trail your left leg and get presented.<br />
On exit<br />
Look up at the C.F. and watch for the count. As the count comes move with the C.F. but as your<br />
job on exit is to be lower than C.F. think about exiting slightly earlier than C.F. Also, as your<br />
placement should be lower than the C.F. on exit, all you have to do is release your hold of the bar<br />
rail and drop straight down. Think presentation and maintain eye contact.<br />
Fig. G.18<br />
29
Inside Diver<br />
The Inside Diver position can be used when the other jumper is in the centre float position in the<br />
door.<br />
Position in the door<br />
Wait for the centre float to climb out and get into position in the door. Take the C.F. arm grips and<br />
position yourself as you briefed on the ground. Take time to get your position correct and think<br />
about which leg you are going to use to power out of the aircraft with to aid presentation. Get<br />
presented by lifting your right elbow and lowering your left. Stand with your left foot forward and<br />
feel balanced. You have the luxury of space in this slot so use it. Be near the door to help you<br />
exit, but don’t crowd the C.F. by leaning out on them. When you are ready, look at the C.F. and<br />
watch for the count.<br />
On Exit<br />
As the count comes, move with the C.F. and leave with them. Use power in your exit to go with<br />
the C.F. rather than expecting them to “pull” you out of the plane. To aid in your presentation lead<br />
with your left foot and maintain eye contact.<br />
Fig. G.19<br />
30
4-Way Exits<br />
On a 4-way exit each jumper will have a different job. This is because each jumper will have<br />
different slots in the door. The four slots are commonly known as:<br />
Point<br />
Outside Centre (O.C.)<br />
Inside Centre (I.C.)<br />
Tail<br />
Point<br />
The Point’s job on exit is to be high on the formation in relation to the other jumpers. Point flyers<br />
use different techniques to achieve this on different formations – your coach will guide you.<br />
Position in the door<br />
As Point you may often feel like you have no room in the door especially with smaller aircraft.<br />
Pick up grips, be high in the door and get presented yet balanced. If necessary ask other jumpers<br />
to give you more room near the door to allow you to find your balance.<br />
On the launch<br />
Watch the count come from the centre and move with it, trust that space will appear as the<br />
formation leaves the door but don’t wait to be pulled out of the aircraft. Your placement depends<br />
on the formation but you should be the highest jumper in relation to the rest of your group. You<br />
should always attempt to look across the formation towards the tail.<br />
Outside Centre<br />
The Outside Centre’s (O.C.) job on exit is one of responsibility and control due to their position in<br />
relation to the other jumpers on exit. The Outside Centre usually gives the count so they should<br />
know when the formation is ready to launch.<br />
Position in the door<br />
When getting into position aim to have your right foot in the centre of the door with your centre of<br />
mass directly above your right foot. Get balanced then take up grips or present them depending<br />
on the formation. Try to be presented to the relative air without sacrificing your balance.<br />
On the launch<br />
If you are giving the count don’t rush it, give the other jumpers the chance to read it. Your<br />
placement depends on the formation but you should think about getting your hips away and out<br />
from the door to give space to the inside centre. As you launch look across at Inside Centre.<br />
31
Inside Centre<br />
The Inside Centre’s (I.C.) job on exit is to leave with the Outside Centre and in a position between<br />
Point and Tail.<br />
Position in the door<br />
You will usually be the last to take up a position and take grips. As the inside jumper, it’s usually<br />
easier to get balanced. Pick up grips and look to the Outside Centre.<br />
On the launch<br />
Get eye contact with O.C. in the door and maintain this on the exit. Watch the count and move<br />
with the Outside Centre leaving at the same time. To avoid tension on the grips think about<br />
getting your hips through the door. Your placement depends on the formation being launched but<br />
you should be level with Outside Centre.<br />
Tail<br />
The Tail’s job on exit is to be the lowest jumper in the formation in relation to those you are<br />
jumping with. In order to achieve this the Tail needs to leave the aircraft ever so slightly earlier<br />
than the Outside Centre.<br />
Position in the door<br />
When getting into position, firstly get balanced to the rear of the door than present or pick up the<br />
grip depending on the formation. Lastly try to lower yourself in relation to the Outside Centre but if<br />
you have a grip on him or if he has a grip on you, be sure not to pull him down with you. Once<br />
you are in position look for the pulse or count.<br />
On the launch<br />
Whatever count is used, move with it, whether it is up down out, or out in out, just be in time with<br />
the count but remember to be slightly early when the formation hits the air. With this slot,<br />
anticipation is THE top tip and by getting low in the door you will give yourself a head start. Your<br />
placement depends on the formation but whatever it is you should be looking up at the formation<br />
trying to make eye contact with Point as soon as possible.<br />
Fig. G.20<br />
32