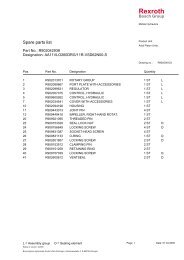
LT3-00032-2-A - DDKS Industries, hydraulic components distributor
LT3-00032-2-A - DDKS Industries, hydraulic components distributor
LT3-00032-2-A - DDKS Industries, hydraulic components distributor

You also want an ePaper? Increase the reach of your titles
YUMPU automatically turns print PDFs into web optimized ePapers that Google loves.
ASSEMBLY PROCEDURE<br />
shuttle valve adapter<br />
shuttle valve mounting<br />
See figure 10. Lubricate tetraseals (15) and o-ring (16) and place in c’bores on shuttle<br />
valve adapter’s (17) mounting surface.<br />
Carefully attach shuttle adapter to port block using soc. hd. cap screws (18). Torque to<br />
75 lbs-ft., 102 Nm.<br />
Note: Bolt pattern for shuttle adapter is non-symmetrical and can be mounted only one<br />
way.<br />
See figure 11. Lubricate tetraseals (11) and place in c’bores of shuttle valve’s mounting<br />
surface.<br />
Carefully attach shuttle valve to shuttle valve adapter using screws (13). Torque to 75<br />
lbs-ft., 102 Nm.<br />
Note: Bolt pattern for shuttle adapter is non-symmetrical and can be mounted only one<br />
way.<br />
VALVE BLOCK ASSEMBLY<br />
Figure 12<br />
NOTE: Prior to assembly of reconditioned parts, check finish of gasket surface on<br />
valve block and retainer. Must have 60 rms finish with no grinding marks which might<br />
carry oil to outside surface. If lapping is necessary, check depth of pockets for valve<br />
seats after lapping. Must be .085”, 2,16 mm minimum after lapping to provide clearance<br />
for valve seats.<br />
NOTE: Do not use impact tools or over tighten threaded parts.<br />
Wash and dry all parts. During assembly, lapped and ground surfaces should be kept<br />
lubricated with clean oil and protected from nicks or surface damage.<br />
Place valve block (1) with the six poppet valves bores up in order to press two roll pins<br />
(26) in position. Roll pins to be .12” 3,04 mm below surface of valve block. (Not<br />
required after 8-96).<br />
Install four orifice plugs (3) into valve block (1) and tighten in place.<br />
Disassemble the strainer assembly (14) and reassemble per the following steps:<br />
Install the orifice screw of the strainer assembly into valve block. Thread elastic stop<br />
nut onto the orifice screw and torque to 23 lbs-in., 2,6 Nm.<br />
Install clean filter screen on strainer support and secure in place with socket head cap<br />
screw, 6-32 X 1/4” lg. Torque #6-32 screw to 13 lbs-in., 1,47 Nm.<br />
Place valve block with poppet valve bores facing up. Position gasket (29) on valve<br />
block. Lubricate bores with clean <strong>hydraulic</strong> fluid.<br />
Place springs (33) 1.43”, 36,32 lg. into outer most bores at each end of the valve<br />
block. Place sequence poppet (30) over these springs. Position seats (27) small shoulder<br />
side first over poppets.<br />
Place springs (35) 1.09”, 27,68 mm lg. into bores next to the sequence poppet valves<br />
of two steps previous. Place dual relief poppet (31) over these springs. Position seats<br />
(28) with the groove side facing up, over poppets.<br />
Place spring (32) into bore next to compensator valve side of block. Install replenish<br />
poppet over spring. Position seat (28) with the groove side facing down, over poppet.<br />
Insert spring (35) into the remaining bore. Place spring retainer (34) in spring. Place<br />
servo poppet (31) over the retainer and spring. Position seat (28) with the groove side<br />
facing down, over poppet.<br />
Carefully position the retainer plate over seats and poppets. Pressing with one hand<br />
on the valve, compress seats, poppets and springs far enough to alternately thread<br />
two button head cap screws (43) in far enough to hold the retainer plate. Install the<br />
other two screws and alternately tighten screws. Torque to 30 lbs-in,. 3,39 Nm.<br />
Lubricate o-ring (4) and install on to seat (5), thread seat in valve block. Be careful not<br />
to damage bore in the seat. Torque to 15 lbs-in., 20,34 Nm.<br />
Apply vaseline to shank of cone (13) and install spring (12) on cone. Carefully insert<br />
cone and spring into valve block positioning point of cone into bore of seat.<br />
Lubricate o-ring (11) install in groove of piston (10) and insert end of piston into spring<br />
(12).<br />
Lubricate o-ring (9) and install on housing guide (8) and thread into valve block.<br />
Tighten in place.<br />
Thread nut (7) on socket set screw (6) and thread screw into housing guide (8) until it<br />
starts to compress spring.<br />
30