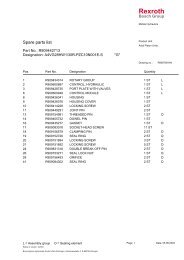
LT3-00032-2-A - DDKS Industries, hydraulic components distributor
LT3-00032-2-A - DDKS Industries, hydraulic components distributor
LT3-00032-2-A - DDKS Industries, hydraulic components distributor

You also want an ePaper? Increase the reach of your titles
YUMPU automatically turns print PDFs into web optimized ePapers that Google loves.
ASSEMBLY PROCEDURE<br />
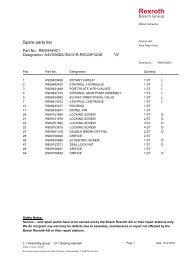
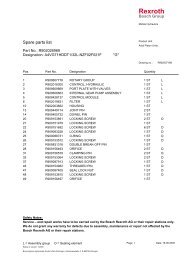
PARTS LIST FOR FIGURE 10 (continued)<br />
item description part no. qty<br />
18 screw 1/2-13 x 2-1/2 358-20280 4<br />
19 shuttle valve assembly S23-11966 1<br />
20 plug, str. thd. 488-35041 2<br />
21 o-ring 691-00906 2<br />
22 o-ring SAE-B 671-00155 1<br />
o-ring SAE-C 671-00159<br />
rear drive adapter<br />
See figure 10. A special tool T4 refer assembly tools is required to press shaft seal<br />
(13) into SAE-B adapter. Place adapter on a clean surface with pilot facing up. Use<br />
seal tool to drive seal into adapter. Make certain that the white lip of seal numbered<br />
side is toward inside of the adapter.<br />
Apply a light film of grease on o-ring (21), install on plug (20) and thread into adapter<br />
gage ports and tighten.<br />
Apply a light film of grease in sealing groove on adapter mounting face and on port<br />
block face. Place tetraseals (5) in grooves in adapter and o-ring (4) in groove in port<br />
block face.<br />
Apply a light film of oil or grease on o-ring (3), and place around pilot dia. of adapter.<br />
Engage pilot of adapter into bore of port block. Align holes and secure with screws (7).<br />
Torque to 49 lbs-ft., 66,4 Nm.<br />
Install coupling (14) thru vane cartridge (2) and into auxiliary drive shaft (2) fig. 4 or<br />
4.1.<br />
pilot valve assembly<br />
See figure 11. Insert seat (2-8) into cap (2-3) and seat in bottom of bore.<br />
Install small end first of piston (2-6) into block (2-7). Install small end first of block (2-7)<br />
into bore and against seat.<br />
Install spacer (2-5) and secure in place with set screw (2-4).<br />
Install spring (2-11) onto cone (2-9). Install spring (2-10) over spring (2-11).<br />
Install o-ring (2-14) on piston (2-13), insert small end into springs, and insert into cap<br />
(2-3) and seat (2-8).<br />
Install plug (2-15), screw (2-17) and nut (2-16). Set per requirement and cover with<br />
acorn nut (2-18).<br />
Insert plug (2-19) into hole on spring end of cap.<br />
Insert orifice plug (2-1) in center hole in cap. Grease and install o-rings (2-2).<br />
shuttle valve assembly<br />
See figure 11. Lube spool (3) and insert it into valve body (1). When the spool is fully<br />
engaged, move the spool back and forth a few times to check for smooth operation.<br />
Spool must move freely in body bore.<br />
Install spring stop (4) into one end of valve body (1). Make sure it is seated properly.<br />
Insert spring (8) into valve body (1) over the spool (3). Install plug (12) and o-ring (15)<br />
into the valve body (1). Repeat step on the other end of valve body.<br />
Lube o-ring (9) and place over the sleeve (5) and install into bore of valve body (1). Be<br />
careful not to jam sleeve in bore.<br />
Insert piston (6) into sleeve (5) and place spring (7) into piston (6).<br />
Lube o-ring (10) and place onto the sleeve (5).<br />
Lube o-rings which come on pilot valve sub assembly (2).<br />
Mount pilot valve cap sub-assembly (2) onto shuttle block (1). Use three soc. hd.<br />
screws (14) and one drilled head screw which comes with the pilot valve subassembly.<br />
Make sure that the screw that comes with the valve cap sub-assembly is<br />
positioned on end closest to acorn nut. Torque to 50 lbs-ft., 68 Nm. Run lead wire<br />
which comes with valve cap sub-assembly through holes in special screw and acorn<br />
nut. Twist ends together.<br />
28