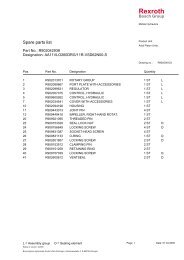
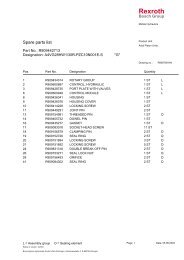
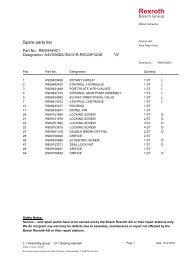
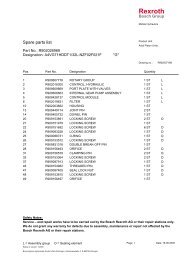
LT3-00032-2-A - DDKS Industries, hydraulic components distributor
LT3-00032-2-A - DDKS Industries, hydraulic components distributor
LT3-00032-2-A - DDKS Industries, hydraulic components distributor

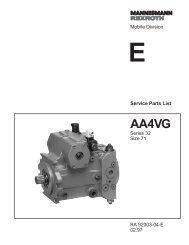
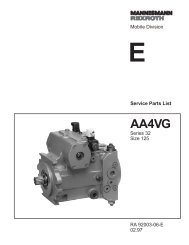
Create successful ePaper yourself
Turn your PDF publications into a flip-book with our unique Google optimized e-Paper software.
ASSEMBLY PROCEDURE<br />
BARREL HOLDDOWN AND<br />
AUXILIARY PUMP 30 SERIES<br />
See figure 4.1 & 10. Use special tool T2 and slip over auxiliary shaft and engage dowels<br />
into holddown screw assembly (5), figure 4.1. Carefully tighten clockwise until holddown<br />
screw assembly bottoms out.<br />
NOTE: The main drive shaft must be held to prevent barrel assembly from turning. If<br />
barrel assembly turns, the adjustment cannot be made.<br />
Back off holddown screw assembly 140 0 , counter-clockwise.<br />
Barrel lift-off is now set at 0.032”, 0,81mm.<br />
Remove spanner wrench. Rotate drive shaft, to check if any binding occurs.<br />
Lock holddown screw assembly in place by tightening the six socket head cap screws<br />
gradually in the following torque sequence until 65 lbs-in., 7,4 Nm torque is reached.<br />
NOTE: If barrel holddown has to be reset for any reason all six socket head cap<br />
screws must be loosened gradually in the same order they were tightened. Do not<br />
remove screws completely. Use the #10-32 UNF threaded holes in the insert to<br />
disengage insert from holddown screw assembly. Insert must be loose before resetting<br />
barrel holddown.<br />
Torque sequence for locking holddown screw assembly<br />
AUXILIARY PUMP<br />
See figure 10. Slip sealing washer (1) into bore in port block, over auxiliary shaft and<br />
seat at bottom of bore.<br />
With the valve block face of the port block located at 12 o’clock position, the dowel pin<br />
hole for vane cartridge assembly (2) in the port block is located between 1 o’clock and<br />
2 o’clock position.<br />
Grease o-rings on vane cartridge assembly.<br />
Install vane cartridge assembly into port block, making sure dowel pin in vane<br />
cartridge assembly to seat against sealing washer (1).<br />
NOTE: Distance from end of vane cartridge assembly to face of port block .82” ±<br />
0.02”, 20,8 ± 0,05mm.<br />
Untie cords holding port plate and remove.<br />
END COVER<br />
Apply a light film of oil or grease to o-rings (3), (4) and tetraseals (5) and place o-rings<br />
(3) and (4) around pilot of end cover (6), place tetraseals (5) in grooves in face of end<br />
cover.<br />
Apply a light film of oil or grease to o-ring (11), and place on plug (10). Thread plug<br />
into end cover and tighten.<br />
Engage pilot of end cover into bore of port block. Refer to figure 10 for “G” port<br />
positioning. Align holes and secure with screws (7). Torque to 350 lbs-ft., 474.6 Nm.<br />
Apply a light film of oil or grease to o-ring (8), and place on plug (9). Thread plug into<br />
end cover and tighten.<br />
Apply a light film of oil or grease to o-ring (21) and place on plug (20). Thread plug into<br />
gage port.<br />
26