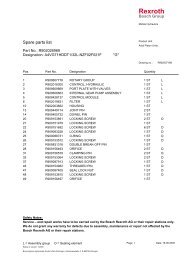
LT3-00032-2-A - DDKS Industries, hydraulic components distributor
LT3-00032-2-A - DDKS Industries, hydraulic components distributor
LT3-00032-2-A - DDKS Industries, hydraulic components distributor

You also want an ePaper? Increase the reach of your titles
YUMPU automatically turns print PDFs into web optimized ePapers that Google loves.
ASSEMBLY PROCEDURE<br />
CONTROL COVER ASSEMBLY<br />
(Continued)<br />
PORT BLOCK ASSEMBLY<br />
9<br />
Install the cover assemblies (14) & (15) over the dowel pins on the housing pads and<br />
secure with seal (12) and screws (13). Torque to 30 lbs-ft., 40,8 Nm.<br />
See figure 8. Position the port block (1) on a clean flat surface with two open ports up.<br />
The finished faces must not be scratched or damaged.<br />
Compress the ring checks (3) and install in the two system ports and align holes in the<br />
rings with the side holes in the port walls.<br />
9<br />
Place lockwashers (5) on screws (4) and install screws through port wall and ring<br />
checks and thread into nut (3). Torque to 10 lbs-ft., 13,56 Nm.<br />
Install two check valve assemblies (7) in valve face of port block. Torque to 30 lbs-ft.,<br />
40.8 Nm.<br />
FIGURE 8<br />
11<br />
10<br />
9<br />
Install nine hex. hd. soc. plugs (9) and o-rings (8) into port block. Torque to 16 lbs-ft.,<br />
22 Nm.<br />
Install hex. soc. plugs (10) and o-ring (11) into port block. Torque to 50 lbs-ft., 68 Nm.<br />
Install “AVSEAL”Ò plugs (2) into port block.<br />
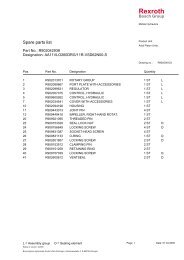
PARTS LIST FOR FIGURE 8<br />
(P24/30P) (P24/30S)<br />
item description part no. S23-15105 S23-15127<br />
quantity quantity<br />
1 port block 033-91564 1 —<br />
port block w/shuttle (S) 033-91604 — 1<br />
3 ring check 033-72355 2 2<br />
4 soc. hd. cap screw 359-11140 2 2<br />
5 lockwasher 348-10016 2 2<br />
6 ring check nut 033-72356 2 2<br />
7 check valve assembly S13-40266 2 2<br />
8 o-ring 691-00906 9 9<br />
9 hex. soc. plug 488-35041 13 13<br />
10 hex. soc. plug 488-35018 3 6<br />
11 o-ring 691-00908 3 6<br />
PORT BLOCK INSTALLATION<br />
See figure 9. Position the pump with open end of the housing assembly (6) facing up.<br />
Install new gasket (5) on the housing. Do not use gasket compound.<br />
Install two port plate pins (3) in the face of the port block assembly (2) and the dowel<br />
pins (7) into mounting surface of port block.<br />
Insert lifting eyes into tapped holes in each system port mounting surface.<br />
Apply heavy grease to the rear of the port plate (4) and install over the port plate pins.<br />
Temporarily attach port plate to port block by inserting a cord through one of the 2”,<br />
50,8 mm diameter ports down through the port block port, through arcuate in the port<br />
plate, around web, back through port block and tie ends of the cord to lifting eye.<br />
Repeat this step to the other side of the port plate.<br />
Install the port block assembly over the auxiliary shaft and position onto tubes and<br />
dowel pins while engaging pressure feed tubes.<br />
CAUTION: Use extreme care and slowly lower the port block carefully onto the four<br />
tubes which are precision fit in the port block. Check when the block is within 1/2”,<br />
12,7 mm of seating that the tubes are square in the holes and the port plate is seated<br />
firmly against the block. Lower the block until the joint is closed.<br />
Install the six bolts and washers (8) & (9) & (1) & (10). Do not drop the bolts in place<br />
as the threads will be damaged. Torque bolts evenly. Torque bolts (1) in 50 lb., 67,8 Nm<br />
increments to 450 lbs-ft., 610 Nm and the two bolts (8) to 120 lbs-ft., 163 Nm tightening<br />
in turn all six bolts. Torque two bolts, Fig.6 items to 120 lbs-ft., 163 Nm.<br />
CAUTION: Exercise extreme care to prevent damage to the valve mounting surface<br />
while installing and torquing the top bolts.<br />
24