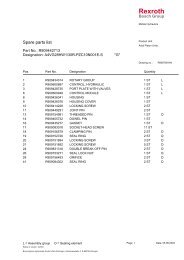
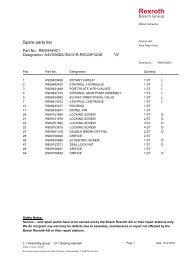
LT3-00032-2-A - DDKS Industries, hydraulic components distributor
LT3-00032-2-A - DDKS Industries, hydraulic components distributor
LT3-00032-2-A - DDKS Industries, hydraulic components distributor

Create successful ePaper yourself
Turn your PDF publications into a flip-book with our unique Google optimized e-Paper software.
UNIT DISASSEMBLY<br />
SERVO/REPLENISH PUMP<br />
AND BARREL HOLDDOWN<br />
(continued)<br />
(24 series barrel holddown)<br />
NOTE: This is a complete vane cartridge assembly and removed in one step. A puller<br />
tool T3 is recommended.<br />
Remove sealing washer (1).<br />
See figure 4. Remove holddown lock retainer ring (8). (Use internal snap ring pliers.)<br />
See figure 9. Remove four screws (1) and two screws (8). NOTE: There is a preload<br />
from the barrel holddown which will lift the port block approximately 1/8” (3.2mm) at<br />
release.<br />
Carefully lift and remove port block (2) and port plate (4). CAUTION: The port plate<br />
may cling to the barrel face because of oil film. Do not allow the port plate to fall and<br />
become damaged.<br />
See figure 6. Remove the face plate (2) and face plate pins (1) from the face of the<br />
barrel assembly.<br />
See figure 4. Remove holddown adjusting screw lock (7), use an 18” blade type<br />
screwdriver, with the blade ground down to clear holddown shaft.<br />
See figure 7. Lock main shaft from turning.<br />
See figure 4. Use special tool T2, slip over auxiliary shaft (2) and engage dowels into<br />
holddown adjusting screw (6). Loosen load but do not remove.<br />
See figure 6. Remove two bolts (5) holding housing and flange together.<br />
See figure 3. Push tubes (4) out of housing slots and toward barrel, do not bend or<br />
damage them.<br />
See figure 6. Lift housing (4) over tubes and barrel assembly and remove. Mounting<br />
flange must be driven from housing due to tight fit.<br />
NOTE: Do not damage gasket faces in this process. Do not remove the retaining<br />
screws or bearing from the housing unless bearing is damaged and replacement is<br />
necessary.<br />
Barrel assembly can be removed by lifting with auxiliary shaft. The pistons will remain<br />
with the cam assembly. These parts are precision finished and must be handled with<br />
extreme care!<br />
See figure 4. Using special tool T2, holddown assembly can be removed from barrel.<br />
Remove adjusting screw, (6), spring (5), retainer (4), spherical seat (3) and auxiliary<br />
shaft (2).<br />
(30 series barrel holddown)<br />
See figure 9. Remove four screws (1) and two screws (8). NOTE: There is a preload<br />
from the barrel holddown which will lift the port block approximately 1/8” (3.2mm) at<br />
release.<br />
Carefully lift and remove port block (2) and port plate (4).<br />
CAUTION: The port plate may cling to the barrel face because of oil film. Do not allow<br />
the port plate to fall and become damaged.<br />
See figure 6. Remove the face plate (2) and face plate pins (1) from the face of the<br />
barrel assembly.<br />
See figure 4.1. Loosen six screws gradually in alternating sequence.<br />
CAUTION: Holddown is under preload. Do not remove screws completely.<br />
Insert three #10-32 screws into the three #10-32 threaded holes. Alternately turn in<br />
screws till the tapered retainer releases. A loud crack sound should be heard when it<br />
releases.<br />
See figure 7. Lock main shaft from turning.<br />
See figure 4.1. Use special tool T2, slip it over auxiliary shaft (2) and engage dowels<br />
into barrel holddown nut assy. (5). Loosen load but do not remove.<br />
See figure 6. Remove two bolts (5) holding housing and flange together.<br />
12