Pinhole Camera Design Challenge Instructor Notes. Jill Marshall ...
Pinhole Camera Design Challenge Instructor Notes. Jill Marshall ...
Pinhole Camera Design Challenge Instructor Notes. Jill Marshall ...

Create successful ePaper yourself
Turn your PDF publications into a flip-book with our unique Google optimized e-Paper software.
<strong>Jill</strong> <strong>Marshall</strong> &<br />
Gretchen Edelmon<br />
Handout - 1<br />
<strong>Design</strong> <strong>Challenge</strong> <strong>Instructor</strong> <strong>Notes</strong><br />
UTeach Institute - NMSI Annual Conference<br />
Austin, TX / May 24 – 26, 2011<br />
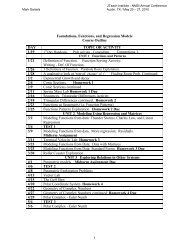
5 min: Introduction of the challenge: Teachers often need specialized equipment and rarely <br />
have much funding to acquire it. One thing that I (JM) have needed is a pinhole camera for <br />
use in my physics class. Past CI students have needed them for geometry lessons. <br />
[If possible, demo examples] <br />
10 min: Pair share: If you were using a pinhole camera in class, would it be better to <br />
purchase/build high quality cameras or allow students to build simpler, less well <br />
constructed ones? Would you have students build a really nice set to leave in the classroom <br />
(each student signing her work) or should students build their own and take it with them? <br />
How would you decide? What ‘big idea’ in your content area can be illustrated using a <br />
pinhole camera? <br />
Jigsaw homework assignment (each group divides the tasks and leaves class with an <br />
agreement): Research pinhole cameras on the Internet and post the URL of one reference <br />
site on the class web site. Post a paragraph description of a lesson in which you would use a <br />
pinhole camera in your content area. Post a paragraph or sketch illustrating how a pinhole <br />
camera works. <br />
Class day: <br />
5 min: Presentation of available materials, design constraints, testing conditions, <br />
documentation requirements. [Note: If students develop their own needs/specification <br />
documentation, more time will be required.] <br />
10 min: Students review available materials and create a scale drawing of their proposed <br />
prototype with dimensions. Upon presentation of the drawing to instructors, a random <br />
team member is selected to explain the drawing. Upon successful explanation, the team <br />
receives its materials. <br />
20 min: Build prototype, test, revise (documenting process), retest, revise as needed. <br />
(Groups who finish early can devise a second model.) <br />
10 min: Whole class camera test. A randomly selected member of each team will be <br />
selected to test each camera on a previously unseen image. If a different image is available <br />
for each team, the image can be read/described aloud. If there is only one image, the viewer <br />
sketches the image on a card and then cards are read/displayed on a document camera. <br />
5 min: think/pair/share: What steps were necessary to design the camera? To design <br />
anything? <br />
5 min (or for homework): Compare each group’s design steps with those in the <br />
UTeachEngineering design process. Describe possible improvements to camera design and <br />
revisions to classroom activity. Describe the difference between a 5E lesson and a design <br />
lesson, reflecting on original description of differences between scientists and engineers. <br />
Homework Assignment: Turn in revised and annotated documentation of the process (one <br />
per student or jigsaw sections). <br />
Possible reading assignment: Barnett (2005). <br />
Teacher <strong>Notes</strong>: <br />
1. Suggested uses for the pinhole camera in high school classes: <br />
2