
You also want an ePaper? Increase the reach of your titles
YUMPU automatically turns print PDFs into web optimized ePapers that Google loves.
Users Guide<br />
UniStop<br />
Version 1.03<br />
(Software version 1.05)<br />
Go faster faster<br />
UNIPRO ApS<br />
VIBORG HOVEDVEJ 24<br />
DK-7100 VEJLE<br />
DENMARK<br />
Tel.: +45 75 85 11 82<br />
Fax: +45 75 85 17 82<br />
www.uniprolaptimer.com<br />
mail@uniprolaptimer.com
Introduction.............................................................................................................................3<br />
Overview..................................................................................................................................4<br />
Quick Guide to the basic functions.......................................................................................5<br />
Turning UniStop on .................................................................................................5<br />
Taking lap times and split times................................................................................5<br />
Analyse mode ........................................................................................................5<br />
Clearing Laps .........................................................................................................5<br />
Turning UniStop off.................................................................................................5<br />
Reference Manual ...................................................................................................................6<br />
Basic information ........................................................................................................................... 6<br />
USB connector .......................................................................................................6<br />
Real-time Clock ......................................................................................................6<br />
Display..................................................................................................................6<br />
Symbols................................................................................................................6<br />
Batteries ...............................................................................................................6<br />
KeyStrap ...............................................................................................................6<br />
Operating modes ........................................................................................................................... 7<br />
Turning UniStop on .................................................................................................7<br />
Stop watch ............................................................................................................8<br />
Stop Watch Analyse .............................................................................................. 12<br />
Info .................................................................................................................... 13<br />
Main menu .......................................................................................................... 14<br />
Setup menu......................................................................................................... 15<br />
Clock setup.......................................................................................................... 15<br />
Contrast setup ..................................................................................................... 15<br />
Language setup.................................................................................................... 16<br />
Auto power-down setup......................................................................................... 16<br />
Multistart setup .................................................................................................... 16<br />
LED Feedback setup.............................................................................................. 16<br />
PC transfer .......................................................................................................... 17<br />
Battery change..................................................................................................... 18<br />
UNIPRO – The original Laptimer 2
Introduction<br />
Thank you for trusting us to deliver the most advanced stop watch on the market.<br />
The UniStop has several unique features and will very quickly become an indispensable tool.<br />
Even with all the advanced features, the stop watch is very easy to use. With just a few clicks<br />
you are ready to take lap times for up to 4 drivers at the same time. You can easily take split<br />
times as well (up to 9 splits per lap).<br />
The graphical display makes it very easy to see and analyze the times saved in the stop watch.<br />
UniStop speaks your language too<br />
The user interface comes in many different languages, and is preinstalled with English,<br />
German, Italian, Danish, French, Spanish, Protoguese, Dutch and Norwegian. When other<br />
languages are added, new firmware (software) will be published on www.uniprolaptimer.com.<br />
If you have any problems or questions regarding your UniStop we will make sure to give you<br />
the necessary support.<br />
Please e-mail your questions to support@uniprolaptimer.com or contact your local dealer.<br />
Good luck on the tracks!<br />
UNIPRO ApS<br />
Viborg Hovedvej 24<br />
DK-7100 Vejle<br />
Denmark<br />
Web: www.uniprolaptimer.com<br />
E-mail: mail@uniprolaptimer.com<br />
Forum: forum.uniprolaptimer.com<br />
Knowledge Base: www.laptimer.dk<br />
UNIPRO – The original Laptimer 3
Overview<br />
We have put a lot of effort into making UniStop very fast and easy to operate. The feedback<br />
we get from drivers and teams using UniStop tells us that we have succeeded. Here you can<br />
get an overview over the functions in UniStop.<br />
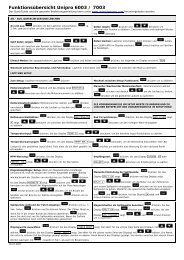
SYMBOLS<br />
Small symbols<br />
gives feedback<br />
about stop<br />
watch, battery<br />
and buttons to<br />
use.<br />
RTC<br />
Build-in real-time<br />
clock gives<br />
information about<br />
the current clock<br />
and date.<br />
LEDS<br />
Bright LEDs for<br />
fast feedback.<br />
DISPLAY<br />
Large graphical<br />
display, with multiple<br />
languages.<br />
MEMORY<br />
Large memory for<br />
almost 2000 laps or<br />
splits.<br />
LAP BUTTONS<br />
One Lap button for<br />
each stop watch.<br />
Fast and easy<br />
access.<br />
SPLIT BUTTONS<br />
One Split button for<br />
each stop watch. You<br />
can get up to 9 split<br />
times per lap.<br />
MENU<br />
Because of the<br />
graphic display,<br />
easy operation is<br />
possible with<br />
menus and<br />
arrow buttons.<br />
ARROW BUTTONS<br />
For easy navigation<br />
in menus and for<br />
adjustment of<br />
values.<br />
HOOK<br />
Hang UniStop around your neck<br />
with the supplied keystrap.<br />
USB<br />
Fast connection to<br />
PC for upgrades.<br />
Please notice that the top four buttons at each side is associated with laps and splits for each<br />
of the four drivers. To make operation very easy you will find a menu button that together with<br />
the four arrow buttons and the OK button will make a very easy to use user interface.<br />
The following section will explain more about the different hardware features in UniStop.<br />
UNIPRO – The original Laptimer 4
Quick Guide to the basic functions<br />
This chapter describes how to get started with using the UniStop just for the basic functions:<br />
taking lap times and split times for up to 4 drivers at the same time.<br />
TURNING UNISTOP ON<br />
Press the MENU button to turn the stop watch on. UniStop starts by showing the startup<br />
screen for a few seconds. After that you will be on the stop watch screen. Press MENU twice if<br />
you want to skip the startup sequence and go directly to the stop watch.<br />
TAKING LAP TIMES AND SPLIT TIMES<br />
You start each of the four stop watches by pressing L1, L2, L3 or L4. L1 means Lap for driver 1<br />
and so on. It does not matter in what sequence the watches are started. You are free to use<br />
them as you wish.<br />
Each time you press the L1 you will save a lap time for driver number 1 – and the same for the<br />
other buttons / drivers.<br />
If you want to take split times, just press the S1 to S4 buttons. You can save up to 8 split<br />
times per lap plus the extra split time you get automatically from the last split to the finish<br />
line.<br />
When you are finished with the race / training session, you can press the MENU button to show<br />
the popup menu. Here you can choose STOP ALL to stop all watches and go to the main menu.<br />
If you want a bigger font when using 3 or 4 drivers, just press and hold L2 when turning<br />
UniStop on. Press and hold L1 during power-up to get back to the default mode again.<br />
If you want “sum splits” press L4 when turning UniStop on. Press and hold L3 during power-up<br />
to set back to default mode again (normal splits)<br />
ANALYSE MODE<br />
From the main menu, you can go to the Analyse screen. From this screen you can analyse the<br />
times you have just measured. The screen is almost the same as before, but now you can<br />
scroll through the different laps and splits. UniStop automatically selects the best lap for each<br />
driver. If you press the L1 to L4 button, you can scroll up through the laps for each driver and<br />
if you press S1 to S4 you can scroll up through the split times for each driver. If you however<br />
want to scroll down, you simply press and hold the OK button while scrolling with the L1 to L4<br />
and S1 to S4 buttons.<br />
CLEARING LAPS<br />
If you want to clear the laps stored you can do it in several ways.<br />
- Press and hold OK while turning UniStop on.<br />
- Choose “CLEAR LAPS” from the popup menu.<br />
- Press and hold down OK for 1 second from the stop watch screen<br />
You always have to confirm by pressing OK except when using the first method.<br />
TURNING UNISTOP OFF<br />
Pressing the MENU button and holding it down will turn UniStop off. You can do the same from<br />
the main menu by choosing “POWER OFF”.<br />
That’s how easy it is – if you are ready for some more advanced features, then read the<br />
Reference Manual section.<br />
UNIPRO – The original Laptimer 5
Reference Manual<br />
In the following chapters you can find detailed information about all the functions of UniStop.<br />
Basic information<br />
USB CONNECTOR<br />
The USB connection is compatible to USB version 2.0 full-speed. That is what you typically find<br />
on your PC. You have to notice, that UniStop acts as a device (or slave) so you will not be able<br />
to connect it to a USB printer. You should also notice that a special <strong>Unipro</strong> USB driver is<br />
needed on the PC. Please install this driver before UniStop is connected the first time! The<br />
driver is supplied on the CDROM included in the box. The USB cable is an optional accessory.<br />
REAL-TIME CLOCK<br />
UniStop is equipped with an internal real-time clock. This clock runs even when UniStop is<br />
turned off and it keeps track of the time and date.<br />
As an extra feature, the real-time clock will be synchronized with the PC clock every time you<br />
connect UniStop to the PC Watch program.<br />
DISPLAY<br />
The display used in UniStop is a new custom made graphic display than besides the 128 x 64<br />
pixels also have some fixed symbols at the top. This leaves more room on the screen and<br />
helps us make an easier to operate stop watch.<br />
SYMBOLS<br />
In the top part of the display you will find a number of fixed symbols. Not all symbols are used<br />
in UniStop. UniStop will show you which buttons to press at all time. This will make it very<br />
easy to navigate the menus!<br />
These symbols are showing things like battery status, stop watch running, USB connection and<br />
the menu keys to use.<br />
BATTERIES<br />
UniStop is made to run a very long time on two standard AAA cells batteries. We designed it to<br />
use standard batteries and not expensive Lithium batteries and the software is optimized to<br />
run using as little energy as possible.<br />
KEYSTRAP<br />
A <strong>Unipro</strong> KeyStrap is included with UniStop. This is a nice way to have UniStop with you at all<br />
times and at the same time avoid dropping it on the ground. Please do not let kids play with<br />
the KeyStrap. It can be dangerous and it can strangle by accident!<br />
UNIPRO – The original Laptimer 6
Operating modes<br />
The stop watch has some different menu or screens. You change between the different modes<br />
with the buttons.<br />
TURNING UNISTOP ON<br />
To turn on UniStop you simply press the MENU button. The<br />
display displays the start-up screen with the logo and more<br />
information about UniStop, for instance software version and<br />
owners name.<br />
At the same time UniStop is counting down to start with the<br />
LEDs at the top. After the count down, UniStop starts in the<br />
“Stop watch”.<br />
It is however possible to skip this start-up phase. If you press<br />
the MENU twice instead of just once, UniStop starts directly in<br />
the “Stop watch”, ready to use. It will skip the startup screen and thereby reduce the startup<br />
time.<br />
You can also jump directly to the “Main menu” by pressing the OK button after the press on<br />
the MENU button.<br />
If you do not like the supplied logo, you can change it to your own from the PC Watch<br />
program. It needs to be a black and white bitmap with the resolution of 64 x 64 pixels. Some<br />
of the picture may be covered by the text.<br />
It is also possible to change the text at the bottom line. At default this is set to<br />
“www.uniprolaptimer.com” but you can for example set it to your own name. The maximum<br />
number of characters is 25. This is also done from the PC Watch program.<br />
UNIPRO – The original Laptimer 7
STOP WATCH<br />
The stop watch screen is the most important screen on<br />
UniStop! It is here the timing of the drivers is done.<br />
Depending on the number of stop watches running, you will see<br />
different layouts of the screen. If you are only timing one<br />
driver, you will see more information than if you are timing four<br />
drivers!<br />
When you want to start the stop watch, simply press L1 to start<br />
the timing of driver one, L2 for start the timing of driver two<br />
and so on. You will see the corresponding stop watch running in the display. Notice, that if you<br />
set UniStop to use “multistart”, all drivers will start at the same time.<br />
To take split times, you use the S1 – S4 buttons. One for each driver. You can take up to 8<br />
split times per lap, but you are automatically getting a split from the last split point to the<br />
finish line.<br />
When either a new lap or new split is measured it is compared to the best and visual feedback<br />
is given with the 3 LEDs at the top. If the time is better, the light is green and if the time is<br />
worse the light is red. A time close to the best is shown with yellow light. The lights are used<br />
as described below.<br />
Difference < +/- 0:15 sec. yellow LED<br />
Difference > +0:15 sec. red LED<br />
Difference > -0:15 sec. green LED<br />
The visual feedback can be turned off in the “LED Feedback setup”.<br />
If you want to see more information on the selected driver you can use the “MORE INFO” from<br />
the popup menu. This gives a little more information including the theoretical best lap time for<br />
each driver.<br />
When the race is finished, you can use the “STOP ALL” from the popup menu. This will stop all<br />
the stop watches and change UniStop to the main menu with “ANALYSE” selected.<br />
To stop all and go to the Analyse screen, just press MENU and then OK twice.<br />
UNIPRO – The original Laptimer 8
Stop watch with 1 driver<br />
As seen on the example to the left, you have a lot of<br />
information in the display.<br />
The menu line is showing the number 1. This is indicating that<br />
stop watch for driver 1 is running. It could however be 1, 2, 3<br />
or 4. If driver 4 is coming first, it is okay to start that stop<br />
watch first!<br />
The time is the current running lap time. It is showing the<br />
running time of the current lap. You can see the current lap<br />
number to right, next to the lap time.<br />
The last lap time is shown on the line below. It will be shown from lap 2 and forwards, and the<br />
last lap number is shown to the right. When a last lap time is displayed, you can see the time<br />
difference compared to the best lap time. It is shown on the line below. If the number is<br />
negative, you got a faster lap time, and if it is positive, you got a slower lap time.<br />
The split time is shown if you pressed the corresponding split button (S1 – S4) to get a split<br />
time. The split number is shown in front of the split time, and you can see the best split time<br />
for the same split number to the right. If you see “Split L”, it is the split time from the last split<br />
point to the finish line. This is shown when you finish the lap by pressing the lap button.<br />
The clock symbol at the top is indicating a stop watch is running.<br />
Stop watch with 2 drivers<br />
The menu line is showing the number 1,2. This is indicating<br />
that stop watch for driver 1 and 2 are running. It could<br />
however be 1, 2, 3 or 4. If driver 3 and 4 are coming first, it is<br />
okay to start them first!<br />
The display shows the current lap time, the current lap number,<br />
the best lap time, the best lap number, the split number, the<br />
split time and the best split time. Everything is shown for each<br />
driver.<br />
Sometimes the display differs from the just described information:<br />
When you start on a new lap, the last lap time is shown instead of the current lap time. This<br />
lap time is displayed for 15 seconds before changing back to the current lap time.<br />
If no split times are measured on a lap, the last lap time is displayed instead of split times.<br />
The clock symbol at the top is indicating a stop watch is running.<br />
UNIPRO – The original Laptimer 9
Stop watch with 3 drivers<br />
The menu line is showing the number 1,2,3. This is indicating<br />
that stop watch for driver 1, 2 and 3 are running. It could<br />
however be 1, 2, 3 or 4. If driver 2, 3 and 4 are coming first, it<br />
is okay to start them first!<br />
The display shows for each driver the current lap time, the<br />
current lap number, the best lap time, the best lap number, the<br />
split number, the split time and the best split time.<br />
Sometimes the display differs from the just described information:<br />
When you start on a new lap, the last lap time is shown instead of the current lap time. This<br />
lap time is displayed for 15 seconds before changing back to the current lap time.<br />
If no split times are measured on a lap, the last lap time is displayed instead of split times.<br />
The clock symbol at the top is indicating a stop watch is running.<br />
Stop watch with 4 drivers<br />
This is showing the display when timing all four drivers.<br />
The display shows for each driver the current lap time, the<br />
current lap number, the best lap time, the best lap number, the<br />
split number, the split time and the best split time.<br />
Sometimes the display differs from the just described<br />
information:<br />
When you start on a new lap, the last lap time is shown instead<br />
of the current lap time. This lap time is displayed for 15 seconds before changing back to the<br />
current lap time.<br />
If no split times are measured on a lap, the last lap time is displayed instead of split times.<br />
The clock symbol at the top is indicating a stop watch is running.<br />
If you are using 3 or 4 drivers a lot, we have added a special<br />
stop watch mode with a bigger font.<br />
To change to this special mode, press and hold L2 when turning<br />
UniStop on. If you want to change back again to normal mode,<br />
press and hold L1 when turning on. You only need to do this<br />
change once, not every time you turn UniStop on!<br />
The example shows 4 drivers with the icons used. If no splits are measured on a lap, the best<br />
lap time is shown instead of the split time. You can see this on driver 2 in the picture above.<br />
UNIPRO – The original Laptimer 10
Stop watch popup menu<br />
While operating the stop watch, you can bring up a popup<br />
menu. Simply press the MENU button and you will see the<br />
menu shown on the picture. Please notice, that if the stop<br />
watch is started you will need to press a little longer on the<br />
MENU button. This is to prevent you bringing up the menu if<br />
you wanted to press the L4 button instead. This little delay is<br />
only valid when one of the stop watched are running!<br />
If you press the MENU button again, the popup menu will<br />
disappear again. Otherwise use the up and down buttons (L4<br />
and S4) to select the menu point you want and press OK.<br />
From the popup menu you will be able to do the following.<br />
• Stop all watches running and go to the “Main menu”<br />
• Get more information, e.g. theoretical lap time and more<br />
• Remove a driver<br />
• Go to the “Main menu”<br />
The default selected line menu point is always “Stop all”. That way you can quickly stop the<br />
stop watch and go to the main menu by pressing MENU followed by OK.<br />
If you want to go directly from the stop watch to analyse mode, you press MENU followed by<br />
two clicks on OK. This will bring up the menu, stop all watches and enter analyse mode.<br />
If however no watches are running you might see this popup<br />
instead.<br />
Because there are already some laps measure in the memory,<br />
you will be able to do the following.<br />
• Clear all memory<br />
• Analyse the laps in memory<br />
• Go to the “Main menu”<br />
If you already cleared the memory, the only thing you can<br />
chose from the popup menu is to go directly to the main menu.<br />
This example is shown on the picture on the left.<br />
UNIPRO – The original Laptimer 11
STOP WATCH ANALYSE<br />
The Stop Watch Analyse mode is for looking at the lap and split times for the session you just<br />
timed.<br />
On the menu line you will see the driver’s numbers to the right.<br />
This is important to know because it is the same buttons you<br />
need to use to scroll through the laps.<br />
The stop watch analyse screen will automatically start with the<br />
best lap for each driver.<br />
If no split times have been recorded, the corresponding line will<br />
be empty.<br />
You can adjust the drivers lap number number by pressing the L1 – L4 button. To adjust the<br />
drivers split number you can press the S1 – S4 button. The lap and split numbers will always<br />
be increased when pressing L1 – L4 and S1 – S4. If you want to decrease the numbers, please<br />
press and hold down the OK button while operating the L1 – L4 and S1 - S4 buttons.<br />
Analyse popup menu<br />
While operating in analyse mode, you can bring up a popup<br />
menu. Simply press the MENU button and you will see the<br />
menu shown on the picture. If you press the MENU button<br />
again or the LEFT arrow button, the popup menu will disappear<br />
again. Otherwise use the up and down buttons (L4 and S4) to<br />
select the menu point you want and press OK.<br />
From the popup menu you will be able to do the following.<br />
• Clear all laps<br />
• Get more information, e.g. theoretical lap time and more<br />
• Go to the “Main menu”<br />
UNIPRO – The original Laptimer 12
INFO<br />
The information screen is available from both the “Stop watch” and the “Stop Watch Analyse”<br />
screen. It will show more information on the race that cannot be viewed anywhere else.<br />
The information screen will show the starting time for the race<br />
and the theoretical best lap times for the 4 drivers.<br />
If the theoretical lap time cannot be calculated, it is shown like<br />
“-:--:--“.<br />
When you press the OK button your UniStop will return to<br />
either the “Stop watch” or the “Stop Watch Analyse” screen.<br />
UNIPRO – The original Laptimer 13
MAIN MENU<br />
From the main menu you can go to the different menus or turn<br />
UniStop off.<br />
On the screen you will see menu points and the current time<br />
and date. You can use the up and down buttons to select the<br />
menu point you want and then press the OK button. This is also<br />
shown with the symbols at the top line!<br />
At the bottom line you can see the current time and date.<br />
From the main menu you will be able to do the following.<br />
• Go to the stop watch<br />
• Analyse your lap times<br />
• Setup UniStop<br />
• Turn UniStop off<br />
If you still have the stop watch running, you will not be able to go to “ANALYSE” and “SETUP”.<br />
You can clearly see if the stop watch is running with the small clock icon at the top row.<br />
If you want to turn UniStop off, you use the arrow buttons to go to “POWER OFF” and then<br />
press the OK button.<br />
Please remember that you can set the auto power-off time from the Setup menu.<br />
HINT. You can always press and hold the MENU button down for two seconds. This will turn<br />
UniStop off.<br />
UNIPRO – The original Laptimer 14
SETUP MENU<br />
Some basic settings are in the setup menu.<br />
From this menu, you can change the following:<br />
• Time and date<br />
• Display contrast<br />
• Current language<br />
• Power-off time<br />
• Multistart<br />
• LED feedback<br />
When you are finished you can return to the main menu by pressing the left arrow button.<br />
All settings are stored and will not be cleared if you remove the batteries.<br />
CLOCK SETUP<br />
UniStop includes a real-time clock running even when UniStop<br />
is off.<br />
You can set the clock in two ways.<br />
The easiest way is to connect UniStop to the PC software called<br />
PC Watch. Every time you connect UniStop to the PC using the<br />
USB cable, the clock will be synchronized with the clock in the<br />
PC. That way you always update the clock UniStop to keep it<br />
accurate.<br />
The other way is to use the clock setup screen shown on the picture. You simply move around<br />
the screen with the left and right arrows and adjust the corresponding number with the up and<br />
down arrow. The selected number is shown with bold digits. To set the clock, press the OK<br />
button and to cancel the changes, press the MENU button.<br />
The 24H and 12H mode will change between the European 24 hour clock and the typical<br />
American mode with am and pm. The order of date and month is also reversed.<br />
When you are adjusting the values, you can press and hold the UP and DOWN buttons and the<br />
adjustment will accelerate.<br />
CONTRAST SETUP<br />
The contrast of the display is the light difference between the<br />
dots that are turned on and dots that are turned off.<br />
You can manually adjust the contrast setting by selecting<br />
“CONTRAST:” and press OK. Then use the arrow up and down<br />
buttons to adjust the setting. You can change between –6 and<br />
+6. You will see the contrast change at the same time. When<br />
the contrast is what you like, press OK again to go back to the<br />
setup menu.<br />
UNIPRO – The original Laptimer 15
LANGUAGE SETUP<br />
UniStop is able to support a lot of different languages and you<br />
are able to select them from the setup menu. To do that, move<br />
to LANGUAGE and press OK. You will then be able to change<br />
the language with the up and down buttons.<br />
As soon you press the OK button again, UniStop will be change<br />
to use the other language. The name of the language is always<br />
the same two letters. That way you can always recognize your<br />
own language!<br />
AUTO POWER-DOWN SETUP<br />
UniStop will automatically turn itself off if it is not used. To save<br />
batteries, you want it to turn off as fast as possible, but on the<br />
other hand it should not affect the daily work.<br />
You can adjust the auto power-off time between 1 and 30<br />
minutes by selecting “OFF TIME:” and press OK. Then use the<br />
up and down buttons to adjust the setting. When the time is<br />
what you want, press OK again to go back to the setup menu.<br />
MULTISTART SETUP<br />
UniStop can start the stop watches in two ways.<br />
When Multistart is off, you start each stop watch one at a time.<br />
When Multistart is on, you will always start all four stop<br />
watches at once. If you want less drivers, you can always use<br />
the “REMOVE DRIVER” from the popup menu to remove one.<br />
LED FEEDBACK SETUP<br />
UniStop will compare the lap and split times to the best and will<br />
show if it is the same, better or worse with the three bright<br />
LEDs at the top.<br />
If you do not want this, you can uncheck the checkbox to turn<br />
this function off.<br />
UNIPRO – The original Laptimer 16
PC TRANSFER<br />
UniStop automatically change to PC mode when a USB cable is<br />
inserted. You can’t enter PC mode manually.<br />
The PC program has full control over UniStop when the USB<br />
cable is in. It can transfer data either ways, change settings or<br />
update the firmware (program) in UniStop.<br />
You will see the transfer status and progress on the screen. A progress bar goes from 0% to<br />
100% indicating the data transfer.<br />
UniStop leaves PC mode and returns to the main menu as soon<br />
as the USB cable is removed again.<br />
Please notice, that UniStop cannot see if the USB driver is<br />
installed correctly on the connected PC. It can only detect the<br />
cable. You need to make sure that the <strong>Unipro</strong> USB driver is<br />
installed correctly to be able to transfer data.<br />
UNIPRO – The original Laptimer 17
BATTERY CHANGE<br />
When it is time to change the batteries a small battery symbol is<br />
shown in top of the display. This does not mean that UniStop will<br />
stop functioning. The first sign of really low battery voltage is when<br />
the real-time clock is corrupted. The battery symbol is shown when<br />
the battery voltage is around 2.2V. Five different steps is shown all the way down to 1.7V.<br />
The battery voltage is measured when UniStop has not been touched for 10 seconds.<br />
The batteries are located inside the box. Put UniStop on the table with the backside up.<br />
Unscrew the six screws and remove the lower part of the box. Here you will see a battery<br />
holder with two standard Alkaline 1.5V AAA batteries. Please replace them with two new ones<br />
of high quality. Be careful to put them in with the right polarity. If you should by accident put<br />
them in the opposite direction, you will not hurt either UniStop or the batteries.<br />
When assembling UniStop again, please notice that the two short screws goes at the top and<br />
the four longer screws is at the battery compartment. This is very important to avoid<br />
destroying UniStop!<br />
Please do not dispose the batteries in the nature. Use the official return channels for them!<br />
UNIPRO – The original Laptimer 18