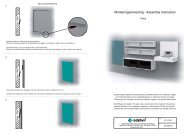
Monteringsanvisning - Assembly instruction - Edsbyn
Monteringsanvisning - Assembly instruction - Edsbyn
Monteringsanvisning - Assembly instruction - Edsbyn

Create successful ePaper yourself
Turn your PDF publications into a flip-book with our unique Google optimized e-Paper software.
<strong>Monteringsanvisning</strong> - <strong>Assembly</strong> <strong>instruction</strong><br />
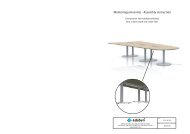
Skjutbar skiva<br />
Sliding table top<br />
135<br />
OBS! Bordet får inte brukas i utdraget läge<br />
utan måste skjutas tillbaka mot bordsskärm<br />
samt låsas fast med de främre rattarna.<br />
NOTE! The table may not be used in extension<br />
mode, Before using the table it has to be pushed back<br />
to the table screen and locked with the front knobs.<br />
Ratt/knob<br />
AB Edsbyverken, Box 300, SE-828 25 <strong>Edsbyn</strong><br />
Tel/Phone +46 (0)271-27500, Fax +46 (0)271-27501<br />
www.edsbyn.com<br />
Date:<br />
Nr:<br />
2012-02-13<br />
00530171
F<br />
1 par/pair<br />
G<br />
2x<br />
H<br />
2x<br />
I<br />
4x<br />
J<br />
1x<br />
K<br />
8x<br />
4<br />
2,5<br />
Beslag vänster/Fittings left<br />
1.<br />
F<br />
F<br />
Montera beslag för skjutbar skiva (F) i gavelsarg.<br />
Mount the fittings for sliding table top (F) in the gableframe.<br />
2.<br />
F<br />
Lägg ner beslagen för skjutbar skiva (F) på gavelsargerna så att pinnbultarna hamnar i slitsarna.<br />
OBS! Höger och vänster beslag, se bilderna.<br />
Put down the fittings for the sliding table top (F) on the gableframes so that the tie rods fall into the vents.<br />
NOTE! Right and left fittings, see pictures.
3.<br />
H<br />
I<br />
G<br />
I<br />
Beslagen är rätt placerade om dessa ligger jämnt i fram- och bakkant med gavelsarger<br />
(med beslagen i bakre läget).<br />
Montera beslagen med plast distanser och rattar (I) i främre och bakre pinnbulten.<br />
OBS! Montera plast distanserna på rätt ställe.<br />
Plastdistans (G) 4 mm tjock skall monteras vid bakkant.<br />
Plastdistans (H) 2,5 mm tjock skall monteras vid framkant.<br />
Skruva fast rattarna ordentligt, den bakre låser ej fast beslaget.<br />
Den främre låser fast beslaget och enbart den skall användas för att använda funktionen<br />
att skjuta/dra skivan för åtkomst till kabelränna.<br />
The fittings are placed correctly if they are laying evenly in the front and rear edge with the gableframes<br />
(with fittings in the rear position).<br />
Assemble the fittings with plastic spacers and knobs (I) in the front and rear studs.<br />
NOTE! Fit the plastic spacers in the right place.<br />
Plastic spacer (G) 4 mm thick, is to be mounted at the rear edge.<br />
Plastic spacer (H) 2.5 mm thick, is to be mounted at the front edge.<br />
Screw the knobs properly, the rear knob do not lock the fitting.<br />
The front knob locks the fitting. It is only this front knob you use to<br />
pushing/pull the table top for accessing the cable groove.<br />
4.<br />
Distanser att använda på elstativ 383 och 394.<br />
- 3 mm används till 383<br />
- 8 mm används till 394<br />
a) b)<br />
Distances for electric stands 383 and 394.<br />
-3mmto383<br />
-8mmto394<br />
c)<br />
Tag bort skyddstejpen.<br />
Remove the protective tape.<br />
Montera distansen (J) mitt på stativet.<br />
Assemble the distance (J) in the middle of the stand.<br />
Denna distans används för att eliminera<br />
nedhäng av bordsskivan.<br />
This distance is used to eliminate the<br />
sag of the table top.
5.<br />
K<br />
Se till att beslagen för skjutbar skiva är i dess bakre läge, lås fast beslaget med den främre ratten.<br />
Lägg på bordsskivan med dess bakre kant mot bordsskärmen, eller lämna en spalt på några<br />
millimeter för kabeldragning. Placera/mät in den även i sidled.<br />
Skruva nu fast enbart beslagen för skjutbar skiva i bordsskivan med skruvarna (K).<br />
Därefter skall bordsskivan kunna dras ut från bordsskärmen ca 135 mm genom att<br />
lossa de främre rattarna och ta tag i bordsskivan och dra.<br />
Nu finns åtkomst till kabelränna mellan bordsskärm och bordsskiva.<br />
OBS! Bordet får inte brukas i utdraget läge (med åtkomst av kabelränna) utan måste skjutas tillbaka<br />
mot bordsskärm och låsas fast med rattarna. Om bordet med funktionen skjutbar skiva inte utrustas<br />
med bordsskärm bör bordsskivan mätas in och monteras enligt bifogad anvisning.<br />
Make sure that the fittings for the sliding table top is in its rear position, lock the fitting with the front knob.<br />
Put the table top with its rear edge against the table screen, or leave a gap of some<br />
millimetres for wiring. Place/measure it also laterally.<br />
Screw only the fittings of sliding top in to the table top with the screws (K).<br />
Thereafter the table top can be pulled out from the table screen about 135 mm by<br />
loosening the front knobs, holding the table top and pulling.<br />
Now it is possible to reach the cable groove between the screen and the table top.<br />
NOTE! The table must not be used in extension position (with access to the cable groove). It has to be pushed back<br />
against a table screen and locked with the knobs. If the table with the feature sliding table top is not equipped<br />
with table screen the table top should be measured up and installed according to <strong>instruction</strong>s attached.