Installation Instructions 14 - Pacific Columns, Inc.
Installation Instructions 14 - Pacific Columns, Inc.
Installation Instructions 14 - Pacific Columns, Inc.

Create successful ePaper yourself
Turn your PDF publications into a flip-book with our unique Google optimized e-Paper software.
<strong>Installation</strong> <strong>Instructions</strong><br />
Figure 1<br />
Figure 2<br />
Figure 3<br />
<strong>14</strong><br />
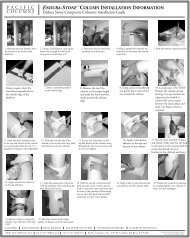
BALUSTRADE INSTALLATION INSTRUCTIONS<br />
1. Installing Newel Posts (Figure 1)<br />
a. Use the installation kit or appropriate installation hardware.<br />
b. Slide the Trim Collar down to cover up the hardware and glue the collar in place.<br />
c. Glue the Post Cap in place with PL Premium.<br />
2. Rail Lengths Needed<br />
a. Measure the distance for each section of balustrade you need.<br />
b. Cut your top and bottom rails to the lengths that you measured for each section. Cut rails<br />
¼” shorter than needed if using the QuickInstall installation brackets. The Rail <strong>Installation</strong><br />
Brackets will make up for this ¼”.<br />
3. Determine How Many Spindles You Need for Each Section (Figure 2)<br />
a. Divide each section length by the spindle’s ‘Recommended On-Center-Spacing.’ This is the<br />
maximum spacing to pass the nation-wide 4” sphere code.<br />
b. Round up to the nearest full number. This is how many spindles you are going to use.<br />
4. Spindle Spacing and Pre-Drilling (Figure 3)<br />
a. Take the number of spindles that you calculated in step #3, and divide the section’s length<br />
by that number. This will give you the exact on-center-spacing for that specific section<br />
(each section that is a different length will have slightly different on-center-spacing).<br />
b. Find and mark the centerline on the top and bottom rails.<br />
c. Take the on-center-spacing calculated in “a”, and divide it by 2. This will give you the<br />
distance from the newel post or wall to drill your first hole. Drill your first hole at this point<br />
on the centerline.<br />
d. Drill each additional hole along the centerline, at a distance of the on-center-spacing<br />
calculated in “a” until all holes are drilled for the section.<br />
<strong>Pacific</strong> <strong>Columns</strong>, <strong>Inc</strong>. Tel (800) 294-1098 www.pacificcolumns.com
<strong>Installation</strong> <strong>Instructions</strong><br />
Figure 4a<br />
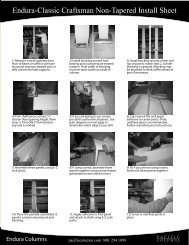
5. Assemble Each Section (Figure 4)<br />
a. Apply a small bead of PL Premium adhesive to the bottom<br />
of each spindle.<br />
b. Insert the bottom of the spindle rods into the pre-drilled<br />
holes on the bottom rail. Do this for every spindle in the<br />
section.<br />
c. Apply a small bead of PL Premium adhesive on the top of<br />
each spindle.<br />
d. Place the top rail over the spindles, inserting the spindle<br />
rods into the pre-drilled holes on the top rail.<br />
e. Use straps to hold the balustrade section together while the<br />
adhesive dries. PL Premium normally dries within 24 hours.<br />
f. Remove all excess adhesive.<br />
g. Remove straps once adhesive sets.<br />
Figure 4b<br />
Figure 5a<br />
6. Attach the Assembled Sections to Newel Post or Wall (Figure 5)<br />
a. Apply a bead of adhesive to the rail installation bracket<br />
insert.<br />
b. Insert the rail installation brackets into each side of the top<br />
and bottom rail.<br />
c. Screw the railing brackets into your newel posts/wall.<br />
PRE-ASSEMBLED BALUSTRADE SYSTEMS<br />
We will pre- assemble each section of balustrade for your<br />
project. Just provide us with exact lengths, and your system will<br />
arrive to you ready to be installed! Call for pricing.<br />
Figure 5b<br />
<strong>Pacific</strong> <strong>Columns</strong>, <strong>Inc</strong>. Tel (800) 294-1098 www.pacificcolumns.com 15