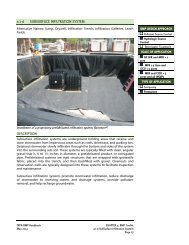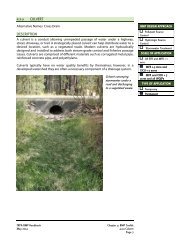
4.1-c INFILTRATION TRENCH DESCRIPTION - Tahoe BMP
4.1-c INFILTRATION TRENCH DESCRIPTION - Tahoe BMP
4.1-c INFILTRATION TRENCH DESCRIPTION - Tahoe BMP

Create successful ePaper yourself
Turn your PDF publications into a flip-book with our unique Google optimized e-Paper software.
<strong>4.1</strong>-c<br />
<strong>INFILTRATION</strong> <strong>TRENCH</strong><br />
Alternative Names: Soak Away Pit, Infiltration Tube, Drywell, Subsurface Infiltration<br />
System<br />
<strong>BMP</strong> DESIGN APPROACH<br />
Pollutant Source Control<br />
Hydrologic Source<br />
Control<br />
Stormwater Treatment<br />
SCALE OF APPLICATION<br />
All SFR and MFR < 1<br />
acre<br />
MFR 1-5 Acre and<br />
CICU < 5 acres<br />
MFR and CICU > 5<br />
acres and all WQIPs<br />
TYPE OF APPLICATION<br />
Temporary<br />
Permanent<br />
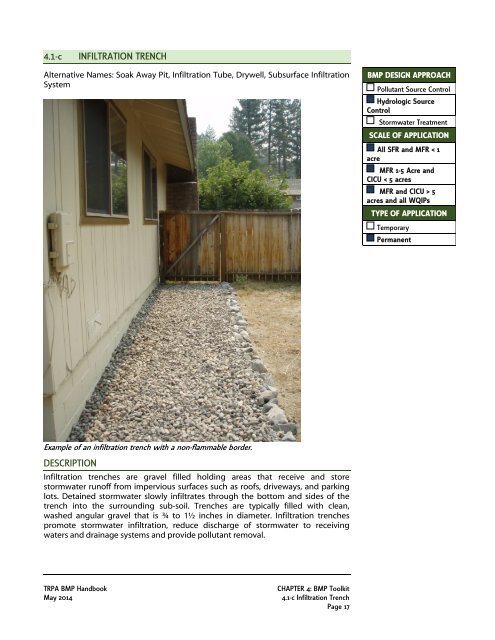
Example of an infiltration trench with a non-flammable border.<br />
<strong>DESCRIPTION</strong><br />
Infiltration trenches are gravel filled holding areas that receive and store<br />
stormwater runoff from impervious surfaces such as roofs, driveways, and parking<br />
lots. Detained stormwater slowly infiltrates through the bottom and sides of the<br />
trench into the surrounding sub-soil. Trenches are typically filled with clean,<br />
washed angular gravel that is ¾ to 1½ inches in diameter. Infiltration trenches<br />
promote stormwater infiltration, reduce discharge of stormwater to receiving<br />
waters and drainage systems and provide pollutant removal.<br />
TRPA <strong>BMP</strong> Handbook<br />
May 2014<br />
CHAPTER 4: <strong>BMP</strong> Toolkit<br />
<strong>4.1</strong>-c Infiltration Trench<br />
Page 17
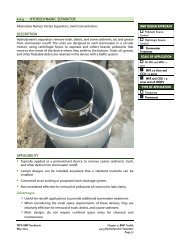
APPLICABILITY<br />
• Widely applicable for storage of runoff from roof tops. Pretreatment is required<br />
when runoff is conveyed to an infiltration trench from driveways, small parking<br />
areas or road segments.<br />
• Not appropriate for soils with infiltration rates less than 1”/hr, areas with<br />
seasonally high groundwater (e.g., SEZ), or where groundwater contamination is<br />
a concern.<br />
• Site infiltration trenches on relatively flat terrain (less than a 5 percent slope).<br />
Infiltration trenches may be sited on steeper terrain by designing flatter storage<br />
cells that step down the steeper slope or through the use of subsurface drains.<br />
• Avoid placing within 600 feet of a drinking water source.<br />
• Avoid placing infiltration trenches in locations sloping towards foundations.<br />
Advantages<br />
• If properly installed and maintained, infiltration trenches can significantly<br />
reduce or eliminate the discharge of runoff from impervious surfaces to<br />
receiving waters or drainage systems.<br />
• Reduces the peak loading of receiving waters and storm drain systems.<br />
• Design is adaptable to fit easily along the margins, perimeter, and unused<br />
sections of developed sites and under roof eaves.<br />
• Installation is relatively easy and inexpensive.<br />
• Reduces localized flooding or ponding problems while avoiding the need<br />
to construct a drainage system.<br />
• Recharges the groundwater.<br />
Disadvantages<br />
• Without pretreatment, applicability is limited to sites with low fine<br />
sediment loads. If inflowing pollutant loads are high as may be the case<br />
with driveways and parking lots, frequent maintenance is necessary to<br />
maintain effectiveness. Once clogged, restoration typically requires<br />
rebuilding the infiltration trench.<br />
• Clogged systems with standing surface water can become a nuisance due<br />
to mosquito breeding and ice formation during the winter.<br />
DESIGN CONSIDERATIONS<br />
• Size standard infiltration trenches to retain at least the 20-yr/1-hr volume<br />
generated from the tributary impervious area.<br />
• Where space is limited, consider use of prefabricated subsurface storage<br />
chambers instead of gravel-filled infiltration trenches to increase stormwater<br />
storage capacity. Prefabricated systems are rigid structures that are wrapped<br />
with geotextile fabric, placed into the trench, and then backfilled with gravel.<br />
Refer to Section <strong>4.1</strong>-d for more details regarding Subsurface Infiltration Systems.<br />
• Consult the NRCS <strong>Tahoe</strong> Basin Soil Survey (NRCS 2007) or the <strong>BMP</strong> Calculation<br />
Spreadsheet (found at: www.tahoebmp.org) for design guidance. The <strong>BMP</strong><br />
CHAPTER 4: <strong>BMP</strong> Toolkit<br />
TRPA <strong>BMP</strong> Handbook<br />
<strong>4.1</strong>-c Infiltration Trench May 2014<br />
Page 18
Calculation Spreadsheet estimates potential depths to groundwater, restrictive<br />
layers, and soil permeability rates for every parcel in the Lake <strong>Tahoe</strong> Region.<br />
• On-site measurements of the Ksat are typically recommended over values<br />
estimated in the <strong>BMP</strong> Calculation Spreadsheet for designing an infiltration<br />
trench.<br />
• Depth to seasonal high groundwater, bedrock, or a restrictive layer shall be<br />
at least 1 foot below the bottom of the trench.<br />
• Pretreatment of runoff is necessary for large parking lots, commercial sites, and<br />
industrial sites when a significant potential exists for discharge of contaminants<br />
to groundwater or surface water (e.g., heavy metals or hydrocarbons).<br />
• Where stormwater runoff may have high sediment loads, include a pretreatment<br />
device (e.g., sediment trap) at the inlet of an infiltration system for removal of<br />
coarse sediment and debris. For applications where a pretreatment device is not<br />
possible at the inlet to the system (roof dripline trench), perforated piping with<br />
inspection ports embedded in the gravel may be used to provide maintenance<br />
access. Improving the ease of maintenance can promote maintenance, thereby<br />
extending the effective life on an infiltration trench.<br />
• For soils with slower infiltration rates, consider lining the bottom of the trench<br />
with 6 inches to 1 foot of sand. This technique provides a layer of soil that may<br />
infiltrate better than the native soils during freezing conditions.<br />
• On slopes greater than 5 percent baffles, headers, or terraces (noncombustible<br />
materials) to provide a level bottom to the infiltration trench. Alternatively, use a<br />
rock lined ditch or subsurface drain to collect and convey runoff to a more<br />
appropriate location for infiltration.<br />
• When the ground slopes toward the foundation install a subsurface drain to<br />
convey runoff to a more appropriate location for infiltration.<br />
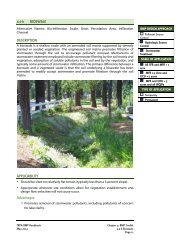
• An alternative to the gravel dripline trench is a roof dripline planter bed (See<br />
Roof Dripline Planter Beds Figure). Ensure that the plantings are dense, irrigated,<br />
low-growing, non-woody vegetation that comply with fire defensible space<br />
guidelines of the local fire protection district.<br />
TRPA <strong>BMP</strong> Handbook<br />
May 2014<br />
CHAPTER 4: <strong>BMP</strong> Toolkit<br />
<strong>4.1</strong>-c Infiltration Trench<br />
Page 19
This infiltration trench is too steep and is acting as a conveyance rather than infiltration<br />
system. A subsurface drain could be added and connected to a subsurface infiltration<br />
system at the bottom.<br />
INSTALLATION CONSIDERATIONS<br />
• Install infiltration trenches after fine sediment ) sources have been minimized<br />
• Install infiltration trenches after other site construction activities to avoid<br />
clogging the trench.<br />
• Avoid excessive compaction of the bottom of the trench during construction.<br />
Use lightweight equipment to excavate the trench to protect the Ksat of the<br />
underlying soil. Place excavated material downslope from the trench in a stable<br />
location to avoid washing material back into the trench should a runoff event<br />
occur.<br />
• Excavate the system to the required size with enough extra width and length for<br />
placement of a border.<br />
• The bottom of the trench shall be flat to provide uniform infiltration across the<br />
surface area of the trench.<br />
• Consider wrapping the system with non-woven geotextile fabric to reduce<br />
sediment accumulation throughout the infiltration trench. This should extend<br />
the effective life of the infiltration trench and reduce the need to rebuild a<br />
clogged system.<br />
• Preferred Method: Excavate the trench and place geotextile fabric in the<br />
trench with enough remaining fabric to overlap the top of the gravel. Place<br />
gravel in the trench to within 3 inches of the final grade. Overlap the top of<br />
the gravel with the fabric. Add a final layer of gravel over the fabric to the<br />
final grade.<br />
CHAPTER 4: <strong>BMP</strong> Toolkit<br />
TRPA <strong>BMP</strong> Handbook<br />
<strong>4.1</strong>-c Infiltration Trench May 2014<br />
Page 20
• Alternative Method: Excavate the trench and place gravel to within 3 inches<br />
of the final grade. Place a layer of geotextile fabric over the gravel and add<br />
more gravel to reach the final grade.<br />
• Using Fabric: When overlapping geotextile fabric, provide a maximum<br />
overlap of 1 foot from the upstream sheet to the downstream sheet to<br />
create a shingled effect. When laying out geotextile fabric for installation,<br />
provide sufficient material to compensate for perimeter irregularities and<br />
for overlapping.<br />
• Use gravel that is angular, washed, and uniformly graded to ¾ to 1½ inches in<br />
diameter. This specification will provide roughly a 30-40 percent void space for<br />
storage or runoff.<br />
• If gravel aggregate is not washed prior to delivery, wash on site to remove dirt<br />
and fines before placement into the trench. Ensure that dirt and fines washed<br />
from the gravel are contained on site and do not enter a drainage system.<br />
• Install a containment border around the system. If it the trench is within 5 feet of<br />
a structure use noncombustible border and baffle materials such as larger rocks.<br />
• Ensure the surrounding surface is stable. This will reduce the potential for<br />
erosion to occur if the capacity of the infiltration trench is exceeded during a<br />
runoff event.<br />
• Ensure that runoff from impervious areas will flow into and not bypass the<br />
system.<br />
• Vehicles shall not park or drive on an infiltration trench. Install parking barriers<br />
next to infiltration trenches constructed near vehicle parking areas.<br />
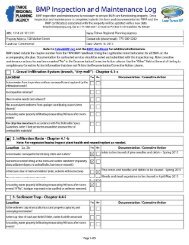
INSPECTION/MAINTENANCE CONSIDERATIONS<br />
Infiltration trenches shall be inspected at a minimum semiannually (in the spring<br />
and fall) and after major storm events. Inspect infiltration trenches are flow<br />
obstruction, sediment accumulation, standing water, and safety hazards and spills.<br />
An inspection and maintenance log, writing utensil and a camera among other<br />
things will help keep track of inspection and maintenance activities. Use the<br />
following Table for more specific information on inspection and maintenance<br />
activities.<br />
EFFECTIVENESS CONSIDERATIONS<br />
An appropriately sized infiltration trench that is adequately maintained is a highly<br />
effective <strong>BMP</strong> for runoff reduction from development. However, the rate of fine<br />
sediment delivery to the trench will dictate the frequency of maintenance; a higher<br />
the rate of delivery requires increased frequency of maintenance.. Routine<br />
maintenance is necessary to prolong the effectiveness of infiltration trenches,<br />
because once clogged, restoration typically requires rebuilding the system.<br />
TRPA <strong>BMP</strong> Handbook<br />
May 2014<br />
CHAPTER 4: <strong>BMP</strong> Toolkit<br />
<strong>4.1</strong>-c Infiltration Trench<br />
Page 21
Infiltration Trench Inspection and Maintenance Table<br />
INSPECTION AND MAINTENANCE ACTIVITIES<br />
SUGGESTED<br />
FREQUENCY<br />
INSPECTION<br />
EQUIPMENT<br />
MAINTENANCE<br />
EQUIPMENT<br />
Inspect for signs that stormwater runoff is properly accessing the infiltration feature. It may be necessary to<br />
pour water on the impervious surface the feature is designed to capture.<br />
• Repair any blocked or diverted conveyances.<br />
Inspect the feature for standing water.<br />
• If water has not fully infiltrated after 96 hours then rehabilitate the infiltration feature (described below).<br />
• Contact your local vector abatement office for specific instructions on controlling mosquitoes until<br />
rehabilitation can be performed.<br />
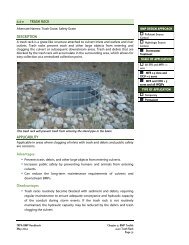
Inspect for trash and debris (especially pine needles).<br />
• Remove trash and debris from infiltration feature.<br />
Inspect for invasive weeds.<br />
• Remove invasive weeds monthly during the first two growing seasons. Thereafter, weed annually, or as<br />
needed.<br />
Inspect for upslope or adjacent contributing sediment sources to reduce the accumulation of sediment in the<br />
infiltration feature.<br />
• Stabilize contributing erosion and bare soil areas to prevent sediment entry into infiltration feature.<br />
Inspect for sediment and debris accumulation in the infiltration feature especially at the inlet.<br />
• If there is visual evidence of sediment at the top of the trench.<br />
• When dry, remove gravel, sieve gravel to remove sediment, clean or replace the underlying fabric, replace<br />
cleaned gravel and dispose of sediment in a TRPA approved stable on-site location or out of the Lake <strong>Tahoe</strong><br />
Region.<br />
Inspect site for unusual or unsafe conditions (snowplow damage, structural damage, dumping, vandalism, etc.).<br />
• Repair structural components as necessary.<br />
Inspect infiltration feature for signs of compaction caused by vehicle traffic. Compaction will compromise<br />
performance and cause the feature to fail.<br />
• May need to aerate compacted soil below gravel to rehabilitate infiltration function.<br />
• Install parking barriers to exclude vehicle entry if signs of vehicle-caused compaction exist.<br />
Monitor ongoing effectiveness and determine whether another <strong>BMP</strong> type or additional <strong>BMP</strong>s could improve<br />
long-term effectiveness and improve benefits to costs versus the existing infiltration feature.<br />
• Analyze Inspection and Maintenance Log for trends and recurring issues.<br />
• Prepare a plan that more effectively addresses stormwater capture, reduces long term maintenance costs,<br />
and improves overall effectiveness and safety of the <strong>BMP</strong>.<br />
Before and during<br />
major storms<br />
96 hours after major<br />
storms<br />
Monthly<br />
(April—Oct)<br />
Monthly during first<br />
growing season and<br />
annually thereafter<br />
Spring<br />
Semi-annually (spring<br />
and fall) and after<br />
major storms<br />
Annually in spring<br />
Annually in fall<br />
Every 5 years<br />
Water source<br />
Invasive Weeds<br />
Inspector<br />
Shovel<br />
Qualified<br />
Inspector or<br />
Consultant<br />
Trash bag<br />
Shovel<br />
Tools suggested per<br />
qualified individual<br />
Leaf rake<br />
Trash bag<br />
Tools as needed to<br />
control infestation<br />
Soil Amendment,<br />
Seeds/Plants,<br />
Irrigation, Mulch,<br />
Erosion Control<br />
Blanket, Riprap, or<br />
Coir Logs<br />
Shovel<br />
Sieving screen<br />
Trash bag<br />
Tools as needed<br />
Parking barrier<br />
Installation tools<br />
Qualified Inspector<br />
or Consultant<br />
CHAPTER 4: <strong>BMP</strong> Toolkit<br />
TRPA <strong>BMP</strong> Handbook<br />
<strong>4.1</strong>-c Infiltration Trench May 2014<br />
Page 22
Infiltration Trench Figure<br />
THE TAHOE REGIONAL PLANNING AGENCY (TRPA) SHALL NOT BE RESPONSIBLE FOR THE ACCURACY OR COMPLETENESS OF ELECTRONIC COPIES OF THIS DETAIL.<br />
TRPA <strong>BMP</strong> Handbook<br />
May 2014<br />
CHAPTER 4: <strong>BMP</strong> Toolkit<br />
<strong>4.1</strong>-c Infiltration Trench<br />
Page 23
Infiltration Facility Figure<br />
THE TAHOE REGIONAL PLANNING AGENCY (TRPA) SHALL NOT BE RESPONSIBLE FOR THE ACCURACY OR COMPLETENESS OF ELECTRONIC COPIES OF THIS DETAIL.<br />
CHAPTER 4: <strong>BMP</strong> Toolkit<br />
TRPA <strong>BMP</strong> Handbook<br />
<strong>4.1</strong>-c Infiltration Trench May 2014<br />
Page 24
Roof Dripline Planter Beds Figure<br />
THE TAHOE REGIONAL PLANNING AGENCY (TRPA) SHALL NOT BE RESPONSIBLE FOR THE ACCURACY OR COMPLETENESS OF ELECTRONIC COPIES OF THIS DETAIL.<br />
TRPA <strong>BMP</strong> Handbook<br />
May 2014<br />
CHAPTER 4: <strong>BMP</strong> Toolkit<br />
<strong>4.1</strong>-c Infiltration Trench<br />
Page 25
Armored Dripline Figure<br />
THE TAHOE REGIONAL PLANNING AGENCY (TRPA) SHALL NOT BE RESPONSIBLE FOR THE ACCURACY OR COMPLETENESS OF ELECTRONIC COPIES OF THIS DETAIL.<br />
CHAPTER 4: <strong>BMP</strong> Toolkit<br />
TRPA <strong>BMP</strong> Handbook<br />
<strong>4.1</strong>-c Infiltration Trench May 2014<br />
Page 26