Propeller Technical Manual - Jabiru
Propeller Technical Manual - Jabiru
Propeller Technical Manual - Jabiru

You also want an ePaper? Increase the reach of your titles
YUMPU automatically turns print PDFs into web optimized ePapers that Google loves.
<strong>Propeller</strong> <strong>Technical</strong> <strong>Manual</strong><br />
JPM0001-1<br />
<strong>Jabiru</strong> Aircraft Pty Ltd<br />
4A482U0D And 4A484E0D <strong>Propeller</strong>s<br />
Figure 6 – Pitch Set Jig<br />
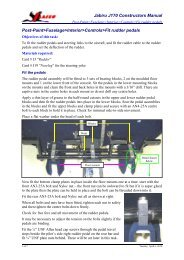
4.7.5 Procedure - <strong>Propeller</strong> installation<br />
1. Figure 7 shows typical propeller installation details.<br />
2. Ensure that <strong>Propeller</strong> drive bushes – 6 off, are in place in the Crankshaft <strong>Propeller</strong> Flange (note that<br />
two are special, short parts and face “backwards” compared to the others – see Figure 8). Fit the rear<br />
spinner backing plate to the flange.<br />
3. When fitting a propeller turn the crank of the engine by hand until the magnets are aligned vertically<br />
and then fit the propeller with the blades close to horizontal. This method makes it likely that when<br />
the engine is turned off the propeller will naturally tend to come to rest with the blades close to<br />
horizontal. Note that this procedure does not apply to 3300 engines as they may stop in any position.<br />
4. Fit propeller to flange.<br />
5. Fit <strong>Propeller</strong> Bolts - 4 off. The bolts must be oriented with the nuts positioned furthest from the<br />
propeller flange (nuts forward for a standard tractor installation).<br />
6. Fit front spinner plate and penny washers to front of propeller. Note the use of AN970 “Penny<br />
Washers” – this is required to distribute the load applied by the bolts.<br />
7. Ensure that both spinner plates are locating correctly on the spigots of the propeller hub. The rear<br />
spinner plate is drilled to allow the rear hub bolt spigots to pass through and mate directly against the<br />
propeller flange. There must be nothing between these mating faces.<br />
8. Progressively tighten bolts ensuring equal distribution of load and in a normal criss-cross torque<br />
sequence. Ensure that the hub is tightened evenly: check that the gap between the front and rear<br />
hub plates is the same on both sides of the propeller.<br />
9. Using Torque Wrench, tighten propeller mounting bolts to the value given in Table 5.<br />
10. Using Torque Wrench, tighten the outer blade clamp bolts to the value given in Table 5.<br />
11. Check tracking of <strong>Propeller</strong> as detailed in Section 4.7.6.<br />
12. Locate Spinner on Spinner Flange and fix with Machine Screws through tinnerman Washers.<br />
13. Check Spinner tracking as detailed in Section 4.7.7<br />
14. After the first 5 hours following the propeller installation or adjustment of the hub mounting bolts the<br />
spinner must be removed and the propeller bolts checked for correct tension per Table 6.<br />
This document is controlled while it remains on the <strong>Jabiru</strong> server. Once this no longer applies the document becomes uncontrolled.<br />
ISSUE 1 Dated : 1st Feb 2013 Issued By: DPS Page: 25 of 32<br />
L:\files\<strong>Manual</strong>s_For_Products\<strong>Propeller</strong>_<strong>Manual</strong>s\JPM0001-1_Prop_<strong>Manual</strong> (1).doc