Propeller Technical Manual - Jabiru
Propeller Technical Manual - Jabiru
Propeller Technical Manual - Jabiru

Create successful ePaper yourself
Turn your PDF publications into a flip-book with our unique Google optimized e-Paper software.
<strong>Propeller</strong> <strong>Technical</strong> <strong>Manual</strong><br />
JPM0001-1<br />
<strong>Jabiru</strong> Aircraft Pty Ltd<br />
4A482U0D And 4A484E0D <strong>Propeller</strong>s<br />
4.7 Maintenance Procedures<br />
4.7.1 Acceptance Checking<br />
<strong>Propeller</strong>s supplied are balanced before shipping. Balancing before fitting to an aircraft is not necessary.<br />
Visually inspect propeller to ensure that it has not been damaged in transit.<br />
Check that the propeller drive bushes are a neat fit in the sockets of the propeller. Section 5.5 gives<br />
details.<br />
4.7.2 Procedure – Removal of Existing <strong>Propeller</strong><br />
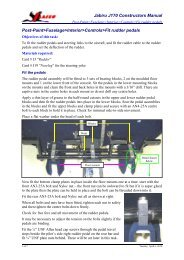
Figure 7 shows a typical propeller installation.<br />
1. Remove Machine Screws and Tinnerman Washers from Spinner.<br />
2. Remove Spinner.<br />
3. Unbolt <strong>Propeller</strong> Bolts - 4 off.<br />
4. Remove Bolts, Spinner Flanges, Washers and <strong>Propeller</strong>.<br />
4.7.3 Procedure - <strong>Propeller</strong> Assembly<br />
1. Place the rear hub plate on a flat bench.<br />
2. Fit the two blades to the hub. By design there is a small space between the inner ends of the two<br />
blades (Figure 4). Care must be taken to ensure that the blades are positioned with their retaining<br />
shoulders hard against the matching shoulders of the hub (i.e. with the gap between blades as large<br />
as possible). Failure to achieve this can result in one blade being positioned differently to the other,<br />
resulting in an out of balance condition and increased vibration.<br />
3. Place the front hub plate on the assembly, taking care to align it with the pitch lock pins in the blades<br />
(where equipped).<br />
4. Loosely fit the 4 outer blade clamp bolts to the hub assembly.<br />
5. Gradually tighten the 4 clamp bolts to the value given in Table 5. This is to “settle” the blades into the<br />
hub.<br />
6. Ensure that the gap between the front and rear hubs is even on both sides (Figure 5).<br />
7. Loosen the clamp screws.<br />
8. For propellers without pitch lock pins, use a static jig to set the blade angles.<br />
This document is controlled while it remains on the <strong>Jabiru</strong> server. Once this no longer applies the document becomes uncontrolled.<br />
ISSUE 1 Dated : 1st Feb 2013 Issued By: DPS Page: 22 of 32<br />
L:\files\<strong>Manual</strong>s_For_Products\<strong>Propeller</strong>_<strong>Manual</strong>s\JPM0001-1_Prop_<strong>Manual</strong> (1).doc