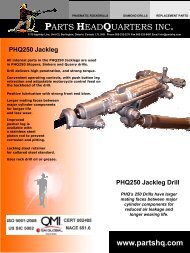
PHQ250JHMAVL Jackleg MK 1 Parts and Repair Manual PDF
PHQ250JHMAVL Jackleg MK 1 Parts and Repair Manual PDF
PHQ250JHMAVL Jackleg MK 1 Parts and Repair Manual PDF

Create successful ePaper yourself
Turn your PDF publications into a flip-book with our unique Google optimized e-Paper software.
Page 24<br />
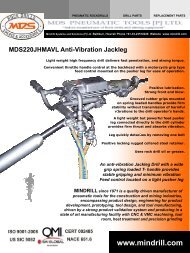
67. To remove the bronze front cylinder washer<br />
liner (C1517) place the cylinder body under the<br />
piston of a hydraulic press. Use T201 to press<br />
the bronze liner out of the cylinder. If a press is<br />
not available the liner can be driven out by<br />
striking the T201 tool carefully with a hammer.<br />
68. To install a new liner st<strong>and</strong> the cylinder body on the press<br />
bench with the front end down. Carefully place a new bronze<br />
liner (C1517) in the front cylinder washer using the lead on<br />
the liner to align the bushing in the bore. A good method is to<br />
place the liner on a piston <strong>and</strong> insert the liner with the piston<br />
to be sure of alignment. Insert a second piston (B2334) with<br />
the head into the bore resting on the bronze liner or head of the<br />
first piston. Push the bushing with the hydraulic press until it<br />
bottoms out inside the cylinder with an audible “click”.<br />
69. Often the inside diameter of the bronze front cylinder washer (C1517) will shrink inwards due<br />
to the pressure on the outside diameter as it is pressed into place. Check that the piston stem<br />
moves freely through the bronze washer <strong>and</strong> if required hone the inside diameter until the fit is<br />
correct. The front cylinder washer liner test should be repeated after installing a new bronze liner<br />
<strong>and</strong> if metal on metal contact occurs repeat the inspection of the cylinder bore <strong>and</strong> piston head.<br />
Chuck Insert Removal<br />
70. Inspect the hexagon bore of the chuck bushing (C1418A) with the gauge tool<br />
C3720. Replace the chuck bushing if it is cracked, chipped or worn oversize. If<br />
the gauge enters the bushing across the flats 19,19mm (0.7555”) or more, the<br />
insert is worn oversize. Worn chuck bushings damage drill steel <strong>and</strong> can cause<br />
the water tube to break off when the drill steel is very sloppy in the chuck<br />
bushing. Chipped bushings damage drill steel.<br />
71. To remove the chuck bushing (C1418A) place the chuck assembly in tool<br />
T218 under the piston of a hydraulic press. Place the service tool T555 for<br />
collared chuck inserts in the bore of the chuck <strong>and</strong> press out the chuck bushing, It<br />
is important that all parts are correctly aligned in this pressing operation to avoid<br />
damage to the chuck. It toll T218 is not available place the chuck assembly in a<br />
used fronthead (A2598A) inverted <strong>and</strong> supported between two steel blocks)<br />
Check the top outer diameter of the chuck bushing <strong>and</strong> the top inner diameter of the chuck. If<br />
either is corroded there has been no contact between the bushing <strong>and</strong> the chuck <strong>and</strong> the chuck<br />
should be discarded as it no longer is supporting the front of the chuck bushing. Rule of thumb<br />
says that up to five chuck bushings can be replaced in one chuck before the chuck is worn out.<br />
Version 200711