PHQ250JHMAVL Jackleg MK 1 Parts and Repair Manual PDF
PHQ250JHMAVL Jackleg MK 1 Parts and Repair Manual PDF
PHQ250JHMAVL Jackleg MK 1 Parts and Repair Manual PDF

You also want an ePaper? Increase the reach of your titles
YUMPU automatically turns print PDFs into web optimized ePapers that Google loves.
Page 21<br />
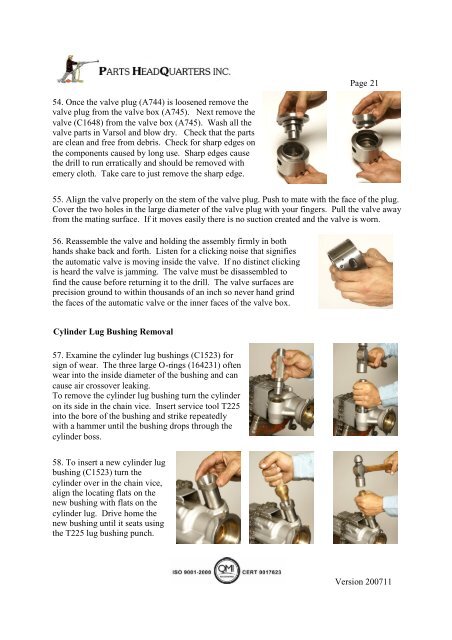
54. Once the valve plug (A744) is loosened remove the<br />
valve plug from the valve box (A745). Next remove the<br />
valve (C1648) from the valve box (A745). Wash all the<br />
valve parts in Varsol <strong>and</strong> blow dry. Check that the parts<br />
are clean <strong>and</strong> free from debris. Check for sharp edges on<br />
the components caused by long use. Sharp edges cause<br />
the drill to run erratically <strong>and</strong> should be removed with<br />
emery cloth. Take care to just remove the sharp edge.<br />
55. Align the valve properly on the stem of the valve plug. Push to mate with the face of the plug.<br />
Cover the two holes in the large diameter of the valve plug with your fingers. Pull the valve away<br />
from the mating surface. If it moves easily there is no suction created <strong>and</strong> the valve is worn.<br />
56. Reassemble the valve <strong>and</strong> holding the assembly firmly in both<br />
h<strong>and</strong>s shake back <strong>and</strong> forth. Listen for a clicking noise that signifies<br />
the automatic valve is moving inside the valve. If no distinct clicking<br />
is heard the valve is jamming. The valve must be disassembled to<br />
find the cause before returning it to the drill. The valve surfaces are<br />
precision ground to within thous<strong>and</strong>s of an inch so never h<strong>and</strong> grind<br />
the faces of the automatic valve or the inner faces of the valve box.<br />
Cylinder Lug Bushing Removal<br />
57. Examine the cylinder lug bushings (C1523) for<br />
sign of wear. The three large O-rings (164231) often<br />
wear into the inside diameter of the bushing <strong>and</strong> can<br />
cause air crossover leaking.<br />
To remove the cylinder lug bushing turn the cylinder<br />
on its side in the chain vice. Insert service tool T225<br />
into the bore of the bushing <strong>and</strong> strike repeatedly<br />
with a hammer until the bushing drops through the<br />
cylinder boss.<br />
58. To insert a new cylinder lug<br />
bushing (C1523) turn the<br />
cylinder over in the chain vice,<br />
align the locating flats on the<br />
new bushing with flats on the<br />
cylinder lug. Drive home the<br />
new bushing until it seats using<br />
the T225 lug bushing punch.<br />
Version 200711