PHQ250JHMAVL Jackleg MK 1 Parts and Repair Manual PDF
PHQ250JHMAVL Jackleg MK 1 Parts and Repair Manual PDF PHQ250JHMAVL Jackleg MK 1 Parts and Repair Manual PDF
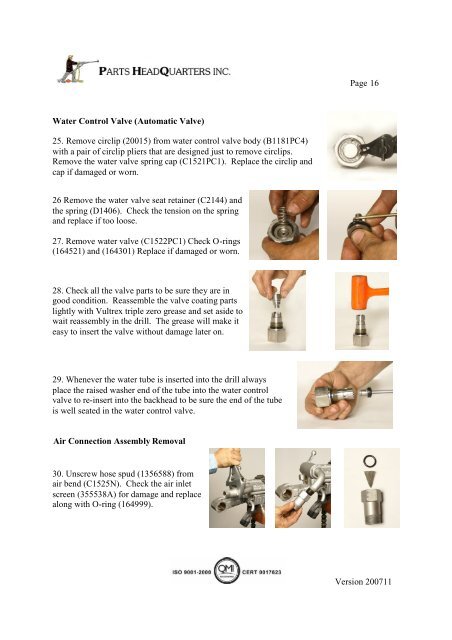
Page 16 Water Control Valve (Automatic Valve) 25. Remove circlip (20015) from water control valve body (B1181PC4) with a pair of circlip pliers that are designed just to remove circlips. Remove the water valve spring cap (C1521PC1). Replace the circlip and cap if damaged or worn. 26 Remove the water valve seat retainer (C2144) and the spring (D1406). Check the tension on the spring and replace if too loose. 27. Remove water valve (C1522PC1) Check O-rings (164521) and (164301) Replace if damaged or worn. 28. Check all the valve parts to be sure they are in good condition. Reassemble the valve coating parts lightly with Vultrex triple zero grease and set aside to wait reassembly in the drill. The grease will make it easy to insert the valve without damage later on. 29. Whenever the water tube is inserted into the drill always place the raised washer end of the tube into the water control valve to re-insert into the backhead to be sure the end of the tube is well seated in the water control valve. Air Connection Assembly Removal 30. Unscrew hose spud (1356588) from air bend (C1525N). Check the air inlet screen (355538A) for damage and replace along with O-ring (164999). Version 200711
Page 17 31. Unscrew the air bend nut (C1526) from the backhead. Always replace the copper washer (D1601). Replace any worn or damaged parts as the air connection nut and bend are safety critical. If the air connection releases from a drill during operation the hose will injure the driller! Water Connection Assembly Removal 32. Unscrew the water inlet adapter stud (D2441) from the water stem (C1809) and unscrew water stem nut (S2141)from the backhead of the drill 33. Remove water stem thrust washer (S2487) inlet washer rubber (D1402) from the backhead of the drill. Remove the water inlet screen (C1272) with a small screw driver or a scriber. 34. Replace both O-rings (164811) as well as the stem thrust washer (S2487) and washer rubber (D1402) whenever the drill is in the shop for repair. Check the screen filter (C1272) and replace if damaged. Version 200711
- Page 1 and 2: PRINTED 2/12/2008 PHQ250 Jackleg Pa
- Page 3 and 4: Certificate of Performance Page 3 T
- Page 5 and 6: Page 5 NOTE: PHQ continuously updat
- Page 7 and 8: Rockdrill Repair Shop The rock dril
- Page 9 and 10: Page 9 Version 200711
- Page 11 and 12: Page 11 Maintenance Procedures The
- Page 13 and 14: Page 13 Version 200711
- Page 15: Page 15 17. Remove the operating ha
- Page 19 and 20: Page 19 41. Examine all the parts f
- Page 21 and 22: Page 21 54. Once the valve plug (A7
- Page 23 and 24: Front Cylinder Assembly Inspection
- Page 25 and 26: Page 25 72. To replace the chuck bu
- Page 27 and 28: Assembly Procedures 77. To install
- Page 29 and 30: 88. Check to insure the proper fit
- Page 31 and 32: Page 31 101. Fit the clevis body (A
- Page 33 and 34: Page 33 PICTURE SHOWS A STOPER DRIL
- Page 35 and 36: Page 35 PHQ250 Anti-Vibration Jackl
- Page 37 and 38: Page 37 Troubleshooting Guides Prob
- Page 39 and 40: Troubleshooting Guides Problem Prob
- Page 41: Page 41 Troubleshooting Guides Prob
Page 16<br />
Water Control Valve (Automatic Valve)<br />
25. Remove circlip (20015) from water control valve body (B1181PC4)<br />
with a pair of circlip pliers that are designed just to remove circlips.<br />
Remove the water valve spring cap (C1521PC1). Replace the circlip <strong>and</strong><br />
cap if damaged or worn.<br />
26 Remove the water valve seat retainer (C2144) <strong>and</strong><br />
the spring (D1406). Check the tension on the spring<br />
<strong>and</strong> replace if too loose.<br />
27. Remove water valve (C1522PC1) Check O-rings<br />
(164521) <strong>and</strong> (164301) Replace if damaged or worn.<br />
28. Check all the valve parts to be sure they are in<br />
good condition. Reassemble the valve coating parts<br />
lightly with Vultrex triple zero grease <strong>and</strong> set aside to<br />
wait reassembly in the drill. The grease will make it<br />
easy to insert the valve without damage later on.<br />
29. Whenever the water tube is inserted into the drill always<br />
place the raised washer end of the tube into the water control<br />
valve to re-insert into the backhead to be sure the end of the tube<br />
is well seated in the water control valve.<br />
Air Connection Assembly Removal<br />
30. Unscrew hose spud (1356588) from<br />
air bend (C1525N). Check the air inlet<br />
screen (355538A) for damage <strong>and</strong> replace<br />
along with O-ring (164999).<br />
Version 200711


