MiniPro Setting Instructions - Midc-Ent.com
MiniPro Setting Instructions - Midc-Ent.com
MiniPro Setting Instructions - Midc-Ent.com

Create successful ePaper yourself
Turn your PDF publications into a flip-book with our unique Google optimized e-Paper software.
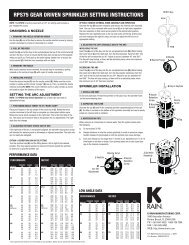
MINIPRO <br />
GEAR DRIVEN SPRINKLER SETTING INSTRUCTIONS<br />
NOTE: The <strong>MiniPro</strong> is factory preset with a 40° arc setting, and includes a pre-installed #1.5 nozzle.<br />
CHANGING A NOZZLE<br />
1 REMOVING THE NOZZLE RETENTION SCREW<br />
Use your K-Key or a small flat blade screwdriver to remove the nozzle<br />
retention screw by turning counter-clockwise to remove and clockwise<br />
to re-install.<br />
2 PULL UP THE RISER<br />
Insert the K-Key in the keyhole on the top of the nozzle turret and turn<br />
the key 1/4 turn to insure that the key does not slip out of the keyhole<br />
when you pull it up. Firmly pull up the entire spring-loaded riser to<br />
access the nozzle socket. Hold the riser assembly up with one hand.<br />
3 REMOVING THE NOZZLE<br />
Insert the end of the K-Key, hook side up, into the tall slot along the right<br />
side of the nozzle and pull up to pop out nozzle. NOTE: Do not<br />
put the K-Key or any instrument into the nozzle opening.<br />
4 INSTALLING A NOZZLE<br />
Press the desired nozzle into the nozzle socket. Make sure the nozzle<br />
number is visible and the nozzle “Wing” is up. Then, re-install the<br />
nozzle retention screw. NOTE: The nozzle retention screw is also a<br />
break-up screw and used to adjust the distance of the spray.<br />
SETTING THE ARC ADJUSTMENT<br />
1 FINDING THE LEFT START POSITION<br />
Place your finger on the top center of the nozzle turret. Rotate the turret<br />
to the right until it stops and then back to the left until it stops. Notice<br />
the position of the nozzle arrow. This is the “Left Start” position. The<br />
sprinkler will begin spraying from this position and rotate clockwise until<br />
it reaches the right “Arc Stop”.<br />
2 ORIENTING THE LEFT START POSITION<br />
Insert the K-Key in the keyhole on the top of the nozzle turret and turn<br />
the key 1/4 turn to insure that the key does not slip out of the keyhole<br />
when you pull it up. Being careful not to allow the nozzle turret to turn,<br />
firmly pull up the entire spring-loaded riser. Hold the lower riser assembly<br />
up with one hand. Now turn only the lower riser clockwise or counterclockwise<br />
until the nozzle arrow is pointing where you want the sprinkler<br />
to begin spraying.<br />
3 CHANGING THE ARC<br />
Insert the K-Key or a small flat blade screwdriver into the Arc Set<br />
Adjustment slot. Turn clockwise to increase the arc or counter-clockwise<br />
to decrease the arc.<br />
NOTE: The arc set arrow in the center of the nozzle turret rotates<br />
to show the current setting.
MINIPRO <br />
GEAR DRIVEN SPRINKLER SETTING INSTRUCTIONS<br />
SPRINKLER INSTALLATION<br />
1 INSTALL AND BURY<br />
Thread the sprinkler on the pipe. Bury the sprinkler flush to grade.<br />
NOTE: Do not use pipe dope. Gear driven sprinklers and pop-up<br />
sprays should not be installed on the same watering zone.<br />
2 INSPECTING THE FILTER<br />
Unscrew the top and lift the <strong>com</strong>plete sprinkler assembly out of the<br />
housing can. The filter is located on the bottom of the sprinkler<br />
assembly and can easily be pulled out, cleaned and re-installed.<br />
3 WINTERIZATION TIPS<br />
When using an air <strong>com</strong>pressor to remove water from the system<br />
please note the following:<br />
1) Do not exceed 30 PSI.<br />
2) Always introduce air into the system gradually to avoid air<br />
pressure surges. Sudden release of <strong>com</strong>pressed air into the<br />
sprinkler can cause damage.<br />
3) Each zone should run no longer than 1 minute on air. Sprinklers<br />
turn 10 to 12 times faster on air than on water. Over spinning<br />
rotors on air can cause damage to the internal <strong>com</strong>ponents.<br />
STANDARD NOZZLE PERFORMANCE<br />
U.S.<br />
Nozzle Pressure Radius Flow<br />
PSI Ft. GPM<br />
#1.5 30 23' 1.4<br />
Factory 40 24' 1.7<br />
Installed 50 24' 1.9<br />
Nozzle<br />
#0.75 30 17' .75<br />
40 17' .8<br />
50 18' .9<br />
#1 30 20' 0.9<br />
40 21' 1.2<br />
50 21' 1.3<br />
#2 30 25' 1.8<br />
40 27' 2.1<br />
50 27' 2.4<br />
#3 30 28' 2.7<br />
40 30' 3.0<br />
50 30' 3.3<br />
METRIC<br />
Pressure Radius Flow<br />
KPa Bars Meters L/M M 3 /H<br />
207 2.0 7.0 5.3 .4<br />
276 3.0 7.3 6.4 .4<br />
345 3.5 7.3 7.2 .5<br />
207 2.0 5.2 2.8 .2<br />
276 3.0 5.2 3.0 .2<br />
345 3.5 5.5 3.4 .2<br />
207 2.0 6.1 3.4 .2<br />
276 3.0 6.4 4.5 .3<br />
345 3.5 6.4 4.9 .3<br />
207 2.0 7.6 6.8 .5<br />
276 3.0 8.2 8.0 .5<br />
345 3.5 8.2 9.1 .6<br />
207 2.0 8.5 10.2 .7<br />
276 3.0 9.1 11.4 .8<br />
344 3.5 9.1 12.5 .8<br />
Data represents test results in zero wind for <strong>MiniPro</strong>. Adjust for local conditions.<br />
Radius may be reduced with nozzle retention screw.<br />
K-RAIN MANUFACTURING CORP.<br />
1640 Australian Avenue<br />
Riviera Beach, FL 33404 USA<br />
PH: 1-561-844-1002 / 1-800-735-7246<br />
FAX: 1-561-842-9493<br />
WEB: http://www.krain.<strong>com</strong><br />
© K-RAIN Manufacturing Corp. LN