Operation Manual Pressure Washer - DeVilbiss Air Power Company
Operation Manual Pressure Washer - DeVilbiss Air Power Company
Operation Manual Pressure Washer - DeVilbiss Air Power Company

You also want an ePaper? Increase the reach of your titles
YUMPU automatically turns print PDFs into web optimized ePapers that Google loves.
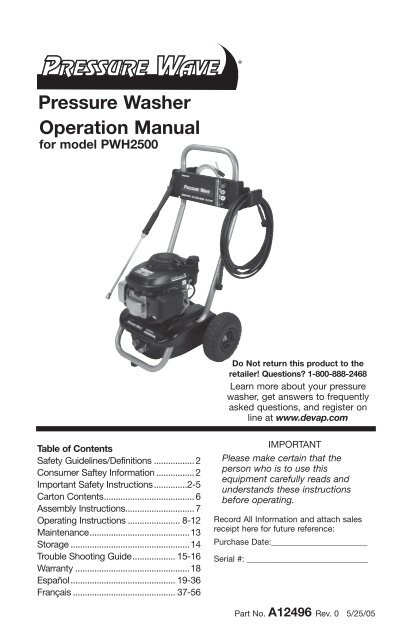
<strong>Pressure</strong> <strong>Washer</strong><br />
<strong>Operation</strong> <strong>Manual</strong><br />
for model PWH2500<br />
Do Not return this product to the<br />
retailer! Questions? 1-800-888-2468<br />
Learn more about your pressure<br />
washer, get answers to frequently<br />
asked questions, and register on<br />
line at www.devap.com<br />
Table of Contents<br />
Safety Guidelines/Definitions .................2<br />
Consumer Saftey Information ................2<br />
Important Safety Instructions ..............2-5<br />
Carton Contents ......................................6<br />
Assembly Instructions .............................7<br />
Operating Instructions ...................... 8-12<br />
Maintenance ..........................................13<br />
Storage ..................................................14<br />
Trouble Shooting Guide .................. 15-16<br />
Warranty ................................................18<br />
Español ............................................ 19-36<br />
Français ........................................... 37-56<br />
IMPORTANT<br />
Please make certain that the<br />
person who is to use this<br />
equipment carefully reads and<br />
understands these instructions<br />
before operating.<br />
Record All Information and attach sales<br />
receipt here for future reference:<br />
Purchase Date:_______________________<br />
Serial #: _____________________________<br />
Part No. A12496 Rev. 0 5/25/05
SAFETY GUIDELINES - DEFINITIONS<br />
This manual contains information that is important for you to know and understand.<br />
This information relates to protecting YOUR SAFETY and PREVENTING EQUIPMENT<br />
PROBLEMS. To help you recognize this information, we use the symbols below. Please<br />
read the manual and pay attention to these symbols.<br />
Indicates an imminently<br />
hazardous situation<br />
which, if not avoided, will result in death<br />
or serious injury.<br />
Indicates a potentially<br />
hazardous situation<br />
which, if not avoided, could result in death<br />
or serious injury.<br />
Indicates a potentially<br />
hazardous situation<br />
which, if not avoided, may result in minor<br />
or moderate injury.<br />
Used without the safety<br />
alert symbol indicates a<br />
potentially hazardous situation which, if not<br />
avoided, may result in property damage.<br />
CONSUMER SAFETY INFORMATION<br />
This product may not be equipped with a spark arresting muffler.<br />
If the product is not equipped and will be used around flammable<br />
materials, or on land covered with materials such as agricultural crops, forest, brush,<br />
grass, or other similar items, then an approved spark arrester must be installed and<br />
is legally required in the state of California. It is a violation of California statutes<br />
section 130050 and/or sections 4442 and 4443 of the California Public Resources<br />
Code, unless the engine is equipped with a spark arrester, as defined in section 4442,<br />
and maintained in effective working order. Spark arresters are also required on some<br />
U.S. Forest Service land and may also be legally required under other statutes and<br />
ordinances.<br />
Engine exhaust contains chemicals known, in certain quantities, to<br />
cause cancer, birth defects or other reproductive harm.<br />
IMPORTANT SAFETY INSTRUCTIONS<br />
Do not operate this unit until you have read and understand this<br />
Operators <strong>Manual</strong> and the Engine Owners <strong>Manual</strong> for Safety,<br />
<strong>Operation</strong>, and Maintenance Instructions.<br />
READ AND SAVE THESE INSTRUCTIONS<br />
HAZARD<br />
RISK OF EXPLOSION OR FIRE<br />
WHAT CAN HAPPEN<br />
• Spilled gasoline and it’s vapors can<br />
become ignited from cigarette sparks,<br />
electrical arcing, exhaust gases, and hot<br />
engine components such as the muffler.<br />
• Heat will expand fuel in the tank which<br />
could result in spillage and possible fire<br />
explosion.<br />
• Operating the pressure washer in an explosive<br />
environment could result in a fire.<br />
HOW TO PREVENT IT<br />
• Shut off engine and allow it to cool before<br />
adding fuel to the tank.<br />
• Use care in filling tank to avoid spilling fuel.<br />
Move pressure washer away from fueling<br />
area before starting engine.<br />
• Keep maximum fuel level ½" below top of<br />
tank to allow for expansion.<br />
• Operate and fuel equipment in well ventilated<br />
areas free from obstructions. Equip<br />
areas with fire extinguisher suitable for<br />
gasoline fires.<br />
A12496<br />
2- ENG
HAZARD<br />
RISK OF EXPLOSION OR FIRE (continued)<br />
WHAT CAN HAPPEN<br />
• Materials placed against or near the<br />
pressure washer can interfere with its proper<br />
ventilation features causing overheating and<br />
possible ignition of the materials.<br />
• Muffler exhaust heat can damage painted<br />
surfaces, melt any material sensitive to<br />
heat (such as siding, plastic, rubber, or<br />
vinyl), and damage live plants.<br />
• Improperly stored fuel could lead to<br />
accidental ignition. Fuel improperly<br />
secured could get into the hands of<br />
children or other unqualified persons.<br />
• Use of acids, toxic or corrosive chemicals,<br />
poisons, insecticides, or any kind of<br />
flammable solvent with this product could<br />
result in serious injury or death.<br />
HOW TO PREVENT IT<br />
• Never operate pressure washer in an area<br />
containing dry brush or weeds.<br />
• Always keep pressure washer a minimum of<br />
four feet away from surfaces (such as houses,<br />
automobiles, or live plants) that could be<br />
damaged from muffler exhaust heat.<br />
• Store fuel in an OSHA approved container,<br />
in a secure location away from work area.<br />
• Do not spray flammable liquids.<br />
RISK TO BREATHING<br />
HAZARD<br />
WHAT CAN HAPPEN<br />
• Breathing exhaust fumes will cause<br />
serious injury or death! Engine exhaust<br />
contains carbon monoxide, an odorless<br />
and deadly gas.<br />
• Some cleaning fluids contain substances<br />
which could cause injury to skin, eyes, or<br />
lungs.<br />
HOW TO PREVENT IT<br />
• Operate pressure washer in a well<br />
ventilated area. Avoid enclosed areas such<br />
as garages, basements, etc.<br />
• Never operate unit in a location occupied<br />
by humans or animals.<br />
• Use only cleaning fluids specifically recommended<br />
for high pressure washers. Follow<br />
manufacturers recommendations. Do not<br />
use chlorine bleach or any other corrosive<br />
compound.<br />
HAZARD<br />
RISK TO FLUID INJECTION<br />
WHAT CAN HAPPEN<br />
• Your washer operates at fluid pressures<br />
and velocities high enough to penetrate<br />
human and animal flesh, which could<br />
result in amputation or other serious injury.<br />
Leaks caused by loose fittings or worn<br />
or damaged hoses can result in injection<br />
injuries. DO NOT TREAT FLUID INJECTION<br />
AS A SIMPLE CUT! See a physician<br />
immediately!<br />
• Injuries can result if system pressure is not<br />
reduced before attempting maintenance or<br />
disassembly.<br />
HOW TO PREVENT IT<br />
• Never place hands in front of nozzle.<br />
• Direct spray away from self and others.<br />
• Make sure hose and fittings are tightened<br />
and in good condition. Never hold onto the<br />
hose or fittings during operation.<br />
• Do not allow hose to contact muffler.<br />
• Never attach or remove wand or hose<br />
fittings while system is pressurized.<br />
• To relieve system pressure, shut off<br />
engine, turn off water supply, and pull gun<br />
trigger until water stops flowing.<br />
• Use only hoses and accessories rated<br />
for pressure higher than your pressure<br />
washer's PSI.<br />
3- ENG A12496
HAZARD<br />
RISK OF CHEMICAL BURN<br />
WHAT CAN HAPPEN<br />
• Use of acids, toxic or corrosive chemicals,<br />
poisons, insecticides, or any kind of<br />
flammable solvent with this product could<br />
result in serious injury or death.<br />
HOW TO PREVENT IT<br />
• Do not use acids, gasoline, kerosene,<br />
or any other flammable materials in this<br />
product. Use only household detergents,<br />
cleaners and degreasers recommended<br />
for use in pressure washers.<br />
• Wear protective clothing to protect eyes<br />
and skin from contact with sprayed<br />
materials.<br />
HAZARD<br />
RISK OF ELECTRICAL SHOCK<br />
WHAT CAN HAPPEN<br />
• Spray directed at electrical outlets or<br />
switches, or objects connected to an<br />
electrical circuit, could result in a fatal<br />
electrical shock.<br />
HOW TO PREVENT IT<br />
• Unplug any electrically operated product<br />
before attempting to clean it. Direct spray<br />
away from electric outlets and switches.<br />
HAZARD<br />
RISK OF ELECTRICAL SHOCKRISK OF<br />
ELECTRICAL SHOCKRISK OF HOT SURFACES<br />
WHAT CAN HAPPEN<br />
• Contact with hot surfaces, such as<br />
engines exhaust components, could<br />
result in serious burn.<br />
HOW TO PREVENT IT<br />
• During operation, touch only the control<br />
surfaces of the pressure washer. Keep<br />
children away from the pressure washer<br />
at all times. They may not be able to<br />
recognize the hazards of this product.<br />
HAZARD<br />
RISK OF INJURY OR PROPERTY DAMAGE<br />
WHEN TRANSPORTING OR STORING<br />
WHAT CAN HAPPEN<br />
• Fuel or oil can leak or spill and could<br />
result in fire or breathing hazard, serious<br />
injury or death can result. Fuel or oil<br />
leaks will damage carpet, paint or other<br />
surfaces in vehicles or trailers.<br />
HOW TO PREVENT IT<br />
• If pressure washer is equipped with a<br />
fuel shut-off valve, turn the valve to the<br />
off position before transporting to avoid<br />
fuel leaks. If pressure washer is not<br />
equipped with a fuel shut-off valve, drain<br />
the fuel from tank before transporting.<br />
Only transport fuel in an OSHA approved<br />
container. Always place pressure washer<br />
on a protective mat when transporting to<br />
protect against damage to vehicle from<br />
leaks. Remove pressure washer from<br />
vehicle immediately upon arrival at your<br />
destination.<br />
A12496<br />
4- ENG
HAZARD<br />
RISK OF UNSAFE OPERATION<br />
WHAT CAN HAPPEN<br />
• Unsafe operation of your pressure washer<br />
could lead to serious injury or death to<br />
you or others.<br />
• If proper starting procedure is not<br />
followed, engine can kickback causing<br />
serious hand and arm injury.<br />
• The spray gun/wand is a powerful cleaning<br />
tool that could look like a toy to a<br />
child.<br />
• Reactive force of spray will cause gun/<br />
wand to kickback, and could cause the operator<br />
to slip or fall, or misdirect the spray.<br />
Improper control of gun/wand can result in<br />
injuries to self and others.<br />
HOW TO PREVENT IT<br />
• Do not use chlorine bleach or any other<br />
corrosive compound.<br />
• Become familiar with the operation and<br />
controls of the pressure washer.<br />
• Keep operating area clear of all persons,<br />
pets, and obstacles.<br />
• Do not operate the product when<br />
fatigued or under the influence of alcohol<br />
or drugs. Stay alert at all times.<br />
• Never defeat the safety features of this<br />
product.<br />
• Do not operate machine with missing,<br />
broken, or unauthorized parts.<br />
• Never leave wand unattended while unit<br />
is running.<br />
• If engine does not start after two pulls,<br />
squeeze trigger of gun to relieve pump<br />
pressure. Pull starter cord slowly until<br />
resistance is felt. Then pull cord rapidly<br />
to avoid kickback and prevent hand or<br />
arm injury.<br />
• Keep children away from the pressure<br />
washer at all times.<br />
• Do not overreach or stand on an unstable<br />
support.<br />
• Do not use pressure washer while<br />
standing on a ladder.<br />
• Grip gun/wand firmly with both hands.<br />
Expect the gun to kickback when<br />
triggered.<br />
RISK OF INJURY FROM SPRAY<br />
WHAT CAN HAPPEN<br />
• High velocity fluid spray can cause<br />
objects to break, propelling particles at<br />
high speed.<br />
• Light or unsecured objects can become<br />
hazardous projectiles.<br />
HAZARD<br />
HOW TO PREVENT IT<br />
• Always wear ANSI approved Z87 safety<br />
glasses.Wear protective clothing to protect<br />
against accidental spraying.<br />
• Never point wand at, or spray people or<br />
animals.<br />
• Always secure trigger lock when wand<br />
is not in service to prevent accidental<br />
operation.<br />
• Never permanently secure trigger in pull<br />
back (open) position.<br />
5- ENG A12496
CARTON CONTENTS<br />
Engine Frame and<br />
Wheel Assembly<br />
<strong>Operation</strong><br />
<strong>Manual</strong><br />
Engine<br />
<strong>Manual</strong><br />
Chemical<br />
Hose<br />
Registration<br />
card<br />
Grommet Kit<br />
with Quick<br />
Connect Nozzles<br />
Nozzle<br />
Cleaning<br />
Tool<br />
Bagged Parts<br />
Accessories Panel<br />
Spray Gun<br />
Engine<br />
Oil<br />
Handle<br />
High <strong>Pressure</strong><br />
Hose<br />
Quick Connect Spray Wand<br />
A12496<br />
6- ENG
1. To Assemble Quick Connect<br />
Grommets:<br />
a. Squeeze grommet and place<br />
into hole, fitting groove to<br />
rim.<br />
ASSEMBLY INSTRUCTIONS<br />
4. Connect wand to gun. Tighten<br />
securely.<br />
5. Attach high pressure hose to<br />
gun. Tighten securely.<br />
b. Push grommet into place.<br />
c. Repeat steps until all<br />
grommets are assembled.<br />
2. To Assemble Quick Connect<br />
Nozzles:<br />
a. Remove<br />
five<br />
colored<br />
quick<br />
connect<br />
nozzles<br />
from<br />
plastic bag<br />
and insert<br />
them into correct grommet.<br />
NOTE: Nozzles are color<br />
coded to match colored<br />
6. To Assemble Accessories<br />
Panel<br />
a. Remove top screws on<br />
handle assembly.<br />
b. Loosen bottom screws on<br />
handle assembly.<br />
c. Place grooves in accessories<br />
panel assembly onto screws<br />
and slide panel assembly<br />
into place.<br />
d. Place screws (removed<br />
earlier) into the top holes and<br />
secure accessories panel<br />
assembly to handles. Do not<br />
overtighten.<br />
Remove<br />
Loosen<br />
Screws<br />
nozzles on panel. 7. Add engine oil (supplied)<br />
to engine. Refer to Engine<br />
Owners <strong>Manual</strong> supplied by<br />
engine manufacturer for correct<br />
procedure.<br />
NOTE: There will be a slight amount<br />
of oil in the engine from factory<br />
testing.<br />
3. Place handle assembly onto<br />
frame, depress the snap buttons,<br />
and slide the handle assembly<br />
onto the frame until snap buttons<br />
snap into place.<br />
NOTE: The pump on this unit is<br />
maintenance free and requires no oil,<br />
if there is a problem with the pump<br />
contact an Authorized Service Center.<br />
7- ENG A12496
OPERATING INSTRUCTIONS<br />
Compare the illustrations with your unit to familiarize yourself with the location<br />
of various controls and adjustments. Save this manual for future reference.<br />
Spray Gun<br />
Chemical<br />
Hose<br />
Quick<br />
Connect<br />
Spray Wand<br />
High<br />
<strong>Pressure</strong><br />
Hose<br />
Engine<br />
BASIC ELEMENTS OF A<br />
PRESSURE WASHER<br />
High <strong>Pressure</strong> Pump (located inside<br />
the shroud): Increases the pressure<br />
of the water supply.<br />
Engine: Drives the high pressure<br />
pump.<br />
High <strong>Pressure</strong> Hose: Carries the<br />
pressurized water from the pump to<br />
the gun and spray wand.<br />
Spray Gun: Connects with spray<br />
wand to control water flow rate,<br />
direction, and pressure.<br />
Quick Connect Spray Wand: Allows<br />
the user to quickly change out highpressure<br />
nozzles. See How To Use<br />
Spray Wand instructions in this section.<br />
Chemical Hose: Feeds cleaning<br />
agents into the pump to mix with the<br />
water. See How To Apply Chemicals/<br />
Cleaning Solvents instructions in this<br />
section.<br />
High <strong>Pressure</strong> Pump<br />
(located inside the shroud)<br />
BASIC ELEMENTS OF AN<br />
ENGINE<br />
Refer to the engine manual for<br />
location and operation of engine<br />
controls.<br />
Choke Control: Opens and closes<br />
carburetor choke valve.<br />
Starter Grip: Pulling starter grip<br />
operates recoil starter to crank<br />
engine.<br />
Fuel Valve Lever: Opens/closes<br />
connection between fuel tank and<br />
carburetor.<br />
Engine Switch: Enables and disables<br />
ignition system.<br />
PRESSURE WASHER<br />
TERMINOLOGY<br />
PSI: Pounds per Square Inch. The<br />
unit of measure for water pressure.<br />
Also used for air pressure, hydraulic<br />
pressure, etc.<br />
GPM: Gallons Per Minute. The unit of<br />
measure for the flow rate of water.<br />
A12496<br />
8- ENG
CU: Cleaning Units. GPM multiplied by<br />
PSI. GPM x PSI = CU<br />
Bypass Mode: Allows water to<br />
re-circulate within pump when the gun<br />
trigger is not pulled.<br />
Allowing the unit to<br />
run for more than<br />
two minutes without the gun trigger<br />
pulled could cause overheating and<br />
damage to the pump.<br />
Chemical Injection System: Mixes<br />
cleaners or cleaning solvents with<br />
the water to improve cleaning<br />
effectiveness.<br />
Water Supply: All pressure washers<br />
must have a source of water. The<br />
minimum requirements for a water<br />
supply are 20 PSI and 5 gallons per<br />
minute.<br />
PRESSURE WASHER<br />
OPERATING FEATURES<br />
PRESSURE ADJUSTMENTS<br />
The pressure setting is preset at the<br />
factory to achieve optimum pressure<br />
and cleaning. If you need to lower the<br />
pressure, it can be accomplished by<br />
these methods.<br />
1. Back away from the surface<br />
to be cleaned. The further away<br />
you are, the less the pressure will<br />
be on the surface to be cleaned.<br />
2. Change to the 40º nozzle -<br />
(white) this nozzle delivers a less<br />
powerful stream of water and a<br />
wider spray pattern.<br />
DO NOT attempt<br />
to increase pump<br />
pressure. A higher pressure setting<br />
than the factory set pressure may<br />
damage pump.<br />
READ AND UNDERSTAND ALL WARNINGS BEFORE STARTING UNIT<br />
When using the high pressure setting, DO NOT allow the high<br />
pressure spray to come in contact with unprotected skin, eyes,<br />
or with any pets or animals. Serious injury can occur.<br />
Your washer operates at fluid pressures and velocities high enough to penetrate<br />
human and animal flesh, which could result in amputation or other serious injury.<br />
Leaks caused by loose fittings or worn or damaged hoses can result in injection<br />
injuries. DO NOT TREAT FLUID INJECTION AS A SIMPLE CUT! See a physician<br />
immediately!<br />
NEVER fill fuel tank when engine is running or hot. Do not<br />
smoke when filling fuel tank.<br />
NEVER fill fuel tank completely. Fill tank to 1/2" below bottom of filler neck<br />
to provide space for fuel expansion. Wipe any fuel spillage from engine and<br />
equipment before starting engine.<br />
NEVER run engine indoors or in enclosed, poorly ventilated areas. Engine exhaust<br />
contains carbon monoxide, an odorless and deadly gas.<br />
DO NOT let hoses come in contact with very hot engine muffler during or<br />
immediately after use of your pressure washer. Damage to hoses from contact with<br />
hot engine surfaces will NOT be covered by warranty.<br />
NEVER pull water supply hose to move pressure washer. This<br />
could damage hose and/or pump inlet.<br />
DO NOT use hot water, use cold water only.<br />
NEVER turn water supply off while pressure washer engine is running or damage to<br />
pump will result.<br />
DO NOT stop spraying water for more than two minutes at a time. Pump operates<br />
in bypass mode when spray gun trigger is not pressed. If pump is left in bypass<br />
mode for more than two minutes internal components of the pump can be<br />
damaged.<br />
If you do not understand these precautions, please call 1-800-888-2468 to<br />
speak to a service representative for further instructions.<br />
9- ENG A12496
TO USE SPRAY WAND<br />
The nozzles for the spray wand are<br />
stored in nozzle holder on the panel<br />
assembly. Colors on the panel identify<br />
nozzle location and spray pattern. See<br />
chart to choose the correct nozzle for<br />
the job to be performed.<br />
CHANGING NOZZLES ON SPRAY<br />
WAND<br />
Risk of Flying<br />
Object could<br />
cause risk of serious injury. DO<br />
NOT attempt to change nozzles<br />
while pressure washer is running.<br />
Turn engine off before changing<br />
nozzles.<br />
1. Pull quick connect coupler back<br />
and insert nozzle.<br />
2. Release quick connect coupler<br />
and twist nozzle to make sure it<br />
is secure in coupler.<br />
Risk of Flying<br />
Object could cause<br />
risk of serious injury. Ensure nozzle<br />
is completely inserted in QC socket,<br />
and QC snap ring is fully engaged<br />
(forward) before squeezing gun<br />
trigger.<br />
Risk of injection or<br />
injury to person.<br />
Do not direct discharge stream<br />
toward persons, unprotected<br />
skin, eyes, or any pets or animals.<br />
Serious injury can occur.<br />
Nozzle Color Red Yellow White Black<br />
0º 15º 40º low pressure<br />
Spray Pattern<br />
Uses<br />
Surfaces *<br />
*<br />
powerful<br />
pinpoint for<br />
very intense<br />
cleaning<br />
Metal or<br />
concrete<br />
DO NOT use<br />
on wood<br />
intense<br />
cleaning of<br />
small areas<br />
metal,<br />
concrete, or<br />
wood<br />
covers wide<br />
areas of<br />
cleaning<br />
metal,<br />
concrete,<br />
wood, or vinyl<br />
applies<br />
cleaning<br />
solutions<br />
metal,<br />
concrete,<br />
wood, or vinyl<br />
The high pressure spray from your pressure washer is<br />
capable of causing damage to surfaces such as wood,<br />
glass, automobile paint, auto striping and trim, and delicate objects such as<br />
flowers and shrubs. Before spraying, check the item to be cleaned to assure<br />
yourself that it is strong enough to resist damage from the force of the spray.<br />
A12496<br />
10- ENG
HOW TO APPLY CHEMICALS<br />
AND CLEANING SOLVENTS<br />
Applying chemicals or cleaning<br />
solvents is a low pressure operation.<br />
NOTE: Use only soaps and chemicals<br />
designed for pressure washer use. Do<br />
not use bleach.<br />
To Apply chemicals:<br />
1. Press chemical<br />
hose onto<br />
barbed fitting<br />
located near high<br />
pressure hose<br />
connection of<br />
pump as shown.<br />
2. Place other end of chemical<br />
hose with filter on it into container<br />
holding chemical/cleaning<br />
solution. NOTE: For every 7<br />
gallons of water pumped 1 gallon<br />
of chemical/cleaning solution will<br />
be used.<br />
3. Install low pressure (black)<br />
nozzle into quick connect fitting<br />
of spray wand, see How To Use<br />
Spray Wand paragraph in this<br />
section.<br />
4. After use of chemicals, place<br />
chemical hose into container of<br />
clean water and draw clean water<br />
through chemical injection system<br />
to rinse system thoroughly. If<br />
chemicals remain in the pump<br />
it could be damaged. Pumps<br />
damaged due to chemicals will<br />
not be covered under warranty.<br />
NOTE: Chemicals and soaps will not<br />
siphon when spray wand is in the high<br />
pressure setting.<br />
Barbed Fitting<br />
STARTING<br />
Prior to starting, refer to your engine<br />
manual for proper starting procedure.<br />
1. In a well ventilated outdoor<br />
area add fresh, high quality,<br />
unleaded gasoline with a pump<br />
octane rating of 86 or higher. Do<br />
not overfill. Wipe up spilled fuel<br />
before starting the engine. Refer<br />
to Engine Owners <strong>Manual</strong> for<br />
correct procedure.<br />
2. Check engine oil level. See<br />
Engine Owners <strong>Manual</strong> for correct<br />
procedure. NOTE: There will<br />
be a slight amount of oil in the<br />
engine from factory testing.<br />
3. Verify the filter<br />
Filter Screen<br />
screen is in<br />
water inlet of<br />
pump. NOTE:<br />
Cone side<br />
faces out.<br />
4. Connect water<br />
source to pump inlet. NOTE:<br />
Water source must provide a<br />
minimum of 5 gallons per minute at<br />
20 PSI.<br />
5. Connect high pressure hose to<br />
pump outlet.<br />
Water<br />
Source<br />
High<br />
<strong>Pressure</strong><br />
Hose<br />
Hook-up<br />
6. If applying a chemical or<br />
cleaning solution, see How<br />
To Apply Chemicals/Cleaning<br />
Solvents instructions in this<br />
section.<br />
11- ENG A12496
7. Turn water source on.<br />
NOTE: Failure to do so could<br />
cause damage to the pump.<br />
8. Start engine. See Engine<br />
Owners <strong>Manual</strong> for correct<br />
procedure. NOTE: When engine<br />
rope is pulled, pressure starts<br />
building in the gun. If the engine<br />
does not start after two pulls,<br />
pull the gun trigger to relieve this<br />
pressure.<br />
9. Depress trigger on gun to<br />
start water flow. NOTE: Stand<br />
on a stable surface and grip<br />
gun/spray wand firmly with both<br />
hands. Expect the gun to kick<br />
when triggered.<br />
10. Release trigger to stop water<br />
flow.<br />
11. Adjust spray for the task being<br />
performed by changing quick<br />
connect nozzle. See How To Use<br />
Spray Wand instructions in this<br />
section.<br />
SHUTTING DOWN<br />
1. After each use, if you have<br />
applied chemicals, place chemical<br />
hose into container of clean water<br />
and draw clean water through<br />
chemical injection system to rinse<br />
system thoroughly. NOTE: Failure<br />
to do so could cause damage to<br />
the pump.<br />
2. Turn engine off. See Engine<br />
Owner’s <strong>Manual</strong>. NOTE: NEVER<br />
turn the water off with the engine<br />
running.<br />
3. Turn water source off.<br />
4. Pull trigger on spray gun to<br />
relieve any water pressure in hose<br />
or spray gun.<br />
5. See Storage section in this<br />
manual for proper storage<br />
procedures.<br />
A12496<br />
12- ENG
When performing<br />
maintenance, you<br />
may be exposed to hot surfaces,<br />
water pressure, or moving parts that<br />
can cause serious injury or death!<br />
Before performing any maintenance<br />
or repair, disconnect spark plug<br />
wire, let engine cool and release<br />
all water pressure. The engine<br />
contains flammable fuel. DO NOT<br />
smoke or work near open flames<br />
while performing maintenance.<br />
To ensure efficient operation and<br />
longer life of your pressure washer, a<br />
routine maintenance schedule should<br />
be prepared and followed. If the<br />
pressure washer is used in unusual<br />
conditions, such as high-temperatures<br />
or dusty conditions, more frequent<br />
maintenance checks will be required.<br />
ENGINE<br />
Consult the Engine Owners<br />
<strong>Manual</strong> for the manufacturer's<br />
recommendations for any and all<br />
maintenance. Consult the Engine<br />
Owners <strong>Manual</strong> for the manufacturer's<br />
recommendations for any and<br />
all maintenance. NOTE: The frame is<br />
equipped with an oil drain hole to help<br />
make changing the engine oil easier.<br />
PUMP<br />
The pump on this unit is maintenance<br />
free and requires no oil, if there is a<br />
problem with the pump contact an<br />
Authorized Service Center.<br />
NOZZLE CLEANING<br />
If the nozzle becomes clogged<br />
with foreign materials, such as dirt,<br />
excessive pressure may develop. If<br />
the nozzle becomes partially clogged<br />
or restricted, the pump pressure will<br />
pulsate. Clean the nozzle immediately<br />
using the nozzle kit supplied and the<br />
following instructions:<br />
1. Shut off the pressure washer and<br />
turn off the water supply.<br />
2. Pull trigger on gun handle to<br />
relieve any water pressure.<br />
MAINTENANCE<br />
3. Disconnect the spray wand from<br />
the gun.<br />
4. Remove the high-pressure nozzle<br />
from the spray wand. Remove<br />
any obstructions with the nozzle<br />
cleaning tool provided and<br />
backflush with clean water.<br />
5. Direct water supply into spray<br />
wand to backflush loosened<br />
particles for 30 seconds.<br />
6. Reassemble the nozzle to the<br />
wand.<br />
7. Reconnect spray wand to gun<br />
and turn on water supply.<br />
8. Start pressure washer and place<br />
spray wand into high pressure<br />
setting to test.<br />
HOW TO CLEAN THE WATER<br />
INLET FILTER<br />
This screen filter should be checked<br />
periodically and cleaned if necessary.<br />
1. Remove filter<br />
Filter Screen<br />
by grasping<br />
end and<br />
removing it<br />
from water<br />
inlet of pump<br />
as shown.<br />
2. Clean filter by flushing it with<br />
water on both sides.<br />
3. Re-insert filter into water inlet of<br />
pump. NOTE: Cone side faces out.<br />
NOTE: Do not operate pressure<br />
washer without filter properly installed.<br />
13- ENG A12496
STORAGE<br />
ENGINE<br />
Consult the Engine Owners <strong>Manual</strong> for<br />
the manufacturer's recommendations<br />
for storage.<br />
PUMP<br />
The manufacturer recommends using<br />
a pump protector/winterizer, such<br />
as, when storing the unit for more<br />
than 30 days and/or when freezing<br />
temperatures are expected. If a pump<br />
protector/winterizer is not available,<br />
*RV antifreeze needs to be run through<br />
the pump as outlined in the steps<br />
below.<br />
NOTE: Using a pump protector/winterizer<br />
or *RV antifreeze is to provide proper<br />
lubrication to the internal seals of the<br />
pump regardless of temperature or<br />
environment.<br />
1. Obtain a funnel, six ounces of *RV<br />
antifreeze, and 16 - 36 inches of<br />
garden hose with a male hose<br />
connector attached to one end.<br />
Use only RV<br />
antifreeze. Any<br />
other antifreeze is corrosive and<br />
can damage pump.<br />
2. Disconnect spark plug wire.<br />
3. Connect length of garden hose to<br />
water inlet of pump.<br />
4. Add *RV antifreeze to hose as<br />
shown.<br />
5. Pull engine starter rope slowly<br />
several times until antifreeze<br />
comes out of high pressure hose<br />
connection of pump.<br />
6. Remove garden hose from water<br />
inlet of pump.<br />
7. Reconnect spark plug wire.<br />
*Windshield washer fluid may also be<br />
used<br />
PRESSURE WASHER<br />
1. Drain all water from high pressure<br />
hose, coil it, and store it in cradle<br />
of the pressure washer handle.<br />
2. Drain all water from spray gun<br />
and wand by holding spray gun in<br />
a vertical position with nozzle end<br />
pointing down and squeezing<br />
trigger. Store in gun holder.<br />
3. Store chemical hose so it is<br />
protected from damage.<br />
A12496<br />
14- ENG
PROBLEM<br />
Engine will<br />
not start (see<br />
Engine <strong>Manual</strong><br />
for further<br />
engine<br />
troubleshooting)<br />
No fuel.<br />
TROUBLE SHOOTING GUIDE<br />
CAUSE<br />
<strong>Pressure</strong> builds up after two pulls<br />
on the recoil starter or after initial<br />
use.<br />
Choke lever in the “No Choke”<br />
position.<br />
Spark plug wire not attached.<br />
Engine ON/OFF switch in OFF<br />
position.<br />
Choke lever in the “Choke”<br />
position on a “hot” engine or an<br />
engine that has been exposed to<br />
thermal heat for a long period of<br />
time.<br />
Fuel valve closed<br />
Add Fuel.<br />
CORRECTION<br />
Squeeze gun trigger to relieve<br />
pressure.<br />
Move choke to the “Choke”<br />
position.<br />
Attach spark plug wire.<br />
Place engine ON/OFF switch in<br />
ON position.<br />
Move choke to the “No Choke”<br />
position.<br />
Move the fuel valve lever to the<br />
“Open” position.<br />
No or low<br />
pressure<br />
(initial use)<br />
Spray wand not in high pressure.<br />
See How to Use Spray Wand<br />
instructions in the <strong>Operation</strong><br />
Section.<br />
Low water supply. Water supply must be at least 5<br />
GPM @ 20 PSI.<br />
Leak at high pressure hose fitting. Repair leak. Apply sealant tape<br />
if necessary.<br />
Nozzle obstructed.<br />
See Nozzle Cleaning instructions<br />
in the Maintenance section.<br />
Water filter screen clogged.<br />
Remove and clean filter.<br />
<strong>Air</strong> in hose.<br />
Choke lever in the “Choke” position.<br />
High pressure hose is too long.<br />
Turn off the engine, then the<br />
water source. Disconnect the<br />
water source from the pump inlet<br />
and turn the water source on<br />
to remove all air from the hose.<br />
When there is a steady stream<br />
of water present, turn water<br />
source off. Re-connect water<br />
source to pump inlet and turn on<br />
water source. Squeeze trigger to<br />
remove remaining air<br />
Move choke to the “No Choke”<br />
position.<br />
Use high pressure hose under<br />
100 feet.<br />
15- ENG A12496
PROBLEM CAUSE CORRECTION<br />
Will not draw<br />
chemicals<br />
Spray wand not in low pressure.<br />
Chemical filter clogged.<br />
Chemical screen not in cleaning<br />
solution.<br />
See How to Use Spray Wand<br />
paragraph in the <strong>Operation</strong><br />
Section.<br />
Clean filter.<br />
Make sure end of chemical hose<br />
is fully submerged into cleaning<br />
solution.<br />
No or low<br />
pressure<br />
(after period<br />
of normal<br />
use)<br />
Water leaking<br />
at gun/<br />
spray wand<br />
connection<br />
Water<br />
leaking at<br />
pump<br />
Pump<br />
Pulsates<br />
Chemical too thick.<br />
<strong>Pressure</strong> hose is too long<br />
Chemical build up in chemical<br />
injector.<br />
Worn seal or packing<br />
Worn or obstructed valves.<br />
Worn unloader piston.<br />
Worn or broken o-ring.<br />
Loose hose connection.<br />
Loose connections.<br />
Piston packings worn.<br />
Worn or broken o-rings.<br />
Pump head or tubes damaged<br />
from freezing.<br />
Nozzle obstructed.<br />
Dilute chemical. Chemical should<br />
be the same consistency as water.<br />
Lengthen water supply hose<br />
instead of high pressure hose.<br />
Have parts cleaned or replaced<br />
by AWSC.<br />
Have replaced by AWSC.<br />
Have replaced by AWSC.<br />
Have replaced by AWSC.<br />
Check and replace.<br />
Tighten.<br />
Tighten.<br />
Have replaced by AWSC.<br />
Have replaced by AWSC.<br />
Have replaced by AWSC.<br />
See Nozzle Cleaning paragraph in<br />
the Maintenance section for the<br />
correct procedure.<br />
A12496<br />
16- ENG
NOTES<br />
17- ENG A12496
LIMITED WARRANTY<br />
<strong>DeVilbiss</strong> <strong>Air</strong> <strong>Power</strong> <strong>Company</strong> warrants to the original purchaser who uses the product in a<br />
consumer application (personal, residential or household usage) that all products covered under this<br />
warranty are free from defects in material and workmanship for one year from the date of purchase.<br />
All products covered by this limited warranty which are used in commercial applications (i.e., income<br />
producing) are warranted to be free of defects in material and workmanship for 90 days from the date<br />
of original purchase. Products covered under this warranty include air compressors, air tools, service<br />
parts, pressure washers, and generators.<br />
<strong>DeVilbiss</strong> <strong>Air</strong> <strong>Power</strong> <strong>Company</strong> will repair or replace, at <strong>DeVilbiss</strong>' option, products or components<br />
which have failed within the warranty period. Service will be scheduled according to the normal work<br />
flow and business hours at the service center location, and the availability of replacement parts. All<br />
decisions of <strong>DeVilbiss</strong> <strong>Air</strong> <strong>Power</strong> <strong>Company</strong> with regard to this limited warranty shall be final.<br />
This warranty gives you specific legal rights, and you may also have other rights which vary from state<br />
to state.<br />
RESPONSIBILITY OF ORIGINAL PURCHASER (initial User):<br />
• To process a warranty claim on this product, DO NOT return it to the retailer. The product must be<br />
evaluated by an Authorized Warranty Service Center. For the location of the nearest Authorized<br />
Warranty Service Center call 1-800-888-2468, 24 hours a day, 7 days a week or visit our web site<br />
@ devap.com.<br />
• Retain original cash register sales receipt as proof of purchase for warranty work.<br />
• Use reasonable care in the operation and maintenance of the product as described in the Owners<br />
<strong>Manual</strong>(s).<br />
• Deliver or ship the product to the nearest Authorized Warranty Service Center. Freight costs, if any,<br />
must be paid by the purchaser.<br />
• <strong>Air</strong> compressors with 60 and 80 gallon tanks will be inspected at the site of installation. Contact<br />
the nearest Authorized Warranty Service Center that provides on-site service calls for service call<br />
arrangements.<br />
• If the purchaser does not receive satisfactory results from the Authorized Warranty Service Center,<br />
the purchaser should contact <strong>DeVilbiss</strong> <strong>Air</strong> <strong>Power</strong> <strong>Company</strong>.<br />
THIS WARRANTY DOES NOT COVER:<br />
• Merchandise sold as reconditioned, used as rental equipment, or floor or display models.<br />
• Merchandise that has become damaged or inoperative because of ordinary wear, misuse*, cold,<br />
heat, rain, excessive humidity, freeze damage, use of improper chemicals, negligence, accident,<br />
failure to operate the product in accordance with the instructions provided in the Owners <strong>Manual</strong>(s)<br />
supplied with the product, improper maintenance, the use of accessories or attachments not<br />
recommended by <strong>DeVilbiss</strong> <strong>Air</strong> <strong>Power</strong> <strong>Company</strong>, or unauthorized repair or alterations.<br />
* An air compressor that pumps air more than the recommended duty cycle during a one hour<br />
period may be considered misuse.<br />
• Repair and transportation costs of merchandise determined not to be defective.<br />
• Costs associated with assembly, required oil, adjustments or other installation and start-up costs.<br />
• Expendable parts or accessories supplied with the product which are expected to become<br />
inoperative or unuseable after a reasonable period of use, including but not limited to sanding disks<br />
or pads, saw and shear blades, grinding stones, springs, chisels, nozzles, o-rings, air jets, washers<br />
and similar accessories.<br />
• Merchandise sold by <strong>DeVilbiss</strong> <strong>Air</strong> <strong>Power</strong> <strong>Company</strong> which has been manufactured by and identified<br />
as the product of another company, such as gasoline engines. The product manufacturer's<br />
warranty, if any, will apply.<br />
• ANY INCIDENTAL, INDIRECT OR CONSEQUENTIAL LOSS, DAMAGE, OR EXPENSE THAT<br />
MAY RESULT FROM ANY DEFECT, FAILURE OR MALFUNCTION OF THE PRODUCT IS<br />
NOT COVERED BY THIS WARRANTY. Some states do not allow the exclusion or limitation of<br />
incidental or consequential damages, so the above limitation or exclusion may not apply to you.<br />
• IMPLIED WARRANTIES, INCLUDING THOSE OF MERCHANTABILITY OR FITNESS FOR<br />
A PARTICULAR PURPOSE, ARE LIMITED TO ONE YEAR FROM THE DATE OF ORIGINAL<br />
PURCHASE. Some states do not allow limitations on how long an implied warranty lasts, so the<br />
above limitations may not apply to you.<br />
213 Industrial Drive • Jackson, TN 38301-9615<br />
Telephone: 1-800-888-2468<br />
FAX: 1-800-888-9036<br />
A12496<br />
18- ENG