Physics Ray Diagram Flipbook Take Home Test 2 - thecubscientist ...
Physics Ray Diagram Flipbook Take Home Test 2 - thecubscientist ...
Physics Ray Diagram Flipbook Take Home Test 2 - thecubscientist ...

Create successful ePaper yourself
Turn your PDF publications into a flip-book with our unique Google optimized e-Paper software.
<strong>Physics</strong><br />
<strong>Ray</strong> <strong>Diagram</strong> <strong>Flipbook</strong><br />
<strong>Take</strong> <strong>Home</strong> <strong>Test</strong> 2<br />
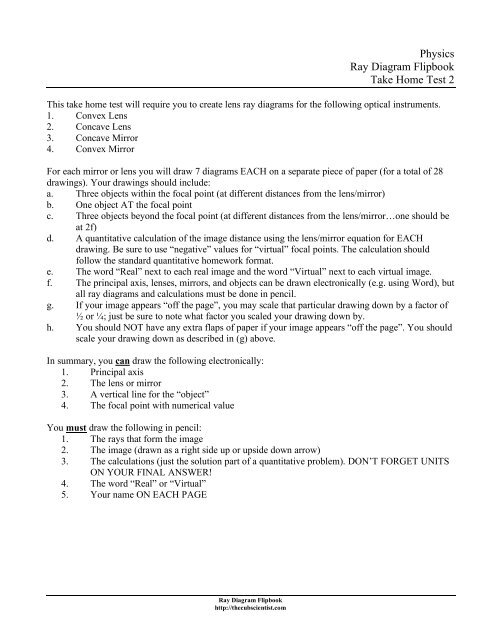
This take home test will require you to create lens ray diagrams for the following optical instruments.<br />
1. Convex Lens<br />
2. Concave Lens<br />
3. Concave Mirror<br />
4. Convex Mirror<br />
For each mirror or lens you will draw 7 diagrams EACH on a separate piece of paper (for a total of 28<br />
drawings). Your drawings should include:<br />
a. Three objects within the focal point (at different distances from the lens/mirror)<br />
b. One object AT the focal point<br />
c. Three objects beyond the focal point (at different distances from the lens/mirror…one should be<br />
at 2f)<br />
d. A quantitative calculation of the image distance using the lens/mirror equation for EACH<br />
drawing. Be sure to use “negative” values for “virtual” focal points. The calculation should<br />
follow the standard quantitative homework format.<br />
e. The word “Real” next to each real image and the word “Virtual” next to each virtual image.<br />
f. The principal axis, lenses, mirrors, and objects can be drawn electronically (e.g. using Word), but<br />
all ray diagrams and calculations must be done in pencil.<br />
g. If your image appears “off the page”, you may scale that particular drawing down by a factor of<br />
½ or ¼; just be sure to note what factor you scaled your drawing down by.<br />
h. You should NOT have any extra flaps of paper if your image appears “off the page”. You should<br />
scale your drawing down as described in (g) above.<br />
In summary, you can draw the following electronically:<br />
1. Principal axis<br />
2. The lens or mirror<br />
3. A vertical line for the “object”<br />
4. The focal point with numerical value<br />
You must draw the following in pencil:<br />
1. The rays that form the image<br />
2. The image (drawn as a right side up or upside down arrow)<br />
3. The calculations (just the solution part of a quantitative problem). DON’T FORGET UNITS<br />
ON YOUR FINAL ANSWER!<br />
4. The word “Real” or “Virtual”<br />
5. Your name ON EACH PAGE<br />
<strong>Ray</strong> <strong>Diagram</strong> <strong>Flipbook</strong><br />
http://<strong>thecubscientist</strong>.com
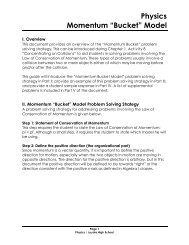
The diagram below shows an example of a convex lens ray diagram setup. This diagram shows the<br />
possible placement of the 7 objects that you will draw. Note that this diagram shows all 7 objects on the<br />
same diagram, you will only draw ONE object per diagram. THIS DIAGRAM IS FOR<br />
ILLUSTRATIVE PURPOSES ONLY. YOU WILL NOT DRAW SEVEN ARROWS ON ONE<br />
SHEET.<br />
Three objects<br />
outside focal point<br />
One object at<br />
the focal point<br />
Three objects<br />
within focal point<br />
2f<br />
f<br />
f<br />
One object should<br />
be drawn at 2f<br />
<strong>Ray</strong> <strong>Diagram</strong> <strong>Flipbook</strong><br />
http://<strong>thecubscientist</strong>.com