Subwoofer REL TZero instrucciones - Novomusica
Subwoofer REL TZero instrucciones - Novomusica
Subwoofer REL TZero instrucciones - Novomusica

You also want an ePaper? Increase the reach of your titles
YUMPU automatically turns print PDFs into web optimized ePapers that Google loves.
O<br />
Operating Instructions for the<br />
TZERO<br />
Sub-Bass<br />
System
Important Safeguards<br />
1 Read all of these instructions.<br />
2 Save these instructions for future use.<br />
3 Heed all warnings.<br />
4 Follow all instructions.<br />
5 Unplug from the wall socket before cleaning. Clean only with a dry cloth.<br />
6 Keep away from water or other liquids. Do not rest drinks, vases or other liquid-filled items on the unit.<br />
7 Do not place on a stand or table; it may fall causing injury to a child or adult and damage to the unit.<br />
8 Do not install near any heat sources such as radiators, heat registers, stoves or other apparatus<br />
(including amplifiers) that produce heat.<br />
9 The unit should only be operated from the power source indicated on the panel of the amplifier.<br />
10 Do not defeat the safety purpose of the grounding-type plug. A grounding type plug has two blades<br />
and a third grounding prong. The third prong is provided for your safety. If the provided plug does not<br />
fit into your outlet, consult and electrician for replacement of the obsolete outlet.<br />
11 Only use the power cord supplied.<br />
12 Do not allow anything to rest on the power cord. Position the power cord such that it cannot be walked on.<br />
13 For added protection during a lightning storm, or when not in use for long periods of time, unplug it<br />
from the wall socket.<br />
14 Do not attempt to service the unit yourself, as removing the amplifier may expose you to dangerous<br />
voltages. Refer all servicing to your dealer.<br />
15 Unplug the unit from the wall socket and refer servicing to your dealer under the following conditions:<br />
a When the power cord or plug is damaged.<br />
b If liquid has been spilled onto the unit.<br />
c If the unit does not operate properly by following the operating instructions.<br />
d If the unit has been dropped and damaged.<br />
e When the unit exhibits a drastic change in performance.<br />
1
Warning<br />
This item is heavy. To avoid risk of injury, take care when handling.<br />
Design Safety<br />
This apparatus is supplied with a detachable mains cord. A 2A fuse is fitted in the socket. Should the fuse<br />
need to be replaced use a similar rated fuse approved to ASTA or BSI 362 standards. Do not use without the<br />
fuse cover in place. Replacement fuse covers are available from your distributor.<br />
Important Information<br />
The lightning flash with arrowhead symbol within an equilateral triangle is intended to alert<br />
the user to the presence of un-insulated dangerous voltage within the product’s enclosure<br />
that may be of sufficient magnitude to constitute a risk of electric shock to persons.<br />
The exclamation point within an equilateral triangle is intended to alert the user to the<br />
presence of important operating and maintenance (servicing) instructions in the literature<br />
accompanying the appliance.<br />
2
Welcome to the <strong>REL</strong> Family<br />
Thank you for purchasing a <strong>REL</strong> TZERO Sub-Bass System. The TZERO is the result of a state-of-the-art collaboration<br />
between our American design and engineering team and our British production team.<br />
TZERO is conceived as the most cost effective high end product we know how to build. We have spared none<br />
of the materials and finishing techniques our larger designs are noted for. Many competing products are<br />
clearly the result of cost engineering, however, TZERO is a pure high end product in design and execution.<br />
If, like many, you are surprised and delighted by the quality and “suddenness” of bass as rendered by TZERO,<br />
know that this is the result of a careful, painstaking iterative process of the sort that so rarely makes it into<br />
production at anything like these prices.<br />
Many of the sonic virtues – speed, warmth and slam – embodied in TZERO are the direct result of<br />
mechanical and acoustic advancements. In particular, we have utilized thick slabs of dense, acousticallyinert<br />
MDF, masterfully bonded to create an exceptionally rigid, near-monocoque cabinet. Additionally, the<br />
aluminum feet are milled from solid billet and weigh an incredible amount. We thoroughly tested and<br />
were able to clearly discern the benefit of having a solid, high mass exit path for deleterious vibration;<br />
vibration that would otherwise slow and blur the clarity of bass lines. Make a structure inert and quieter<br />
and more of the music emerges.<br />
A brief word about the styling, fit, and finish. Each TZERO receives nine coats of lacquer, all of which require<br />
hand sanding. The final coat is then turned by hand on a large, industrial rouging wheel using jewelry buffing<br />
compound. Finally, the deep, wet gloss is achieved by hand polishing using micro fiber cloth and expensive<br />
automotive waxes. All exposed bolts used to attach the rear panel to the TZERO cabinet are polished T-304<br />
stainless steel allen head designs. This extra cost is undergone to ensure that even in humid markets <strong>REL</strong>s<br />
will not oxidize or degrade in appearance. Each badge is milled from solid billet aluminum and is a full<br />
2.5mm thick even though we choose to only reveal 1mm above the surface of the cabinet. Much like the<br />
underlying quality of all <strong>REL</strong>s, more lies beneath the surface than is evident to the eye.<br />
3
Overview<br />
TZERO Sub-Bass System<br />
Many or most loudspeakers emphasize the mid-bass. This is the range from 50 to 90 Hz. We at <strong>REL</strong> believe<br />
this is an incomplete approach and that loudspeakers need to be extended in the lower frequencies for true<br />
full range reproduction. All of our designs are true Sub-Bass Systems, meaning they are designed to reproduce<br />
very low frequencies (below 30 Hz) that are felt rather than heard. This is because we understand that music<br />
is full-range, as are sound effects on movies, and we intend for our products to reproduce all of these<br />
sounds, not just a narrow band.<br />
TZERO is equipped to allow you to take full advantage of Dolby Digital AC3, DTS, MPEG 2 and any other<br />
digital sound format that includes a dedicated Low Frequency Effects (LFE) channel.<br />
The dedicated LFE input meets the tough specification laid down for digital 3/2.1 channels, usually known<br />
as 5.1. The output is nominally flat from 35 Hz – 90 Hz. It has a dedicated input level control which enables<br />
users to set the LFE level independently of the processor. This is important because not all processors offer<br />
control over this significant parameter. The LFE channel is frequently output at 10 dB higher levels than the<br />
other channels.<br />
The TZERO also has a high-level (speaker level) input with dedicated input level control. Uniquely, both the<br />
speaker level and the LFE input can be used simultaneously. This means you may set it up for the best<br />
possible 2-channel performance sound with your CDs or other stereo signals and instantly revert to using<br />
the Sub-Bass System as the dedicated LFE component when watching movies. This is a feature of real<br />
benefit if you wish to play music in stereo mode in the purist audiophile way and also in <strong>REL</strong> Theater<br />
Reference mode with no switching necessary. By connecting BOTH High Level and .1 concurrently and<br />
setting your processor to “Large” or “Full Range”, the best possible performance will be obtained. Consult<br />
the owner’s manual of your loudspeakers or consult with your dealer before setting to large as a few<br />
speakers cannot handle the bass that is then directed through to the main speakers.<br />
4
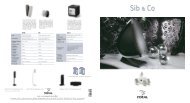
<strong>REL</strong> TZERO Rear Panel Connection Legend<br />
1<br />
2<br />
1<br />
2<br />
3<br />
8<br />
3<br />
9<br />
7<br />
10<br />
8<br />
9<br />
4 5 6 7<br />
5
1 Volume Control for HI/LOW INPUT: Use to adjust output when using either HIGH-LEVEL or LOW-LEVEL<br />
input. Do not use both simultaneously.<br />
2 Volume Control for .1/LFE INPUT: Use to adjust output level when using .1/LFE input from a 5.1 amplifier<br />
or processor.<br />
3 Crossover Control: Used to select crossover frequency. Variable between 30Hz and 120Hz.<br />
4 LOW-LEVEL INPUT: Used to connect LOW-LEVEL to the output of a preamplifier, integrated<br />
amplifier or receiver ONLY when HIGH-LEVEL INPUT cannot be properly connected. (For home<br />
cinema, use.1/LFE INPUT).<br />
5 .1/LFE INPUT: Used to connect to the .1/LFE output from a 5.1 amplifier of processor. Should be<br />
used in conjunction with <strong>REL</strong> HIGH-LEVEL connection for the ultimate theater experience.<br />
6 Phase Switch: Used to set phase 0-180 degrees.<br />
7 Power Mode Switch: Used to set power mode. Set to “ENERGY SAVER” to enable automatic standby<br />
function or to “ALWAYS ON” to disable standby function.<br />
8 HIGH-LEVEL INPUT (Neutrik® Speakon® Socket): Use to connect HIGH-LEVEL to the main<br />
front amplifier speaker terminals.<br />
9 Power ON/OFF Switch: Use to turn unit on or off.<br />
10 IEC Mains Socket: Fused mains (AC) input socket that accepts a detachable power cord.<br />
6
Connecting Up<br />
Always switch your system off before disconnecting any wires.<br />
ALWAYS connect using the <strong>REL</strong> HIGH-LEVEL input, unless your system simply cannot accommodate this.<br />
While rare, a few esoteric systems, such as those that deliver a pure digital signal to active speakers, preclude<br />
this possibility. To increase the versatility of connecting up, the TZERO has three separate inputs: A Neutrik<br />
Speakon socket and two phono sockets. This is to facilitate use with both two-channel stereo systems and AV<br />
surround sound systems.<br />
The HIGH-LEVEL, unbalanced, dual-channel (stereo) input is via a Neutrik Speakon connector which is connected<br />
to the power amplifier’s left and right channel speaker terminals. This has the advantage of ensuring that the<br />
<strong>REL</strong> receives exactly the same signal as the main speakers. This means that the character of the bass from the<br />
main system is carried forward into the sub-bass. This is a very important point and together with the <strong>REL</strong>’s<br />
Active Bass Controller (ABC) ensures far superior system integration of the sub-bass with the main system.<br />
The LOW-LEVEL input is via a phono jack that connects to either the .1/LFE output of a home cinema<br />
amplifier/processor or to the output of a stereo preamplifier.<br />
HIGH-LEVEL and .1/LFE inputs can be used simultaneously. The benefits are two-fold when used with a<br />
home cinema system. The .1 Input reproduces the .1/LFE channel and the HIGH-LEVEL connection underpins<br />
the main front speakers. The main front speakers should be set to the “large” option on the processor. See<br />
“Home Cinema Applications” for more information.<br />
Connecting to the Power Amplifier Using the Speakon HIGH-LEVEL INPUT<br />
To engage the Neutrik Speakon plug, insert fully into socket and rotate clockwise until locked.<br />
To remove the Neutrik Speakon plug, grip body of plug, place thumb on chrome lever, move lever backwards,<br />
rotate plug anticlockwise quarter turn and withdraw.<br />
The HIGH-LEVEL input is designed to accept the stereo (two-channel) signals from the speaker terminals of<br />
your receiver, integrated amplifier or basic amplifier. This has the advantage of ensuring that your subwoofer<br />
receives exactly the same signal as the main speakers, which means that the character of the bass from the<br />
7
main system is carried forward into the Sub-Bass System. This is a very important point and together with<br />
<strong>REL</strong>’s Natural RollOff circuitry, ensures far superior system integration of the Sub-Bass System with the<br />
main system.<br />
HIGH-LEVEL INPUT: Connections should be made to the same binding post on main amplifier as the main<br />
speakers. Red to amplifier main right speaker red terminal, yellow to amplifier main left speaker red terminal<br />
and black to amplifier main speaker black terminal, right or left but not both. Plug the Neutrik Speakon plug<br />
into the HIGH-LEVEL Speakon socket. Note: This connection does not draw power from the power amplifier<br />
and, yes, your <strong>REL</strong> is a powered sub bass system. However, by deriving its signal from the main power<br />
amplifier, better sound quality is achieved.<br />
.1/LFE INPUT: This requires a phono-to-phono cable and is a dedicated true .1 channel. This circuit<br />
therefore eliminates the normal Natural RollOff Crossover and passes the .1 LOW-LEVEL signal through<br />
with only the required 120Hz fourth-order filter.<br />
LOW-LEVEL INPUT: This single channel phono input allows for conventional connection to a preamplifier<br />
and should be used in the rare event that a HIGH-LEVEL connection proves incompatible. Plug one end of<br />
a single phono-phono cable into the LOW-LEVEL input jack of the <strong>REL</strong> and the other end into either the<br />
left or right channel output of your preamplifier. Because much sub-50Hz bass information is mono, there<br />
is little need to connect both left and right channels. Should your system require this style of connection<br />
– HIGH-LEVEL is preferred – additional performance is available by purchasing a second, matching <strong>REL</strong> and<br />
running each as separate stereo subs.<br />
PHASE SWITCH – Used to set phase<br />
Position 0 / HIGH-LEVEL, LOW-LEVEL or LFE: 0 degrees phase<br />
Position 180 / HIGH-LEVEL, LOW-LEVEL or LFE: 180 degrees phase<br />
PHASE SELECTION AFFECTS BOTH HIGH- AND LOW-LEVEL INPUTS<br />
Crossover is always engaged for HIGH-LEVEL INPUT. The .1/LFE signal does not pass through the<br />
crossover circuit.<br />
8
<strong>REL</strong> Set-Up Made Simple<br />
<strong>REL</strong> products are not traditional subwoofers, but are true Sub-Bass Systems. A <strong>REL</strong> is designed to augment<br />
the performance of “full range” speaker systems in order to provide, in certain cases, linear response below<br />
12 Hz. Therefore, for the moment, set aside everything you’ve been taught about subwoofers and how they<br />
are integrated into a stereo or home cinema system. The set-up and positioning of <strong>REL</strong> Sub-Bass Systems<br />
differs from that of conventional subwoofers. A <strong>REL</strong> will take advantage of physics and room acoustics to<br />
provide deep pressurization as no traditional subwoofer can. It is important that you bring to the set-up<br />
process a willingness to do things a little differently in order to obtain these superior results. The end result<br />
of your labors will be an utterly seamless integration of true deep bass to a sound system, regardless of the<br />
main speakers’ low bass capability.<br />
Basic set-up should take no more than ten to fifteen minutes to accomplish once connected.<br />
Before You Begin<br />
1 It is helpful to know that you will almost always connect the <strong>REL</strong> to the input on the rear panel labeled<br />
“HIGH-LEVEL INPUT.” This connection is made using the supplied 34’, 10” (10 meters) cable, the bare<br />
leads of which connect to the speaker output terminals of the power amplifier. The easy and foolproof<br />
connection at the <strong>REL</strong> is done with a Neutrik Speakon connector. The purpose of connecting to the<br />
speaker output terminals is one of the unique secrets of <strong>REL</strong>’s success. By connecting to the high-level<br />
input on the <strong>REL</strong> from the amplifier, you build forward the sonic signature of your main system, including<br />
the tonal balance and timing cues of the entire electronics chain. In this way, the <strong>REL</strong> is fed the exact<br />
signal that is fed to the main speakers.<br />
2 When possible, the <strong>REL</strong> should be placed in one of the corners behind the speakers. Remember, we are<br />
dealing with true LOW bass pressurization with <strong>REL</strong>s. Low bass pressurization below 40Hz is best derived<br />
from corner placement, where the most linear and efficient low bass can be produced.<br />
Connecting and Setting Up<br />
HIGH-LEVEL connection, using the enclosed cable with the Neutrik Speakon connector, is always the first<br />
choice. This connection can be made without affecting the performance of the amplifier because the <strong>REL</strong>’s<br />
amplifier input impedance is 150,000 ohms, in effect not producing any additional demand whatsoever on<br />
the rest of your system.<br />
9
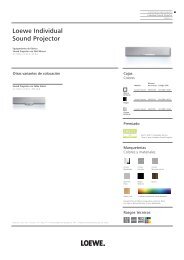
• The standard HIGH-LEVEL hook up procedure is: attach the red wire to the amplifier’s right positive<br />
speaker output terminal; attach the yellow wire to the amplifier’s left positive speaker output terminal;<br />
attach the black wire to whichever of the amplifier’s ground output terminals is convenient; plug the<br />
Speakon connector into the Sub-Bass System’s HIGH-LEVEL input.<br />
Supplied Neutrik Speakon HIGH-LEVEL Interconnect<br />
Yellow<br />
Black<br />
Red<br />
HIGH-LEVEL Input<br />
Release Lever<br />
+ L – + R –<br />
Amplifier Main Speaker Outputs<br />
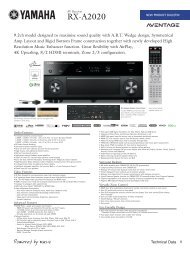
• For differential (i.e. fully balanced) amplifiers using one <strong>REL</strong>, simply use the standard connecting scheme<br />
with the exception of connecting the black wire to chassis ground (i.e. a metal bolt or screw, preferably<br />
not painted or anodized, on the chassis of the power amp or receiver), not to a negative speaker<br />
terminal, and then connecting into the HIGH-LEVEL input on the <strong>REL</strong>. Please contact your dealer should<br />
there be any questions concerning this or any other hookup procedure.<br />
Supplied Neutrik Speakon HIGH-LEVEL Interconnect<br />
Yellow<br />
Red<br />
Black<br />
+<br />
Chassis Screw<br />
+ L – + R –<br />
Amplifier Main Speaker Outputs<br />
NOTE: The TZERO is equipped with internal circuitry to allow seamless connection to Class-D (digital) main<br />
amplifiers. If connecting to a Class-D amplifier, follow the above connection procedure for differential<br />
amplifiers.<br />
10
• If connecting two <strong>REL</strong>s in a stereo configuration, connect the black wire of each <strong>REL</strong> to the negative speaker<br />
terminal of the corresponding amplifier channel; twist together the red and yellow wires of each <strong>REL</strong><br />
separately and connect each pair to the positive speaker terminal of the corresponding amplifier channel.<br />
Supplied Neutrik Speakon HIGH-LEVEL Interconnect<br />
Left Sub<br />
Yellow<br />
Red<br />
Yellow<br />
Red<br />
Black<br />
Supplied Neutrik Speakon HIGH-LEVEL Interconnect<br />
Black<br />
Right Sub<br />
+ L – + R –<br />
Amplifier Main Speaker Outputs<br />
• If connecting a single <strong>REL</strong> as a dedicated center channel sub, connect the black wire of the <strong>REL</strong> to the<br />
negative center channel speaker terminal; twist together the red and yellow wires and connect this pair<br />
to the positive center channel speaker terminal.<br />
Supplied Neutrik Speakon HIGH-LEVEL Interconnect<br />
Yellow<br />
Red<br />
Black<br />
+ C –<br />
Amplifier Main Speaker Outputs<br />
11
• If connecting a <strong>REL</strong> as a dedicated rear channel sub, connect the black wire of the <strong>REL</strong> to either the left<br />
rear or right rear negative speaker terminal; connect the yellow wire to the left rear positive speaker<br />
terminal; connect the red wire to the right rear positive speaker terminal.<br />
Supplied Neutrik Speakon HIGH-LEVEL Interconnect<br />
Yellow<br />
Black<br />
Red<br />
+ RL – + RR –<br />
Amplifier Main Speaker Outputs<br />
LOW-LEVEL connection (via phono connector) is always an option if HIGH-LEVEL connection is not possible.<br />
When connecting to the LOW-LEVEL inputs in a system in which HIGH-LEVEL connection is not possible,<br />
such as if using internally-amplified speakers, connect a single phono cable between the LOW-LEVEL input<br />
jack of the <strong>REL</strong> and either the left or right channel output of your preamplifier. Because virtually all sub-<br />
50Hz bass information is mono, there is no need to connect both left and right channels.<br />
When connecting to a home cinema system where a .1/LFE channel output is present, connect a single<br />
phono cable between the sub output of the processor/receiver and the .1/LFE input jack on the <strong>REL</strong>.<br />
Positioning: The optimal position for a <strong>REL</strong> is in one of the corners behind the main speakers. This position<br />
provides 9 dB of acoustic amplification and allows for the most linear true low bass wave launch, owing to<br />
the ability to tune the <strong>REL</strong> to the longest distance in the room in order to produce the longest, therefore<br />
lowest, bass waves.<br />
The Process: To begin the set-up process, choose a piece of music that has a repetitive bass line that is very<br />
low in frequency. We suggest track four from the soundtrack to Sneakers (Columbia CK 53146). This has a<br />
repetitive bass drum throughout that gives you plenty of time to move the woofer around, but more<br />
importantly, the venue was quite large for this recording, and therefore it has a very deep and large-scale<br />
bass signature. This type of track is perfect for the set-up process and should be played at the highest<br />
reasonable level expected for system playback.<br />
12
Working with a partner, one in the listening position and one at the <strong>REL</strong> manipulating the controls, is the<br />
most effective and efficient way to set up the <strong>REL</strong>. If working alone, the initial steps in the set-up can be very<br />
effectively carried out from the location of the <strong>REL</strong>. Trying to ignore all other music in the track, listen for the<br />
bass drum and its effect on the listening room.<br />
Phase Orientation: Once in the corner phase can be adjusted. This may be the single most critical step, and<br />
because it really is quite simple, it is often over-thought. Keep in mind; the right phase is whichever position<br />
is the loudest or fullest. While playing music with true low bass, adjust the crossover to a point where the<br />
<strong>REL</strong> and the speaker are sure to share frequencies (about halfway up, or at 12 o’clock on the crossover<br />
control, or slightly higher for smaller speakers). At this point turn the HI/LOW LEVEL control up so that both<br />
the <strong>REL</strong> and speaker are roughly equal in volume and then switch, using the phase switch, from “0” to “180”<br />
phase positions. Again, whichever position is loudest or fullest is the correct position. That is, when the<br />
position is working in harmony with your main speakers, reinforcing bass, not cancelling it.<br />
Placement: The next step is to determine precisely how far from the corner the sub should be placed to<br />
achieve the most efficient output, as well as the lowest frequency extension. With the <strong>REL</strong> fully into the<br />
corner, and continuing to play the music, slowly pull the <strong>REL</strong> from the corner on the diagonal, equidistant<br />
from both side and rear wall. At a certain point (sometimes a matter of only a few inches, in rare cases a foot<br />
or more) the <strong>REL</strong> will audibly go lower, play louder, and, if it truly locks on to the room and is fully<br />
pressurizing it, the air around the <strong>REL</strong> will seem to be energized, stop right there! This is the correct position<br />
from the corner for the <strong>REL</strong>.<br />
Crossover and Level Settings: To determine the crossover point, take the volume of the <strong>REL</strong> (using the<br />
HI/LOW LEVEL control) all the way down, and put the crossover to 30 Hz. At this point, bring the <strong>REL</strong>’s volume<br />
back up slowly to the point where you have achieved a subtle balance, i.e. the point at which you can hear<br />
the <strong>REL</strong> even with the main speakers playing. Now, bring the crossover point up until it is obviously too high;<br />
at this point bring it down to the appropriate lower setting. For all intents and purposes, this is the correct<br />
crossover point. Once this stage has been reached, subtle changes to volume and crossover can be made to<br />
provide the last bit of complete and seamless integration. With that, set-up is complete.<br />
13
Hint: There may be a tendency to set the crossover point too high and the volume of the Sub-Bass System<br />
too low when first learning how to integrate a <strong>REL</strong> with the system, the fear being one of overwhelming the<br />
main speakers with bass. But in doing so, the resulting set-up will be lacking in bass depth and dynamics.<br />
The proper crossover point and volume setting will increase overall dynamics, allow for extended bass<br />
frequencies, and improve soundstage properties. Note, volume must be adjusted in conjunction with crossover<br />
changes. In general, when selecting a lower crossover point, more volume may need to be applied.<br />
<strong>REL</strong> Theater Reference Home Cinema Applications<br />
For Dolby Digital AC3 or other 5.1 theater systems, once the standard set-up for two-channel outlined<br />
above is complete, the LFE output from the processor or receiver should be connected to the .1/LFE input<br />
and appropriate volume adjustments made using the .1/LFE LEVEL control. For this configuration, you must<br />
set the processor to the “large” or “full range” setting for the left and right speakers in order for the <strong>REL</strong> to<br />
receive the bass signal via the high-level cable. In this configuration, the <strong>REL</strong> provides support for both the<br />
left and right speakers for two-channel listening, and support for the LFE when movies are playing. Most<br />
processors will allow you to defeat the subwoofer output when listening in the two-channel mode. The<br />
effect of this set-up is one of greatly increased dynamics in the mid-bass range, no bass bloat, and a greater<br />
degree of space and timing from the special audio effects.<br />
<strong>REL</strong> Theater Reference 3D Bass<br />
While slightly more complicated than the basic <strong>REL</strong> Theater Reference scheme, use of three <strong>REL</strong>s produces a<br />
number of noteworthy benefits and proves the most cost effective method of achieving professional Dolby 5.1<br />
standard bass performance. <strong>REL</strong> Theater Reference 3D Bass produces true full range performance from the<br />
three primary zones of reproduction in theater sound resulting in a far more natural and immersive<br />
experience than ANY single sub can produce.<br />
1 The main L/R speakers should be connected to the primary <strong>REL</strong> using <strong>REL</strong> Theater Reference connection.<br />
This unit forms the foundation of your theater system’s performance and so should be perfectly<br />
matched to one’s main speakers.<br />
14
2 In the rear corner (ideally that which is opposite the primary sub), connect a second <strong>REL</strong> to the rear<br />
speakers using <strong>REL</strong> Theater Reference connectivity. The purpose of the rear channel <strong>REL</strong> is to ensure<br />
proper front-to-rear balance and weight; too often virtually ALL the power and weight in a theater<br />
comes from the front and it produces unnatural weighting as well as hot spots. By placing a rear <strong>REL</strong><br />
diagonally opposite, bass transects the room on a tangent and has the effect of greatly smoothing<br />
overall in-room response of your <strong>REL</strong>s. This unit need not be a duplicate of your primary <strong>REL</strong>; instead<br />
it should match well with your surround speakers.<br />
3 Connect to the center channel a third <strong>REL</strong> using ONLY the HIGH-LEVEL connection. This may be easily<br />
accomplished by connecting directly to the connection terminals on the rear of the center channel<br />
speaker. To do so, first twist the red and yellow leads together and connect to the positive terminal,<br />
then connect the remaining black lead to the negative (black) terminal on the rear of the speaker. The<br />
purpose of the third “center” <strong>REL</strong> is to ensure the center channel can keep up with the scale, weight<br />
and dynamics the main system now has. Location should be anywhere from the opposite corner of the<br />
front wall to somewhere in the middle of the front wall, listen for best integration with the center<br />
channel speaker. Some people prefer to use the <strong>REL</strong> as an actual pediment or stand for their center<br />
channel, the choice is yours. Again, this unit need NOT be an exact duplicate of the primary <strong>REL</strong> but<br />
should be chosen for its acoustic ability to mate seamlessly with your center channel.<br />
First, carefully set-up and dial in the primary <strong>REL</strong>, then move to the rear <strong>REL</strong> and balance this against the main<br />
<strong>REL</strong>. Care must be taken to ensure phase is identical on both <strong>REL</strong>s as accidentally reversing phase of one relative<br />
to the other will result in a dramatic reduction in bass output. Finally, carefully dial in the performance of<br />
the center channel sub. Hint: To make this easier, once the primary <strong>REL</strong> has been dialed in, unplug it using<br />
the Speakon connection from the system and dial in the rear, followed by the center channel <strong>REL</strong>.<br />
Genuine sticklers for perfection find it easiest to tune in sections. For example, connect ONLY the L/R mains<br />
and the primary <strong>REL</strong>. Next, tune ONLY the rear surrounds and the rear <strong>REL</strong>. Finally, listen to and tune ONLY<br />
the center channel with the center <strong>REL</strong>.<br />
15
When you have accomplished this task, plug all three units in and re-check your gain settings as the<br />
cumulative effect of hooking all three up will usually result in, temporarily, excessive output. Work carefully<br />
and methodically to reduce the settings on primary, then rear, and finally center channel <strong>REL</strong>s and in a few<br />
minutes balance should be restored. However, the net result of all your tuning will be a sound that utterly<br />
immerses the theater owner in a rich natural wash of bass that suffuses the room effortlessly, rather than<br />
what is often experienced as too loud a bass balance pushing uncomfortably at the listener.<br />
Running In<br />
Care taken over running in will be rewarded by many years of pleasurable use. Both the electronics and the<br />
drive unit will benefit from an initial period of carefully controlled use. Possible damage may be sustained<br />
by running in the unit at too high a volume setting over an extended period. On the other hand, by taking a<br />
little care over this initial period, about 24 hours of actual use, a longer life with an eventual higher potential<br />
performance is assured.<br />
Care and Polishing<br />
The cabinets are best maintained by using a light automotive spray-on wax and a micro fiber cloth. (We use<br />
a spray-on made by a company called Griot’s Garage. While this may not be available in all markets, you<br />
can use a similar product.) Take care not to spray the aluminum badge. Do not place objects, such as drinks<br />
on top of your <strong>REL</strong> TZERO. Never use a dry cloth on this finish.<br />
Technical<br />
TZERO uses a very fast, gentle and transparent filter intended to allow excellent impulse response and a<br />
natural sound. We refer to this circuit as Natural RollOff. Most subs use slow, very steep filters that lend<br />
an unnatural, machine-like quality to the sound. The TZERO employs a highly refined Class-D amplifier<br />
which combines high performance and high efficiency. The TZERO includes an automatic power-saving<br />
mode which ensures that, when not in use, the unit consumes as little power as possible. The driver is<br />
simple, rugged and relatively light, and yet offers excellent self-damping so we are better able to<br />
reproduce the nuance of music and preserve the explosiveness of transients. Finally, the cabinets, apart<br />
from being physically beautiful, are like finely tuned instruments that are largely responsible for the sonic<br />
virtue with which the TZERO is imbued.<br />
16
Power Saving Efficiency<br />
All <strong>REL</strong> Sub-Bass Systems are designed for maximum power efficiency, both when passing a signal through<br />
to its resultant output sound into the room and also when silent.<br />
In addition to the low power draw exhibited by all <strong>REL</strong> models, the TZERO also features an automatic standby<br />
mode that is enabled when the power mode switch on the rear of the unit is set to the “ENERGY SAVER”<br />
position. In this mode, the input signal is constantly monitored for activity (audio information). If no audio<br />
information is detected over a period of fifteen minutes, the unit will enter a low power standby mode in<br />
which less than three watts of power is consumed. When input signal activity is detected, the unit resumes<br />
normal operation. By using the energy saver mode, you can ensure that there is no unnecessary power draw<br />
when the unit is not in use.<br />
Alternatively, the user has the option to leave the unit in the normal operating mode at all times by selecting<br />
the “ALWAYS ON” position of the power mode switch. In this mode, the unit will not enter standby<br />
regardless of whether or not there is activity on the input signal. Using this setting ensures that the TZERO is<br />
ready to react instantaneously to bass transients, whether in music or movies, and is therefore the<br />
recommended setting to achieve the highest performance<br />
17
Specifications<br />
TZERO<br />
Type:<br />
Drive Unit:<br />
Lower Frequency Response:<br />
Input Connectors:<br />
Input Impedance:<br />
Gain Control Range:<br />
Power Output:<br />
Phase Switch:<br />
Amplifier Type:<br />
Protection System<br />
Fully Electronic SET-SAFE:<br />
D.C. Fault:<br />
Output Short:<br />
Mains Input Voltage:<br />
Fuse:<br />
Dimensions (WHD):<br />
Sealed, down-firing active woofer<br />
6.5in., 165mm long-throw, steel chassis<br />
38 Hz at -6 dB in room<br />
High-Level Neutrik Speakon, Low-Level single phono, LFE phono<br />
High-Level: 150k, Low Level: 10k, .1/LFE: 10k ohms<br />
80 dB<br />
100 Watts (RMS)<br />
Yes, 0 or 180 degrees<br />
Class D<br />
Yes<br />
Yes<br />
Yes<br />
100-240 volts<br />
2.00 Amp semi delay<br />
8.5 x 9.5 x 10.25 in., (216 x 241 x 260 mm)<br />
Including Feet and Rear Panel Controls<br />
15 lbs. (6.8 kg)<br />
Gloss Piano Black or White Lacquer<br />
Net Weight:<br />
Finish:<br />
Supplied Accessories<br />
Mains Lead:<br />
Yes<br />
Neutrik Speakon Interconnect: Yes (10 Meters Nominal)<br />
User Manual:<br />
Yes<br />
In the interest of product improvement, <strong>REL</strong> Acoustics Limited reserves the right to alter these specifications without notice.<br />
18
Notes<br />
19
<strong>REL</strong> Acoustics Limited<br />
North Road, Bridgend industrial Estate . Bridgend, CF31 3TP . United Kingdom<br />
Telephone: +44 (0)1 656 768 777 . Fax: +44 (0) 1 656 766 093<br />
Web: www.rel.net