Night Vision Goggles USER'S MANUAL
Night Vision Goggles USER'S MANUAL
Night Vision Goggles USER'S MANUAL

Create successful ePaper yourself
Turn your PDF publications into a flip-book with our unique Google optimized e-Paper software.
VEGA<br />
<strong>Night</strong> <strong>Vision</strong> <strong>Goggles</strong><br />
USER’S <strong>MANUAL</strong><br />
Important Export Restrictions! Commodities, products, technologies<br />
and services of this manual are controlled by the U.S.<br />
Department of State Office of Defense Trade Controls, in accordance<br />
with International Traffic in Arms (ITAR), Title 22, Code of<br />
Federal Regulations Part 120-130 and/or by the Export Administration<br />
Regulations (EAR) of U.S. Department of Commerce. At any<br />
time when a license or a written approval of the U.S. Government<br />
is applicable to it, it is illegal and strictly forbidden to export, intend<br />
to export, transfer in any other manner whatsoever, sell any<br />
hardware or technical data, provide any associated service to any<br />
non-U.S. resident, beyond or within the United States territory,<br />
until the valid license or written approval has been issued by the<br />
Departments of the U.S. Government having jurisdiction. Additionally<br />
U.S. law prohibits the sale, transfer, or export of items to<br />
certain restricted parties, destinations, and embargoed countries,<br />
as identified on lists maintained by the U.S. Department of State,<br />
the U.S. Department of Commerce, and the U.S. Department of<br />
Treasury. It is the responsibility of the Customer to be aware of<br />
these lists. The sale, transfer, transportation, or shipment outside<br />
of the U.S. of any product prohibited or restricted for export<br />
without complying with U.S. export control laws and regulations,<br />
including proper export licensing, documentation or authorization,<br />
is unlawful and may result in civil and/or criminal penalties<br />
and/or constitute a federal crime. Diversion contrary to U.S. law<br />
is strictly prohibited.
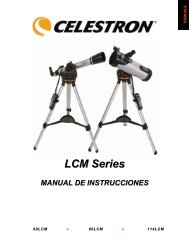
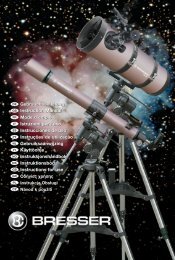
PARTS OF THE GOGGLES<br />
Battery compartment<br />
objective Lens focus<br />
dioper Adjustment<br />
operation Button<br />
Mounting rail<br />
flip-up head mount<br />
Mounting rail<br />
LED indicator<br />
IR illuminator<br />
CAUTION:<br />
This product contains natural rubber latex which may cause allergic reactions! FDA has<br />
noted an increase in the number of deaths reported to the agency that are associated with an<br />
apparent sensitivity to natural latex proteins. If you are allergic to latex, it is a good idea to learn<br />
which products contain it and strictly avoid exposure.<br />
We provide the information in this manual for familiarization purposes only; the contents may undergo further<br />
changes with no commitment by Armasight to keep customers notified about any updates.<br />
Armasight© assumes no responsibility for any misprints or other errors that this manual may contain.<br />
2
1. Description and Data<br />
Description<br />
If low-cost, high quality head-mounted night vision is what you need, the Armasight Vega is the best<br />
choice for you! The Generation 1 Vega comes complete with a head mount that allows the unit to be<br />
positioned over either eye, and is the perfect inexpensive, hands-free option for air soft games, paintball,<br />
hunting or security at night, where the Armasight Vega will give you the edge. A built-in, shortrange<br />
IR illuminator allows the Vega to work exceptionally well even in complete darkness, and an<br />
optional Armasight long-range infrared illuminator will dramatically boost your viewing range when<br />
required. The Armasight Vega features all-glass optics, a single, push-button control, and durable, reinforced<br />
composite housing.<br />
––<br />
Designed<br />
features<br />
Compact and Lightweight<br />
for Hand-Free operations<br />
resolution Gen. 1+ Image Intensifier Tube<br />
Flood infrared illuminator<br />
adjustable headgear for ultimate comfort<br />
headgear<br />
design which allows the unit to be positioned over either eye<br />
–<br />
be used in conjunction with long-range IR Illuminator<br />
and fog resistant<br />
Two-Year Warranty<br />
–SPECIFICAtions *<br />
––<br />
High<br />
––<br />
Built-in<br />
––<br />
Fully<br />
––<br />
Flip-Up<br />
––<br />
Special<br />
––<br />
Can<br />
––<br />
Water<br />
––<br />
Limited<br />
Generation 1+<br />
Magnification<br />
1x<br />
Objective lens diameter (mm) 20.6<br />
Lens system<br />
35 mm; F/1.7<br />
Field of view (°) 35<br />
Focus range (m)<br />
0.2 to infinity<br />
Exit pupil diameter (mm) 8<br />
Eye relief (mm) 20<br />
Power Supply<br />
CR-123 Lithium (1) 3V<br />
Battery life IR On (hour) up to 12<br />
Battery life IR Off (hour) up to 58<br />
Body material<br />
Glass-fiber reinforced composite<br />
Lens material/type<br />
Multicoated heavy glass<br />
Operating temperature (°C) -30 to +45<br />
Dimensions (LxWxH, mm/in) 147 x 82 x 46 / 5.8 x 3.2 x 1.8<br />
Weight (kg/lbs) 0.25 / 0.54<br />
. * Armasight© reserves the right to modify these specifications at any time without notice.<br />
3
STANDARD COMPONENTS and optional equipment<br />
1) Armasight Vega <strong>Goggles</strong><br />
<strong>Night</strong> vision goggles with 1x magnification.<br />
2) Objective Lens Cap<br />
The Objective Lens Cap is designed to protect the objective lens from physical damage, as well as allow<br />
the testing of the device’s operation in daylight.<br />
3) Eye Cup<br />
The rubber eye cup is designed to protect the eyepiece and to provide comfort of use for the user.<br />
4) CR123A Lithium Battery<br />
3V CR123A lithium batteries are used to supply power to the unit.<br />
5) Head Mount<br />
Adjustable universal assembly that secures the goggles to the user’s head, providing hands-free operation.<br />
6) User Manual<br />
The user manual contains a full description of the device and accessories, information about controls,<br />
installation, maintenance and troubleshooting procedures.<br />
7) Carrying Case<br />
The carrying case is used to store and carry the Vega goggles and accessories.<br />
8) Optional IR810 Detachable Long Range IR illuminator (Part# IAIR810IR000001)<br />
Extra long-range infrared illuminator. Provides greater viewing capabilities when the environment has<br />
little or no ambient light.<br />
9) Optional Dovetail to Weaver Transfer Piece #21 (Part# ANRA000001)<br />
Allows the IR illuminator to be mounted on the Vega.<br />
2. PREPARATIONS FOR OPERATION<br />
WARNING:<br />
The Vega night vision goggles are designed for several years of reliable service. To ensure<br />
trouble-free performance, please observe the following instructions:<br />
• Do not activate the device in daylight unless the protective lens cover is fitted securely over<br />
the lens. If the device is ON, do not direct the device at bright light sources, such as car headlights,<br />
camp fires, street lights, etc., as this will cause damage to the device.<br />
• Do not check the device operation in daylight unless the front lens cap is fitted securely over<br />
the lens, and even then, the device should only be ON for the few seconds it takes to establish<br />
correct operation.<br />
• Do not open the body of the device or otherwise disassemble it.<br />
• Avoid dropping or otherwise impacting the device.<br />
• Do not expose the device to moisture or extreme temperatures.<br />
• Do not touch the lenses. Clean optical parts with a clean, soft cloth, and only use professional<br />
lens cleaners designed for use with optics.<br />
• Do not forget to remove the battery from the battery compartment if the device is to be<br />
stored for more than 3 days.<br />
• Do not forget to turn the device OFF during periods of non-operation.<br />
4
WARNING:<br />
Take into consideration the following information and restrictions in order to avoid damaging<br />
the device and to ensure a long service life and failure-free operation:<br />
• Performance of the device in nighttime conditions depends on the level of ambient light in<br />
the environment. Some light (moonlight, starlight, etc.) is required for the device to provide an<br />
image.<br />
• Ambient light level is reduced by the presence of clouds, shade, or objects that block natural<br />
light (buildings, trees, etc.).<br />
• The device loses its effectiveness when operated in shadowed areas.<br />
• The effectiveness of the device is adversely affected by weather conditions such as rain,<br />
snow, sleet, or fog, and environmental conditions such as smoke or dust.<br />
• The device resolution level is reduced in environments with very low light sources. The visibility<br />
will degrade significantly under starlit conditions, particularly in low contrast environments<br />
such as deserts, large areas of uniform vegetation, etc.<br />
• The device is equipped with a protection system that will automatically disable the image<br />
intensifier tube when the illuminance level stays above 40 lux for over 10 seconds.<br />
BATTERY INSTALLATION<br />
1) Unscrew the battery compartment cap on the front side of the goggles body.<br />
2) Insert the CR123A battery into the battery compartment in accordance with polarity markings.<br />
3) Screw the cap onto the place.<br />
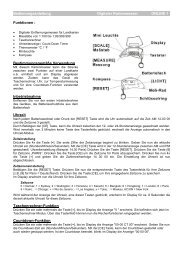
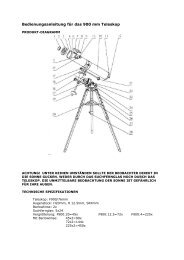
ATTACHING THE VEGA TO A HEAD MOUNT<br />
D<br />
E<br />
F<br />
To attach your Vega to a head mount perform the following<br />
steps:<br />
1) Loosen the screw (A), press the button (B); put the monocular<br />
rail into the headset socket (C).<br />
2) Put the head mount, with the Vega attached, on your<br />
head.<br />
B<br />
A<br />
C<br />
3) Loosen the screw (A) and perform an eye relief adjustment<br />
by moving the monocular on the rail.<br />
4) The head mount intended for use with the Vega is fitted with a flip-up mechanism. Press the button<br />
(D) from the head mount side and lift the monocular to the top position.<br />
5) To return the unit back to the operating position, press the button (D) again and lower the monocular.<br />
6) The unit can be accommodated for observation with either the left or the right eye. To switch the unit<br />
position for observation from one eye to the other, remove the unit from the adapter, turn the unit to<br />
180 and attach it to the headset over the desired eye.<br />
7) Press the button (E) and move the monocular on the rail (F) to reach the most comfortable position<br />
for observation.<br />
5
3. OPERATION INSTRUCTIONS<br />
Controls<br />
The Vega is designed to meet the needs and requirements of various users. Each user can individually<br />
set the unit to the most desirable and effective position with the help of the controls. The Vega unit<br />
controls and indicators are shown and detailed further, below:<br />
Operation Button. Press the button to turn the unit on. Press the button again to turn the built-in IR<br />
Illuminator on. Press the button a third time to turn the unit off. The IR will also turn off automatically.<br />
Lens Focus. Focuses the objective lens. Adjust the lens for sharpest image of viewed object.<br />
Diopter Adjustment. Focuses the eyepieces. Focus the eyepieces to get a clear image on the IIT<br />
screen.<br />
Power/IR ON Indicator. The LED indicator located near the ocular will light up red when unit is on, and<br />
will change to green when built-in IR illuminator is activated.<br />
FOCUSING<br />
1) Adjust the diopter. For the best possible image resolution, you must first adjust the eyepiece (diopter).<br />
Turn the diopter adjustment ring clockwise until it stops. While looking through the eyepiece,<br />
observe the scene and slowly begin turning the diopter adjustment ring counterclockwise until the<br />
image becomes clear and sharp.<br />
2) Adjust the lens focus. To focus your Vega at different distances, simply rotate the objective lens focus<br />
ring.<br />
Testing PROCEDURES<br />
CAUTION:<br />
Do not test the scope in daylight conditions for more than 10 minutes, even with lens protective<br />
cap on.<br />
To check device operation in daylight or in an illuminated room observe the following procedures:<br />
1) Verify that the battery is inserted into the battery compartment in accordance with polarity markings<br />
on the goggles’ body.<br />
2) Verify that the objective lens is closed securely.<br />
3) Activate the unit by pushing the operation button, but without removing the protective caps. While<br />
looking through the eyepiece of your Vega, observe the scene. Verify whether or not the green light is<br />
indicating that correct IIT operation is occurring.<br />
OPERATION IN NIGHTTIME CONDITIONS<br />
CAUTION:<br />
Avoid exposing the goggles to bright light sources. Bright light emitted by fires, automobile<br />
headlights, lanterns, projectors, etc. will cause serious damage your Vega.<br />
1) Visually estimate the illuminance level in the viewing area. Operation with the objective lens cap<br />
off is safe when the illuminance level is less than 1 lux; at an illuminance level of 1 lux, you will<br />
barely be able to read a newspaper, even after your eyes have adapted to the low light conditions.<br />
2) Verify that the battery is inserted into the battery compartment in accordance with the polarity<br />
markings on the goggles’ body.<br />
6
3) Remove the front lens cap.<br />
4) Activate the unit by pushing the operation button. A green light indicating correct IIT operation will<br />
appear after a momentary delay.<br />
5) Observe the scene and focus your Vega.<br />
6) Turn the unit off after completing your operations. The green glow will disappear from the eyepiece.<br />
7) Securely place the objective lens cap over the objective lens.<br />
IR ILLUMINATOR OPERATION<br />
CAUTION:<br />
Do not forget that light emitted from the IR illuminator is invisible to the naked eye; however, it<br />
can be easily detected when using night vision devices.<br />
Infrared illuminators are used in areas where the level of light is not sufficient for surveillance. An IR<br />
illuminator can provide an extra source of infrared light, which, although invisible to a naked eye, can<br />
greatly enhance the performance of night vision devices. Turn on the IR illuminator when working in<br />
total darkness. Please remember that the beam emitted by your IR illuminator will lose its brightness<br />
over distance. The built-in IR illuminator is designed to provide additional source of light for reading<br />
maps or other basic, short-range applications; the viewing distance is up to 3m.<br />
You can activate the IR illuminator of your goggles by pushing the operation button a second time after<br />
you’ve turned the unit on. A green LED light will appear when the IR illumination is turned on.<br />
NOTE:<br />
The IR will automatically turn off when the unit’s main power is turned OFF.<br />
optional IR810 ILLUMINATOR<br />
IR810 long-range infrared illuminator provides greater viewing capabilities when the environment has<br />
little or no ambient light.<br />
To mount an IR810 Long Range Infrared Illuminator to the Vega, use the optional Dovetail to Weaver<br />
Transfer Piece. Perform the following steps:<br />
1) Install the transfer piece onto one of the Vega rails.<br />
2) Tighten the two fixing screws on the transfer piece.<br />
3) Loosen the IR illuminator fixing screw.<br />
4) Mount the IR illuminator on the Weaver rail of transfer piece and tighten the fixing screw.<br />
4. MAINTENANCE PROCEDURES<br />
The Vega should always be stored in the supplied packaging, particularly in heated and ventilated<br />
rooms. To keep the device operational, please follow the instructions listed previously regarding preparations<br />
for storage. The battery should be stored separately from the device and be inserted into the<br />
battery compartment only when the device is being prepared for use. The presence of both acids and<br />
alkalis near the goggles is not recommended.<br />
When stored, your Vega should be protected from exposure to direct sunlight or extreme temperatures.<br />
7
<strong>Goggles</strong> CLEANING PROCEDURES<br />
1) Gently remove any dirt from the goggles using a clean, soft cloth.<br />
2) Wipe external surfaces down (with the exception of optical surfaces) with a clean cloth moistened<br />
with pure water.<br />
3) Dry all wet surfaces with a different clean, dry cloth.<br />
4) Carefully remove any dirt from the optical surfaces using a lens brush.<br />
5) To avoid scratches, optical surfaces must be cleaned using a clean cotton swab that has been slightly<br />
dampened with pure alcohol. The glass should be wiped in circular motions starting from the center<br />
and moving out towards the edge, without touching the barrel. Change the cotton swab as soon as it<br />
becomes dirty.<br />
PREPARATION FOR STORAGE<br />
When preparing your Vega for storage, perform the following steps:<br />
1) Verify that the goggles are operating in accordance with all previously specified procedures.<br />
2) Remove the battery from the battery compartment.<br />
3) Clean the goggles and all accessories.<br />
4) Place all components into the storage case.<br />
5. Troubleshooting<br />
Common problems that may occur with your goggles or the detection and viewing tests, as well as actions<br />
you can take to correct them, are listed in the Troubleshooting Table, below. This table does not<br />
list all of the malfunctions that may occur with your device. If you experience a malfunction of the<br />
device that is not listed in this table, please contact Armasight or your Vega retailer.<br />
NOTE:<br />
Before you use this table, be sure you have performed all normal operational safety, care and<br />
handling checks and procedures. If your device malfunctions in a way not listed in this table,<br />
contact Armasight or your Vega retailer.<br />
Troubleshooting Guide<br />
Problem Possible Cause Action<br />
Press operation button.<br />
The goggles do not turn on<br />
Inspect for a missing, defective or improperly<br />
installed battery.<br />
If these actions fail, submit the device for unit level maintenance.<br />
Check if the goggles are focused.<br />
Poor image quality<br />
Check if the lenses are greasy, fogged or<br />
dirty.<br />
If the problem persists, contact your service center.<br />
Light visible through the eyecups<br />
Diopter adjustment cannot be performed<br />
Lens focus cannot be performed<br />
IR illuminator does not switch on<br />
Check the exit pupil distance value.<br />
Check the eyepiece resilience.<br />
Check to see if the diopter adjustment<br />
ring is deformed or broken.<br />
Check to see if the lens focus adjustment<br />
ring is deformed or broken.<br />
Turn the IR illuminator on in dark area.<br />
Visually estimate if the observed scene is<br />
properly lighted.<br />
Press the operation button repeatedly.<br />
Replace the battery or install it properly<br />
Focus the ocular and objective.<br />
Thoroughly clean the surfaces of each<br />
lens.<br />
Press the eyecup to your face.<br />
If the eyecup is defective, contact your<br />
service center.<br />
If the diopter adjustment ring is damaged,<br />
contact your service center.<br />
If the lens focus adjustment ring is<br />
damaged, contact your service center.<br />
If the IR illuminator does not turn on,<br />
contact your service center.<br />
8
6. warranty INFORMATION<br />
This product is guaranteed to be free from manufacturing defects in material and workmanship under normal use for<br />
a period of two (2) years from the date of purchase. In the event that a defect covered by the below warranty occurs<br />
during the applicable period stated above, Armasight, at its discretion, will either repair or replace the product; such<br />
action on the part of Armasight shall be the full extent of Armasight’s liability, and the Customer’s sole and exclusive<br />
reparation. This warranty does not cover a product if it has (a) been used in ways other than its normal and customary<br />
manner; (b) subjected to misuse; (c) subjected to alterations, modifications or repairs by the Customer of by any party<br />
other than Armasight without prior written consent of Armasight; (d) special order or “close-out” merchandise or<br />
merchandise sold “as-is” by either Armasight or the Armasight dealer; or (e) merchandise that has been discontinued<br />
by the manufacturer and either parts or replacement units are not available due to reasons beyond the control of<br />
Armasight. Armasight shall not be responsible for any defects or damage that in Armasight’s view are a result from the<br />
mishandling, abuse, misuse, improper storage or improper operation of the device, including use in conjunction with<br />
equipment that is electrically or mechanically incompatible with, or of inferior quality to, the product, as well as failure<br />
to maintain the environmental conditions specified by the manufacturer. CUSTOMER IS HEREBY NOTIFIED THAT OP-<br />
ERATION OF THE EQUIPMENT DURING DAYLIGHT HOURS OR UNDER ANY EXCESSIVE LIGHT CONDITIONS MAY PERMA-<br />
NENTLY DAMAGE THE INTERNAL COMPONENTS OF THE UNIT AND SAID DAMAGE WILL NOT BE COVERED UNDER THIS<br />
WARRANTY. This warranty is extended only to the original purchaser. Any breach of this warranty shall be enforced<br />
unless the customer notifies Armasight at the address noted below within the applicable warranty period.<br />
The customer understands and agrees that except for the foregoing warranty, no other warranties written or oral,<br />
statutory, expressed or implied, including any implied warranty of merchantability or fitness for a particular purpose,<br />
shall apply to the product. All such implied warranties are hereby and expressly disclaimed.<br />
Limitation of liability<br />
Armasight will not be liable for any claims, actions, suits, proceedings, costs, expenses, damages or liabilities arising<br />
out of the use of this product. Operation and use of the product are the sole responsibility of the Customer. Armasight’s<br />
sole undertaking is limited to providing the products and services outlined herein in accordance with the terms and<br />
conditions of this Agreement. The provision of products sold and services performed by Armasight to the Customer<br />
shall not be interpreted, construed, or regarded, either expressly or implied, as being for the benefit of or creating any<br />
obligation toward any third party of legal entity outside Armasight and the Customer; Armasight’s obligations under<br />
this Agreement extend solely to the Customer. Armasight’s liability hereunder for damages, regardless of the form or<br />
action, shall not exceed the fees or other charges paid to Armasight by the customer or customer’s dealer. Armasight<br />
shall not, in any event, be liable for special, indirect, incidental, or consequential damages, including, but not limited<br />
to, lost income, lost revenue, or lost profit, whether such damages were foreseeable or not at the time of purchase,<br />
and whether or not such damages arise out of a breach of warranty, a breach of agreement, negligence, strict liability<br />
or any other theory of liability.<br />
9
Product warranty registration<br />
In order to validate the warranty on your product, Armasight must receive a completed Product Warranty Registration<br />
Card for each unit, or the Customer can complete a warranty registration on our website, at www.armasight.com.<br />
Please complete the included form and immediately mail it to our Service Center:<br />
Armasight Inc.<br />
815 Dubuque Avenue<br />
South San Francisco<br />
CA 94080<br />
United States of America.<br />
Obtaining warranty service<br />
To obtain warranty service on your unit, the End-user (Customer) must notify the Armasight service department via<br />
email. Send any requests to service@armasight.com to receive a Return Merchandise Authorization number (RMA).<br />
When returning any device, please take in the product to your retailer, or send the product, postage paid and with a<br />
copy of your sales receipt, to Armasight Corporation’s service center at the address listed above. All merchandise must<br />
be fully insured with the correct postage; Armasight will not be responsible for improper postage or merchandise<br />
that becomes lost or damaged during shipment. When sending product back, please clearly write the RMA# on the<br />
outside of the shipping box. Please include a letter that indicates your RMA#, the Customer’s Name, a Return Address,<br />
reason for the return, Contact information (valid telephone numbers and/or an e-mail address), and proof of purchase<br />
that will help us to establish the valid start date of the warranty. Product merchandise returns that do not have an<br />
RMA# listed may be refused, or a significant delay in processing may occur. Estimated Warranty service time is 10-20<br />
business days. The End-user/ Customer is responsible for postage to Armasight for warranty service. Armasight will<br />
cover return postage/ shipping after warranty repair to the End-user/ Customer only if the product is covered by the<br />
aforementioned warranty. Armasight will return the product after warranty service by domestic UPS Ground service<br />
and/ or domestic mail. Should any other requested, required or international shipping methods be necessary, the<br />
postage/ shipping fee will be the responsibility of the End-user/ Customer.<br />
ARMASIGHT PRODUCT WARRANTY REGISTRATION CARD<br />
Product Name<br />
Purchase Date<br />
PRODUCT INFORMATION<br />
Purchased Form<br />
Product Serial #<br />
Name<br />
Address<br />
City<br />
Day Phone #<br />
E-mail address<br />
CUSTOMER INFORMATION<br />
Country<br />
Home Phone #<br />
Zip<br />
Customer Signature Required<br />
10
for note<br />
11
Armasight Inc.<br />
815 Dubuque Avenue,<br />
South San Francisco,<br />
CA 94080, USA<br />
Phone: (888)959-2259<br />
Fax: (888)959-2260<br />
Intl Phone/Fax: (650)492-7755<br />
info@armasight.com<br />
CAUTION:<br />
This product contains natural rubber latex<br />
which may cause allergic reactions! FDA has<br />
noted an increase in the number of deaths reported<br />
to the agency that are associated with an<br />
apparent sensitivity to natural latex proteins. If<br />
you are allergic to latex, it is a good idea to learn<br />
which products contain it and strictly avoid exposure.<br />
www.armasight.com