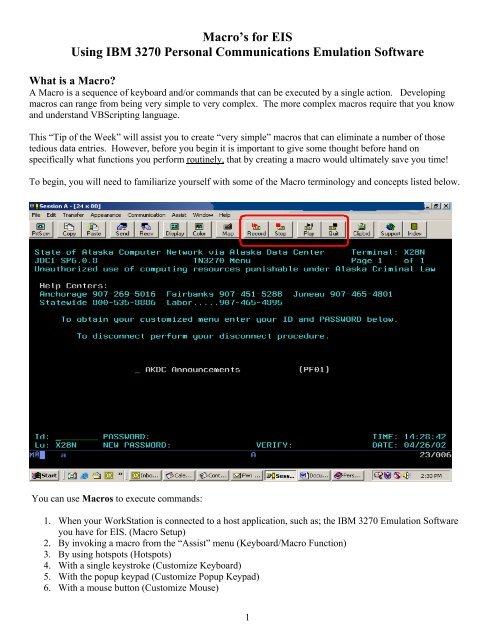
Macro's for EIS Using IBM 3270 Personal Communications - Dpaweb
Macro's for EIS Using IBM 3270 Personal Communications - Dpaweb
Macro's for EIS Using IBM 3270 Personal Communications - Dpaweb

You also want an ePaper? Increase the reach of your titles
YUMPU automatically turns print PDFs into web optimized ePapers that Google loves.
Macro’s <strong>for</strong> <strong>EIS</strong><br />
<strong>Using</strong> <strong>IBM</strong> <strong>3270</strong> <strong>Personal</strong> <strong>Communications</strong> Emulation Software<br />
What is a Macro?<br />
A Macro is a sequence of keyboard and/or commands that can be executed by a single action. Developing<br />
macros can range from being very simple to very complex. The more complex macros require that you know<br />
and understand VBScripting language.<br />
This “Tip of the Week” will assist you to create “very simple” macros that can eliminate a number of those<br />
tedious data entries. However, be<strong>for</strong>e you begin it is important to give some thought be<strong>for</strong>e hand on<br />
specifically what functions you per<strong>for</strong>m routinely, that by creating a macro would ultimately save you time!<br />
To begin, you will need to familiarize yourself with some of the Macro terminology and concepts listed below.<br />
You can use Macros to execute commands:<br />
1. When your WorkStation is connected to a host application, such as; the <strong>IBM</strong> <strong>3270</strong> Emulation Software<br />
you have <strong>for</strong> <strong>EIS</strong>. (Macro Setup)<br />
2. By invoking a macro from the “Assist” menu (Keyboard/Macro Function)<br />
3. By using hotspots (Hotspots)<br />
4. With a single keystroke (Customize Keyboard)<br />
5. With the popup keypad (Customize Popup Keypad)<br />
6. With a mouse button (Customize Mouse)<br />
1
When you create a macro, it can be added to the “Select a Key” and/or an “Action Popup Keypad” <strong>for</strong> future<br />
use. Macros can also be:<br />
Assigned to a “key”<br />
Assigned to the “popup keypad”<br />
Assigned to a “mouse-button”<br />
Started by a “hotspot”<br />
A macro can include the following:<br />
Functions<br />
Other macros<br />
Characters<br />
Strings<br />
Wait Conditions<br />
Branches<br />
Commands to run Windows or DOS programs<br />
As you can imagine there are a number of methods to create and use macros. Below is an illustration of one of<br />
the easier methods <strong>for</strong> the novice PC users. Let’s get started!<br />
Recording a Macro<br />
1. Select “Assist” from the menu-bar. The “Assist” drop-down menu appears OR you can place your cursor<br />
in the field that you want to begin recording your macro and click on “Record” on the toolbar menu as<br />
illustrated below.<br />
2
2. Select “Start Recording Macro”... from the drop down menu OR the “Record” button on the toolbar menu.<br />
The “Record Macro As” dialog-box will be displayed.<br />
NOTE: When you are ready to record a<br />
macro it is very important to have the<br />
cursor placed in the beginning of the field<br />
that you want the macro to begin in. If you<br />
do not do this your macro will not function<br />
properly.<br />
3. Type the name of the file in which you want<br />
to save the macro. We suggest that you<br />
make up a “File Name” that correlates with<br />
the functions of the macro. For example,<br />
ET Notice. MAC or you may want to use<br />
the actual NOA number, such as N002.MAC<br />
4. Click “OK”. The Record operation starts. In the “Assist” menu, “Start Recording Macro”... is changed to<br />
“Stop Recording Macro”; “Pause Recording Macro” and “Cancel Recording Macro” are added.<br />
5. Record the keystrokes.<br />
NOTE: When the Macro is in “Record” mode it is recording every keystroke you make!<br />
If, while you are recording, you choose Cancel Recording Macro:<br />
The Record operation is canceled and nothing is saved. “Cancel Recording Macro” and “Pause Recording<br />
Macro” are removed from the drop-down list. “Stop Recording Macro” is changed to “Start Recording<br />
Macro”.<br />
If, while you are recording, you choose Pause Recording Macro:<br />
The Record operation is paused and “Pause Recording Macro” is changed to “Resume Recording Macro”.<br />
3<br />
Macro Menu Toolbar
If you choose Resume Recording Macro:<br />
The Record operation is resumed and “Resume Recording Macro” is changed to “Pause Recording Macro”.<br />
6. When you want to end the recording, select “Stop Recording Macro” OR click on the “Stop” button on the<br />
toolbar menu. The Record operation stops and the macro is saved in the file you named. “Stop Recording<br />
Macro” is changed to “Start Recording Macro”; “Cancel Recording Macro” and “Pause Recording Macro”<br />
are removed from the list.<br />
Playing-Back a Macro/Script<br />
NOTE: It is very important to be sure that your cursor is positioned in the field where you want to begin your<br />
macro both when recording and playing back a macro. If you do not do this, your macro will NOT function<br />
properly.<br />
1. Select “Assist” from the window menu-bar. The “Assist pull-down menu” appears. OR place your cursor<br />
in the field where you want to start your macro and click on the “Play” button on the toolbar menu.<br />
2. Select “Start Playing Macro/Script”... from the menu. The Play Macro/Script dialog-box is displayed.<br />
3. Click on the “File Name” of the “macro or script” that you want to play.<br />
4. Click “OK” button. Playback starts. In the “Assist” menu, “Start Playing Macro/Script”... changes to<br />
“Cancel Playing Macro/Script”.<br />
If you want to stop playing the macro, choose “Cancel Playing Macro/Script”. From the Assist menu OR<br />
click on the “Quit” button on the toolbar menu.<br />
If a pause was recorded in the macro, choose “Resume Playing Macro/Script” when you want it to<br />
continue.<br />
5. Playback stops when it reaches the end of the macro or script.<br />
See how easy creating and using macros can be?<br />
To assign a Macro or Script to a key<br />
Some Advanced Macro Functions:<br />
1. Select “Keyboard Setup” from the “Assist” drop-down list. The “Keyboard Setup” dialog-box is displayed.<br />
2. Check User-Defined (and, if you are changing an existing keyboard-file, type the file-name or push Browse<br />
and select it), then push the “Customize” button. The “Customize Keyboard” dialog-box is displayed.<br />
3. Click the key to which you want to assign the macro. The current actions <strong>for</strong> that key are displayed.<br />
4. Select the macro from the Macro: drop-down list.<br />
5. Click the shift-position to which you want to assign the macro. The macro name is displayed at the position<br />
that you clicked.<br />
6. Select “Save” to save the settings in the original file or “Save As”... to save them in a new file.<br />
4
To assign a Macro or Script to a popup keypad<br />
1. Select “Popup Keypad Setup” in the “Assist” drop-down list. The “Popup-Keypad Setup” dialog-box is<br />
displayed.<br />
2. Check User-Defined (and, if you are changing an existing keypad-file, type the file-name or push Browse<br />
and select it), then push the Customize button. The Customize Popup Keypad dialog-box is displayed.<br />
3. Select the keypad size from the “Keypad Size” box (top right), then choose the keypad number (bottom<br />
left). The keypad layout and the current actions <strong>for</strong> the selected keypad are displayed.<br />
4. Select the macro from the Macro: drop-down list.<br />
5. Click the pad-position to which you want to assign the macro. The macro's name is displayed at the pad<br />
position that you clicked.<br />
6. Select “Save” to save the settings in the original file or “Save As”... to save them in a new file.<br />
To assign a macro to a mouse-button<br />
1. Select “Mouse Setup” from the “Assist” drop-down list. The “Mouse Setup” dialog-box is displayed.<br />
2. Check User-defined (and, if you are changing an existing mouse-file, type the file-name or click “Browse”<br />
and select it), then select the “Customize” button. The “Customize Mouse” dialog-box is displayed.<br />
3. Select a macro from the Macro: drop-down list.<br />
4. Click the mouse-button to which you want to assign the macro. The macro's name is displayed on the<br />
button that you clicked.<br />
5. Select “Save” to save the settings in the original file or “Save As”... to save them in a new file.<br />
Setting Up or Changing Hotspots<br />
1. Select “Assist” from the window menu-bar. The “Assist” drop-down menu appears.<br />
2. Select “Hotspots Setup”... from the drop-down list. The “Select Active Hotspots” dialog-box appears.<br />
3. Select one or more of the different types of hotspot. If you want to have 3-D Hotspots, check the<br />
appropriate “Show Hotspots” box too.<br />
4. Click the “OK” button. The dialog-box disappears and the hotspots you chose are activated.<br />
Customizing a Macro/Script<br />
Macros are typically a relatively simple sequence of actions usually created with the Record Macro function.<br />
Scripts allow more functional per<strong>for</strong>mance by using logic not available through the Record Macro function.<br />
You can also use any standard text editor to create or edit a macro or script file.<br />
To create or change a macro or script, select the “Customize” button in the “Macro/Script Setup” dialog-box.<br />
5
Macros or scripts can be used in the following functions:<br />
Customize Keyboard - is assigned to a key and initiated by a keystroke<br />
Keyboard/Macro Function - is initiated directly<br />
Hotspots - is used to activate a hotspot function<br />
Popup Keypad - is assigned to a button and initiated from the keypad<br />
Mouse - is assigned to a mouse-button<br />
Macro - is initiated from within another script or macro<br />
When you save a macro or script, its name is added to the list in the “Select a Key-Action” box; you can then<br />
use it <strong>for</strong> any of the purposes listed above.<br />
Script Customization<br />
Customizing a script includes editing a script with functions and steps to per<strong>for</strong>m desired actions. Refer to<br />
functions available in the HELP section of <strong>Personal</strong> <strong>Communications</strong> and the Microsoft web page <strong>for</strong> VBScript<br />
language documentation and in<strong>for</strong>mation.<br />
Creating or modifying scripts should be done by those who have programming experience and are<br />
knowledgeable in VBScript.<br />
Macro Customization<br />
Customizing a macro includes the following:<br />
� Functions<br />
� Macros<br />
� Characters<br />
� Strings<br />
� Wait Conditions<br />
� Other Statements<br />
Functions<br />
Select a function from the key action list to include functions such as:<br />
� Host commands (<strong>for</strong> example, Clear)<br />
� Editing commands (<strong>for</strong> example, Backspace)<br />
� Miscellaneous <strong>Personal</strong> <strong>Communications</strong> commands (<strong>for</strong> example, Show View)<br />
Macros<br />
You can break a large macro into small pieces and call (sub)macros from within macros. To include a macro in<br />
a macro, select it from the list in the “Select a Key-Action” box.<br />
Characters<br />
To include characters that you cannot type on the keyboard; select the character you want from the “Key<br />
Action” list.<br />
Strings<br />
You can include strings that you would normally type, such as 'logon system1'; to do so, type the string,<br />
prefixed with a " (double-quote) character - eg. "logon system1.<br />
6
Wait Conditions<br />
You can include Wait Conditions that cause the macro to pause until the condition is fulfilled - eg. wait until<br />
cursor at (1,1).<br />
Other Statements<br />
There are several other statements that you can use:<br />
GOTO - LABEL - EXIT - RUN - NORMAL - MIN - MAX - REMARK<br />
You can also use SEND or RECEIVE to initiate file-transfer.<br />
Hotspots<br />
A hotspot is an area on the host-session screen, which you can select (click) with the mouse to execute a<br />
command or function.<br />
Hotspots can be used to -<br />
Simulate function keys<br />
Execute a macro that has the same name as the word that you select on the screen<br />
Execute the word that you select<br />
Simulate the Enter key at the current cursor location<br />
Connect to a Web site by clicking on a URL that appears on the screen.<br />
Where Do You Want To Go From Here?<br />
What is a Macro?<br />
Record a Macro?<br />
Playing-Back a Macro/Script<br />
Assign a Macro/Script To A Key<br />
Assign a Macro/Script To A Popup Keypad<br />
Assign a Macro To A Mouse-button<br />
Setting Up or Changing Hotspots<br />
Customizing a Macro/Script<br />
7