Lexicon 480L | PDF - Freeverb3
Lexicon 480L | PDF - Freeverb3
Lexicon 480L | PDF - Freeverb3

Create successful ePaper yourself
Turn your PDF publications into a flip-book with our unique Google optimized e-Paper software.
Installation and Audio Connections<br />
Analog Audio Connections<br />
See page 1-2 for details about audio interfacing<br />
(pinouts, impedance, etc.)<br />
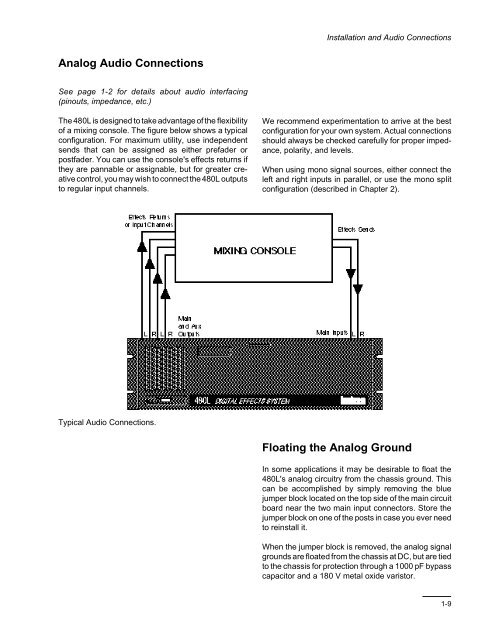
The <strong>480L</strong> is designed to take advantage of the flexibility<br />
of a mixing console. The figure below shows a typical<br />
configuration. For maximum utility, use independent<br />
sends that can be assigned as either prefader or<br />
postfader. You can use the console's effects returns if<br />
they are pannable or assignable, but for greater creative<br />
control, you may wish to connect the <strong>480L</strong> outputs<br />
to regular input channels.<br />
We recommend experimentation to arrive at the best<br />
configuration for your own system. Actual connections<br />
should always be checked carefully for proper impedance,<br />
polarity, and levels.<br />
When using mono signal sources, either connect the<br />
left and right inputs in parallel, or use the mono split<br />
configuration (described in Chapter 2).<br />
Typical Audio Connections.<br />
Floating the Analog Ground<br />
In some applications it may be desirable to float the<br />
<strong>480L</strong>'s analog circuitry from the chassis ground. This<br />
can be accomplished by simply removing the blue<br />
jumper block located on the top side of the main circuit<br />
board near the two main input connectors. Store the<br />
jumper block on one of the posts in case you ever need<br />
to reinstall it.<br />
When the jumper block is removed, the analog signal<br />
grounds are floated from the chassis at DC, but are tied<br />
to the chassis for protection through a 1000 pF bypass<br />
capacitor and a 180 V metal oxide varistor.<br />
1-9