war Tiger II with the best of two small-scale kits - FineScale Modeler
war Tiger II with the best of two small-scale kits - FineScale Modeler
war Tiger II with the best of two small-scale kits - FineScale Modeler

You also want an ePaper? Increase the reach of your titles
YUMPU automatically turns print PDFs into web optimized ePapers that Google loves.
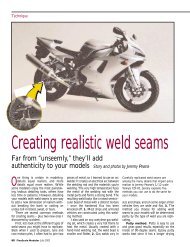
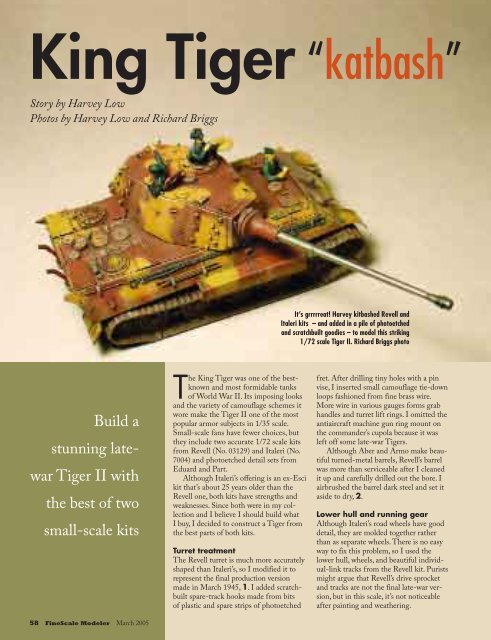
King <strong>Tiger</strong> “katbash”<br />
Story by Harvey Low<br />
Photos by Harvey Low and Richard Briggs<br />
Build a<br />
stunning late-<br />
<strong>war</strong> <strong>Tiger</strong> <strong>II</strong> <strong>with</strong><br />
<strong>the</strong> <strong>best</strong> <strong>of</strong> <strong>two</strong><br />
<strong>small</strong>-<strong>scale</strong> <strong>kits</strong><br />
58 <strong>FineScale</strong> <strong>Modeler</strong> March 2005<br />
The King <strong>Tiger</strong> was one <strong>of</strong> <strong>the</strong> <strong>best</strong>known<br />
and most formidable tanks<br />
<strong>of</strong> World War <strong>II</strong>. Its imposing looks<br />
and <strong>the</strong> variety <strong>of</strong> camouflage schemes it<br />
wore make <strong>the</strong> <strong>Tiger</strong> <strong>II</strong> one <strong>of</strong> <strong>the</strong> most<br />
popular armor subjects in 1/35 <strong>scale</strong>.<br />
Small-<strong>scale</strong> fans have fewer choices, but<br />
<strong>the</strong>y include <strong>two</strong> accurate 1/72 <strong>scale</strong> <strong>kits</strong><br />
from Revell (No. 03129) and Italeri (No.<br />
7004) and photoetched detail sets from<br />
Eduard and Part.<br />
Although Italeri’s <strong>of</strong>fering is an ex-Esci<br />
kit that’s about 25 years older than <strong>the</strong><br />
Revell one, both <strong>kits</strong> have strengths and<br />
weaknesses. Since both were in my collection<br />
and I believe I should build what<br />
I buy, I decided to construct a <strong>Tiger</strong> from<br />
<strong>the</strong> <strong>best</strong> parts <strong>of</strong> both <strong>kits</strong>.<br />
Turret treatment<br />
The Revell turret is much more accurately<br />
shaped than Italeri’s, so I modified it to<br />
represent <strong>the</strong> final production version<br />
made in March 1945, 1. I added scratchbuilt<br />
spare-track hooks made from bits<br />
<strong>of</strong> plastic and spare strips <strong>of</strong> photoetched<br />
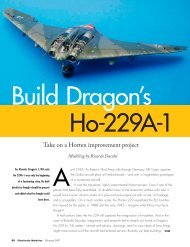
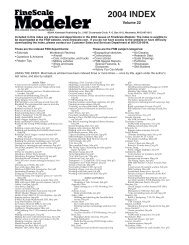
It’s grrrrreat! Harvey kitbashed Revell and<br />
Italeri <strong>kits</strong> – and added in a pile <strong>of</strong> photoetched<br />
and scratchbuilt goodies – to model this striking<br />
1/72 <strong>scale</strong> <strong>Tiger</strong> <strong>II</strong>. Richard Briggs photo<br />
fret. After drilling tiny holes <strong>with</strong> a pin<br />
vise, I inserted <strong>small</strong> camouflage tie-down<br />
loops fashioned from fine brass wire.<br />
More wire in various gauges forms grab<br />
handles and turret lift rings. I omitted <strong>the</strong><br />
antiaircraft machine gun ring mount on<br />
<strong>the</strong> commander’s cupola because it was<br />
left <strong>of</strong>f some late-<strong>war</strong> <strong>Tiger</strong>s.<br />
Although Aber and Armo make beautiful<br />
turned-metal barrels, Revell’s barrel<br />
was more than serviceable after I cleaned<br />
it up and carefully drilled out <strong>the</strong> bore. I<br />
airbrushed <strong>the</strong> barrel dark steel and set it<br />
aside to dry, 2.<br />
Lower hull and running gear<br />
Although Italeri’s road wheels have good<br />
detail, <strong>the</strong>y are molded toge<strong>the</strong>r ra<strong>the</strong>r<br />
than as separate wheels. There is no easy<br />
way to fix this problem, so I used <strong>the</strong><br />
lower hull, wheels, and beautiful individual-link<br />
tracks from <strong>the</strong> Revell kit. Purists<br />
might argue that Revell’s drive sprocket<br />
and tracks are not <strong>the</strong> final late-<strong>war</strong> version,<br />
but in this <strong>scale</strong>, it’s not noticeable<br />
after painting and wea<strong>the</strong>ring.
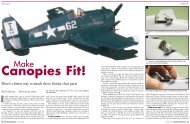
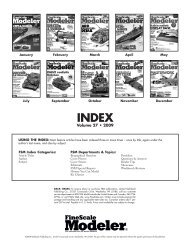
1 Antiaircraft machine<br />
gun post mount<br />
2<br />
Spare<br />
track<br />
hooks<br />
Ventilator<br />
cap<br />
Turret lift rings<br />
Wire camouflage loops<br />
3 4<br />
I aligned, glued, and painted <strong>the</strong> tracks<br />
in sections <strong>of</strong>f <strong>the</strong> model, <strong>the</strong>n super glued<br />
<strong>the</strong>m on after <strong>the</strong> rest <strong>of</strong> <strong>the</strong> model was<br />
assembled and finished.<br />
Since I wanted to have figures standing<br />
in <strong>the</strong> open hatches, I glued pieces <strong>of</strong> styrene<br />
into <strong>the</strong> lower hull to support <strong>the</strong>m.<br />
(This is <strong>best</strong> done before <strong>the</strong> upper hull is<br />
glued on.) In this <strong>scale</strong>, <strong>the</strong> interior can’t<br />
be seen <strong>with</strong> figures in <strong>the</strong> hatches, so I<br />
painted it flat black and called it a day.<br />
Upper hull upgrades<br />
Both <strong>kits</strong> have accurate upper hulls, but<br />
I chose Italeri’s because its hatches can<br />
be posed open. It also has separate parts<br />
for <strong>the</strong> periscopes and o<strong>the</strong>r fine details,<br />
right down to a tiny molded-on wire for<br />
<strong>the</strong> headlight. Although <strong>the</strong> Italeri upper<br />
is slightly longer, it mated neatly <strong>with</strong><br />
Revell’s lower hull after I added styrene<br />
shims to keep <strong>the</strong> <strong>two</strong> properly aligned.<br />
Judicious application <strong>of</strong> putty guaranteed<br />
a seamless fit.<br />
Italeri’s rear hull plate lacks tow cleats,<br />
so it was back to <strong>the</strong> Revell box for those<br />
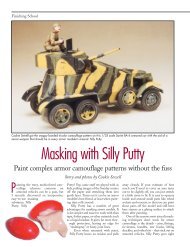
Spare<br />
track<br />
hooks<br />
parts. (I sanded-<strong>of</strong>f <strong>the</strong> jack rest block and<br />
omitted <strong>the</strong> jack as <strong>the</strong>se were deleted on<br />
late <strong>Tiger</strong>s). Fortunately, Revell’s exhaust<br />
pipes and shields were more accurate, so I<br />
had no trouble mating those parts to <strong>the</strong><br />
hull plate, 3. I <strong>the</strong>n finely textured all hull<br />
surfaces <strong>with</strong> a round dental drill bit to<br />
simulate rolled steel.<br />
I began adding <strong>the</strong> finer details to <strong>the</strong><br />
rear deck, 4, by cutting <strong>of</strong>f <strong>the</strong> center<br />
armored air vent (located between <strong>the</strong> fire<br />
extinguisher and wire cutters) from <strong>the</strong><br />
Revell kit. Before attaching it to <strong>the</strong> Italeri<br />
hull, I had to move Italieri’s misplaced<br />
antenna mount from <strong>the</strong> same spot to its<br />
proper location at <strong>the</strong> rear <strong>of</strong> <strong>the</strong> engine<br />
deck. Only <strong>the</strong>n could I install <strong>the</strong> air vent<br />
next to <strong>the</strong> fire extinguisher, which also<br />
came from <strong>the</strong> Revell box.<br />
Next, I installed tool brackets, engine<br />
screens, and engine-deck armored plates<br />
from one <strong>of</strong> <strong>the</strong> Part photoetched sets.<br />
These were followed by fuel-tank air<br />
pipes and grab handles fashioned from<br />
fine brass wire. All <strong>the</strong> effort paid <strong>of</strong>f:<br />
The suitably busy, business-like rear deck<br />
1/72 <strong>scale</strong> | Armor | How-to<br />
1 Harvey kicked <strong>of</strong>f <strong>the</strong> project by detailing <strong>the</strong><br />
turret <strong>with</strong> numerous photoetched and scratchbuilt<br />
styrene items. He also detailed <strong>the</strong> inside <strong>of</strong><br />
<strong>the</strong> loader’s hatch.<br />
2 After cleaning up and drilling out <strong>the</strong> barrel<br />
from <strong>the</strong> Revell kit, Harvey airbrushed it a dark<br />
steel color. Richard Briggs photo<br />
3 The rear hull plate, as well as <strong>the</strong> more-accurate<br />
exhaust pipes and armored covers from <strong>the</strong><br />
Revell kit were used. Richard Briggs photo<br />
4 The rear deck received numerous photoetched<br />
brass grilles, piping made from wire, and o<strong>the</strong>r<br />
goodies.<br />
turned out to be one <strong>of</strong> <strong>the</strong> high points <strong>of</strong><br />
<strong>the</strong> finished model, 5.<br />
On <strong>the</strong> hull sides, I added more photoetched<br />
brass brackets to hold gun-<br />
cleaning rods made from Evergreen styrene<br />
rod and <strong>the</strong> starter crank from <strong>the</strong><br />
Revell kit, 6. Revell’s headlight, shovel, Uhooks,<br />
and hull machine gun were also fine,<br />
so I installed <strong>the</strong>m on <strong>the</strong> front plate, 7.<br />
Part <strong>of</strong>fers a lovely set <strong>of</strong> thin brass<br />
fenders and side-skirts, which I crumpled,<br />
dinged, and dented to realistically “distress”<br />
<strong>the</strong>m before installing on <strong>the</strong> model,<br />
8. Side skirts were <strong>of</strong>ten damaged or<br />
torn-<strong>of</strong>f in combat, so I didn’t install all <strong>of</strong><br />
<strong>the</strong>m. As a result, I have spares to equip a<br />
future <strong>Tiger</strong> <strong>II</strong> or Jagdtiger.<br />
Wea<strong>the</strong>ring up a storm<br />
The paint scheme represents a late-<strong>war</strong><br />
scheme found on some King <strong>Tiger</strong>s.<br />
There is some debate as to whe<strong>the</strong>r one<br />
<strong>of</strong> <strong>the</strong> colors was actually just primer. The<br />
vehicles were also rushed to <strong>the</strong> front<br />
so quickly that some had no markings. I<br />
decided to make my model one <strong>of</strong> those.<br />
March 2005 www.fine<strong>scale</strong>.com 59
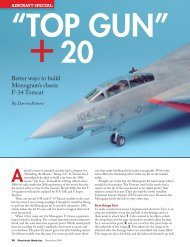
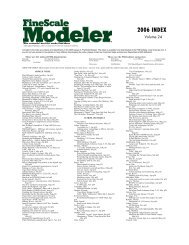
5 6 7<br />
With all <strong>the</strong> bits and pieces installed, <strong>the</strong> highly<br />
detailed engine deck is a highlight <strong>of</strong> <strong>the</strong> finished<br />
model. Richard Briggs photo<br />
8<br />
The realistically ratty fenders and side skirts<br />
came from one <strong>of</strong> <strong>the</strong> Part photoetched set.<br />
Richard Briggs photo<br />
Although barely 4" long, Harvey’s model comprises<br />
more than 300 parts. It represents a<br />
<strong>Tiger</strong> <strong>II</strong> <strong>of</strong> <strong>the</strong> 3rd Kompanie PzAbt 511 in 1945.<br />
Richard Briggs photo<br />
I first primed <strong>the</strong> model <strong>with</strong> Tamiya<br />
flat white (XF-2) to even out <strong>the</strong> color<br />
between <strong>the</strong> various plastic and photoetched<br />
parts that would show through<br />
<strong>the</strong> base coat. This was followed <strong>with</strong> a<br />
base coat <strong>of</strong> Tamiya hull red (XF-9) <strong>with</strong><br />
a bit <strong>of</strong> light brown and white mixed in<br />
for <strong>scale</strong> effect. I chose this color to simulate<br />
<strong>the</strong> red oxide primer introduced in<br />
October 1944 and used as a base coat on<br />
many German tanks.<br />
I <strong>the</strong>n airbrushed Tamiya dark yellow<br />
(XF-60) free-hand in a random pattern<br />
over <strong>the</strong> whole vehicle. I blended <strong>the</strong> colors<br />
by applying “filter” colors: essentially<br />
very diluted light coats airbrushed on<br />
(roughly 95 percent thinner to 5 percent<br />
paint). This added a depth to <strong>the</strong> color<br />
that cannot be achieved <strong>with</strong> washes<br />
alone. I started <strong>with</strong> a mixture <strong>of</strong> Tamiya<br />
clear gloss (X-22) and <strong>the</strong> red-brown base<br />
color <strong>with</strong> more red added for <strong>war</strong>mth.<br />
Tamiya earth brown (XF-52) was misted<br />
onto all <strong>the</strong> lower surfaces to simulate dirt,<br />
followed by a coat <strong>of</strong> clear gloss to prepare<br />
<strong>the</strong> surface for <strong>the</strong> washes.<br />
A wash <strong>of</strong> black-brown to accentuate<br />
<strong>the</strong> details followed an overall wash <strong>of</strong> raw<br />
umber oil paint and Humbrol thinner.<br />
60 <strong>FineScale</strong> <strong>Modeler</strong> March 2005<br />
The hull sides received barrel cleaning rods made<br />
from Evergreen styrene rod held down <strong>with</strong><br />
photoetched brass mounting brackets. The engine<br />
starter crank came from <strong>the</strong> Revell kit.<br />
Dry-brushing <strong>with</strong> <strong>the</strong> original base color<br />
and a bit <strong>of</strong> white oil paint helped accentuate<br />
<strong>the</strong> details fur<strong>the</strong>r, and a coat <strong>of</strong><br />
wea<strong>the</strong>ring powders by MIG Productions<br />
finished up <strong>the</strong> process.<br />
I rubbed <strong>the</strong> rims <strong>of</strong> <strong>the</strong> wheels heavily<br />
<strong>with</strong> pencil lead to simulate wear from<br />
contact <strong>with</strong> <strong>the</strong> tracks. The tracks were<br />
painted gun metal, followed by a heavy<br />
raw-umber oil wash. They were wea<strong>the</strong>red<br />
<strong>with</strong> rust- and dirt-colored wea<strong>the</strong>ring<br />
powders and finished <strong>with</strong> a light<br />
dry-brushing <strong>of</strong> steel. A silver coloring<br />
pencil was used for <strong>the</strong> subtle chippedpaint<br />
effect. I gave <strong>the</strong> entire model<br />
several light coats <strong>of</strong> Testor Dullcote<br />
thinned <strong>with</strong> lacquer thinner to flatten<br />
and even out <strong>the</strong> finish.<br />
I modified figures from a Preiser<br />
German tank crew set to put in <strong>the</strong> open<br />
turret hatches. Tamiya acrylics were followed<br />
by washes and dry-brushing for<br />
added realism.<br />
The model has approximately 300<br />
separate parts – a lot to pack into a tank<br />
barely 4" long. It was an enjoyable project,<br />
and <strong>best</strong> <strong>of</strong> all, <strong>the</strong> finished model takes<br />
up precious little real estate on my display<br />
shelves! FSM<br />
Most <strong>of</strong> <strong>the</strong> front hull detail, including <strong>the</strong> headlight,<br />
U-hooks, and machine gun also came from<br />
<strong>the</strong> Revell box.<br />
Harvey Low, a policy analyst <strong>with</strong> <strong>the</strong> city<br />
<strong>of</strong> Toronto, started modeling in 1974: A 1/48<br />
<strong>scale</strong> Spitfire “<strong>with</strong> about 10 parts!” he says.<br />
He soon moved into 1/72 <strong>scale</strong> aircraft and<br />
now builds a lot <strong>of</strong> Japanese WW<strong>II</strong> aircraft<br />
in that <strong>scale</strong>. But that doesn’t preclude armor<br />
projects and IJN ships (his Fuso battleship<br />
was featured in <strong>the</strong> cover story <strong>of</strong> <strong>the</strong><br />
September 2002 FSM).<br />
SOURCES<br />
Photoetched detail sets for Revell <strong>Tiger</strong> <strong>II</strong><br />
Nos. P72-097 and P72-098, Part Photoetch,<br />
available from Linden Hill Imports, www.<br />
lindenhillimports.com, 914-734-9616<br />
German Tank Crew 1939-1945 No.<br />
72515, Preiser, P.O. Box 1233, 91534<br />
Ro<strong>the</strong>nberg, Germany.<br />
REFERENCES<br />
Achtung Panzer No.6 –<br />
Panzerkampwagen <strong>Tiger</strong> Mitsuri Bitoh,<br />
Dainippon Kaiga Co., Ltd., Japan, 1999.<br />
Germany’s <strong>Tiger</strong> Tanks Thomas L. Jentz &<br />
Hilary L. Doyle, Schiffer Publishing Ltd.,<br />
Atglen, Pa., 1997.<br />
On <strong>the</strong> Way - A Site for 1/72 Armor<br />
Modeling Doug Chaltry, www.on<strong>the</strong>way.<br />
us/default.htm