

Heavy Duty Balanced Opposed Compressors - Ariel Corporation
Heavy Duty Balanced Opposed Compressors - Ariel Corporation
Heavy Duty Balanced Opposed Compressors - Ariel Corporation

Create successful ePaper yourself
Turn your PDF publications into a flip-book with our unique Google optimized e-Paper software.
For Models: JGH:E:K:T Section 4 Part Replacement<br />
an assembly.<br />
5. Pull entire pressure packing out into the crosshead guide, then through the large side opening of<br />
the guide. Take pressure packing to a clean place for disassembly.<br />
6. Set pressure packing on a clean surface on its nose cup or cylinder end. Match mark the outside<br />
diameter of the cups for proper reassembly. Three long tie studs hold the pressure packing<br />
together. The stud holes are unequally spaced to prevent misalignment of the stack of parts.<br />
Remove the stud nuts and unstack the pressure packing. Replace these nuts each time the pressure<br />
packing is serviced.<br />
7. To check ring wear, place assembled rings (note match-marks) on the piston rod. Check end gap<br />
clearance. If the ends butt, or nearly butt, replace the rings. See “Types of Piston Rod Packing<br />
Rings” on page 4-19 for correct ring orientation.<br />
8. Carefully file any fins or wire edges on the rings to square all matching edges.<br />
9. Pry loose the metal gasket on the end cup with a sharp awl. Do not scratch the sides of the gasket<br />
groove.<br />
10. Before reassembly, clean all parts thoroughly.<br />
Piston Rod Packing Reassembly<br />
1. Refer to the pressure packing assembly in your parts book. <strong>Ariel</strong> supplies parts books with each<br />
unit. Contact your distributor to obtain a parts book. Each pressure packing re-build kit includes a<br />
pressure packing assembly drawing.<br />
2. Take care not to scratch mating surfaces of the cups. Cup surfaces must be clean and dry for reassembly.<br />
3. To install a new set of rod rings in an existing packing case, inspect case parts for wear. Cups<br />
should be smooth and flat on the back side where the rod rings must seal. If cups or grooves are<br />
concave or tapered, regrind or relap them. Contact <strong>Ariel</strong> for appropriate rework thickness dimensions.<br />
It is rarely necessary to alter the crosshead side of cups, but if necessary, take care not to<br />
destroy the correct side clearance for the renewal rings.<br />
NOTE: If premature wear is suspected, see <strong>Ariel</strong> “Cylinder and Packing Lubrication<br />
Requirements”.<br />
4. Before a packing case installation, disassemble and thoroughly clean it in an appropriate solvent<br />
for the intended service.<br />
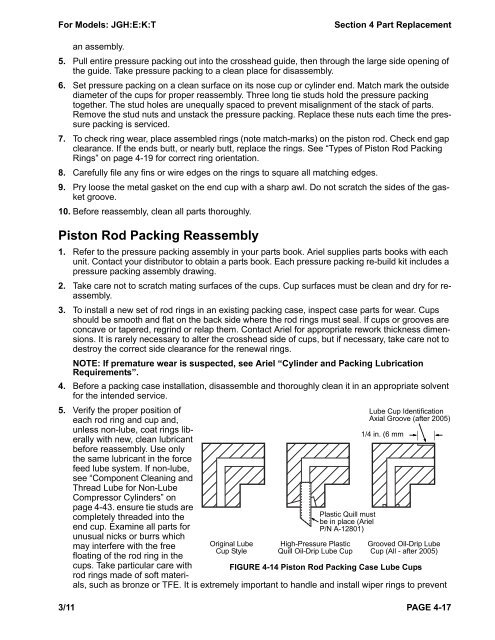
5. Verify the proper position of<br />
each rod ring and cup and,<br />
unless non-lube, coat rings liberally<br />
with new, clean lubricant<br />
before reassembly. Use only<br />
the same lubricant in the force<br />
feed lube system. If non-lube,<br />
see “Component Cleaning and<br />
Thread Lube for Non-Lube<br />
Compressor Cylinders” on<br />
page 4-43. ensure tie studs are<br />
completely threaded into the<br />
end cup. Examine all parts for<br />
unusual nicks or burrs which<br />
may interfere with the free<br />
floating of the rod ring in the<br />
cups. Take particular care with<br />
rod rings made of soft materi-<br />
Original Lube<br />
Cup Style<br />
Plastic Quill must<br />
be in place (<strong>Ariel</strong><br />
P/N A-12801)<br />
High-Pressure Plastic<br />
Quill Oil-Drip Lube Cup<br />
Lube Cup Identification<br />
Axial Groove (after 2005)<br />
1/4 in. (6 mm<br />
Grooved Oil-Drip Lube<br />
Cup (All - after 2005)<br />
FIGURE 4-14 Piston Rod Packing Case Lube Cups<br />
als, such as bronze or TFE. It is extremely important to handle and install wiper rings to prevent<br />
3/11 PAGE 4-17


