

Heavy Duty Balanced Opposed Compressors - Ariel Corporation
Heavy Duty Balanced Opposed Compressors - Ariel Corporation
Heavy Duty Balanced Opposed Compressors - Ariel Corporation

You also want an ePaper? Increase the reach of your titles
YUMPU automatically turns print PDFs into web optimized ePapers that Google loves.
For Models: JGH:E:K:T Section 4 Part Replacement<br />
Wrench flats on the puller-bolts and recessed Allen sockets in the dowel drive pins facilitate<br />
removal and installation.<br />
CAUTION: The A-9047 tool for JGH:E:K:T:C:D machines uses interchangeable base<br />
plates to adapt to different piston o.d.’s and nut sizes. Verify the plate selected will not<br />
permit the piston to be drawn into the end of the tool when tensioned.<br />
CAUTION: The A-9047 tool is equipped with an integral safety collar to ensure the<br />
puller-bolt stem remains captive if the puller-bolt fails. Older A-6774 and A-6799 tools<br />
were equipped with a safety nut on the lower portion of the puller-bolt stem. Verify this<br />
safety nut is re-installed when the puller-bolt stems are re-installed in the tool. Replacement<br />
puller-bolt stems for A-6774 and A-6799 are of the A-9047 integral design.<br />
Position torque tool with the two dowels inserted into the piston nut. Tighten puller head until<br />
torque tool is completely tight against the piston rod assembly, then back off 1/4 turn.<br />
NOTE: The puller head comes with barring holes to insert a 3/8" (9.5 mm) rod to help<br />
tighten or loosen the puller-bolt, if necessary.<br />
3. Apply hydraulic pressure to the torque tool to stretch piston rod (see Table 4-2). Use clean<br />
hydraulic fluid in pump/tool system.<br />
CAUTION: Do not overpressure torque tool; it can cause tool failure and/or excessive<br />
piston rod pre-load. Excessive pre-load can cause piston rod failure, which may result<br />
in personal injury.<br />
CAUTION: Install hydraulic puller stud into piston rod a minimum of eight turns to prevent<br />
piston rod to puller bolt thread failure. Such failures can result in personal injury.<br />
Configure tool properly.<br />
4. Loosen piston rod nut by turning the hex pinion drive counterclockwise with a socket wrench.<br />
Release hydraulic pressure, remove torque tool, and then remove the piston nut.<br />
Piston & Rod Reassembly with Hydraulic Tool<br />
1. Perform steps 1 through 4 in “Manual Piston and Rod Reassembly” on page 4-10.<br />
2. Perform steps 7 through 9 in “Manual Piston and Rod Reassembly” on page 4-10.<br />
3. Mark a line across piston and nut prior to torquing to ensure the nut turns. Verify the threaded<br />
hole in the rod is clean and oiled. Position the torque tool with the two dowels placed into the piston<br />
rod nut. Tighten puller-bolt head, until torque tool is completely tight against the piston rod<br />
assembly, then back off 1/4 turn.<br />
NOTE: The puller head comes with barring holes to insert a rod to help tighten or loosen<br />
the puller, if necessary.<br />
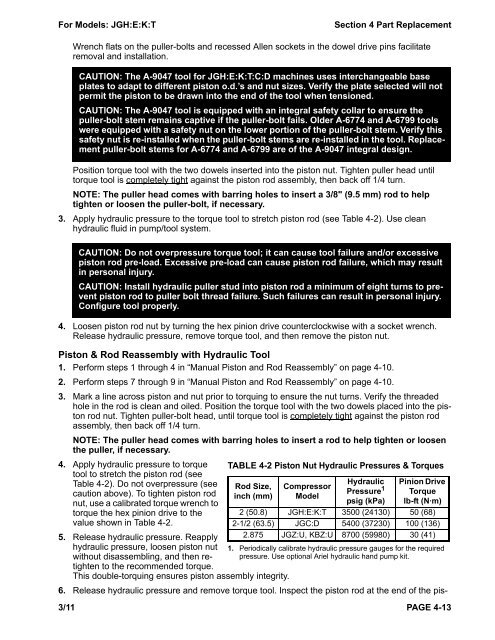
4. Apply hydraulic pressure to torque<br />
tool to stretch the piston rod (see<br />
Table 4-2). Do not overpressure (see<br />
caution above). To tighten piston rod<br />
nut, use a calibrated torque wrench to<br />
torque the hex pinion drive to the<br />
value shown in Table 4-2.<br />
5. Release hydraulic pressure. Reapply<br />
hydraulic pressure, loosen piston nut<br />
without disassembling, and then retighten<br />
to the recommended torque.<br />
This double-torquing ensures piston assembly integrity.<br />
TABLE 4-2 Piston Nut Hydraulic Pressures & Torques<br />
Rod Size,<br />
inch (mm)<br />
Compressor<br />
Model<br />
Hydraulic<br />
Pressure 1<br />
psig (kPa)<br />
Pinion Drive<br />
Torque<br />
lb-ft (N⋅m)<br />
2 (50.8) JGH:E:K:T 3500 (24130) 50 (68)<br />
2-1/2 (63.5) JGC:D 5400 (37230) 100 (136)<br />
2.875 JGZ:U, KBZ:U 8700 (59980) 30 (41)<br />
1. Periodically calibrate hydraulic pressure gauges for the required<br />
pressure. Use optional <strong>Ariel</strong> hydraulic hand pump kit.<br />
6. Release hydraulic pressure and remove torque tool. Inspect the piston rod at the end of the pis-<br />
3/11 PAGE 4-13


