INMOTION Controls Inc. - Duct-O-Wire
INMOTION Controls Inc. - Duct-O-Wire
INMOTION Controls Inc. - Duct-O-Wire

Create successful ePaper yourself
Turn your PDF publications into a flip-book with our unique Google optimized e-Paper software.
<strong>INMOTION</strong> <strong>Controls</strong> Series<br />
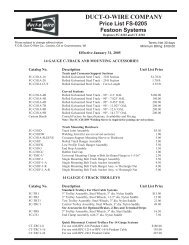
3-3-2 Installation Sequence<br />
1. Turn off the main power for crane.<br />
2. Attach the template (provided) for the receiver to a proper place.<br />
3. Drill the holes for screws, install receiver and then fix the receiver<br />
with 6mm ψ screw nut on vibration- Resistant.<br />
4. Attach 2 sets of cable-assembly (provided) to the receiver and tighten<br />
the cables.<br />
5. Connect cables to the control circuit of crane according to the<br />
receiver’s wiring table and control contacts diagram.<br />
6.<br />
7.<br />
8.<br />
9.<br />
10.<br />
11.<br />
Note:<br />
➀Inspect and make sure that all wires are connected correctly.<br />
➁Earth ground for remote controller and crane must be properly<br />
connected to ensure safety.<br />
Secure the cables between the receiver and crane so that cable cover<br />
(wrapper) will not wear out due to the vibration of the crane.<br />
Open the top cover of the receiver and turn Relay module’s Run/Test<br />
switch to “Test” position.<br />
Turn on the main power for the crane.<br />
Operate the transmitter to test every function and make sure they are<br />
all correct (read by LED indicator).<br />
Note: When Run/Test switch is set at “Test’ position, relay will not<br />
function, but LED will display.<br />
Turn Run/Test switch to “Run” position and secure the top cover to<br />
the receiver with screws.<br />
This completes the installation of receiver.<br />
- 21 -