Tempest® Hot Air Drying System Installation Instructions
Tempest® Hot Air Drying System Installation Instructions
Tempest® Hot Air Drying System Installation Instructions

Create successful ePaper yourself
Turn your PDF publications into a flip-book with our unique Google optimized e-Paper software.
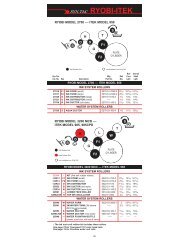
INSTALLATION<br />
10<br />
Connect the two hoses together using the "Y" connector (left hand<br />
subject arrow). Connect the Tempest ® Spray line to the press spray<br />
hopper line using the reducer (right hand subject arrow).<br />
11<br />
Attach the exhaust fan/manifold assembly to the center of the<br />
delivery guard as shown. Make sure that the arrow on the fan is<br />
pointing toward the guard (out of the press) and that the wires are<br />
routed toward the NOPS of the press. The top two screws go<br />
through the second slot down from the top of the guard. Make sure<br />
that the open end of the manifold is pointing toward the NOPS. You<br />
will need to file the openings in the guard so that the screws will<br />
pass through the guard.<br />
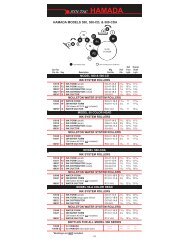
12<br />
Locate the 2 impression cylinder activation solenoids located on<br />
the OPS of the press, one under each head. Remove the 2 outside<br />
nuts and screws from each solenoid (lower subject arrows). Install<br />
the provided longer M4 x 16MM screws. Install the supplied switch<br />
assemblies (as shown in the picture) over the screws and secure<br />
them using the original hardware.<br />
The left photo show the #1 head solenoid and the right shows the<br />
#2 head solenoid. Note how the microswitch trip arms extend up to<br />
the spring studs located on activation linkage (upper subject<br />
arrows).<br />
15