
You also want an ePaper? Increase the reach of your titles
YUMPU automatically turns print PDFs into web optimized ePapers that Google loves.
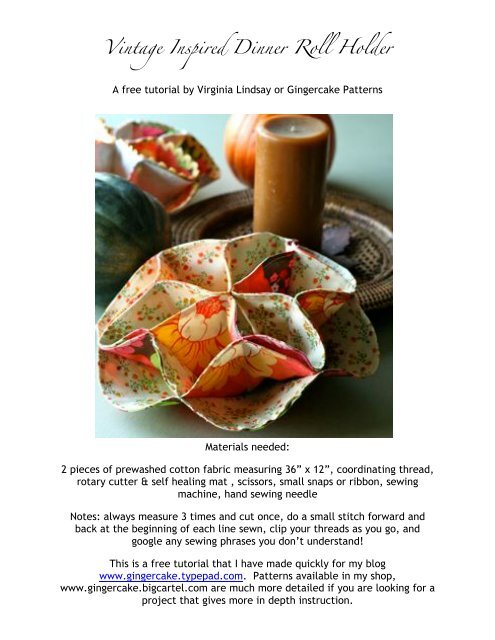
<strong>Vintage</strong> <strong>Inspired</strong> <strong>Dinner</strong> <strong>Roll</strong> <strong>Holder</strong><br />
A free tutorial by Virginia Lindsay or Gingercake Patterns<br />
Materials needed:<br />
2 pieces of prewashed cotton fabric measuring 36” x 12”, coordinating thread,<br />
rotary cutter & self healing mat , scissors, small snaps or ribbon, sewing<br />
machine, hand sewing needle<br />
Notes: always measure 3 times and cut once, do a small stitch forward and<br />
back at the beginning of each line sewn, clip your threads as you go, and<br />
google any sewing phrases you don’t understand!<br />
This is a free tutorial that I have made quickly for my blog<br />
www.gingercake.typepad.com. Patterns available in my shop,<br />
www.gingercake.bigcartel.com are much more detailed if you are looking for a<br />
project that gives more in depth instruction.
Let’s begin!<br />
1.First, you need to cut out 6 circles of prewashed cotton fabric that are 12"<br />
diameter. I used a big embroidery hoop as my guide. With right faces<br />
together, sew 2 circles together with a 1/4 seam. I chose to do contrasting<br />
fabrics, but all the same would be cute too. Leave a 2” opening for turning it<br />
out. Using your scissors, clip your seam all around the circle about every inch<br />
or so. Trim the seams down to 1/8" inch. Turn the circle inside out. Making<br />
sure that you catch the edge of the seam all the way around the circle, press it<br />
out with your iron. Sometimes I use my fingers to kinda roll out the seam<br />
around the circle before I press and that seems to help. Pay special attention<br />
to the opening so that it matches nicely. Now, sew a 1/4" seam around the<br />
outside to finish it. Repeat with the other 4 circles. Here is what you should<br />
have~<br />
It's just 6 circles of fabric sewn together! Sorry I didn't take pics of the above<br />
steps but I know you smarties can figure it out.<br />
2.Take 2 (out of 3 finished) of your circles. If you have contrasting sides like<br />
me, they should be in order. For me it was both big floral sides up. Using<br />
chalk draw a line directly through the middle. Turn your circle 60 degrees and<br />
draw another line through the middle. Repeat one more time. Now you have a<br />
circle with 6 pie pieces drawn. Try to be fairly precise. Over at your sewing<br />
machine, sew along these lines through both pieces.
You can take a damp paper cloth and remove the chalk lines.<br />
3. Next, take the 3rd circle and place it under the sewn together circles. You<br />
have to decide which print you want to be on the inside at this point. After I<br />
was done with my role holder I kinda wished that I had reversed the fabrics and<br />
had the light fabric on the outside. But I like it enough to just leave it for now<br />
instead of dealing with my seam ripper!
!"#$%&#'()*+%#$%(,%$",-%<br />
.,)%("+%,*/+*%#0%-"#'"%<br />
("+%123*#'$%2*+%42.+*+/%<br />
Pin the 3rd circle onto the other piece. Pin it along the seams or your pins will<br />
get in the way for the next step.<br />
The sewn piece should be on top. You will need to find the center point<br />
between each pie piece. If you have a self healing mat like I do, you can line<br />
up your 60 degree wedges on the mat and it will show you the center as shown<br />
below~<br />
!"#$%#$%("+%<br />
'+0(+*%
Open the layers up and on the second layer mark the center. Draw a straight<br />
line (toward the center!) in about 2.25”. I did this with blue chalk since the<br />
white didn’t show up enough but it was hard to remove so I wouldn’t<br />
recommend using your children’s blue chalk on your fabric!<br />
!"#$%34)+%'"245%<br />
4#0+%#$%67689%<br />
Sew down this line with your sewing machine.
Repeat step 5 more times in the center of each pie piece.<br />
Now the bottom should look like the picture above!<br />
4. Now you need to sew on your snaps. Another option here would be to sew<br />
on pieces of ribbon that would look cute too. I used snap fasteners size 2/0.<br />
They are placed like this-<br />
?=:;
My snaps were sewn on by hand with a needle and thread. Be sure to pay<br />
attention to the male/ female parts of the snap so that the parts match up.<br />
5. Pull the layers up and snap it together. Now go set your table!<br />
This tutorial was made by Virginia Lindsay of…