ZICO® - Ziamatic Corp
ZICO® - Ziamatic Corp
ZICO® - Ziamatic Corp

Create successful ePaper yourself
Turn your PDF publications into a flip-book with our unique Google optimized e-Paper software.
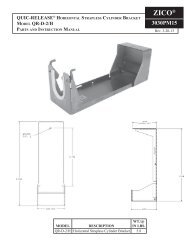
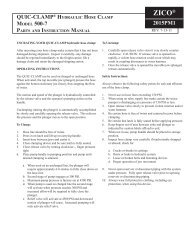
Center Pull Release in Bostrom 450 Tanker Seat<br />
Manual For the EZ-LOC ® Mechanical Bracket<br />
ZICO ®<br />
1026PM5<br />
REV. 2-24-12<br />
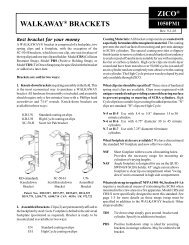
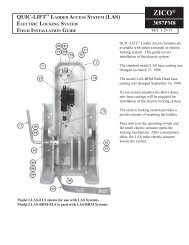
The center pull release kit allows the SCBA bracket to be<br />
released by pulling a "T" handle located on the front of the<br />
seat. The kit puts the release in an accessible location where<br />
it is not in the way of the SCBA pack straps or the seat belt.<br />
It includes all of the parts needed for setup.<br />
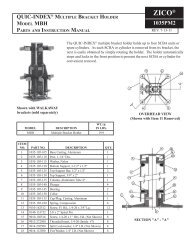
Model QM-EZL-CPR-TS is made for<br />
the EZ-LOC SCBA bracket mounted<br />
in a Bostrom Tanker Series seat. For<br />
additional models and other bracket/seat<br />
combinations please contact us at<br />
1-800-711-FIRE.
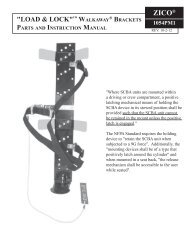
ITEM<br />
NO. PART NO. DESCRIPTION QTY.<br />
1 1010-065-125 CENTER PULL RELEASE ASSEMBLY 1<br />
2 1027-144-995 CABLE PLATE ASSEMBLY 1<br />
3 1026-210-101 PULL RELEASE CABLE ASSEMBLY 51.5" 1<br />
4 1026-210-103 CONDUIT 47" 1<br />
5 1027-144-105 CONDUIT CLAMP 2<br />
6 9025-172006 10-32 x 3/8 THRD FRMING, ZPS SCREW 2<br />
7 9010-221606 8-32 x 3/8 PH PHIL 2<br />
8 1026-200-103 SPRING 1<br />
9 9010-102512 1/4-20 x 3/4 HEX SCREW 2<br />
10 9014-112500 1/4-20 FLAT WASHER 2<br />
11 9012-362500 1/4-20 EXT. U NUT 2<br />
12 1027-105-137 PUSH NUT (FOR 6MM ROD) 2<br />
Page 2
Center Pull Release Installation Instructions for Bostrom 450 Tanker Series Seats<br />
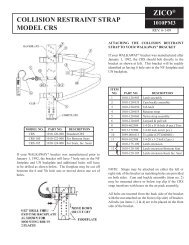
Before installing the Center Pull Release kit, make<br />
sure that the EZ-LOC is fully adjusted for the SCBA<br />
being used. The EZ-LOC should be mounted in the<br />
seat and fully operational.<br />
3. Using vise grips and a pry tool, carefully remove<br />
the push nut from the black mounting bracket that<br />
secures the black conduit assembly.<br />
Important: If you are converting your EZ-LOC from<br />
a Universal Pull Release to a Center Pull Release,<br />
begin at Step 1. If you are installing the Center Pull<br />
Release on a new EZ-LOC with no release, skip to<br />
Step 5.<br />
1. Starting with the yellow ball on your Universal<br />
Pull Release, push the stop sleeve out of the<br />
yellow ball and loosen the set screw. Remove the<br />
stop sleeve and yellow ball.<br />
4. Remove the conduit assembly and slide the cable<br />
assembly out through the top of the strap fork.<br />
The spring should now be loose.<br />
5. Remove the (2) bolts holding the rear of the seat<br />
cushion down to the cross brace, then flip the<br />
cushion up.<br />
6. Lay out and drill (2) 25/64" holes 2-1/4" apart<br />
from the center of the rear seat mount.<br />
2. Remove the bracket holding the yellow pull<br />
release stalk (10" yellow tube) from your seat.<br />
Page 3
Center Pull Release Installation Instructions Continued<br />
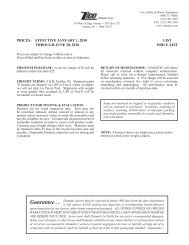
7. Insert the (2) U nuts (Item 11) into the holes,<br />
threads down.<br />
10. Mount the center pull release assembly (Item 1) to<br />
the channel side of the cable plate with (2) 10-32<br />
x 3/8" screws.<br />
8. Mount the conduit clamps (Item 5) to the flat side<br />
of the cable plate (Item 2) with the 8-32 x 3/8"<br />
screws (Item 7). At this time, only hand tighten<br />
two full turns.<br />
11. Install the conduit and Cable Plate under the front<br />
of the seat frame and springs, keeping it above the<br />
mounting frame and cross brace.<br />
9. From the channel side of the Cable Plate, pass the<br />
non-crimped end of the conduit through the center<br />
slot and under the clamps. Push the conduit even<br />
with the end of the Cable Plate and tighten the<br />
clamps.<br />
12. Allow the seat cushion to rest back down far<br />
enough to start 1/4-20 x 3/4" hex screws with<br />
1/4-20 flat washers through the slots in the Cable<br />
Plate and into the U nuts. (Hand tighten two<br />
turns.)<br />
Page 4
Center Pull Release Installation Instructions Continued<br />
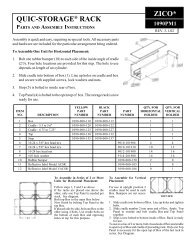
13. Let the seat cushion go all the way down and push<br />
the release assembly into the chosen location.<br />
Once in place, raise the cushion post enough to<br />
tighten the (2) screws holding the cable plate in<br />
place.<br />
16. Slide the cable assembly (Item 3) through the<br />
conduit (Item 4). Look for it to extend out from<br />
under the roller on the Pull Release Assembly.<br />
14. Attach your new conduit assembly 47" (Item 4) to<br />
the mounting bracket using a 6mm push nut (an<br />
extra push nut, Item 12, is provided in the event<br />
the first is damaged during installation).<br />
17. Feed the cable under the roller and toward the<br />
bottom of the "T" handle and pull the Top Clamp<br />
on the EZ-LOC down. Check that the Serrated<br />
Latch Assembly is fully engaged.<br />
15. Insert your new cable (Item 3) through the strap<br />
fork and new spring (Item 8).<br />
Page 5
Center Pull Release Installation Instructions Continued<br />
18. Insert the cable into the bottom of the "T" handle<br />
shaft. Make sure the "T" handle is in the down<br />
position, then tighten the (2) 5/64" hex set screws.<br />
(There is one front and one on the back. The<br />
handle will need to be rotated 180° to reach the<br />
second screw.)<br />
19. The center pull release should now be installed<br />
properly. Check to make sure that it releases the<br />
EZ-LOC and returns to the locked, fully-engaged<br />
position smoothly.<br />
20. Replace the seat cushion and tighten the seat<br />
cushion bolts.<br />
www.ziamatic.com<br />
<strong>Ziamatic</strong> <strong>Corp</strong>.<br />
TOLL FREE: 800-711-3473<br />
10 West College Avenue, P.O. Box 337, Yardley, PA 19067-0587 • (215) 493-3618 • FAX: (215) 493-1401<br />
*ZICO is a registered trademark for fire, safety and marine products made by <strong>Ziamatic</strong> <strong>Corp</strong>. Copyright <strong>Ziamatic</strong> <strong>Corp</strong>. 2-12<br />
Page 6